Tutorial 7:Create a Snowpark Container Services service that uses caller’s rights
Introduction
In this tutorial you explore building a service, presenting a web UI, that uses the caller’s rights feature when executing SQL queries on behalf of the users.
You create a service (named query_service) that executes a query provided in the request. By default, application containers connect to Snowflake as the service user using the service’s owner role. But this application uses the caller’s rights feature to connect to the service endpoint as the end user and using privileges granted to that user.
When testing, you use the service from a web browser because the caller’s rights feature is only supported when accessing a service using network ingress. The caller’s rights feature is not available when accessing a service using a service function.
The service does the following:
-
Exposes one public endpoint.
-
When a user logs in to the endpoint, the service provides a Web UI to provide a query. The service executes the query in Snowflake and returns the results. In this tutorial you execute the following SQL command:
The command returns the name of the currently logged-in user and the currently active role, both of which depend on whether caller’s rights is used.
- When caller’s rights is used, the service connects to Snowflake as the calling user and the user’s default role. The command returns your user name and default role.
- When caller’s rights is not used, the default behavior kicks in where the service connects to Snowflake as the service user and the service’s owner role. Therefore, the command returns the service user name in the form:
SF$SERVICE$unique-id,TEST_ROLE.
There are two parts to this tutorial:
Part 1: Create and test a service. You download code provided for this tutorial and follow step-by-step instructions:
- Download the service code for this tutorial.
- Build a Docker image for Snowpark Container Services, and upload the image to a repository in your account.
- Create a service.
- Communicate with the service using network ingress to connect with the public endpoint that the service exposes. Using a web browser, you login to the public endpoint and execute the SELECT CURRENT_USER(); command. Verify the command output to ensure that the container executed the command as the logged-in user.
Part 2: Understand the service. This section provides an overview of the service code and highlights how the application code uses the caller’s rights.
Prepare
Follow Common Setup to configure prerequisites and create snowflake resources that are required for all Snowpark Container Services tutorials provided in this documentation.
Download the service code
Code (a Python application) is provided to create the query service.
- Download SnowparkContainerServices-Tutorials.zip.
- Unzip the content, which includes one directory for each tutorial. The
Tutorial-6-callers-rightsdirectory has the following files:Dockerfilemain.pytemplates/basic_ui.html
Build an image and upload
Build an image for the linux/amd64 platform that Snowpark Container Services supports, and then upload the image to the image repository in your account (see Common Setup).
You will need information about the repository (the repository URL and the registry hostname) before you can build and upload the image. For more information, see Registry and Repositories.
Get information about the repository
-
To get the repository URL, execute the SHOW IMAGE REPOSITORIES SQL command.
-
The
repository_urlcolumn in the output provides the URL. An example is shown: -
The host name in the repository URL is the registry host name. An example is shown:
-
Build image and upload it to the repository
-
Open a terminal window, and change to the directory containing the files you unzipped.
-
To build a Docker image, execute the following
docker buildcommand using the Docker CLI. Note that the command specifies the current working directory (.) as thePATHfor files to use to build the image.- For
image_name, usequery_service:latest.
Example
- For
-
Upload the image to the repository in your Snowflake account. For Docker to upload an image on your behalf to your repository, you must first authenticate Docker with Snowflake.
-
For Docker to upload an image on your behalf to your repository, first authenticate Docker with the registry.
- We recommend using Snowflake CLI to authenticate your local Docker instance with the image registry for your Snowflake account. Make sure that you configured Snowflake CLI to connect to Snowflake. For more information, see Configuring Snowflake CLI and connecting to Snowflake.
- To authenticate, execute the following Snowflake CLI command:
-
To upload the image, execute the following command:
Example
-
Create a service
In this section you create a service (query_service).
-
Verify that the compute pool is ready and that you are in the right context to create the service.
- Previously, you set the context in the Common Setup step. To ensure that you’re in the right context for the SQL statements in this step, execute the following:
- To ensure that the compute pool you created in the common setup is ready, execute
DESCRIBE COMPUTE POOL, and verify that thestateisACTIVEorIDLE. If thestateisSTARTING, you need to wait until thestatechanges to eitherACTIVEorIDLE.
-
To create the service, execute the following command using
test_role:Note
If a service with that name already exists, use the DROP SERVICE command to delete the previously created service, and then create this service.
-
Execute the following SQL commands to get detailed information about the service you just created. For more information, see Snowpark Container Services: Working with services.
-
To list services in your account, execute the SHOW SERVICES command:
-
To get the status of your service, execute the SHOW SERVICE CONTAINERS IN SERVICE command:
-
To get information about your service, execute the DESCRIBE SERVICE command:
-
Use the service
In this section you verify that the caller’s rights configured for the service work. You log in to the public endpoint from a browser, execute a query, and verify that the Snowflake session that the service created operates as the calling user, instead of as the service user.
First, to set up the context for the SQL statements in this section, execute the following:
The service exposes a public endpoint (see the inline specification provided in the CREATE SERVICE command); therefore, first log in to the endpoint using a web browser, then use the web UI that the service exposes to the internet to send query requests to the service endpoint.
-
Find the URL of the public endpoint that the service exposes:
The
ingress_urlcolumn in the response provides the URL.Example
-
Append
/uito the endpoint URL, and paste it in the web browser. This causes the service to execute theui()function (seemain.py).Note that the first time you access the endpoint URL, you will be asked to log in to Snowflake.
-
Use the same user that you used to create the service. Upon successful login, the service shows the following Web UI.
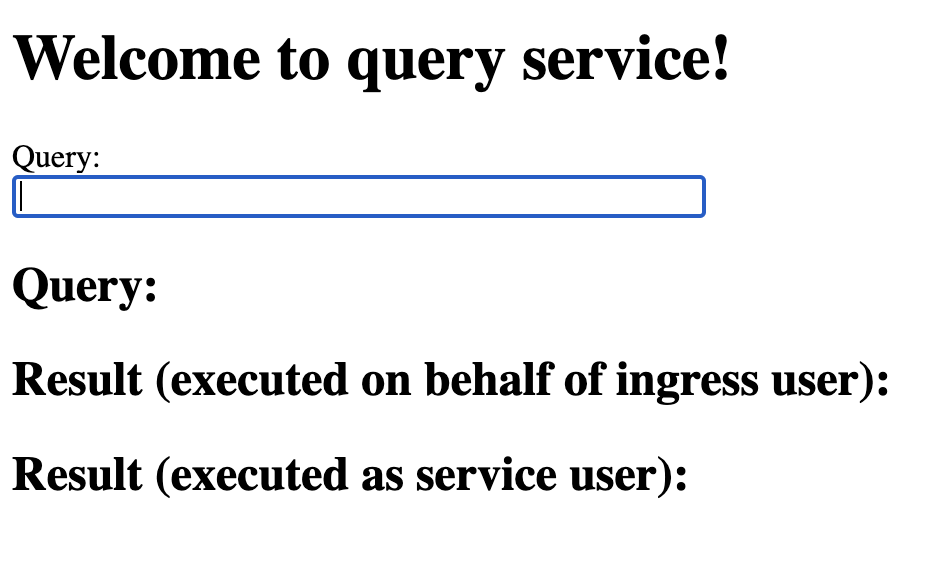
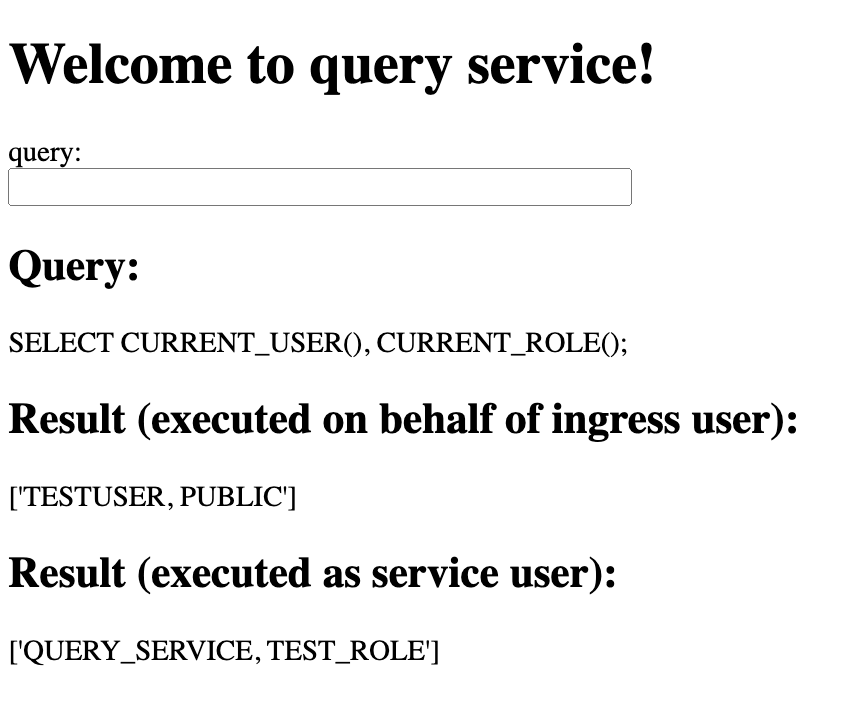
Enter the following command in the text box and press enter to see the results.
Because you included the
executeAsCallercapability in the service specification, when a request arrives, Snowflake inserts theSf-Context-Current-User-Tokenheader in the request and then forwards the request to your service endpoint.For illustration purposes, the service code in this tutorial executes the query both as the caller and the service user.
-
Executes the query on behalf of the caller (ingress user): In this case, the code uses the user token that Snowflake provides to construct a login token for connecting with Snowflake. Thus, the service uses the caller’s rights. Snowflake executes the query on behalf of the caller, displaying the caller’s name and active role name in the query result. For example:
-
Executes the query on behalf of the service user: In this case, the code doesn’t use the user token that Snowflake provides in the request when constructing the login token to connect with Snowflake. Thus, the service doesn’t utilize the caller’s rights, causing Snowflake to execute the query on behalf of the service user. The query result shows the service user’s name (which is the same as the service name) and the active role.
-
When the service executes the query (SELECT CURRENT_USER(), CURRENT_ROLE();) on behalf of the caller, Snowflake doesn’t need the user’s warehouse to execute this simple query. Therefore, the service didn’t need any caller grants. In the next section, the service executes a non-trivial query on behalf of the calling user that requires you to grant caller grants to the service.
Note
You can access the ingress endpoint programmatically. For sample code, see Ingress authentication. Note that you need to append /ui to the endpoint URL in the code so that Snowflake can route the request to the ui() function in the service code.
Use the service with caller grants
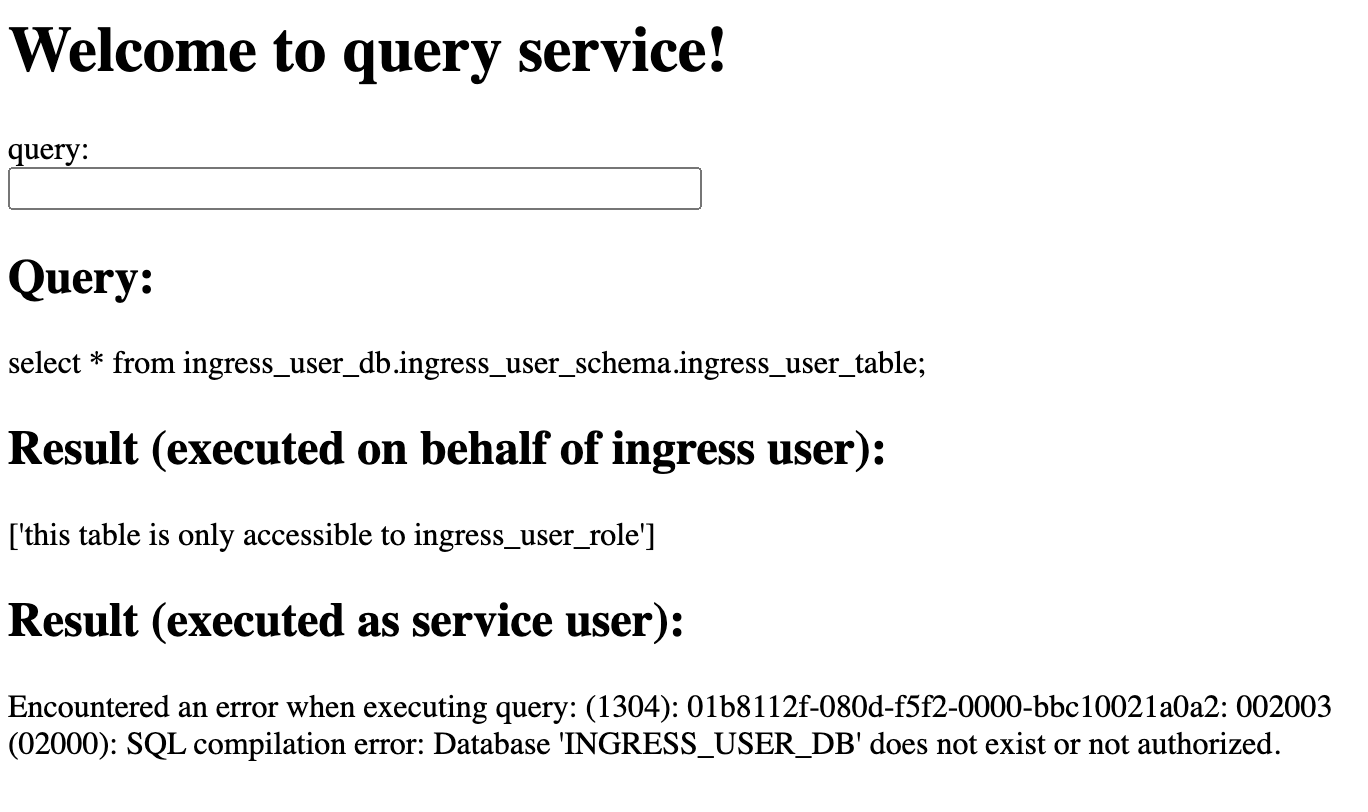
In this section, the service executes the following query on behalf of the caller (the user who logs in the service’s ingress endpoint).
The service doesn’t have permissions to access the table and doesn’t have permission to run the query in the default warehouse. To enable the service to execute this query on behalf of the caller, you grant the required caller grants to the service.
To demonstrate the scenario, you create a new role (ingress_user_role) and a table (ingress_user_table) that’s accessible to the new role but not to the service’s owner role (test_role). Therefore, when the service attempts to execute the query using the service credentials, Snowflake returns an error. But when the service executes the query on behalf of the user, Snowflake executes the query and returns the result.
Create roles and resources
-
Create a role (
ingress_user_role) and a database (ingress_user_db) that only this role can access. You then grant this role to the your user, so that the user can log in to the service’s public endpoint and query this table. -
Create a table (
ingress_user_table) that only theingress_user_rolerole can access.Note that when the service tries to query the table on behalf of the caller, the service operates only as a
test_role, the role that was used to create the service (the service’s owner role). This role does not have permissions to access the user table. -
Grant caller grants to the service’s owner role (
test_role) to query tables in theingress_user_dbdatabase. This privilege allows the service to query tables in this database only if the following are true:- The service is using a caller’s rights session.
- In the session, the caller also has permission to execute these queries.
-
Configure the default warehouse and default secondary roles.
When a session is created for a user, Snowflake activates the default primary role, default secondary roles, and the default warehouse of the logged-in user. In this tutorial,
- You set the
DEFAULT_SECONDARY_ROLESto ALL so that when a session is created for the current user, Snowflake sets the current secondary roles to be all roles granted to the user. - You also set the default warehouse to
tutorial_warehousewhere theingress_user_tablequeries are executed.
Note the following:
- In this tutorial, you log in to the public endpoint of the service. The user has
test_roleas the primary role and theingress_user_roleas the secondary role. This allows the session to do anything that theingress_user_roleallows. - The default role and default warehouse only affect the role and warehouse activated when the service establishes a session on behalf of your user. After a caller’s rights session is established you cannot change the role, but you can change the warehouse.
- You set the
Use the service and test the caller grants
-
Find the URL of the public endpoint that the service exposes:
The
ingress_urlcolumn in the response provides the URL.Example
-
Append
/uito the endpoint URL, and paste it in the web browser. This causes the service to execute theui()function (seeecho_service.py).: Note that the first time you access the endpoint URL, you will be asked to log in to Snowflake. For this test, use the same user that you used to create the service to ensure that the user has the necessary privileges.: -
Use the same user that you used to create the service. Upon successful login, the service shows the following Web UI.
Enter the following command in the text box and press enter to see the results.
For illustration purposes the service code in this tutorial executes the query both as the caller and the service user.
-
Executes the query on behalf of the caller (ingress user): In this case, the code uses the user token provided by Snowflake to construct a login token for connecting with Snowflake. Thus, the service uses the caller’s rights. Snowflake executes the query on behalf of the caller. Because the caller is using the
ingress_user_role rolethat has the privilege to query theingress_user_tabletable, the query returns one row in the result: -
Executes the query on behalf of the service user: In this case, the code does not use the user token that Snowflake provides in the request when constructing the login token to connect with Snowflake. Thus, Snowflake executes the query on behalf of the service user. Because the service owner uses the default
test_role, which does not have permission to query the table, you see an error:
-
Cleanup
You should remove billable resources that you created. For more information, see Step 5 in Tutorial 4.
Reviewing the service code
This section covers the following topics:
- Examining the tutorial code: Review the code files that implement the query service.
Examining the tutorial code
The zip file you downloaded in Step 1 includes the following files:
Dockerfilemain.pytemplates/basic_ui.html
You also use service specification when creating the service. The following section explains how these code components work together to create the service.
main.py file
This Python file contains the code that implements a minimal HTTP server that executes a query in the request and returns query results. The code provides a web user interface (UI) for submitting echo requests.
In the code:
-
The
uifunction displays the following web form and handles query requests submitted from the web form.
This function uses the
@app.route()decorator to specify that requests for/uiare handled by this function:The query service exposes the
executeendpoint publicly (see the inline service specification you provided when creating the service), enabling communication with the service over the web. When you load the URL of the public endpoint with /ui appended in your browser, the browser sends an HTTP GET request for this path, and the server routes the request to this function. The function executes and returns a simple HTML form for the user to enter a query.After the user enters a query and submits the form, the browser sends an HTTP POST request for this path. Because the service specification includes the
executeAsCallercapability, Snowflake adds theSf-Context-Current-User-Tokenheader to the incoming request and forwards the request to this same function (see Connecting to Snowflake using caller’s rights).The code executes the
run_queryfunction twice:-
As the ingress user. In this case, the login token is concatenation of both OAuth token and ingress user token.
-
As the service user. In this case the login token is only the OAuth token.
-
-
The
readiness_probefunction uses the@app.get()decorator to specify that requests for/healthcheckare handled by this function:This function enables Snowflake to check the readiness of the service. When the container starts, Snowflake wants to confirm that the application is working and that the service is ready to serve the requests. Snowflake sends an HTTP GET request with this path (as a health probe, readiness probe) to ensure that only healthy containers serve traffic. The function can do whatever you want.
-
The
get_loggerfunction helps set up logging.
Dockerfile
This file contains all the commands to build an image using Docker.
The Dockerfile contains instructions to install the Flask library ind the Docker container. The code in main.py
relies on the Flask library to handle HTTP requests.
/template/basic_
The query service exposes the echoendpoint endpoint publicly (see service specification), enabling communication with the
service over the web. When you load the public endpoint URL with /ui appended in your browser, the query service displays
this form.
You can enter a query in the form and submit the form, and the service returns the results in an HTTP response.
Service specification
Snowflake uses information you provide in this specification to configure and run your service.
In the service specification, the spec, capabilities, and serviceRoles are the top-level fields.
-
specprovides specification details (see Service specification reference). Note that the service exposes one public endpoint (execute) that enables ingress access to the service from the public web. -
capabilitiesSpecifies theexecuteAsCallercapability. This tells Snowflake that the application intends to use caller’s rights. -
serviceRolesspecifies one service role (ui_usage) and endpoint name (execute) to grant the USAGE privilege on. -
The
readinessProbefield identifies theportandpaththat Snowflake can use to send an HTTP GET request to the readiness probe to verify that the service is ready to handle traffic.The service code (
echo_python.py) implements the readiness probe as follows:Therefore, the specification file includes the
container.readinessProbefield accordingly.
For more information about service specifications, see Service specification reference.
What’s next?
Now that you’ve completed this tutorial, you can return to Working with Services to explore other topics.