Snowpark Container Services: Working with services
Snowpark Container Services lets you more easily deploy, manage, and scale containerized applications. After you create an application and upload the application image to a repository in your Snowflake account, you can run your application containers as a service.
A service represents Snowflake running your containerized application on a compute pool, which is a collection of virtual machine (VM) nodes. There are two types of services:
- Long-running services. A long-running service is like a web service that does not end automatically. After you create a service, Snowflake manages the running service. For example, if a service container stops, for whatever reason, Snowflake restarts that container so the service runs uninterrupted.
- Job services. A job service terminates when your code exits, similar to a stored procedure. When all containers exit, the job service is done.
The following diagram shows the architecture of a service:
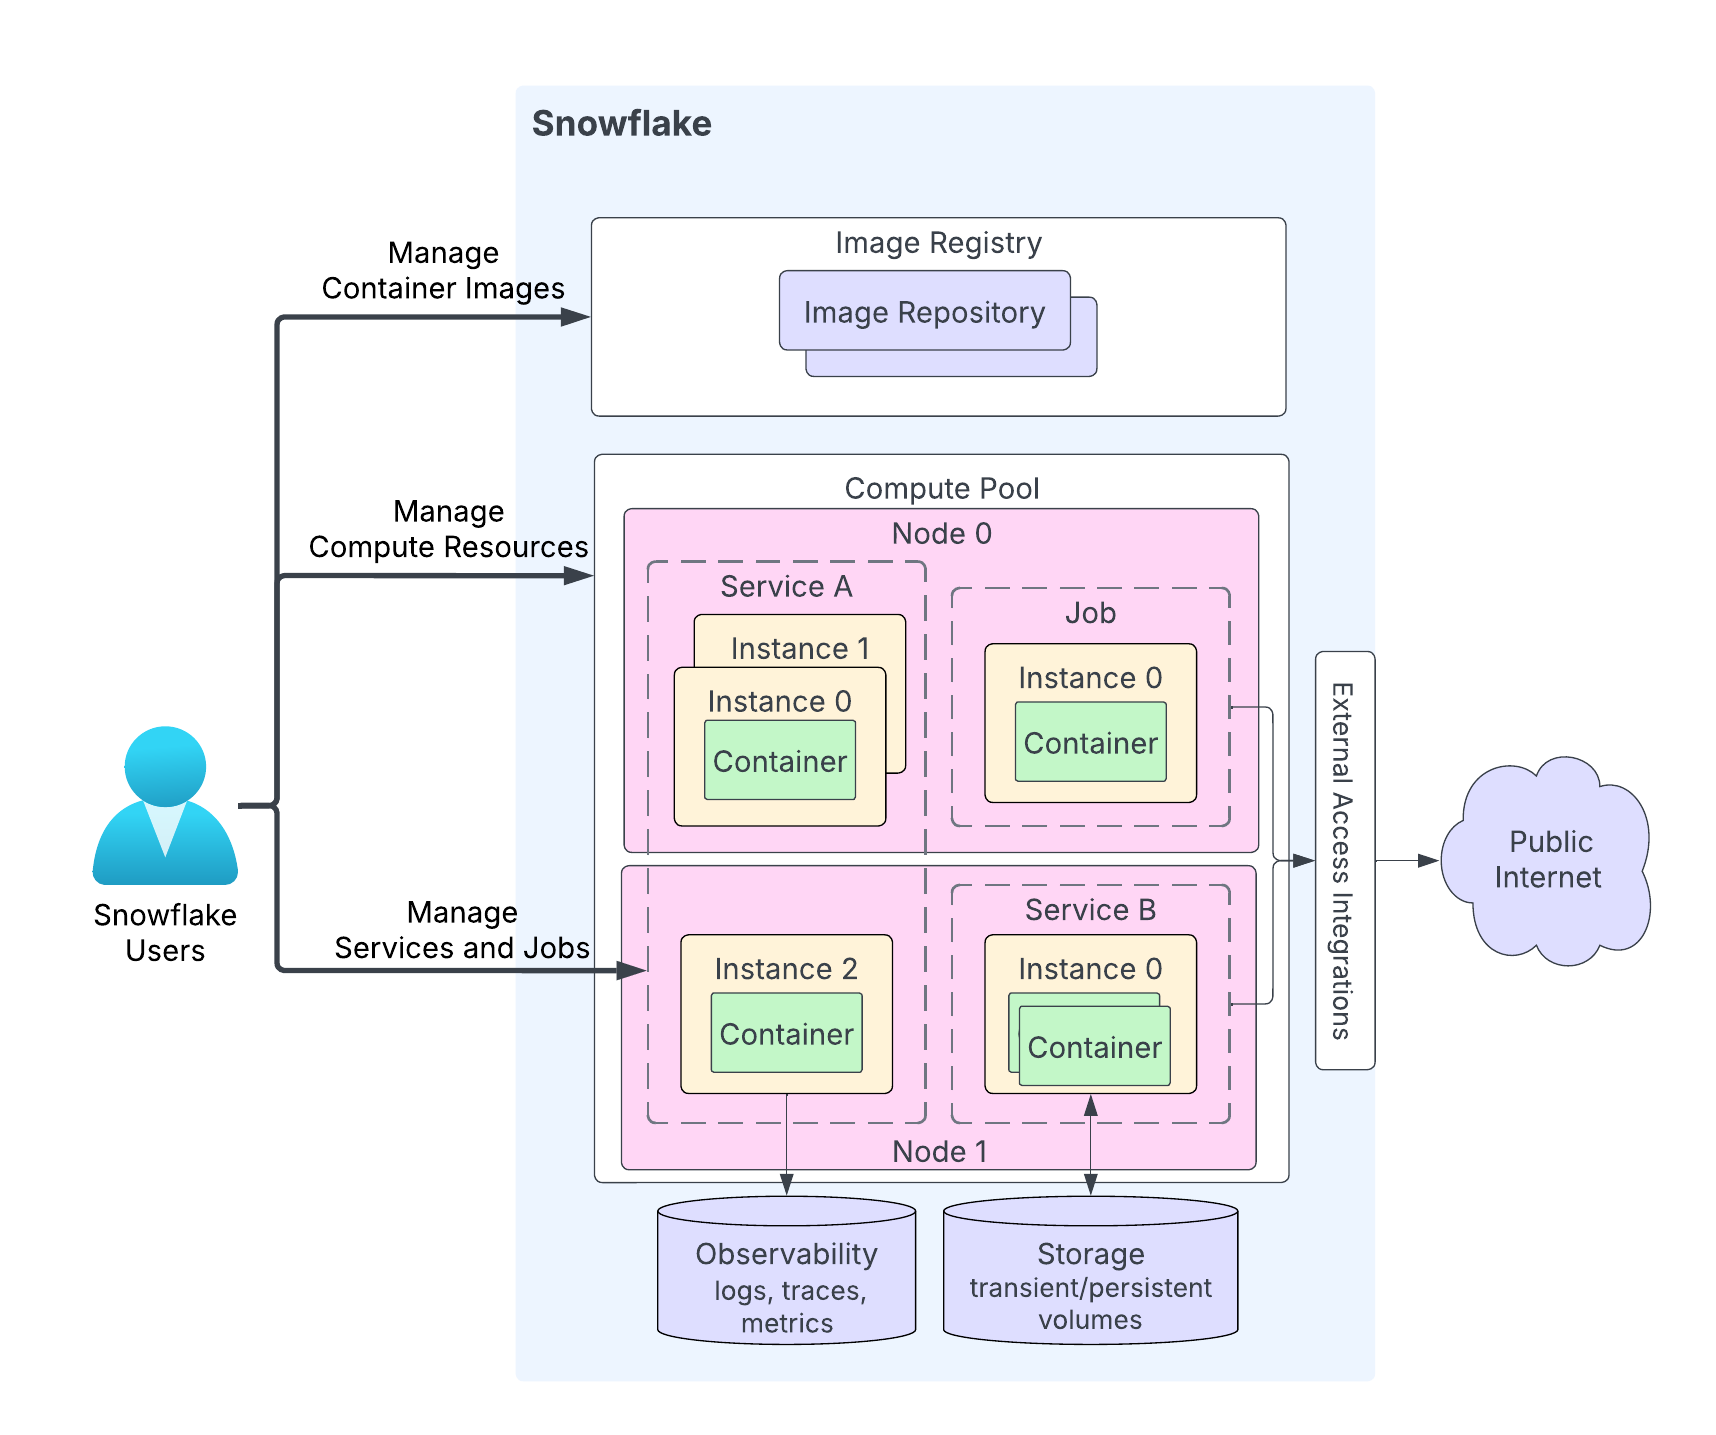
The highlights of the diagram are the following:
-
Users upload their application code to a repository in their Snowflake account. The image registry service serves the OCIv2 API for storing OCI-compliant images in a repository. For example, you can use Docker API to upload images to a repository. When you create a service, you specify the image to use.
-
A compute pool is where Snowflake runs your services. The diagram shows a compute pool having two compute nodes (Node 0 and Node 1). Snowflake runs your service instance on a node. When running multiple service instances, depending on resource requirements, Snowflake might run them on the same node or distribute them across multiple nodes. For example:
- Node 0 is running service A (two instances of the three total instances for that service), and a job (with a single instance).
- Node 1 is running the third instance of service A. This node is also running an instance of service B.
-
Depending on your application code, a service instance can consist of multiple containers. While Snowflake might distribute instances of a service across multiple compute pool nodes, all containers within a single service instance always run on the same compute pool node.
-
Services can optionally communicate with the public internet.
-
A service can use storage including transient storage (for example, memory and local disk) and persistent volumes (for example, block volumes).
-
Snowflake can record logs, traces, and metrics from your services to the event table in your Snowflake account.
Snowflake provides APIs for you to create and manage repositories, compute pools, and services. This topic explains working with services. APIs for managing services include the following:
-
SQL commands:
- Creating a service. CREATE SERVICE, EXECUTE JOB SERVICE.
- Altering a service. ALTER SERVICE, DROP SERVICE.
- Getting information about a service. SHOW SERVICES, DESCRIBE SERVICE, and other commands.
-
Non-SQL interfaces: Snowflake Python APIs, Snowflake REST APIs, and Snowflake CLI.
Starting services
After you upload your application code to a repository in your Snowflake account, you can start a service. The minimum information required to start a service includes:
- A name: Name of the service.
- A service specification: This specification provides Snowflake with the information needed to run your service. The specification is a YAML file.
- A compute pool: Snowflake runs your service in the specified compute pool.
Create a long running service
Use CREATE SERVICE to create a long running service.
-
In most cases, you create a service by specifying an inline specification, as shown below:
-
Create a service by referencing a service specification stored on a Snowflake stage. When you deploy the service in a production environment, you can apply the separation of concerns design principle and upload the specification to a stage, providing stage information in the CREATE SERVICE command, as shown:
Run a job service
Use EXECUTE JOB SERVICE to create a job service. By default this command runs synchronously, and returns a response after all containers of the job service exit. You can optionally specify the ASYNC parameter to run the job service asynchronously.
-
Execute a job service using an inline specification. The command waits until the job finishes executing:
You can optionally execute this job asynchronously using the
ASYNCproperty.When you execute an asynchronous job, you can use the helper function <service_name>!SPCS_WAIT_FOR to wait for the job to complete.
-
Execute a job service using stage information:
Run multiple replicas of a job service (batch jobs)
By default, EXECUTE JOB SERVICE runs a single job service instance on a compute pool to execute the job. However, you might choose to run multiple job service replicas to distribute the workload across compute pool nodes. For example, you might use 10 replicas to process a 10-million-row dataset, with each handling 1 million rows.
Batch jobs support scenarios where the work can be partitioned into independent tasks — one per job service instance (also referred to as replica) — that can potentially be executed concurrently. Snowflake’s ability to execute the instances concurrently depends on the size of the compute pool.
To execute a batch job with multiple instances, use the optional REPLICAS parameter of the EXECUTE JOB SERVICE as shown. The following example executes a job service with 10 instances:
When the REPLICAS parameter is specified in EXECUTE JOB SERVICE, Snowflake populates the following two environment variables in the job container:
SNOWFLAKE_JOBS_COUNT: The value of the REPLICAS property specified on the EXECUTE JOB SERVICE.SNOWFLAKE_JOB_INDEX: The ID of the job service instance, starting from 0. If you have three replicas, the instance IDs will be 0, 1, and 2.
These environment variables are provided so that a job container can use them to partition the input and assign each instance a specific partition to process. For example, when processing 10 million rows with 10 job replicas, the instance with job index 0 would process rows 1 through 1 million, the instance with job index 1 would process rows from 1 million to 2 million, and so on.
Use the SHOW SERVICE INSTANCES IN SERVICE command to find the status of each job service instance.
Use the DESCRIBE SERVICE command to get overall job service status. Snowflake calculates the overall job service status as follows:
- If any instance fails, the job status is FAILED.
- If all instances complete successfully, the job status is DONE.
- If any instance is currently running, the job status is RUNNING.
- Otherwise, the job service status is PENDING.
- If SYSTEM$CANCEL_JOB has been called but the job has not yet fully stopped, the job status is CANCELLING.
- If the job has been successfully cancelled via SYSTEM$CANCEL_JOB, the job status is CANCELLED.
Using specification templates
There are times you might want to create multiple services using the same specification but with different configurations. For example, you suppose that you define an environment variable in a service specification and you want to create multiple services using the same specification but different values for the environment variable.
Specification templates enable you to define variables for field values in the specification. When you create a service you provide values for these variables.
In a specification template, you specify variables as values for various specification fields. Use the {{ variable_name }} syntax to specify these variables. Then, in the CREATE SERVICE command, specify the USING parameter to set values for these variables.
For example, the inline specification template in the following CREATE SERVICE command uses a variable named tag_name for the image tag name. You can use this variable to specify a different image tag for each service. In this example, the USING parameter sets the tag_name variable to the value latest.
If you choose to save the specification template to a Snowflake stage in your account, you can point to the location of the template in the CREATE SERVICE command:
Guidelines for defining variables in a specification
-
Use the
{{ variable_name }}syntax to define variables as field values in the specification. -
These variables can have default values. To specify the default value, use the
defaultfunction in the variable declaration. For example, the following specification defines two variables (character_nameandendpoint_name) with default values.In addition, you can specify an optional boolean parameter to the
defaultfunction to indicate whether you want the default value used when a blank value is passed in for the variable. Consider this specification:In the specification:
- For the
character_namevariable, the boolean parameter is set tofalse. Therefore, if the variable is set to an empty string value (‘’) to this parameter, the value remains blank; the default value (“Bob”) is not used. - For the
echo_endpointvariable, the boolean parameter is set totrue. Therefore, if you pass a blank value to this parameter, the default value (“echo-endpoint”) is used.
By default, the boolean parameter for the
defaultfunction isfalse. - For the
Guidelines for passing values for specification variables
Specify the USING parameter in the CREATE SERVICE command to provide values for variables. The general syntax for USING is:
where
-
var_nameis case sensitive and it should be a valid Snowflake identifier (see Identifier requirements). -
var_valuecan be either an alphanumeric value or a valid JSON value.Examples:
-
The USING parameter in CREATE SERVICE must provide values for the specification variables (except the variables for which the specification provides default values). Otherwise, an error is returned.
Examples
These examples show creating services using specification templates. The CREATE SERVICE commands in these examples use inline specification.
Example 1: Provide simple values
In Tutorial 1 you create a service by providing an inline specification. The following example is a modified version of the same where the specification defines two variables: image_url and SERVER_PORT. Note that the SERVER_PORT variable is repeated in three places. This has the added benefit of using variables that ensure all these fields that are expected to have the same value do have the same value.
In this CREATE SERVICE command, the USING parameter provides values for the two specification variables. The image_url value includes slashes and a colon. These are not alphanumeric characters. Therefore, the example wraps the value in double quotes to make it a valid JSON string value. The template specification expands the following specification:
Example 2: Provide a JSON value
In Tutorial 1, the specification defines two environment variables (SERVER_PORT and CHARACTER_NAME) as shown:
You can templatize this specification by using a variable for the env field. This lets you create multiple services with different values for the environment variables. The following CREATE SERVICE command uses a variable (env_values) for the env field.
The USING parameter in CREATE SERVICE provides value for the env_values variable. The value is a JSON map that provides values for both the environment variables.
Example 3: Provide list as variable value
In Tutorial 2, the specification includes the args field that includes two arguments.
In a template version of the specification, you can provide these arguments as a JSON list as shown:
Scaling services
When your service experiences variable traffic or resource demand, you can configure Snowflake to automatically adjust the number of running service instances. Scaling up handles increased load; scaling down reduces costs when demand is low. For details, see Scaling services.
Suspending a service
A long-running service consumes compute pool resources, incurring costs, but you can suspend the service when it’s not performing meaningful work. When no services or jobs are active on any compute pool node, Snowflake’s compute pool auto-suspend mechanism suspends the pool to reduce costs.
To suspend a service, you can either explicitly call ALTER SERVICE … SUSPEND to suspend a service or set the AUTO_SUSPEND_SECS property using CREATE SERVICE or ALTER SERVICE to define the idle duration after which Snowflake automatically suspends the service.
![]() Preview Feature — Open
Preview Feature — Open
Configuring the automatic suspension of a Snowpark Container Services service using the AUTO_SUSPEND_SECS property is a preview feature.
When the AUTO_SUSPEND_SECS property is set, Snowflake automatically suspends a service if it’s not already suspended and it’s idle for more than AUTO_SUSPEND_SECS seconds. A service is idle when both of the following are true:
- There is no query currently running that includes a service function invocation to that service.
- The service status is RUNNING.
Caution
Auto-suspension doesn’t track data processing initiated by a service function invocation, where the processing continues after the service function returns. In the current implementation, auto-suspension also doesn’t track ingress and service-to-service communications. Therefore, you should not enable auto-suspension for services that provide such features, because it might disrupt these potentially ongoing processes.
When Snowflake suspends a service, it shuts down all service instances on the compute pool. If there are no other services running on the compute pool and if auto-suspend is configured for the compute pool, then Snowflake also suspends the compute pool nodes. You thus avoid having to pay for an inactive compute pool.
Also, note the following:
- Auto-suspension is not supported for job services.
- Auto-suspension is not supported on services with public endpoints because Snowflake currently only tracks service function traffic and not ingress traffic in deciding when a service is idle.
Modify and drop services
After your create a service or a job service, you can perform the following actions:
-
Use the DROP SERVICE command to remove a service from a schema, Snowflake terminates all the service containers.
-
Call the <service_name>!SPCS_CANCEL_JOB function to cancel a job service. When you cancel a job, Snowflake stops the job from running and removes the resources allocated for the job run.
-
Use the ALTER SERVICE command to modify the service; for example, suspend or resume the service, change the number of instances running, and direct Snowflake to redeploy your service by using a new service specification.
Note
You can’t alter a job service.
Terminate service
When you suspend a service (ALTER SERVICE … SUSPEND) or drop a service (DROP SERVICE), Snowflake terminates all the service instances. Similarly, when you upgrade service code (ALTER SERVICE … <fromSpecification>), Snowflake applies rolling upgrades by terminating and redeploying one service instance at a time.
When terminating a service instance, Snowflake first sends a SIGTERM signal to each service container. The container has the option to process the signal and shut down gracefully with a 30-second window. Otherwise, after the grace period, Snowflake terminates all the processes in the container.
Updating service code and redeploying the service
After a service is created, use the ALTER SERVICE … <fromSpecification> command to update service code and redeploy the service.
You first upload the modified application code to your image repository. You then execute the ALTER SERVICE command, either providing the service specification inline or specifying the path to a specification file in the Snowflake stage. For example:
Upon receiving the request, Snowflake redeploys the service using the new code.
Note
When you run the CREATE SERVICE … <fromSpecification> command, Snowflake records the specific version of the provided image. Snowflake deploys that same image version in the following scenarios, even if the image in the repository has been updated:
- When a suspended service is resumed (using ALTER SERVICE … RESUME).
- When autoscaling adds more service instances.
- When service instances are restarted during cluster maintenance.
But when you call ALTER SERVICE … <fromSpecification>, Snowflake uses the latest version in the repository for that image.
If you are the service owner, the output of the DESCRIBE SERVICE command includes the service specification, which includes the image digest (the value of the sha256 field in the specification), as shown below:
ALTER SERVICE can impact communications (see Using a service) with the service.
- If ALTER SERVICE … <fromSpecification> removes an endpoint or removes relevant permissions required to use an endpoint (see serviceRoles in Specification Reference), access to the service will fail. For more information, see Using a Service.
- While the upgrade is in progress, new connections might get routed to the new version. If the new service version is not backward compatible, it will disrupt any active service usage. For example, ongoing queries using a service function might fail.
Note
When updating service code that is part of a native app with containers, you can use the SYSTEM$WAIT_FOR_SERVICES system function to pause the native app setup script to allow for the services to upgrade completely. For more information, see Upgrade an app (Legacy).
Monitoring rolling updates
When multiple service instances are running, Snowflake performs a rolling update, in descending order, based on the ID of the service instances. Use the following commands to monitor service updates:
-
DESCRIBE SERVICE and SHOW SERVICES:
-
The
is_upgradingcolumn in the output shows TRUE if the service is being upgraded. -
The
spec_digestcolumn in the output represents the spec digest of the current service specification. You can execute this command periodically; a change in thespec_digestvalue indicates a service upgrade was triggered. Thespec_digestis in use only afteris_upgradingis FALSE; otherwise, the service upgrade is still in progress.Use the SHOW SERVICE INSTANCES IN SERVICE command to check whether all the instances have been updated to the latest version as explained below.
-
-
SHOW SERVICE INSTANCES IN SERVICE:
- The
statuscolumn in the output provides the status of each individual service instance while the rolling upgrade is in progress. During the upgrade, you will observe each service instance transition status, such as TERMINATING to PENDING, and PENDING to READY. - During the service upgrade, the
spec_digestcolumn in the output of this command might show a different value from SHOW SERVICES, which always returns the latest spec digest. This difference simply indicates that the service upgrade is in progress and service instances are still running the old version of the service.
- The
Get information about services
You can use the these commands:
-
Use the DESCRIBE SERVICE command to retrieve the properties and status of a service. The output returns all service properties.
-
Use the SHOW SERVICES command to list current services (including job services) for which you have permissions. The output provides some of the properties and status for these services.
By default, the output lists services in the current database and schema. You can alternatively specify any of the following scopes. For example:
-
List the services in the account, in a specific database, or in a specific schema: For example, use the IN ACCOUNT filter to list services in your Snowflake account, regardless of which database or schema the services belong to. This is useful if you have Snowflake services created in multiple databases and schemas in your account. Like all other commands, SHOW SERVICES IN ACCOUNTS is gated by privileges, returning only the services for which the role you are using has viewing permissions.
You can also specify IN DATABASE or IN SCHEMA to list the services in the current (or specified) database or schema.
-
List the services running in a compute pool: For example, use IN COMPUTE POOL filter to list the services running in a compute pool.
-
List the services that start with a prefix or that match a pattern: You can apply the LIKE and STARTS WITH filters to filter the services by name.
-
List job services. or exclude job services from the list: You can use SHOW JOB SERVICES or SHOW SERVICES EXCLUDE JOBS to list only job services or exclude job services.
You can also combine these options to customize the SHOW SERVICES output.
-
-
Use the SHOW SERVICE INSTANCES IN SERVICE command to retrieve properties of the service instances.
-
Use the SHOW SERVICE CONTAINERS IN SERVICE command to retrieve the properties and status of the service instances.
-
Call GET_JOB_HISTORY function to get the job histories for jobs that were run within a specified time range.
-
Call the <service_name>!SPCS_WAIT_FOR function to wait and retrieve the service state — including the state of a job service — after a specific time.
Monitoring services
Snowpark Container Services offers tools to monitor compute pools in your account and the services running on them. For more information, see Snowpark Container Services: Monitoring Services.
Managing service-related privileges
There are three aspects to managing service-related privileges:
- What privileges are needed for the service to run?
- What privileges are needed to perform operations on the service?
- What privileges are needed to access the service endpoints?
The following section provides the details.
Privileges needed for the service to run (service owner role)
The role that creates a service is the service’s owner role. The service executes all SQL in the context of this role. For more information, see Using Snowflake-provided service user credentials.
If a service requires a privilege — for example, to access or perform an operation on a database object— the owner role must be granted that privilege.
In service-to-service communication, the owner role determines which endpoints on the destination service are accessible (see service roles).
Privileges needed to perform operations on the service
If a role needs to perform an operation on a service (for example, suspend the service), that role must be granted the privilege to perform that operation.
The following list shows the privileges that you can grant a role to perform operations on a service:
- USAGE: This privilege allows a role to list services, SHOW SERVICES and DESCRIBE SERVICE. The privilege doesn’t allow access to service endpoints. For information, see Privileges needed to access the service endpoints (service roles).
- MONITOR: This privilege allows a role to inspect service telemetry such as logs and container runtime status information. For more information, see SHOW SERVICE CONTAINERS IN SERVICE.
- OPERATE: This privilege allows a role to operate on a service; for example, suspend, resume, upgrade a long running service, or cancel a job service. For more information about these operations, see ALTER SERVICE.
- OWNERSHIP: This privilege grants a role to all the preceding privileges. It also grants a role privilege to modify service properties and to inspect the service specification — DESCRIBE SERVICE output includes the service specification only if the role has the OWNERSHIP privilege.
Each SQL command reference provides access control requirements for the commands. For more information, see SHOW SERVICES, ALTER SERVICE, and DROP SERVICE.
The following rule apply to future grants on services:
-
You can define future grants to a role on services that aren’t created. For example, the following command grants MONITOR privilege on a future service (myservice) to a role (service_admin_role).
The only exception is the OWNERSHIP privilege. You can’t grant the OWNERSHIP privilege on a future service. For more information about future grants and related required privileges, see Future grants on database or schema objects.
-
Transfer of service ownership — including future ownership transfer by using GRANT OWNERSHIP ON FUTURE SERVICES — isn’t supported.
Privileges needed to access the service endpoints (service roles)
A service can expose one or more endpoints that clients access by sending requests. The service’s owner role has full access to the service and its endpoints. To allow other roles to access the endpoints, you must grant them the appropriate privileges. Snowflake supports defining “service roles” in the service specification to manage access to the exposed endpoints.
Examples where a role needs a service role include:
- An owner role of a service function needs a service role that grants access to the endpoint the service function references. Otherwise, you cannot create the service function. If the owner role of the service function loses permission to the service role after creation of the service function, queries using that service function will fail with a permission error.
- In service-to-service communications, the owner role of the service needs the service role that grants access to another service’s endpoint to call that endpoint.
- A user making ingress requests from outside Snowflake to a public endpoint exposed by a service must be granted a role that is granted a service role to allow access to that endpoint.
To enable a role (say some_role) to access a service endpoint, you do the following:
-
Grant the USAGE privilege on the database and schema where the service is created. These privileges enable resolving the names of objects in the schema. In this case, the object is the service.
For example, the following commands grant these USAGE privileges to a role (some_role).
-
Grant the service role that has permission to access the endpoints (see GRANT SERVICE ROLE). You have these options:
-
Grant access to all endpoints that the service exposes using the
all_endpoints_usageservice role, a pre-defined service role that Snowflake creates for every service. A service role name uses this syntax:service-name!service-role. -
Grant access to specific endpoints that a service exposes. This requires you to define one or more service roles in the specification with permission to specific endpoints. Then grant these service roles to manage fine-grained endpoint access.
In the following CREATE SERVICE command, the inline specification defines two endpoints (ep1 and ep2) and a service role (ep1_role) that is granted access to only the ep1 endpoint.
Now, to grant
some_roleaccess to theep1endpoint, grant theep1_roleservice role as shown:
-
Using a service
After creating a service, users in the same account (that created the service) can use it. There are three methods to use a service as illustrated in the diagram. The user needs access to roles having the necessary privileges.

The diagram highlights the methods for using the service, while other service-related components are grayed out for clarity. For a detailed explanation of the service components, refer to the diagram at the beginning of this page.
- Use the service from a SQL query (Service function): You create a service function, a user-defined function (UDF) associated with a service, and use it in a SQL query and leverage custom data processing that your service provides. For an example, see Tutorial 1.
- Use the service from outside Snowflake (Ingress): You can declare one or more service endpoints as public to allow network ingress access to the service. This can be used to build web apps or exposed APIs over your Snowflake data. For an example, see Tutorial 1.
- Use service from another service (Service-to-service communications): Services can communicate with each other by using Snowflake-assigned service DNS name for service-to-service communication For an example, see Tutorial 4.
As the diagram illustrates, when communicating with a service using any of these methods, you send requests to endpoints that the service exposes and get results.
Note
Service functions cannot be used to communicate with a job service.
The following sections provide details.
Service functions: Using a service from an SQL query
A service function is a user-defined function (UDF) you create using CREATE FUNCTION (Snowpark Container Services). However, instead of writing the UDF code directly, you associate the UDF with your service endpoint. Note that you can associate a service function only with a service endpoint that supports the HTTP protocol (see `spec.endpoints` field (optional)).
For example, in Tutorial 1, you create a
service named echo_service that exposes one endpoint (echoendoint) as defined in the service specification:
echoendpoint is a user-friendly endpoint name that represents the
corresponding port (8080). To communicate with this service endpoint, you create
a service function by providing the SERVICE and ENDPOINT parameters as shown:
The AS parameter provides the HTTP path to the service code.
You get this path value from the service code. For example, the following code lines are from service.py in Tutorial 1.
You invoke the service function in a SELECT statement such as the following:
Snowflake directs the request to the associated service endpoint and path.
Note
A service function is used to communicate with a service, and not with a job. In other words, you can only associate a service (not a job) with a service function.
Data exchange format
For data exchange between a service function and an application container,
Snowflake follows the same format that external functions
use (see Data Formats).
For example, suppose you have data rows stored in a table (input_table):
To send this data to your service, you invoke the service function by passing these rows as parameters:
Snowflake sends a series of requests to the container, with batches of data rows in the request body in this format:
The container then returns the output in the following format:
The example output shown assumes that the result is a one-column table with rows (“a”, “b” …).
Configuring batch processing
The CREATE FUNCTION and ALTER FUNCTION commands support parameters that configure how Snowflake handles batches of data processed by your service..
-
Configuring batch size
You can use the MAX_BATCH_ROWS parameter to limit the batch size, that is, the maximum number of rows Snowflake sends to your service in a single request. This helps control the volume of data transferred. This can also result in more, smaller batches that might be processed in parallel if your service supports multiple instances or concurrent requests.
-
Handling errors
You can use the these parameters for batch error handling:
ON_BATCH_FAILURE,MAX_BATCH_RETRIES, andBATCH_TIMEOUT_SECS.
For example, the following ALTER FUNCTION command configures the MAX_BATCH_ROWS and MAX_BATCH_RETRIES parameters of the my_echo_udf service function:
Privileges required to create and manage service functions
To create and manage service functions, a role needs the following privileges:
- The current role must have the service role granted for the endpoint referenced in CREATE FUNCTION or ALTER FUNCTION command.
- To use a service function in a SQL query, the current session must have a role with usage privilege on the service function and the owner role of the service function must be granted the service role for the associated service endpoint.
The following example script shows how you might grant permissions to create and use a service function:
Ingress: Using a service from outside Snowflake
You can declare one or more endpoints as public in the service specification to allow users to use the service from the public. Note that users must be Snowflake users in the same Snowflake account that created the service.
Note that ingress is allowed only with an HTTP endpoint (see `spec.endpoints` field (optional)).
Ingress authentication
A user can access a public endpoint when that user is granted a service role that allows access to that endpoint. (see Privileges needed to access the service endpoints (service roles)).
Then users can access the public endpoint using a browser or programmatically.
-
Accessing a public endpoint by using a browser: When the user uses a browser to access a public endpoint, Snowflake automatically redirects the user to a sign-in page. The user must provide their Snowflake credentials to sign in. After successfully signing in, the user has access to the endpoint. Behind the scenes, the user sign-in generates an OAuth token from Snowflake. The OAuth token is then used to send a request to the service endpoint.
For an example, see Tutorial 1.
-
Accessing a public endpoint programmatically: There are three ways for programmatic clients to access endpoints:
- Using a programmatic access token (PAT): Your application passes
the token in the
Authorizationheader of requests to the endpoint to represent its identity. - Using key-pair authentication: Your application generates a JWT by using
a key pair, exchanges the JWT with Snowflake for an OAuth token, and then passes the OAuth token in the
Authorizationheader of requests to the endpoint to represent its identity. - Using the Python connector: Your application uses
the Python connector to generate a session token, and then passes the session token in the
Authorizationheader of requests to the endpoint to represent its identity.
For related examples, see Tutorial 8.
- Using a programmatic access token (PAT): Your application passes
the token in the
User-specific headers in ingress requests
When a request for a public endpoint arrives, Snowflake automatically passes the following header along with the HTTP request to the container.
Your container code can optionally read the header, know who the caller is, and apply context-specific customization for different users. In addition, Snowflake can optionally include the Sf-Context-Current-User-Email header. To include this header, contact Snowflake Support.
Service-to-service communications
Service instances can communicate directly with each other over TCP (including HTTP). This is true both for instances that belong to the same service and for instances that belong to different services.
Instances can only receive communications (requests) on the endpoints declared in the service specification. The client (the service sending the request) must have the required roles and grants to connect to that endpoint (see Privileges needed to access the service endpoints (service roles)).
- By default, a service instance can connect to other instances of the same service on the declared endpoints. In broader terms, a service’s owner role has permissions to connect to endpoints of services with the same owner role.
- In order for a client service to connect to an endpoint of a service that has a different owner role, the owner role of the client service needs the service role that grants access to another service’s endpoint to call that endpoint. For more information, see Privileges needed to access the service endpoints (service roles).
- If you want to prevent your services from communicating with each other (for reasons such as security), use different Snowflake roles to create those services.
A service instance can be reached using either the service IP address or the service instance IP addresses.
- Requests using the service IP address are routed to a load-balancer that in turn routes requests to a randomly selected service instance.
- Requests using the service instance IP address are routed directly to the specific service instance. You must use the service instance IP when connecting to an endpoint defined using the portRange field (see `spec.endpoints` field (optional)).
Both IP addresses are discoverable using the DNS name that Snowflake automatically assigns to each service. Note that it’s not possible to use DNS to connect to a specific instance. For example, it doesn’t make sense to construct a URL using the service instance DNS name, because there is no way to use the service instance DNS name to reference a specific service instance.
The service instance IP addresses are shown in the output of the SHOW SERVICE INSTANCES IN SERVICE command when the 2025_01 behavior change bundle is enabled.
For a service-to-service communication example, see Tutorial 4.
Note that if a service endpoint is created only to allow service-to-service communications, the TCP protocol should be used (see `spec.endpoints` field (optional)).
Service DNS name
The DNS name format is:
Use SHOW SERVICES (or DESCRIBE SERVICE) to get the DNS name of a service.
The preceding DNS name is a fully qualified name. Services created in the same schema can
communicate using just the <service-name>. Services that are in a different schema or database must provide the hash, such as <service-name>.<hash> or provide the fully qualified name (<service-name>.<hash>.svc.spcs.internal).
Use the SYSTEM$GET_SERVICE_DNS_DOMAIN function to find the DNS domain for a given schema. The DNS hash domain is specific to the current version of the schema. Note the following:
- If that schema or its database is renamed, the hash does not change.
- If the schema is dropped and then recreated (for example using CREATE OR REPLACE SCHEMA) the new schema will have a new hash. If you UNDROP a schema, the hash remains the same.
DNS names have the following limitations:
- Your service names must be a valid DNS label. (See also https://www.ietf.org/rfc/rfc1035.html#section-2.3.1). Otherwise, creating a service will fail.
- Snowflake replaces an underscore (_) in the service name by a dash (-) in the DNS name.
- A DNS name is only for internal communications within Snowflake between services running in the same account. It is not accessible from the internet.
Service instances DNS name
The Service instances DNS name format is the following:
It resolves to a list of service instance IP addresses, one for each instance of the service. Note that there is no guaranteed order to the list of IP addresses that DNS returns. This DNS name should only be used with DNS APIs, not as the hostname in a URL. The expectation is that your application uses this hostname with DNS APIs to collect the set of service instance IPs and then programmatically connect directly to those instance IPs.
This list of IP addresses enables the creation of a mesh network for direct communication between specific service instances.
Which DNS name to choose
The following considerations apply when choosing which DNS name to use when connecting to a service in service-to-service communication.
Use the service DNS name when any of the following is true:
- You need to access a specific destination port in the simplest possible way.
- You want each request to be sent to a randomly selected service instance.
- You don’t know how your application framework performs and caches DNS responses.
Use the service instance DNS name or service instance IP when any of the following is true:
- You want to discover the IP addresses of all the service instances.
- You want to skip an intermediate load balancer.
- You use distributed frameworks or databases, such as Ray or Cassandra, that use service instance IP addresses as identities.
General guidelines related to service-to-service communications
- Traffic for service-to-service communications is sent over the virtual interface eth0.
- If your server is listening on the port 0, when a process binds to the port 0 in Linux, a port is chosen randomly from the
ephemeral port range defined with the
sysctlparameternet.ipv4.ip_local_port_range. Currently, this parameter is not configurable and is equal to32768 60999. - The IP address of a service instance is the IP address of the virtual interface eth0. Use the following methods to get this IP address:
-
From the output of ipconfig:
-
Use the following Python code to get the service IP, service instance IP, and list of all service instance IPs:
-
Manage types of services allowed in your account
Snowflake supports different types of services (workload types) that you can create in your account. These types include user-deployed workloads, such as services and jobs, and first-party workloads that are managed by Snowflake, such as notebooks, model serving, and ML jobs. For a list of workload types, see ALLOWED_SPCS_WORKLOAD_TYPES.
When you list services in your account using SHOW SERVICES, you can include a filter to list only specific workload types. For example, show user-deployed services only:
You can restrict the types of workloads that are allowed in your Snowflake account by using the account-level parameters ALLOWED_SPCS_WORKLOAD_TYPES and DISALLOWED_SPCS_WORKLOAD_TYPES. For example, to allow only NOTEBOOK workloads, run the following statement:
Note
- Workload types that are specified in DISALLOWED_SPCS_WORKLOAD_TYPES can’t be deployed. If you configure both ALLOWED_SPCS_WORKLOAD_TYPES and DISALLOWED_SPCS_WORKLOAD_TYPES, the disallowed list takes precedence. For example, if both parameters specify the NOTEBOOK workload type, NOTEBOOK workloads aren’t allowed to run on Snowpark Container Services.
- Services that are created before you configure these account-level parameters continue to run. However, if you suspend a service whose workload type is disallowed, you can’t restart it.
- To delete all the previously created services of disallowed types, run the ALTER COMPUTE POOL … STOP ALL OF TYPE command.
Passing credentials to a container using Snowflake secrets
There are many reasons why you might want to pass Snowflake managed credentials into your container. For example, your service might communicate with external endpoints (outside Snowflake), in which case you will need to provide credential information in your container for your application code to use.
To provide credentials, first store them in Snowflake secret objects. Then, in the service specification, use containers.secrets to specify which secret objects to use and where to place them inside the container. You can either pass these credentials to environment variables in the containers, or make them available in local files in the containers.
Specifying Snowflake secrets
Specify a Snowflake secret by name or reference (reference is applicable only in the Native Application scenario):
-
Pass Snowflake secret by name: You can pass a secret name as the
snowflakeSecretfield value.Note that you can optionally specify
<secret-name>directly as thesnowflakeSecretvalue. -
Pass Snowflake secret by reference: When using Snowpark Container Services to create a Native App (an app with containers), the app producer and consumers use different Snowflake accounts. In some contexts an installed Snowflake Native App needs to access existing secret objects in the consumer account that exist outside the APPLICATION object. In this case, developers can use the “secrets by reference” specification syntax to handle credentials as shown:
Note that the specification uses
objectReferenceinstead ofobjectNameto provide a secret reference name.
Specifying secrets placement inside the container
You can tell Snowflake to either place the secrets in the containers as environment variables or write them into local container files.
Pass secrets as environment variables
To pass Snowflake secrets to containers as environment variables, include envVarName in the containers.secrets field.
The secretKeyRef value depends on the type of Snowflake secret. Possible values are the following:
usernameorpasswordif the Snowflake secret is of thepasswordtype.secret_stringif the Snowflake secret is of thegeneric_stringtype.
Note that Snowflake does not update secrets passed as environment variables after a service is created.
Example 1: Passing secrets of the password type as environment variables
In this example, you create the following Snowflake secret object of the password type:
To provide this Snowflake secret object to the environment variables (for example, LOGIN_USER and LOGIN_PASSWORD)
in your container, add the following containers.secrets field in the specification file:
In this example, the snowflakeSecret value is a fully qualified object name because secrets can be stored in a different schema than the service that is being created.
The containers.secrets field in this example is a list of two snowflakeSecret objects:
- The first object maps
usernamein the Snowflake secret object to theLOGIN_USERenvironment variable in your container. - The second object maps the
passwordin the Snowflake secret object to theLOGIN_PASSWORDenvironment variable in your container.
Example 2: Passing secrets of the generic_string type as environment variables
In this example, you create the following Snowflake secret object of the generic_string type:
To provide this Snowflake secret object to environment variables (for example, GENERIC_SECRET) in your container, you add the
following containers.secrets field in the specification file:
Write secrets in local container files
To make Snowflake secrets available to your application container in local container files, include a containers.secrets
field:
To make Snowflake secrets available to your application container in local container files, include directoryPath in the containers.secrets:
Snowflake populates necessary files for the secret in this specified directoryPath; specifying the secretKeyRef is not necessary. Depending on the secret type, Snowflake creates the following files in the container under the directory path you provided:
usernameandpasswordif the Snowflake secret is of thepasswordtype.secret_stringif the Snowflake secret is of thegeneric_stringtype.access_tokenif the Snowflake secret is of theoauth2type.
Note
After a service is created, if the Snowflake secret object is updated, Snowflake will update the corresponding secret files in the running containers.
Example 1: Passing secrets of the password type in local container files
In this example, you create the following Snowflake secret object of the password type:
To make these credentials available in local container files, add the following containers.secrets field in the
specification file:
When you start your service, Snowflake creates two files inside the container: /usr/local/creds/username and
/usr/local/creds/password. Your application code can then read these files.
Example 2: Passing secrets of the generic_string type in local container files
In this example, you create the following Snowflake secret object of the generic_string type:
To provide this Snowflake secret object in local container files, you add the
following containers.secrets field in the specification file:
When you start your service, Snowflake creates this file inside the containers: /usr/local/creds/secret_string.
Example 3: Passing secrets of the oauth2 type in local container files
In this example, you create the following Snowflake secret object of the oauth2 type:
To make these credentials available in local container files, add the following containers.secrets field in the
specification file:
Snowflake fetches the access token from the OAuth secret object and creates /usr/local/creds/access_token in the
containers.
When a service uses secrets of the oauth2 type, the service is expected to use that secret to access an internet destination. An oauth secret must be allowed by External Access Integration (EAI); otherwise CREATE SERVICE or EXECUTE JOB SERVICE will fail. This extra EAI requirement only applies to secrets of the oauth2 type and not to other types of secrets.
In summary, the typical steps in creating such a service are:
-
Create a secret of the oauth2 type (shown earlier).
-
Create an EAI to allow use of the secret by a service. For example:
-
Create a service that includes a
containers.secretsfield in the specification. That also specifies the optional EXTERNAL_ACCESS_INTEGRATIONS property to include an EAI to allow use of the oauth2 secret.An example CREATE SERVICE (with inline specification) command:
For more information about egress, see Configure service egress.
Guidelines and limitations
For more information, see Snowpark Container Services: Guidelines and limitations.