DOCUMENTATION
/
Getting Started
Guides
Developer
Reference
Releases
Tutorials
Snowflake Open Catalog
Status

Tutorial 3: Build a PDF chatbot with Cortex Search

GuidesSnowflake AI & MLCortex SearchTutorialsTutorial 3: Build a PDF chatbot

Tutorial 3: Build a PDF chatbot with Cortex Search

Introduction

This tutorial describes how to build a chatbot from a dataset of PDF documents using Cortex Search. In Tutorial 2, you learned how to build a chatbot from text data that was already extracted from its source. This tutorial walks through an example of extracting that text from the PDFs using a basic Python UDF, then ingesting the extracted data into a Cortex Search Service.

What you will learn

  • Extract text from a set of PDF files in a stage using a Python UDF.

  • Create a Cortex Search Service from the extracted text.

  • Create a Streamlit-in-Snowflake chat app that lets you ask questions about the data extracted from the PDF documents.

Prerequisites

The following prerequisites are required to complete this tutorial:

  • You have a Snowflake account and user with a role that grants the necessary privileges to create a database, tables, virtual warehouse objects, Cortex Search Services, and Streamlit apps.

Refer to the Snowflake in 20 minutes for instructions to meet these requirements.

Step 1: Setup

Get the PDF data

You will use a sample dataset of the Federal Open Market Committee (FOMC) meeting minutes for this tutorial. This is a sample of twelve 10-page documents with meeting notes from FOMC meetings from 2023 and 2024. Download the files directly from your browser by following this link:

  • FOMC minutes sample

The complete set of FOMC minutes can be found at the US Federal Reserve’s website.

Note

In a non-tutorial setting, you would bring your own data, possibly already in a Snowflake stage.

Create the database, tables, and warehouse

Execute the following statements to create a database and a virtual warehouse needed for this tutorial. After you complete the tutorial, you can drop these objects.

CREATE DATABASE IF NOT EXISTS cortex_search_tutorial_db;

CREATE OR REPLACE WAREHOUSE cortex_search_tutorial_wh WITH
     WAREHOUSE_SIZE='X-SMALL'
     AUTO_SUSPEND = 120
     AUTO_RESUME = TRUE
     INITIALLY_SUSPENDED=TRUE;

 USE WAREHOUSE cortex_search_tutorial_wh;
Copy

Note

  • The CREATE DATABASE statement creates a database. The database automatically includes a schema named PUBLIC.

  • The CREATE WAREHOUSE statement creates an initially suspended warehouse.

Step 2: Load the data into Snowflake

First create a Snowflake stage to store the files that contain the data. This stage will hold the meeting minutes PDF files.

CREATE OR REPLACE STAGE cortex_search_tutorial_db.public.fomc
    DIRECTORY = (ENABLE = TRUE)
    ENCRYPTION = (TYPE = 'SNOWFLAKE_SSE');
Copy

Note

The directory and encryption are configured for generating presigned_url for a file. If you don’t need to generate presigned_url, you can skip these configurations.

Now upload the dataset. You can upload the dataset in Snowsight or using SQL. To upload in Snowsight:

  1. Sign in to Snowsight.

  2. Select Data in the left-side navigation menu.

  3. Select your database cortex_search_tutorial_db.

  4. Select your schema public.

  5. Select Stages and select fomc.

  6. On the top right, Select the + Files button.

  7. Drag and drop files into the UI or select Browse to choose a file from the dialog window.

  8. Select Upload to upload your file.

Step 3: Parse PDF files

Create a preprocessing function to do the following:

  1. Parse the PDF files and extract the text.

  2. Chunk the text into smaller pieces for indexing.

CREATE OR REPLACE FUNCTION cortex_search_tutorial_db.public.pdf_text_chunker(file_url STRING)
    RETURNS TABLE (chunk VARCHAR)
    LANGUAGE PYTHON
    RUNTIME_VERSION = '3.9'
    HANDLER = 'pdf_text_chunker'
    PACKAGES = ('snowflake-snowpark-python', 'PyPDF2', 'langchain')
    AS
$$
from snowflake.snowpark.types import StringType, StructField, StructType
from langchain.text_splitter import RecursiveCharacterTextSplitter
from snowflake.snowpark.files import SnowflakeFile
import PyPDF2, io
import logging
import pandas as pd

class pdf_text_chunker:

    def read_pdf(self, file_url: str) -> str:
        logger = logging.getLogger("udf_logger")
        logger.info(f"Opening file {file_url}")

        with SnowflakeFile.open(file_url, 'rb') as f:
            buffer = io.BytesIO(f.readall())

        reader = PyPDF2.PdfReader(buffer)
        text = ""
        for page in reader.pages:
            try:
                text += page.extract_text().replace('\n', ' ').replace('\0', ' ')
            except:
                text = "Unable to Extract"
                logger.warn(f"Unable to extract from file {file_url}, page {page}")

        return text

    def process(self, file_url: str):
        text = self.read_pdf(file_url)

        text_splitter = RecursiveCharacterTextSplitter(
            chunk_size = 2000,  # Adjust this as needed
            chunk_overlap = 300,  # Overlap to keep chunks contextual
            length_function = len
        )

        chunks = text_splitter.split_text(text)
        df = pd.DataFrame(chunks, columns=['chunk'])

        yield from df.itertuples(index=False, name=None)
$$;
Copy

Then create a table to hold the parsed data from the PDF files.

CREATE OR REPLACE TABLE cortex_search_tutorial_db.public.docs_chunks_table AS
    SELECT
        relative_path,
        build_scoped_file_url(@cortex_search_tutorial_db.public.fomc, relative_path) AS file_url,
        -- preserve file title information by concatenating relative_path with the chunk
        CONCAT(relative_path, ': ', func.chunk) AS chunk,
        'English' AS language
    FROM
        directory(@cortex_search_tutorial_db.public.fomc),
        TABLE(cortex_search_tutorial_db.public.pdf_text_chunker(build_scoped_file_url(@cortex_search_tutorial_db.public.fomc, relative_path))) AS func;
Copy

Step 4: Create search service

Create a search service over your new table by running the following SQL command:

CREATE OR REPLACE CORTEX SEARCH SERVICE cortex_search_tutorial_db.public.fomc_meeting
    ON chunk
    ATTRIBUTES language
    WAREHOUSE = cortex_search_tutorial_wh
    TARGET_LAG = '1 hour'
    AS (
    SELECT
        chunk,
        relative_path,
        file_url,
        language
    FROM cortex_search_tutorial_db.public.docs_chunks_table
    );
Copy

This command specifies the attributes, which are the columns that you’ll be able to filter search results on, as well as the warehouse and target lag. The search column is designated as chunk, which is generated in the source query as a concatenation of several text columns in the base table. The other columns in the source query can be included in response to a search request.

Step 5: Create a Streamlit app

You can query the service with Python SDK (using the snowflake Python package). This tutorial demonstrates using the Python SDK in a Streamlit in Snowflake application.

First, ensure your global Snowsight UI role is the same as the role used to create the service in the service creation step.

  1. Sign in to Snowsight.

  2. Select Projects » Streamlit in the left-side navigation menu.

  3. Select + Streamlit App.

  4. Important: Select the cortex_search_tutorial_db database and the public schema for the app location.

  5. In the left pane of the Streamlit in Snowflake editor, select Packages and add snowflake (version >= 0.8.0) and snowflake-ml-python to install the required packages in your application.

  6. Replace the example application code with the following Streamlit app:

    import streamlit as st
    from snowflake.core import Root # requires snowflake>=0.8.0
    from snowflake.cortex import Complete
    from snowflake.snowpark.context import get_active_session
    
    """"
    The available models are subject to change. Check the model availability for the REST API:
    https://docs.snowflake.com/en/user-guide/snowflake-cortex/cortex-llm-rest-api#model-availability
    """"
    MODELS = [
        "mistral-large2",
        "llama3.1-70b",
        "llama3.1-8b",
    ]
    
    def init_messages():
        """
        Initialize the session state for chat messages. If the session state indicates that the
        conversation should be cleared or if the "messages" key is not in the session state,
        initialize it as an empty list.
        """
        if st.session_state.clear_conversation or "messages" not in st.session_state:
            st.session_state.messages = []
    
    
    def init_service_metadata():
        """
        Initialize the session state for cortex search service metadata. Query the available
        cortex search services from the Snowflake session and store their names and search
        columns in the session state.
        """
        if "service_metadata" not in st.session_state:
            services = session.sql("SHOW CORTEX SEARCH SERVICES;").collect()
            service_metadata = []
            if services:
                for s in services:
                    svc_name = s["name"]
                    svc_search_col = session.sql(
                        f"DESC CORTEX SEARCH SERVICE {svc_name};"
                    ).collect()[0]["search_column"]
                    service_metadata.append(
                        {"name": svc_name, "search_column": svc_search_col}
                    )
    
            st.session_state.service_metadata = service_metadata
    
    
    def init_config_options():
        """
        Initialize the configuration options in the Streamlit sidebar. Allow the user to select
        a cortex search service, clear the conversation, toggle debug mode, and toggle the use of
        chat history. Also provide advanced options to select a model, the number of context chunks,
        and the number of chat messages to use in the chat history.
        """
        st.sidebar.selectbox(
            "Select cortex search service:",
            [s["name"] for s in st.session_state.service_metadata],
            key="selected_cortex_search_service",
        )
    
        st.sidebar.button("Clear conversation", key="clear_conversation")
        st.sidebar.toggle("Debug", key="debug", value=False)
        st.sidebar.toggle("Use chat history", key="use_chat_history", value=True)
    
        with st.sidebar.expander("Advanced options"):
            st.selectbox("Select model:", MODELS, key="model_name")
            st.number_input(
                "Select number of context chunks",
                value=5,
                key="num_retrieved_chunks",
                min_value=1,
                max_value=10,
            )
            st.number_input(
                "Select number of messages to use in chat history",
                value=5,
                key="num_chat_messages",
                min_value=1,
                max_value=10,
            )
    
        st.sidebar.expander("Session State").write(st.session_state)
    
    
    def query_cortex_search_service(query, columns = [], filter={}):
        """
        Query the selected cortex search service with the given query and retrieve context documents.
        Display the retrieved context documents in the sidebar if debug mode is enabled. Return the
        context documents as a string.
    
        Args:
            query (str): The query to search the cortex search service with.
    
        Returns:
            str: The concatenated string of context documents.
        """
        db, schema = session.get_current_database(), session.get_current_schema()
    
        cortex_search_service = (
            root.databases[db]
            .schemas[schema]
            .cortex_search_services[st.session_state.selected_cortex_search_service]
        )
    
        context_documents = cortex_search_service.search(
            query, columns=columns, filter=filter, limit=st.session_state.num_retrieved_chunks
        )
        results = context_documents.results
    
        service_metadata = st.session_state.service_metadata
        search_col = [s["search_column"] for s in service_metadata
                        if s["name"] == st.session_state.selected_cortex_search_service][0].lower()
    
        context_str = ""
        for i, r in enumerate(results):
            context_str += f"Context document {i+1}: {r[search_col]} \n" + "\n"
    
        if st.session_state.debug:
            st.sidebar.text_area("Context documents", context_str, height=500)
    
        return context_str, results
    
    
    def get_chat_history():
        """
        Retrieve the chat history from the session state limited to the number of messages specified
        by the user in the sidebar options.
    
        Returns:
            list: The list of chat messages from the session state.
        """
        start_index = max(
            0, len(st.session_state.messages) - st.session_state.num_chat_messages
        )
        return st.session_state.messages[start_index : len(st.session_state.messages) - 1]
    
    
    def complete(model, prompt):
        """
        Generate a completion for the given prompt using the specified model.
    
        Args:
            model (str): The name of the model to use for completion.
            prompt (str): The prompt to generate a completion for.
    
        Returns:
            str: The generated completion.
        """
        return Complete(model, prompt).replace("$", "\$")
    
    
    def make_chat_history_summary(chat_history, question):
        """
        Generate a summary of the chat history combined with the current question to extend the query
        context. Use the language model to generate this summary.
    
        Args:
            chat_history (str): The chat history to include in the summary.
            question (str): The current user question to extend with the chat history.
    
        Returns:
            str: The generated summary of the chat history and question.
        """
        prompt = f"""
            [INST]
            Based on the chat history below and the question, generate a query that extend the question
            with the chat history provided. The query should be in natural language.
            Answer with only the query. Do not add any explanation.
    
            <chat_history>
            {chat_history}
            </chat_history>
            <question>
            {question}
            </question>
            [/INST]
        """
    
        summary = complete(st.session_state.model_name, prompt)
    
        if st.session_state.debug:
            st.sidebar.text_area(
                "Chat history summary", summary.replace("$", "\$"), height=150
            )
    
        return summary
    
    
    def create_prompt(user_question):
        """
        Create a prompt for the language model by combining the user question with context retrieved
        from the cortex search service and chat history (if enabled). Format the prompt according to
        the expected input format of the model.
    
        Args:
            user_question (str): The user's question to generate a prompt for.
    
        Returns:
            str: The generated prompt for the language model.
        """
        if st.session_state.use_chat_history:
            chat_history = get_chat_history()
            if chat_history != []:
                question_summary = make_chat_history_summary(chat_history, user_question)
                prompt_context, results = query_cortex_search_service(
                    question_summary,
                    columns=["chunk", "file_url", "relative_path"],
                    filter={"@and": [{"@eq": {"language": "English"}}]},
                )
            else:
                prompt_context, results = query_cortex_search_service(
                    user_question,
                    columns=["chunk", "file_url", "relative_path"],
                    filter={"@and": [{"@eq": {"language": "English"}}]},
                )
        else:
            prompt_context, results = query_cortex_search_service(
                user_question,
                columns=["chunk", "file_url", "relative_path"],
                filter={"@and": [{"@eq": {"language": "English"}}]},
            )
            chat_history = ""
    
        prompt = f"""
                [INST]
                You are a helpful AI chat assistant with RAG capabilities. When a user asks you a question,
                you will also be given context provided between <context> and </context> tags. Use that context
                with the user's chat history provided in the between <chat_history> and </chat_history> tags
                to provide a summary that addresses the user's question. Ensure the answer is coherent, concise,
                and directly relevant to the user's question.
    
                If the user asks a generic question which cannot be answered with the given context or chat_history,
                just say "I don't know the answer to that question.
    
                Don't saying things like "according to the provided context".
    
                <chat_history>
                {chat_history}
                </chat_history>
                <context>
                {prompt_context}
                </context>
                <question>
                {user_question}
                </question>
                [/INST]
                Answer:
                """
        return prompt, results
    
    
    def main():
        st.title(f":speech_balloon: Chatbot with Snowflake Cortex")
    
        init_service_metadata()
        init_config_options()
        init_messages()
    
        icons = {"assistant": "❄️", "user": "👤"}
    
        # Display chat messages from history on app rerun
        for message in st.session_state.messages:
            with st.chat_message(message["role"], avatar=icons[message["role"]]):
                st.markdown(message["content"])
    
        disable_chat = (
            "service_metadata" not in st.session_state
            or len(st.session_state.service_metadata) == 0
        )
        if question := st.chat_input("Ask a question...", disabled=disable_chat):
            # Add user message to chat history
            st.session_state.messages.append({"role": "user", "content": question})
            # Display user message in chat message container
            with st.chat_message("user", avatar=icons["user"]):
                st.markdown(question.replace("$", "\$"))
    
            # Display assistant response in chat message container
            with st.chat_message("assistant", avatar=icons["assistant"]):
                message_placeholder = st.empty()
                question = question.replace("'", "")
                prompt, results = create_prompt(question)
                with st.spinner("Thinking..."):
                    generated_response = complete(
                        st.session_state.model_name, prompt
                    )
                    # build references table for citation
                    markdown_table = "###### References \n\n| PDF Title | URL |\n|-------|-----|\n"
                    for ref in results:
                        markdown_table += f"| {ref['relative_path']} | [Link]({ref['file_url']}) |\n"
                    message_placeholder.markdown(generated_response + "\n\n" + markdown_table)
    
            st.session_state.messages.append(
                {"role": "assistant", "content": generated_response}
            )
    
    
    if __name__ == "__main__":
        session = get_active_session()
        root = Root(session)
        main()
    
    Copy

Step 6: Try out the app

In the right pane of the Streamlit in Snowflake editor window, you’ll see a preview of your Streamlit app. It should look similar to the following screenshot:

Chat with PDF files in Streamlit UI

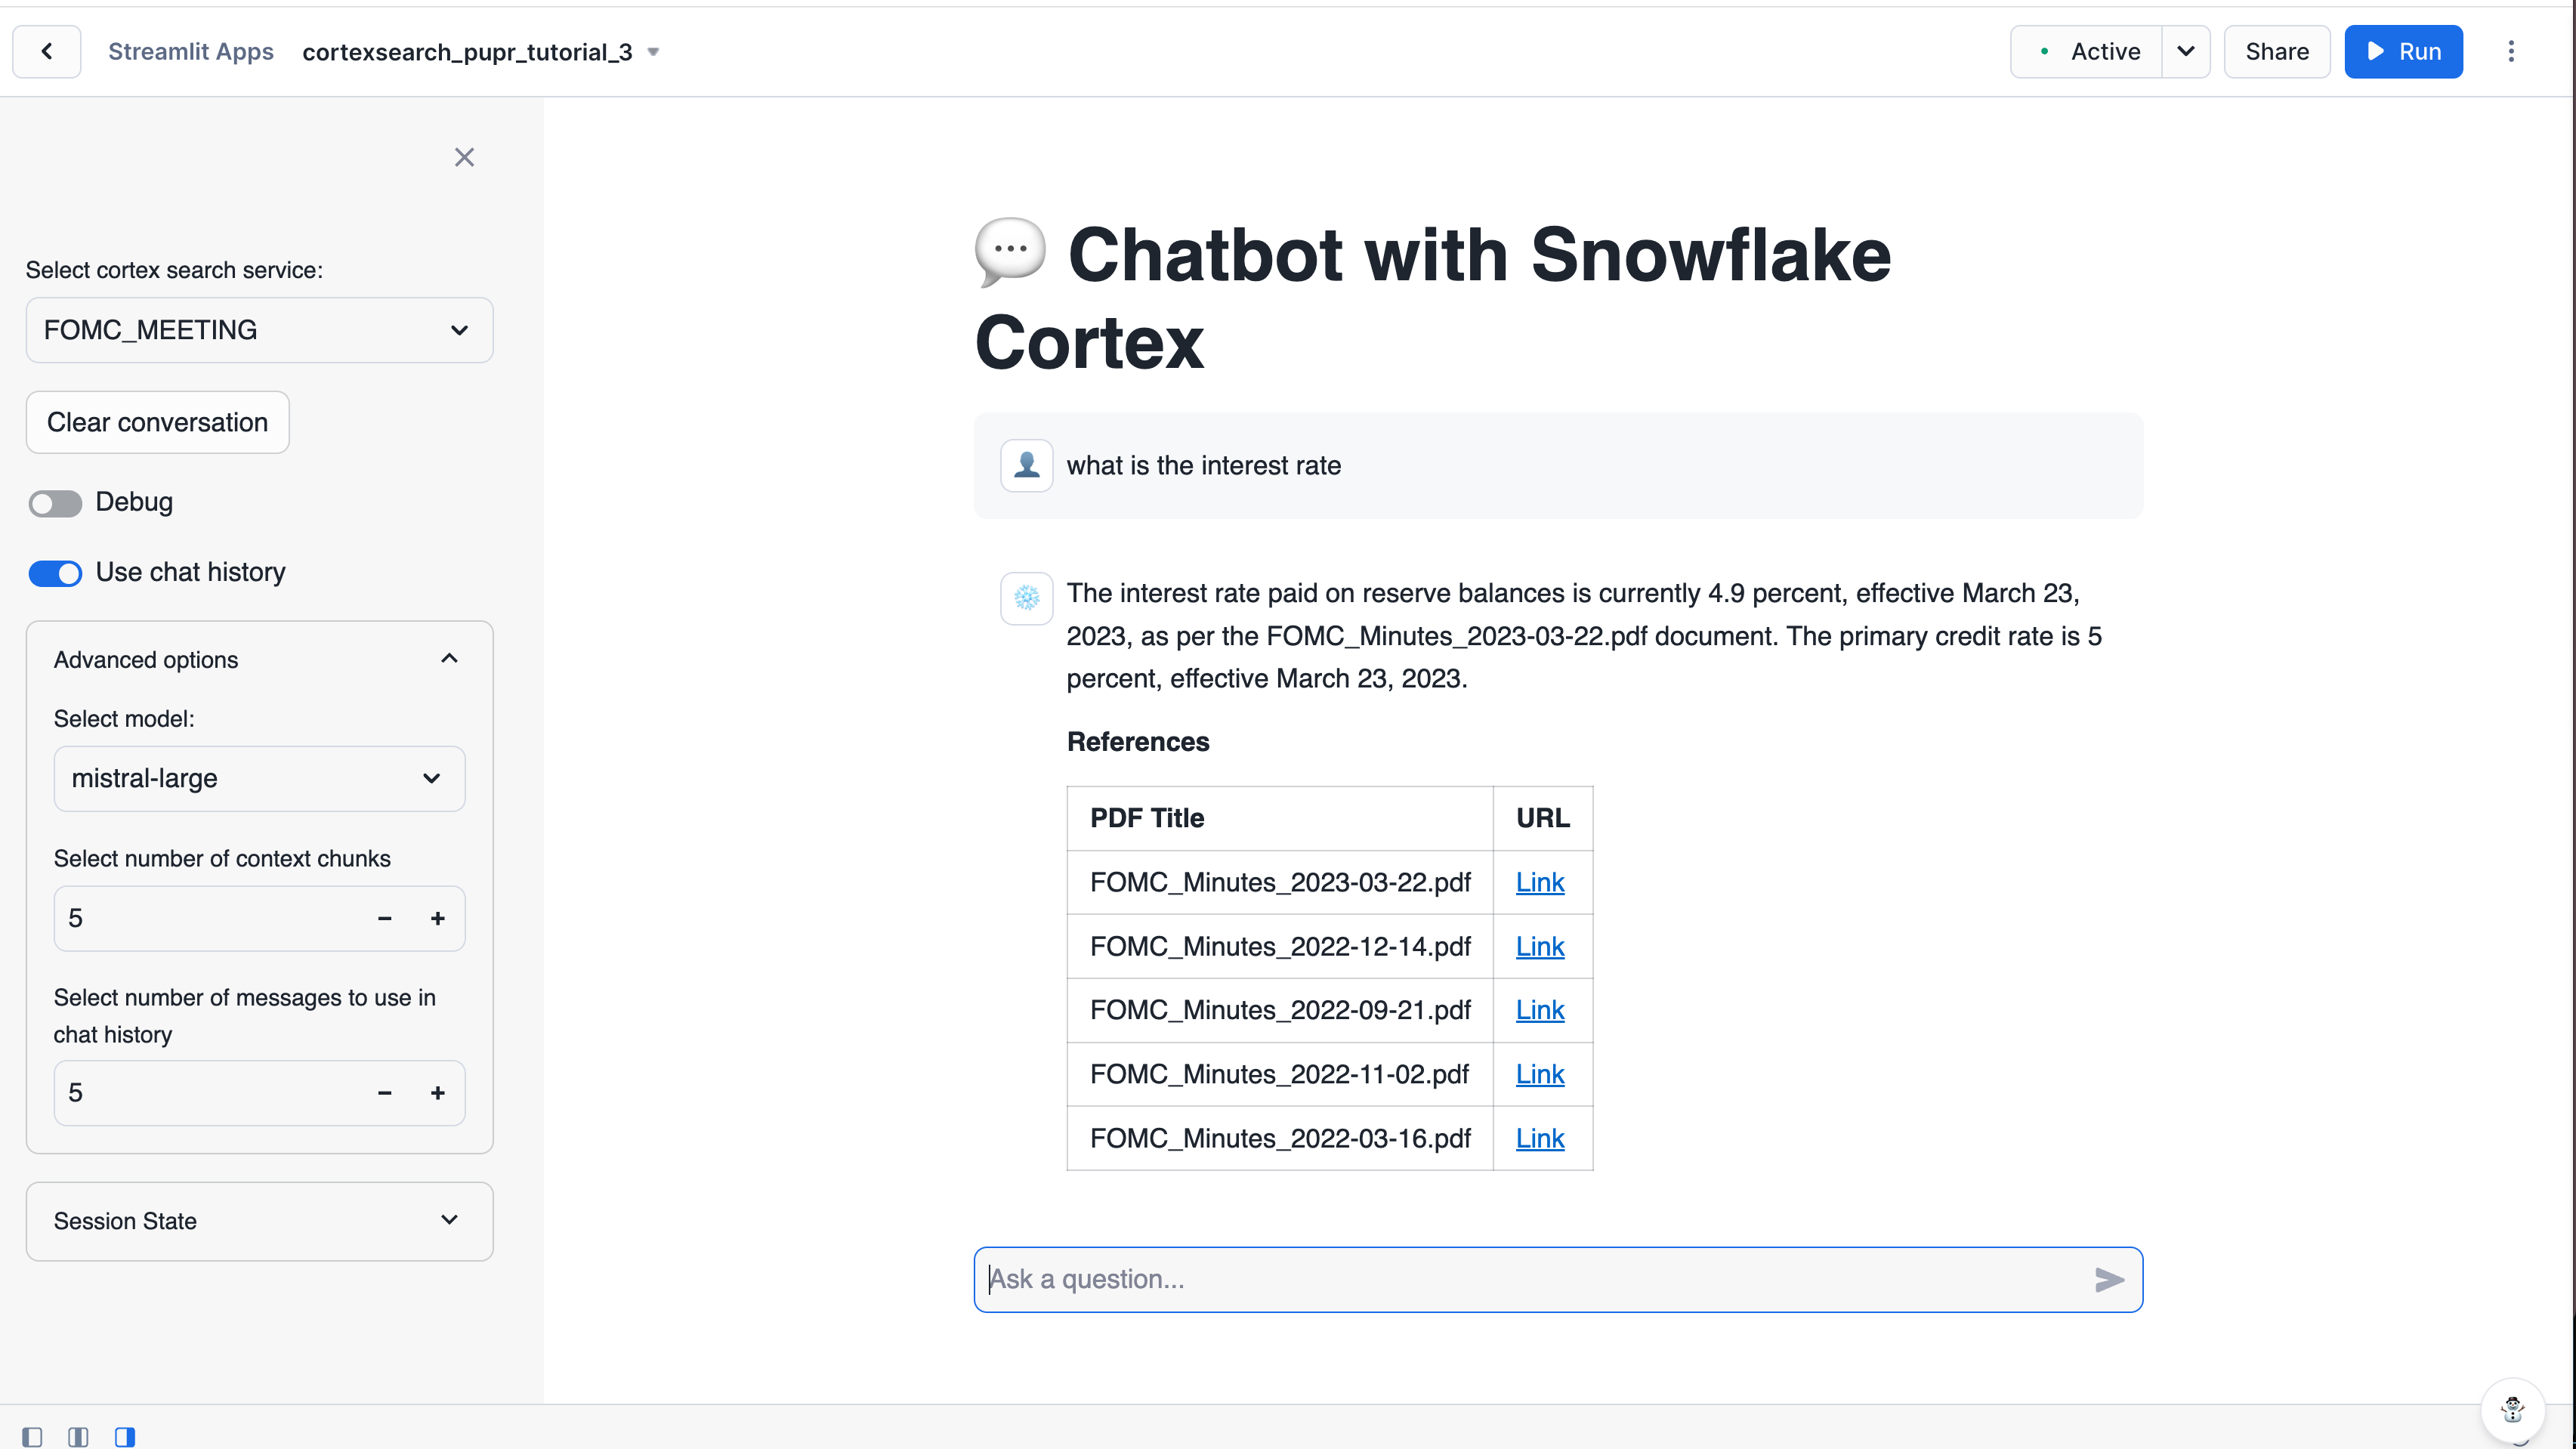
Enter a query in the text box to try out your new app. Some sample queries you can try are:

  • Example session 1: multi-turn question-answering
    • How was gpd growth in q4 23?

    • How was unemployment in the same quarter?

  • Example session 2: summarizing multiple documents
    • How has the fed's view of the market change over the course of 2024?

  • Example session 3: abstaining when the documents don’t contain the right answer
    • What was janet yellen's opinion about 2024 q1?

Step 7: Clean up

Clean up (optional)

Execute the following DROP <object> commands to return your system to its state before you began the tutorial:

DROP DATABASE IF EXISTS cortex_search_tutorial_db;
DROP WAREHOUSE IF EXISTS cortex_search_tutorial_wh;
Copy

Dropping the database automatically removes all child database objects such as tables.

Next steps

Congratulations! You have successfully built a search app from a set of PDF files in Snowflake.

Additional resources

You can continue learning using the following resources:

  • Cortex Search overview

  • Query a Cortex Search Service

Was this page helpful?

Visit Snowflake
Join the conversation
Develop with Snowflake
Share your feedback
Read the latest on our blog
Get your own certification
Privacy NoticeSite Terms© 2025 Snowflake, Inc. All Rights Reserved.
Language: English
  • English
  • Français
  • Deutsch
  • 日本語
  • 한국어
  • Português