Tutorial: Create your first Apache Iceberg™ table
Introduction
This tutorial covers how to create Apache Iceberg™ tables that use Snowflake as the catalog and support read and write operations. Iceberg tables for Snowflake combine the performance and query semantics of regular Snowflake tables with external cloud storage that you manage.
Complete this tutorial using a worksheet in Snowsight or using a Snowflake client such as SnowSQL. You can copy and paste the code examples, and then run them.
What you’ll learn
In this tutorial, you’ll learn how to do the following:
- Create and configure an external volume for Snowflake-managed Iceberg tables. For demonstration purposes, the tutorial creates an external volume for Amazon S3.
- Create two Iceberg tables that use Snowflake as the Iceberg catalog (Snowflake-managed tables).
- Insert data into the Iceberg tables.
- Query the Iceberg tables.
- Delete rows from an Iceberg table.
Prerequisites
Before you start, you should be familiar with the following:
- Snowflake object identifiers and their requirements.
- Apache Iceberg and Iceberg tables in Snowflake. For more information, see Apache Iceberg™ tables.
- Cloud object storage.
- If using S3, you should be familiar with AWS Identity and Access Management (IAM) and IAM policy elements.
You need:
-
A Snowflake user with a role that has the privileges to perform the following actions:
If using a 30-day trial account, you can log in as the user that was created for the account. This user has the role with the privileges needed to create the objects.
If you don’t have a user with the necessary permissions, ask someone who does to create one for you. Users with the ACCOUNTADMIN role can create new users and grant them the required privileges.
-
Administrator access for your cloud storage provider in order to configure an external volume.
-
A storage bucket (or container) with the same cloud provider, in the same region that hosts your Snowflake account.
Note
Snowflake can’t support external volumes with S3 bucket names that contain dots (for example,
my.s3.bucket). S3 doesn’t support SSL for virtual-hosted-style buckets with dots in the name, and Snowflake uses virtual-host-style paths and HTTPS to access data in S3. -
Access to the SNOWFLAKE_SAMPLE_DATA database in your account. Snowflake creates the sample database in new accounts by default. If the database has not been created in your account, see Use the sample database.
Set up a warehouse and database
Set up your environment by creating a warehouse and database for this tutorial.
Create an external volume
Before you can create an Apache Iceberg™ table for Snowflake, you must have an external volume. An external volume is an account-level Snowflake object that stores an identity and access management (IAM) entity for your external cloud storage.
Snowflake uses the external volume to securely connect to your cloud storage to access table data and metadata.
For demonstration purposes, this step covers how to create an external volume for Amazon S3. To create an external volume for a different cloud storage service, see the following topics:
Create an IAM policy that grants access to your S3 location
To configure access permissions for Snowflake in the AWS Management Console, do the following:
-
Log in to the AWS Management Console.
-
From the home dashboard, search for and select IAM.
-
From the left-hand navigation pane, select Account settings.
-
Under Security Token Service (STS) in the Endpoints list, find the Snowflake region where your account is located. If the STS status is inactive, move the toggle to Active.
-
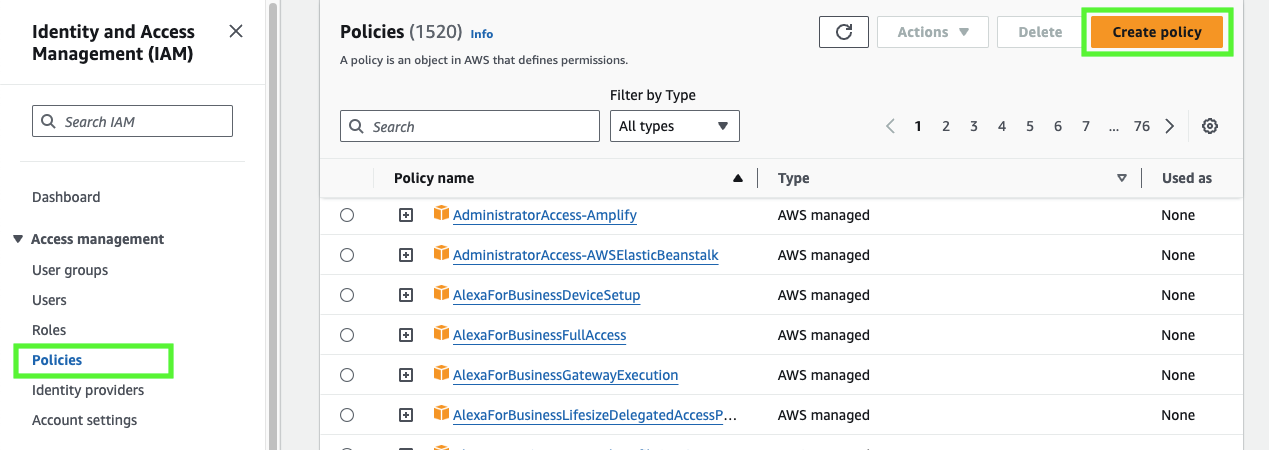
From the left-hand navigation pane, select Policies.
-
Select Create Policy.
-
For Policy editor, select JSON.
-
Add a policy to provide Snowflake with the required permissions to read and write data to your S3 location.
The following example policy grants access to all locations in the specified bucket.
Note
- Replace
my_bucketwith your actual bucket name. You can also specify a path in the bucket; for example,my_bucket/path. - Setting the
"s3:prefix":condition to["*"]grants access to all prefixes in the specified bucket; setting it to["path/*"]grants access to a specified path in the bucket. - For buckets in government regions, the bucket ARNs use the
arn:aws-us-gov:s3:::prefix. -
If you’re using an S3 access point, specify the access point ARN instead of a bucket ARN. For more information, see Configuring IAM policies for using access points.
- Replace
-
Select Next.
-
Enter a Policy name (for example,
snowflake_access) and an optional Description. -
Select Create policy.
Create an IAM role
Create an AWS IAM role to grant privileges on the S3 bucket containing your data files.
-
From the left-hand navigation pane in the Identity and Access Management (IAM) Dashboard, select Roles.
-
Select Create role.
-
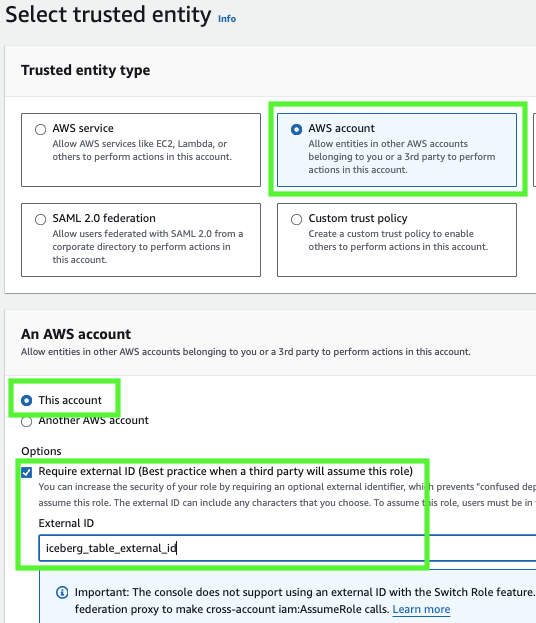
For the trusted entity type, select AWS account.
-
Under An AWS account, select This account. In a later step, you modify the trust relationship and grant access to Snowflake.
-
Select the Require external ID option. Enter an external ID of your choice. For example,
iceberg_table_external_id.An external ID is used to grant access to your AWS resources (such as S3 buckets) to a third party like Snowflake.
-
Select Next.
-
Select the policy that you created for the external volume, then select Next.
-
Enter a Role name and description for the role, then select Create role.
You have now created an IAM policy for an S3 location, created an IAM role, and attached the policy to the role.
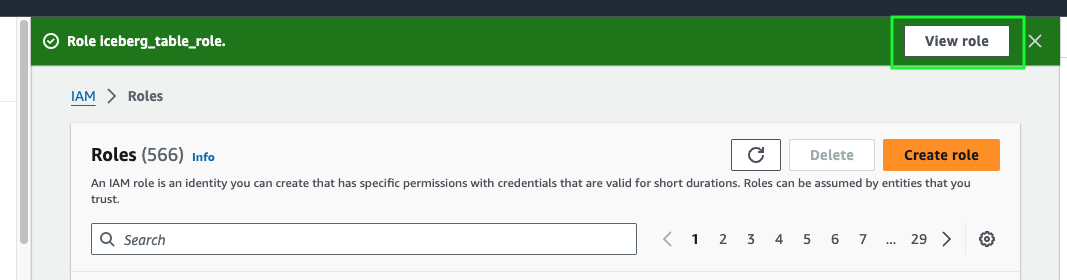
-
Select View role to view the role summary page. Locate and record the ARN (Amazon Resource Name) value for the role.
Create an external volume in Snowflake
Create an external volume using the CREATE EXTERNAL VOLUME command.
The following example creates an external volume named iceberg_external_volume
that defines a single Amazon S3 storage location with encryption.
The example specifies the
external ID (iceberg_table_external_id) associated with the IAM role that you created for the external volume.
Specifying an external ID lets you use the same IAM role (and external ID) across multiple external volumes.
Note
Specify ARNs exactly as provided by AWS. ARNs are case-sensitive.
Retrieve the AWS IAM user for your Snowflake account
-
Retrieve the ARN for the AWS IAM user that was created automatically for your Snowflake account using the DESCRIBE EXTERNAL VOLUME command. Specify the name of your external volume.
The following example describes an external volume named
iceberg_external_volume. -
Record the value for the
STORAGE_AWS_IAM_USER_ARNproperty, which is the AWS IAM user created for your Snowflake account; for example,arn:aws:iam::123456789001:user/abc1-b-self1234.Snowflake provisions a single IAM user for your entire Snowflake account. All S3 external volumes in your account use that IAM user.
Note
If you didn’t specify an external ID (
STORAGE_AWS_EXTERNAL_ID) when you created an external volume, Snowflake generates an ID for you to use. Record the value so that you can update your IAM role trust policy with the generated external ID.
Grant the IAM user permissions to access bucket objects
In this step, you configure permissions that allow the IAM user for your Snowflake account to access objects in your S3 bucket.
-
Log in to the AWS Management Console.
-
From the home dashboard, search for and select IAM.
-
From the left-hand navigation pane, select Roles.
-
Select the IAM role that you created for your external volume.
-
Select the Trust relationships tab.
-
Select Edit trust policy.
-
Modify the policy document with the DESC EXTERNAL VOLUME output values that you recorded.
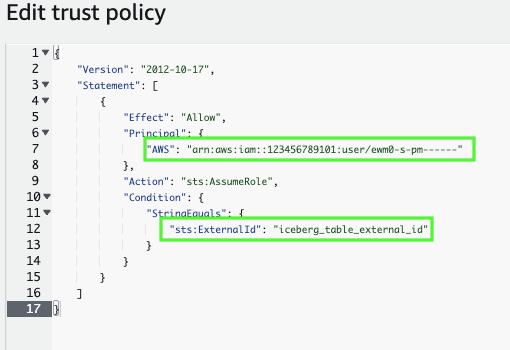
Policy document for IAM role
Where:
snowflake_user_arnis the STORAGE_AWS_IAM_USER_ARN value you recorded.iceberg_table_external_idis your external ID. If you already specified an external ID when you created the role, and used the same ID to create your external volume, leave the value as-is. Otherwise, updatests:ExternalIdwith the value that you recorded.
Note
You must update this policy document if you create a new external volume (or recreate an existing external volume using the CREATE OR REPLACE EXTERNAL VOLUME syntax) and don’t provide your own external ID. For security reasons, a new or recreated external volume has a different external ID and cannot resolve the trust relationship unless you update this trust policy.
-
Select Update policy to save your changes.
Create a table
In this step, you’ll create two Apache Iceberg™ tables: one with the standard CREATE ICEBERG TABLE syntax, and another with the CREATE ICEBERG TABLE … AS SELECT variant. Both tables use the external volume configured in the previous step.
You’ll also learn how to set the Iceberg catalog and external volume at the database level.
Create a table using the standard syntax
First, create an Iceberg table using the standard CREATE ICEBERG TABLE syntax.
Specify CATALOG = 'SNOWFLAKE' so that the table uses Snowflake as the
Iceberg catalog.
To tell Snowflake where to write table data and metadata, specify a value for the BASE_LOCATION parameter.
The example sets the table name (customer_iceberg) as the BASE_LOCATION. This way,
Snowflake writes data and metadata under a directory that includes the table name in your external volume
location.
Later in the tutorial, you load data into this table from the snowflake_sample_data.tpch_sf1.customer table
in the SNOWFLAKE_SAMPLE_DATA database. The column definitions in the CREATE ICEBERG TABLE statement match the sample table.
Note
If you check your cloud storage location, you should now see a directory named metadata/ that Snowflake wrote during table
creation under your BASE_LOCATION. The directory stores the metadata files for your table.
Set the catalog integration and external volume for the database
Next, set the CATALOG and EXTERNAL_VOLUME parameters for the iceberg_tutorial_db that you created in this tutorial.
Setting the parameters tells Snowflake to use the specific catalog and external volume that you choose for all Iceberg tables created after the change.
To verify, check the parameters for the current database (iceberg_tutorial_db):
Create a table using CTAS
Finally, create a second Iceberg table called nation_iceberg using the CREATE ICEBERG TABLE … AS SELECT syntax.
We’ll base the new table on the snowflake_sample_data.tpch_sf1.nation table in the
Snowflake sample database.
Note
Since you just set the CATALOG and EXTERNAL_VOLUME parameters for the iceberg_tutorial_db database,
you can omit both parameters from the CREATE ICEBERG TABLE statement.
The nation_iceberg table will inherit the values from the database.
Load data and query the tables
In this step, you start by loading data from the Snowflake sample database
into the customer_iceberg table using INSERT INTO <table>:
Note
If you check your cloud storage location, you should now see a directory that contains your table data files.
Now that there’s data in the table, you can query the table.
The following query joins the customer_iceberg table with the nation_iceberg table (which already contains data).
Output:
Delete rows
In this step, you use a DELETE statement to remove specific rows from the
customer_iceberg table.
Start by querying the first 10 rows of the table and notice that four rows belong to the AUTOMOBILE market segment:
Output:
Next, let’s use a DELETE statement to remove all of the rows from the table where the market segment is AUTOMOBILE:
Output:
Finally, you can double-check that the rows are gone:
Output:
Congratulations!
You’ve just written to, read from, and modified your first Snowflake-managed Iceberg tables. You’ve also learned how to configure an external volume for Iceberg table storage and set the Iceberg catalog and external volume for all Iceberg tables in a database.
Clean up
To delete all of the objects created for this tutorial, run the following DROP statements.
Replace the following values:
my_other_databasewith the name of a database to use so that you can drop the one created for this tutorial.my_other_warehousewith the name of the external volume that you created.
Summary and additional resources
In this tutorial, you followed an end-to-end workflow for creating and using Snowflake-managed Apache Iceberg™ tables.
Along the way, you completed the following tasks:
-
Created an external volume for Iceberg tables. For more information about external volumes and Iceberg table storage, see Configure an external volume.
-
Created a Snowflake-managed Iceberg table using sample data from the Snowflake sample database. For related information, see the following topics:
- Catalog options.
- For more information about loading data into tables, see Load data into Apache Iceberg™ tables and Load data into Snowflake.
-
Set the Iceberg catalog and external volume for a database. For more information about setting these parameters, see the following topics:
-
Loaded data into, queried, and deleted rows from Iceberg tables. For more information about managing an Iceberg table and its data, see Load data into Apache Iceberg™ tables and Manage Apache Iceberg™ tables.
To learn more about Iceberg tables for Snowflake, see the Iceberg tables documentation. For additional Iceberg tutorials and quickstarts, see the Snowflake tutorials page.