Load and query sample data using SQL
Introduction
This tutorial uses a fictitious food truck brand named Tasty Bytes to show you how to load and query data in Snowflake using SQL. You can access a pre-loaded Snowsight template worksheet to complete these tasks.
The following illustration provides an overview of Tasty Bytes.

Note
Snowflake bills a minimal amount for the on-disk storage used for any sample data in this tutorial. The tutorial provides steps to drop objects and minimize storage cost. Snowflake requires a virtual warehouse to load the data and execute queries. A running virtual warehouse consumes Snowflake credits.
If you are using a 30-day trial account, which provides free credits, you won’t incur any costs.
What you will learn
In this tutorial you will learn how to:
- Use a role to get access to functionality from granted privileges.
- Use a warehouse to access resources.
- Create a database and schema.
- Create a table.
- Load data into the table.
- Query the data in the table.
Prerequisites
This tutorial assumes the following:
-
You have a supported browser.
-
You have access to a Snowflake account and can log in as a user.
If you don’t have an account, you can sign up for a free trial and choose any Snowflake Cloud Region.
Step 1. Sign in using Snowsight
To access Snowsight over the public Internet, do the following:
- In a supported web browser, navigate to https://app.snowflake.com.
- Provide your account identifier or account URL. If you’ve previously signed in to Snowsight, you might see an account name that you can select.
- Sign in using your Snowflake account credentials.
Step 2. Open the SQL worksheet for loading and querying sample data
You can use worksheets to write and run SQL commands on your Snowflake database. You can access a pre-loaded template worksheet for this tutorial. The worksheet has the SQL commands that you will run to use a database, load data into it, and query the data. For more information about worksheets, see Getting started with worksheets.
To open the pre-loaded template worksheet, follow these steps:
-
In the navigation menu, select Projects » Templates.
-
Find and open Load sample data from Amazon AWS S3 with SQL.
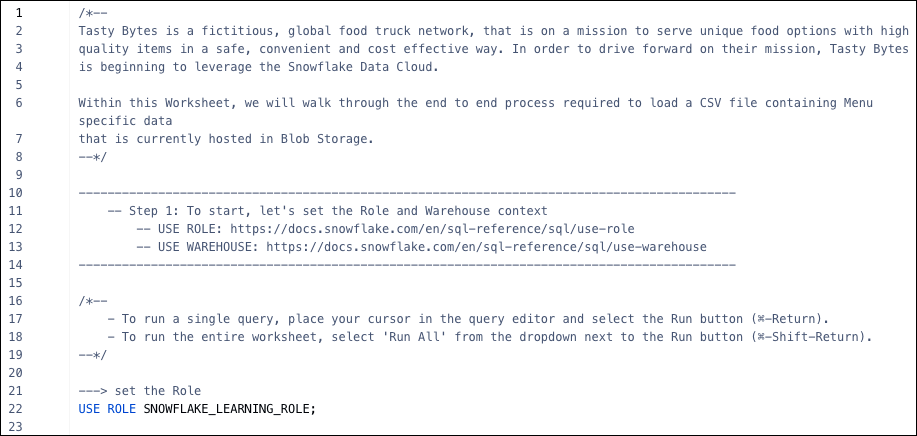
The beginning of your worksheet looks similar to the following image:
Step 3. Set the role and warehouse to use
The role you use determines the privileges you have. In this tutorial, use the SNOWFLAKE_LEARNING_ROLE role so that you can view and manage objects in your account. For more information, see Snowsight templates.
A warehouse provides the required resources to create and manage objects and run
SQL commands. These resources include CPU, memory, and temporary storage. You have
access to the SNOWFLAKE_LEARNING_WH virtual warehouse that you can use for this
tutorial. For more information, see Virtual warehouses.
To set the role and warehouse to use, do the following:
-
In the open worksheet, place your cursor in the USE ROLE line.
-
At the top of the worksheet, select Run.
Note
In this tutorial, run SQL statements one at a time. Don’t select Run All.
-
Place your cursor in the USE WAREHOUSE line, then select Run.
Step 4. Use a database, schema, and table
A database stores data in tables that you can manage and query. A schema is a logical grouping of database objects, such as tables and views. For example, a schema might contain the database objects required for a specific application. For more information, see Databases, Tables and Views - Overview.
In this tutorial, you use the database SNOWFLAKE_LEARNING_DB, a
schema that concatenates your username with _LOAD_SAMPLE_DATA_FROM_S3, and a table
that you create named menu.
To use this database, schema, and table, do the following:
-
In the open worksheet, place your cursor in the USE DATABASE line, then select Run.
-
Place your cursor in the SET line, then select Run.
-
Place your cursor in the USE SCHEMA IDENTIFIER line, then select Run.
-
Place your cursor in the CREATE TABLE lines, then select Run.
-
To confirm that the table was created successfully, place your cursor in the SELECT line, then select Run.
Your output shows the columns of the table you created. At this point in the tutorial, the table doesn’t have any rows.
Step 5. Create a stage and load the data
A stage is a location that holds data files to load into a Snowflake database. This tutorial creates a stage that loads data from an Amazon S3 bucket. This tutorial uses an existing bucket with a CSV file that contains the data. You load the data from this CSV file into the table you created previously. For more information, see Bulk loading from Amazon S3.
To create a stage, do the following:
-
In the open worksheet, place your cursor in the CREATE STAGE lines, then select Run.
-
To confirm that the stage was created successfully, place your cursor in the LIST line, then select Run.
Your output looks similar to the following image:

-
To load the data into the table, place your cursor in the COPY INTO lines, then select Run.
Step 6. Query the data
Now that the data is loaded, you can run queries on the menu table.
To run a query in the open worksheet, select the line or lines of the SELECT command, and then select Run.
For example, to return the number of rows in the table, run the following query:
Your output looks similar to the following image:

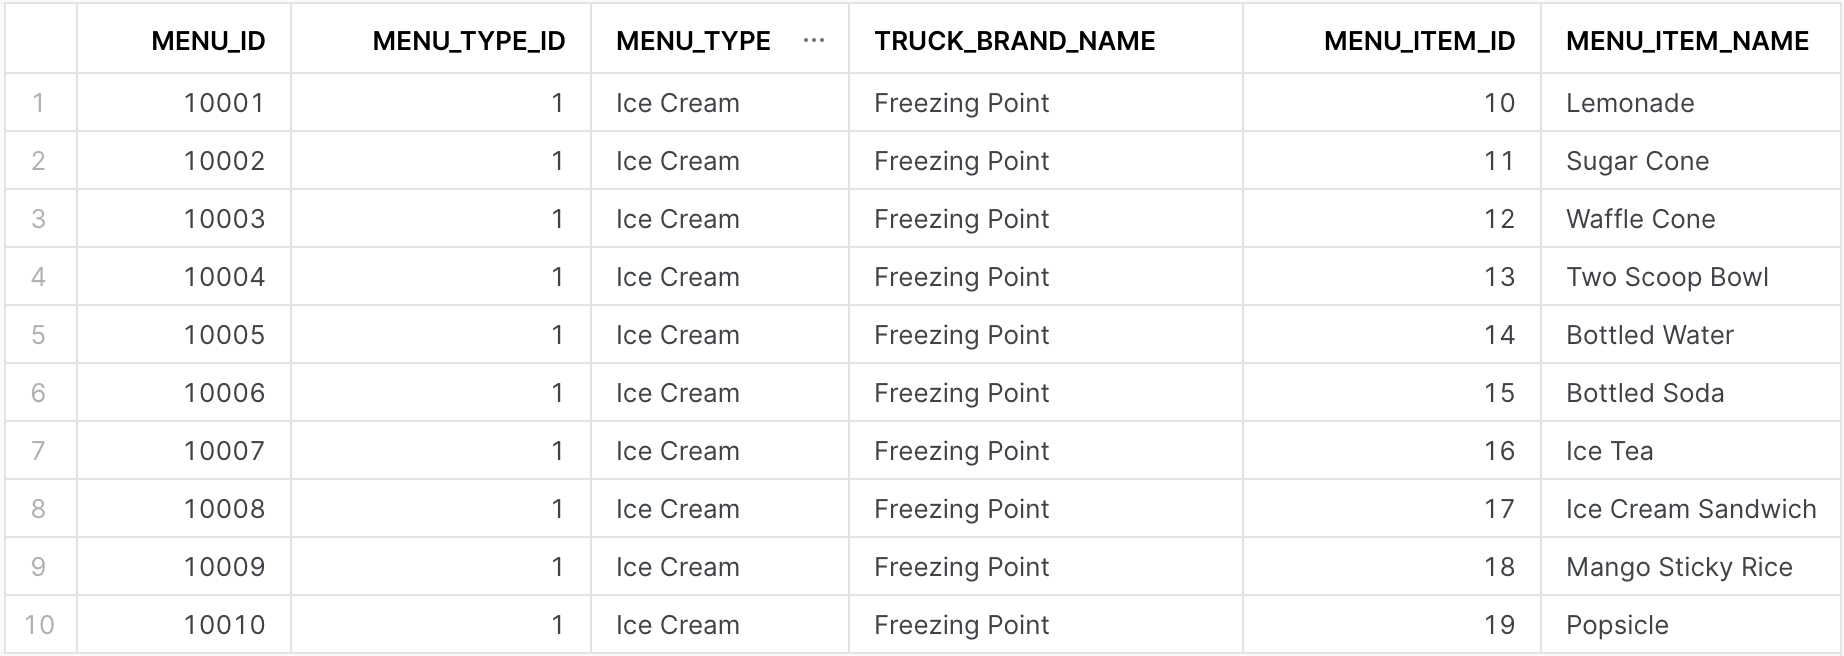
Run this query to return the top ten rows in the table:
Your output looks similar to the following image:
For more information about running a query that returns the specified number of rows, see TOP <n>.
You can run other queries in the worksheet to explore the data in the menu table.
Step 7. Clean up, summary, and additional resources
Congratulations! You have successfully completed this tutorial for trial accounts.
Take a few minutes to review a short summary and the key points covered in this tutorial. Consider cleaning up by dropping any objects you created in this tutorial. Learn more by reviewing other topics in the Snowflake Documentation.
If the objects you created in this tutorial are no longer needed, you can remove them from the system with DROP <object> commands. To remove the table you created, run the following command:
Summary and key points
In summary, you used a pre-loaded template worksheet in Snowsight to complete the following steps:
- Set the role and warehouse context.
- Use a database, schema, and table.
- Create a stage and load the data from the stage into the database.
- Query the data.
Here are some key points to remember about loading and querying data:
- You need the required permissions to create and manage objects in your account. In this tutorial, you use the SNOWFLAKE_LEARNING_ROLE role, which is provided with the template environment.
- You need a warehouse for the resources required to create and manage objects and run SQL commands.
This tutorial uses the
SNOWFLAKE_LEARNING_WHwarehouse included with the template environment. - You used a database to store the data and a schema to group the database objects logically.
- You created a stage to load data from a CSV file.
- After the data was loaded into your database, you queried it using SELECT statements.
What’s next?
Continue learning about Snowflake using the following resources:
-
Complete the other tutorials provided by Snowflake:
-
Familiarize yourself with key Snowflake concepts and features, and the SQL commands used to perform queries and insert/update data:
-
Try the Tasty Bytes Quickstarts provided by Snowflake: