Getting started with hybrid tables
Introduction
A hybrid table is a Snowflake table type that is optimized for hybrid transactional and analytic workloads. These workloads require low latency and high throughput on small but random reads and writes, which often access a single row in a table. Hybrid tables enforce unique and referential integrity constraints, which are critical for transactional workloads.
You can use a hybrid table along with other Snowflake tables and features to power Unistore workloads, which unite transactional and analytic data in a single platform.
Hybrid tables are integrated seamlessly into the existing Snowflake architecture. Customers connect to the same Snowflake database service. Queries are compiled and optimized in the cloud services layer and executed in the same query engine in virtual warehouses. This architecture provides several key benefits:
- Snowflake platform features, such as data governance, work with hybrid tables out of the box.
- You can run hybrid workloads that mix operational and analytic queries.
- You can join hybrid tables with other Snowflake tables, and the query executes natively and efficiently in the same query engine. No federation is required.
- You can execute an atomic transaction across hybrid tables and other Snowflake tables. There is no need to orchestrate your own two-phase commit.
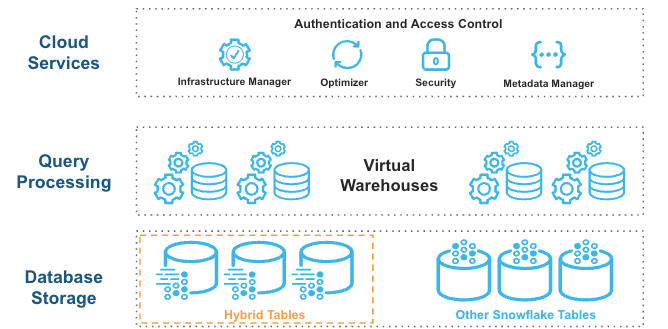
Hybrid tables leverage a row store as the primary data store to provide excellent operational query performance. When you write to a hybrid table, the data is written directly into the row store. Data is asynchronously copied into object storage in order to provide better performance and workload isolation for large scans without affecting ongoing operational workloads. Some data may also be cached in columnar format on your warehouse in order to provide better performance on analytical queries. You simply execute SQL statements against the logical hybrid table, and the query optimizer decides where to read data from to provide the best performance. You get one consistent view of your data without worrying about the underlying infrastructure.
What you will learn
In this tutorial you will learn how to:
- Create and bulk load hybrid tables.
- Create and check the enforcement of UNIQUE, PRIMARY KEY, and FOREIGN KEY constraints.
- Run concurrent updates that depend on row-level locks.
- Run a multi-statement operation in a consistent atomic transaction (across hybrid and standard tables).
- Query hybrid tables and join them to standard tables.
- Verify that security and governance principles apply to both hybrid and standard tables.
Prerequisites
This tutorial assumes that you are:
- Familiar with the Snowsight interface
- Familiar with SQL
- Using a non-trial Snowflake account in select AWS regions
- Able to run as a user who has been granted the ACCOUNTADMIN role
- Aware of unsupported features and limitations on hybrid tables
Step 1. Set up your account
To get started, set up your Snowflake account by creating a new worksheet, a role, database objects, and a virtual warehouse. Then you will be able to create two hybrid tables and one standard table. Follow these steps:
-
Under Worksheets, click the + button in the top-right corner of Snowsight and select SQL Worksheet.
-
Rename the worksheet by selecting its auto-generated timestamp name and typing
Hybrid Tables - QuickStart. -
Complete the following steps by copying the block of SQL commands into your worksheet and running them all.
- Use the ACCOUNTADMIN role to create the
hybrid_quickstart_rolecustom role, then grant this role to the current user. - Create the
hybrid_quickstart_whwarehouse and thehybrid_quickstart_dbdatabase. Grant ownership on these objects to the new role. - Use the new role to create the
dataschema. - Use the new warehouse. (The database and schema you created are already in use, by default.)
- Use the ACCOUNTADMIN role to create the
Step 2. Create and bulk load three tables
This tutorial uses the Tasty Bytes Snowflake fictional food truck business to simulate a use case where you can serve data to an application.
You will create three tables:
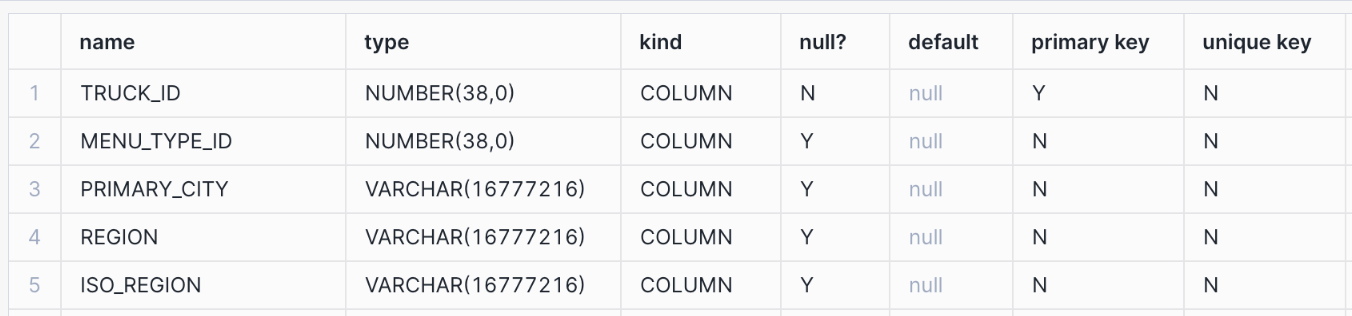
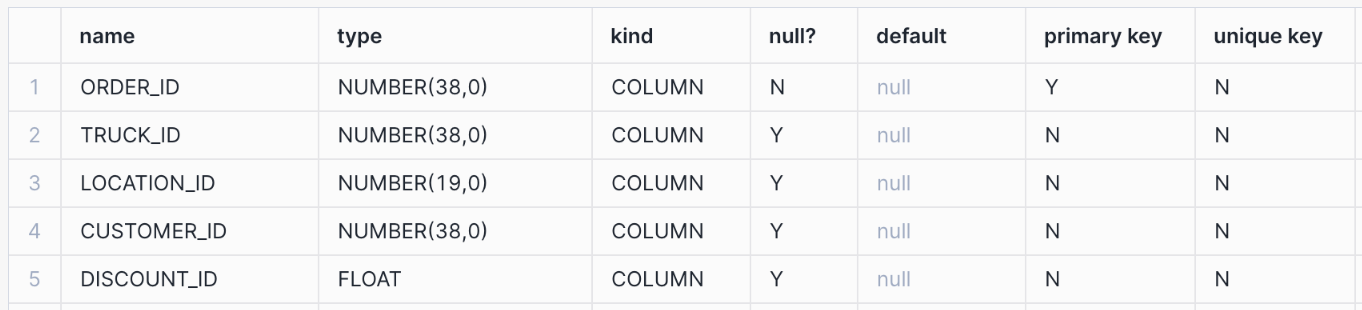
order_headerhybrid table - This table stores order metadata such astruck_id,customer_id,order_amount, and so on.truckhybrid table - This table stores truck metadata such astruck_id,franchise_id,menu_type_id, and so on.truck_historystandard table - This table stores historical information about food trucks, enabling you to track changes over time.
You are creating hybrid and standard tables to demonstrate how well they work together. Nonetheless, hybrid tables have some fundamental differences in their definition and behavior:
- Hybrid tables require a primary key on one or more columns (which implies the creation of a primary key index).
- Hybrid tables allow the creation of secondary indexes on any column.
- PRIMARY KEY, FOREIGN KEY, and UNIQUE constraints are all enforced on hybrid tables.
- Locks on hybrid tables are row-level, not table-level.
- Hybrid table data resides in a row store, but is also copied to columnar object storage.
These differences result in:
- Support for referential integrity when table data is loaded, updated, or deleted.
- Faster DML operations (especially those that update single rows).
- Faster lookup queries.
You can bulk load data into hybrid tables by copying data from a stage or from other tables (that is, by using CTAS, COPY INTO <table>, or INSERT INTO … SELECT). This tutorial uses the CTAS command. For more information about bulk loading hybrid tables, see Loading data.
Create a file format, which describes a staged data set that you can access or load into Snowflake tables, and a stage, which is a Snowflake object that points to a cloud storage location that Snowflake can access to both ingest and query data. The data is stored in a publicly accessible AWS S3 bucket that you reference when you create the stage.
Now use the LIST statement to return all the files in the FROSTBYTE_TASTY_BYTES_STAGE:
The statement should return two records: one for the TRUCK.csv file and one for the ORDER_HEADER.csv file.

After you have created the stage, which points to the location of the data in cloud storage, you can create and load the data into the
truck by using a CTAS command that selects data from the TRUCK.csv file.
Note the PRIMARY KEY constraint on the truck_id column.
The second DDL statement creates a standard table named truck_history, also by using a CTAS statement.
The following DDL statement creates the structure for the order_header hybrid table.
Note the PRIMARY KEY constraint on the order_id column, the FOREIGN KEY constraint on the
truck_id column from the truck table, and the secondary index on the order_ts column.
The following DML statement inserts data into the order_header table, using an INSERT INTO … SELECT statement.
Step 3. Explore your data
Earlier you created the hybrid_quickstart_role role, hybrid_quickstart_wh warehouse, hybrid_quickstart_db database,
and data schema. Continue to use those objects.
You also created and loaded the truck, truck_history, and order_header tables. Now you can run a few queries and become familiar with both the data in these tables and their metadata.
Use the SHOW TABLES command to view properties and metadata for both standard tables and hybrid tables. Use the SHOW HYBRID TABLES command to view information about hybrid tables only.


Display information about the columns in the table by using DESCRIBE <object> commands. Note the columns with PRIMARY KEY and UNIQUE constraints.
List the hybrid tables for which you have access privileges.

List all the indexes for which you have access privileges. Note the value in the
is_unique column for each index.

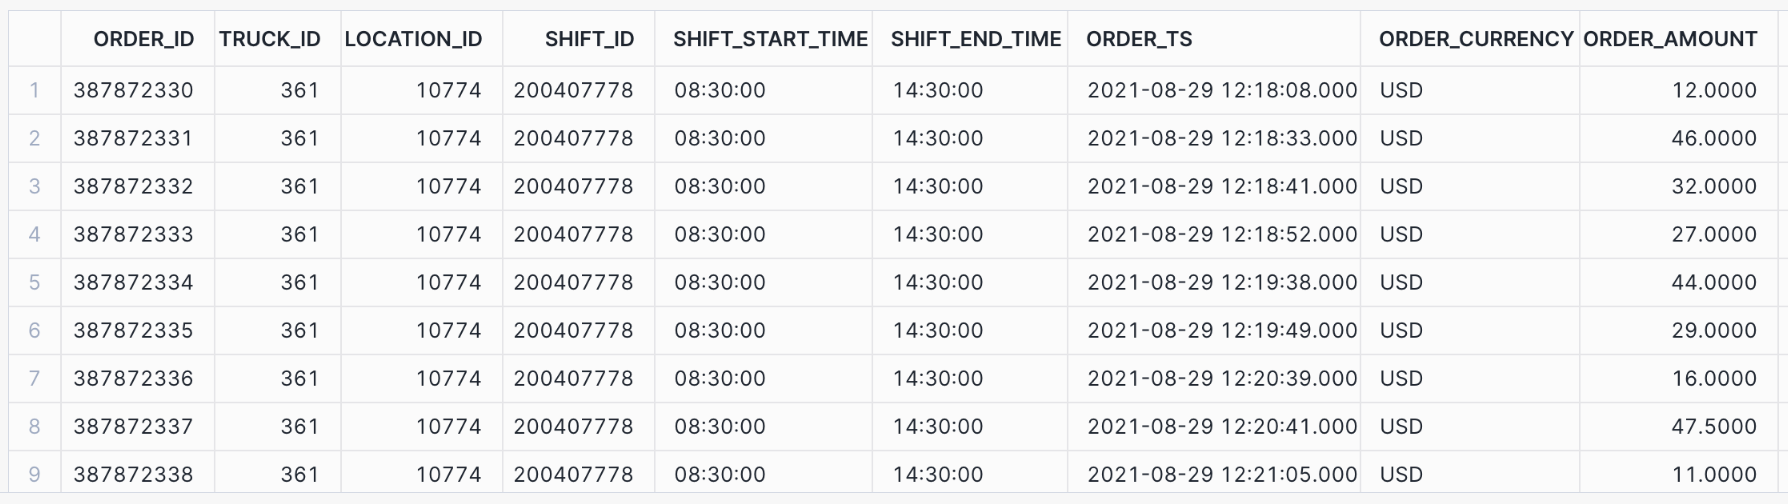
Look at sample data from the tables by running these simple queries.
The output for the first query looks similar to the following:

Step 4. Test the behavior of UNIQUE and FOREIGN KEY constraints
In this step, you will test UNIQUE and FOREIGN KEY constraints. These constraints are enforced when they are defined on hybrid tables.
UNIQUE constraints preserve data integrity by preventing duplicate values from being inserted into a
column. FOREIGN KEY constraints work in tandem with PRIMARY KEY constraints to preserve referential integrity. A value
cannot be inserted into a primary key column if no matching foreign key value exists in the referenced table.
For example, a sale of a product with ID 100 cannot be recorded in a sales fact table if no such product ID
already exists in a referenced product dimension table.
Both types of constraints support data accuracy and consistency for applications that rely heavily on reliable but fast transaction processing.
Step 4.1. Test a UNIQUE constraint
A UNIQUE constraint ensures that all values in a column are different. In the truck table, you
defined the truck_email column as NOT NULL and UNIQUE.
Given the UNIQUE constraint, if you attempt to insert two records with the same email address, the statement will fail. To test this behavior, run the following commands.
Start by selecting an existing email address and setting a variable truck_email to that string. Then select the
maximum value of truck_id from the table and set another variable max_truck_id to that value. Next, set a third
variable, new_truck_id that increments max_truck_id by 1. This process ensures that you do not run into a
“Primary key already exists” error when you insert a new row.
Finally, insert the new row.
The INSERT statement fails and you receive the following error message:
Now create a new unique email address and insert a new record into the truck table:
The INSERT statement should run successfully this time.
Step 4.2. Test a FOREIGN KEY constraint
In this step you will test a FOREIGN KEY constraint.
First, show the DDL that you used to create the order_header table by executing the
GET_DDL function. Note the FOREIGN KEY constraint for the truck_id column in the output.
The output of this command looks similar to the following partial result:

Now try to insert a new record into the order_header table, using a non-existent truck ID.
The INSERT statement should fail because it violates the FOREIGN KEY constraint on the truck table. You should receive
the following error message:
Now use the new new_truck_id variable that you used earlier and insert a new record into the order_header table:
The INSERT statement should run successfully this time.
Step 4.3. Attempt to truncate a table referenced by a FOREIGN KEY constraint
Next, you can verify that a table referenced by a FOREIGN KEY constraint cannot be truncated as long as the foreign-key relationship exists. Run the following TRUNCATE TABLE statement:
The statement should fail, and you should receive the following error message:
Step 4.4. Delete a row referenced by a FOREIGN KEY constraint
Next, you can verify that a record referenced by a FOREIGN KEY constraint cannot be deleted as long as the foreign-key relationship exists. Run the following DELETE statement.
The statement should fail, and you should receive the following error message:
To delete a record referenced by a FOREIGN KEY constraint, you must first delete the corresponding record from the
order_header table. Then you can delete the referenced record from the truck table. Run the following DELETE
statements:
Both statements should run successfully.
Step 5. Use row-level locking to run concurrent updates
Unlike standard tables, which use partition or table-level locking, hybrid tables employ row-level locking for update operations. Row-level locking allows concurrent updates on independent records so that transactions don’t wait on full table locks. For applications that rely on heavy transactional workloads, wait times for locks must be kept to a minimum, allowing concurrent operations to access the same table very frequently.
In this step, you can test concurrent updates to different records in the order_header hybrid table.
You will use the main Hybrid Tables - QuickStart worksheet that you created earlier, and you will create a new worksheet named Hybrid Tables - QuickStart Session 2 to simulate a new session. From the Hybrid Tables - QuickStart
worksheet, you will start a new transaction by using the BEGIN
statement, then run an UPDATE statement (a DML operation). Before running the COMMIT
transaction statement, you will open the Hybrid Tables - QuickStart Session 2 worksheet and run another UPDATE statement.
Finally, you will commit the open transaction.
Step 5.1. Create a new worksheet
Under Worksheets, click the + button in the top-right corner of Snowsight, then select SQL Worksheet.
Rename the worksheet by selecting its auto-generated timestamp name and typing Hybrid Tables - QuickStart Session 2.
This new worksheet will only be used in the current step.
Step 5.2. Run concurrent updates
First, open the Hybrid Tables - QuickStart worksheet. Make sure you are using the right role, warehouse, database, and
schema, then set and select the max_order_id variable.
Note the value of the max_order_id variable.
Start a new transaction and run the first UPDATE statement.
Note that you did not commit the transaction, so now there is an open lock on the row that matches this condition:
Run the SHOW TRANSACTIONS command, which should return a single open transaction.
The output of this command looks similar to the following partial result:

Open the Hybrid Tables - QuickStart Session 2 worksheet. Make sure you are using the right role, warehouse, database, and schema, then set and select the min_order_id variable.
Note that the min_order_id value is different from the max_order_id value that you used in the first UPDATE statement.
Run the second UPDATE statement.
Because hybrid tables use row-level locking and the open transaction locks the row WHERE order_id = $MAX_ORDER_ID,
the UPDATE statement runs successfully.
Open the Hybrid Tables - QuickStart worksheet and commit the open transaction.
Run the following query to view the updated records:
The output of this command looks similar to the following partial result:

Step 6. Demonstrate consistency
In this step, you will learn about a unique hybrid tables feature: the ability to run multi-statement operations natively, easily, and effectively in one consistent atomic transaction, with access to both hybrid tables and standard tables. Snowflake transactions guarantee the “ACID” properties of atomicity, consistency, isolation, and durability. Any given transaction is treated as an atomic unit; preserves a consistent database state when writes occur; is isolated from other concurrent transactions (as if they were being run sequentially); and is committed durably (remains committed, once committed).
In this example, the company acquires a new truck of the same model as an existing truck. Consequently, you must
update the year column for the relevant record in the truck hybrid table to reflect the change.
After this update, you need to promptly update a row and insert a new row in the truck_history table. This
standard table will track and preserve all the changes to the truck fleet over time. You complete all of these steps
as part of one explicitly committed transaction.
Step 6.1. Run a single transaction that contains multiple DML statements
Open the original Hybrid Tables - QuickStart worksheet.
Start a new transaction to ensure that a subsequent series of operations is treated as a single, atomic unit. Then execute multiple DML statements:
- Update the relevant truck record in the
truckhybrid table. - Update the corresponding record in the
truck_historytable by setting therecord_end_timeto mark the end of its validity. - Insert a new record in the
truck_historytable, capturing the updated information.
Finally, commit the transaction.
Step 6.2. Check the results
Now run the following SELECT queries to review the results of the UPDATE and INSERT statements.
The first query should return two rows, and the second query should return one.
The output of this command looks similar to the following partial result:

The output of this command looks similar to the following partial result:

Step 7. Join a hybrid table to a standard table
In this step, you run a join query that combines data from a hybrid table
(order_header) and a standard table (truck_history). This query demonstrates the interoperability of the two
table types.
Step 7.1. Explore the data in the tables
Earlier you created and loaded the order_header table. Now you can run a few queries and review some
information to get familiar with the table. First, list the tables in the database with the SHOW TABLES command,
then select two columns from the output of that list.
The output of this command looks similar to the following partial result:

Now run two simple queries:
The output of the second query looks similar to the following partial result:
Step 7.2. Join a hybrid table to a standard table
To join the order_header hybrid table to the truck_history standard table, run the following
SET statement and query. Joining hybrid tables to standard tables does not require any special syntax.
The join result looks similar to the following partial result:

Step 8. Demonstrate security and governance
In this step, you will run two security-related examples to demonstrate that Snowflake security and governance functionality applies equally to standard tables and hybrid tables.
Roles and grants of privileges to those roles are standard mechanisms for enforcing security when large numbers of database users have access to the same system, whether the workload is transactional, analytic, or hybrid.
Step 8.1. Set up hybrid table access control and user management
Role-based access control (RBAC) works the same for hybrid tables and standard tables. You can manage access to hybrid table data in Snowflake by granting privileges to some roles.
First, create a new hybrid_quickstart_bi_user_role role. Use the ACCOUNTADMIN role to create the new role.
Now you can grant USAGE privileges for the hybrid_quickstart_wh warehouse, hybrid_quickstart_db database,
and all of its schemas to the new role. Use hybrid_quickstart_role to run the GRANT statements.
Using the new role (hybrid_quickstart_bi_user_role), try to select some data from the order_header table.
You cannot select any data because the role hybrid_quickstart_bi_user_role has not been granted the necessary
SELECT privilege on the tables. You receive the following error message:
To solve this problem, use the role hybrid_quickstart_role to grant SELECT privileges on all the tables in the
data schema to hybrid_quickstart_bi_user_role.
Try again to select data from the order_header hybrid table.
This time the query succeeds because HYBRID_QUICKSTART_BI_USER_ROLE has the appropriate privileges at all levels of the hierarchy. The output looks similar to the following partial result:

Step 8.2. Create and implement a masking policy
In this step, you create a masking policy and apply it to the
truck_email column in the truck hybrid table by using an ALTER TABLE … ALTER COLUMN statement.
A masking policy is a standard way of controlling the column-level visibility of data to users with different roles
and privileges.
Note
To create masking policies, you must use an Enterprise Edition account (or a higher-level account). If you are using a Standard Edition account, skip this step. For more information, see Snowflake editions.
Use the hybrid_quickstart_role role, then create the new masking policy, which is intended to mask entire column
values from unauthorized roles.
Now apply this policy to the hybrid table.
Because you are currently using the hybrid_quickstart_role, the truck_email column should not be masked.
Run the following query:

Switch to HYBRID_QUICKSTART_BI_USER_ROLE and run the query again. The TRUCK_EMAIL column should be
masked now.

Step 9. Cleanup, conclusion, and further reading
Cleanup
To clean up your Snowflake environment, run the following SQL statements:
Finally, manually delete the Hybrid Tables - QuickStart and Hybrid Tables - QuickStart Session 2
worksheets.
What you learned
In this tutorial, you learned how to:
- Create and bulk load hybrid tables.
- Create and check the enforcement of UNIQUE, PRIMARY KEY, and FOREIGN KEY constraints.
- Run concurrent updates that depend on row-level locks.
- Run a multi-statement operation in a consistent atomic transaction (across hybrid and standard tables).
- Query hybrid tables and join them to standard tables.
- Verify that security and governance principles apply to both hybrid and standard tables.