Python Connector 사용하기

이 항목에서는 Snowflake 커넥터를 사용하여 사용자 로그인, 데이터베이스 및 테이블 생성, 웨어하우스 생성, 데이터 삽입/로드 및 쿼리 등의 표준 Snowflake 작업을 수행하기 위한 방법을 보여주는 일련의 예를 제공합니다.

이 항목의 마지막에 제공되는 샘플 코드는 예시를 작동하는 단일 Python 프로그램에 통합합니다.

이 항목의 내용:

데이터베이스, 스키마 및 웨어하우스 만들기

로그인한 후, 아직 없는 경우 CREATE DATABASE, CREATE SCHEMACREATE WAREHOUSE 명령을 사용하여 데이터베이스, 스키마 및 웨어하우스를 생성합니다.

아래 예는 tiny_warehouse 웨어하우스, testdb 데이터베이스 및 testschema 스키마를 생성하는 방법을 보여줍니다. 스키마를 생성할 때는 반드시 스키마를 생성할 데이터베이스의 이름을 지정하거나 스키마를 생성할 데이터베이스에 이미 연결되어 있어야 함에 유의하십시오. 아래 예에서는 USE DATABASE 명령을 실행한 후 CREATE SCHEMA 명령을 실행하여 올바른 데이터베이스에 스키마가 생성되도록 합니다.

conn.cursor().execute("CREATE WAREHOUSE IF NOT EXISTS tiny_warehouse_mg")
conn.cursor().execute("CREATE DATABASE IF NOT EXISTS testdb_mg")
conn.cursor().execute("USE DATABASE testdb_mg")
conn.cursor().execute("CREATE SCHEMA IF NOT EXISTS testschema_mg")
Copy

데이터베이스, 스키마 및 웨어하우스 사용하기

테이블을 생성할 데이터베이스 및 스키마를 지정합니다. 또한, DML 문 및 쿼리를 실행하기 위한 리소스를 제공할 웨어하우스를 지정합니다.

예를 들어, testdb 데이터베이스, testschema 스키마 및 tiny_warehouse 웨어하우스(이전에 생성한)를 사용하려면:

conn.cursor().execute("USE WAREHOUSE tiny_warehouse_mg")
conn.cursor().execute("USE DATABASE testdb_mg")
conn.cursor().execute("USE SCHEMA testdb_mg.testschema_mg")
Copy

테이블 생성 및 데이터 삽입하기

CREATE TABLE 명령을 사용하여 테이블을 생성하고 INSERT 명령을 사용하여 데이터를 테이블에 채웁니다.

예를 들어, 이름이 testtable 인 테이블을 생성하고 이 테이블에 행을 2개 삽입합니다.

conn.cursor().execute(
    "CREATE OR REPLACE TABLE "
    "test_table(col1 integer, col2 string)")

conn.cursor().execute(
    "INSERT INTO test_table(col1, col2) VALUES " + 
    "    (123, 'test string1'), " + 
    "    (456, 'test string2')")
Copy

데이터 로딩하기

개별 INSERT 명령을 사용하여 테이블에 데이터를 삽입하는 대신, 내부 또는 외부 위치에 스테이징된 파일에서 데이터를 일괄적으로 로드할 수 있습니다.

내부 위치에서 데이터 복사하기

호스트 컴퓨터의 파일에서 테이블로 데이터를 로드하려면, 우선 PUT 명령을 사용하여 내부 위치의 파일을 스테이징한 후 COPY INTO <테이블> 명령을 사용하여 파일의 데이터를 테이블로 복사합니다.

예:

# Putting Data
con.cursor().execute("PUT file:///tmp/data/file* @%testtable")
con.cursor().execute("COPY INTO testtable")
Copy

여기서 CSV 데이터는 Linux 또는 macOS 환경의 로컬 디렉터리인 /tmp/data 에 저장되며 이 디렉터리에는 이름이 file0, file1, … file100 인 파일이 포함됩니다.

외부 위치에서 데이터 복사하기

외부 위치(즉, S3 버킷)에 이미 스테이징된 파일에서 테이블로 데이터를 로드하려면 COPY INTO <테이블> 명령을 사용합니다.

예:

# Copying Data
con.cursor().execute("""
COPY INTO testtable FROM s3://<s3_bucket>/data/
    STORAGE_INTEGRATION = myint
    FILE_FORMAT=(field_delimiter=',')
""".format(
    aws_access_key_id=AWS_ACCESS_KEY_ID,
    aws_secret_access_key=AWS_SECRET_ACCESS_KEY))
Copy

여기서

  • s3://<s3_버킷>/data/ 은 S3 버킷의 이름을 지정합니다.

  • 버킷의 파일에는 data 접두사가 사용됩니다.

  • 버킷은 계정 관리자(즉, ACCOUNTADMIN 역할의 사용자) 또는 전역 CREATE INTEGRATION 권한이 있는 역할이 CREATE STORAGE INTEGRATION 을 사용하여 생성한 저장소 통합으로 액세스됩니다. 저장소 통합을 사용하면 사용자는 개인 저장소 위치에 액세스하기 위한 자격 증명을 입력하지 않아도 됩니다.

참고

이 예에서는 format() 함수를 사용하여 문을 구성합니다. 환경에 SQL 삽입 공격의 위험이 있는 경우에는 format() 함수를 사용하는 대신 값을 바인딩하는 것이 좋을 수 있습니다.

데이터 쿼리하기

Python용 Snowflake 커넥터를 통해 다음을 제출할 수 있습니다.

  • 동기 쿼리, 쿼리가 완료된 후 애플리케이션으로 제어를 반환합니다.

  • 비동기 쿼리, 쿼리가 완료되기 전 애플리케이션으로 제어를 반환합니다.

쿼리가 완료된 후, Cursor 오브젝트를 사용하여 결과의 모든 값을 가져올 수 있습니다. 기본적으로, Python용 Snowflake 커넥터는 Snowflake 데이터 타입 에서 네이티브 Python 데이터 타입으로 값을 변환합니다. (값을 문자열로 반환하고 애플리케이션에서 타입을 변환하도록 선택할 수 있음에 유의하십시오. 데이터 변환을 우회하여 쿼리 성능 향상하기 를 참조하십시오.)

참고

기본적으로 NUMBER 열의 값은 배정밀도 부동 소수점 값(float64)으로 반환됩니다. fetch_pandas_all()fetch_pandas_batches() 메서드에서 이를 10진수 값(decimal.Decimal)으로 반환하려면 connect() 메서드의 True 매개 변수를 arrow_number_to_decimal 로 설정합니다.

동기 쿼리 수행하기

동기 쿼리를 수행하려면 Cursor 오브젝트의 execute() 메서드를 호출합니다. 예:

conn = snowflake.connector.connect( ... )
cur = conn.cursor()
cur.execute('select * from products')
Copy

cursor 를 사용하여 값 가져오기 의 설명과 같이, Cursor 오브젝트를 사용하여 결과에서 값을 가져옵니다.

비동기 쿼리 수행하기

Python용 Snowflake 드라이버는 비동기 쿼리(쿼리가 완료되기 전에 사용자에게 제어를 반환하는 쿼리)를 지원합니다. 사용자는 비동기 쿼리를 제출하고 폴링을 사용하여 쿼리 완료 시점을 결정할 수 있습니다. 쿼리가 완료된 후에는 결과가 제공됩니다.

참고

비동기 쿼리를 수행하려면 ABORT_DETACHED_QUERY 구성 매개 변수가 FALSE (기본값)인지 확인해야 합니다.

Snowflake는 일정 시간(기본값: 5분) 후에 자동으로 연결을 종료해 활성 쿼리를 모두 분리합니다. 값이 TRUE 인 경우 Snowflake는 이처럼 분리된 쿼리를 종료하므로 비동기 쿼리에 영향을 줄 수 있습니다.

이 기능을 사용하면 각 쿼리가 완료될 때까지 기다릴 필요 없이 여러 쿼리를 병렬로 제출할 수 있습니다. 또한, 동일한 세션 동안 동기 및 비동기 쿼리의 조합을 실행할 수도 있습니다.

마지막으로, 한 연결에서 비동기 쿼리를 제출하고 다른 연결에서 결과를 확인할 수 있습니다. 예를 들어, 사용자는 애플리케이션에서 장기 실행 쿼리를 시작하고 애플리케이션을 종료하며 나중에 결과를 확인할 수 있도록 애플리케이션을 다시 시작할 수 있습니다.
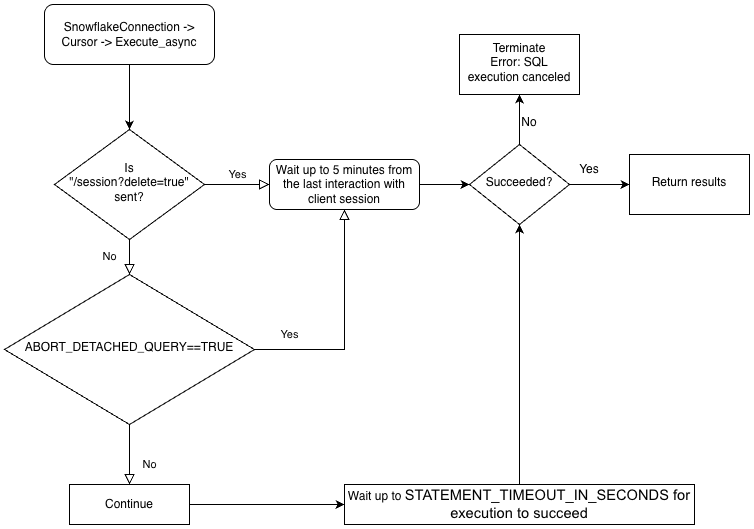
비동기 쿼리 제출하기

비동기 쿼리를 제출하려면 Cursor 오브젝트의 execute_async() 메서드를 호출합니다. 예:

conn = snowflake.connector.connect( ... )
cur = conn.cursor()
# Submit an asynchronous query for execution.
cur.execute_async('select count(*) from table(generator(timeLimit => 25))')
Copy

쿼리를 제출한 후:

비동기 쿼리를 수행하는 예는 비동기 쿼리의 예 를 참조하십시오.

비동기 쿼리의 모범 사례

비동기 쿼리를 제출할 때 따라야 하는 모범 사례는 다음과 같습니다.

  • 다른 쿼리에 종속된 쿼리를 확인한 후 쿼리를 병렬로 실행합니다. 일부 쿼리는 상호 의존적이고 순서가 중요하므로, 병렬 실행에 적합하지 않습니다. 예를 들어, INSERT 문은 해당 CREATE TABLE 문이 종료될 때까지 시작되지 않아야 합니다.

  • 사용 가능한 메모리에 대해 너무 많은 쿼리를 실행하지 않아야 합니다. 여러 쿼리를 병렬로 실행하면 일반적으로 메모리 사용량이 증가하게 됩니다. 특히, 메모리에 2개 이상의 결과 세트가 메모리에 동시에 저장되어 있는 경우에는 사용량이 크게 증가합니다.

  • 폴링 중에 쿼리가 실패하는 드문 경우를 처리해야 합니다.

  • 트랜잭션 제어 문(BEGIN, COMMIT 및 ROLLBACK)은 다른 문과 병렬로 실행되지 않아야 합니다.

Snowflake 쿼리 ID 검색하기

쿼리 ID를 통해 Snowflake에 의해 실행되는 각 쿼리를 식별할 수 있습니다. Python용 Snowflake 커넥터를 사용하여 쿼리를 실행하는 경우에는 Cursor 오브젝트의 sfqid 속성을 통해 쿼리 ID에 액세스할 수 있습니다.

# Retrieving a Snowflake Query ID
cur = con.cursor()
cur.execute("SELECT * FROM testtable")
print(cur.sfqid)
Copy

쿼리 ID를 사용하여 수행할 수 있는 작업은 다음과 같습니다.

쿼리 상태 확인하기

쿼리의 상태를 확인하려면:

  1. Cursor 오브젝트의 sfqid 필드에서 쿼리 ID를 가져옵니다.

  2. Connection 오브젝트의 get_query_status() 메서드로 쿼리 ID를 전달하여 쿼리의 상태를 나타내는 QueryStatus 열거형 상수를 반환합니다.

    기본적으로 get_query_status() 에서는 쿼리 결과가 오류인 경우 오류가 발생되지 않습니다. 오류가 발생하도록 하려면, 대신 get_query_status_throw_if_error() 메서드를 호출해야 합니다.

  3. 쿼리의 상태를 확인하려면 QueryStatus 열거형 상수를 사용합니다.

    • 쿼리가 아직 실행 중인지 확인(예: 비동기 쿼리인지 확인)하려면 Connection 오브젝트의 is_still_running() 메서드로 이 상수를 전달합니다.

    • 오류 발생 여부를 확인하려면 이 상수를 is_an_error() 메서드로 전달합니다.

    열거형 상수의 전체 목록은 QueryStatus 를 참조하십시오.

다음 예에서는 비동기 쿼리를 실행한 후 쿼리의 상태를 확인합니다.

import time
...
# Execute a long-running query asynchronously.
cur.execute_async('select count(*) from table(generator(timeLimit => 25))')
...
# Wait for the query to finish running.
query_id = cur.sfqid
while conn.is_still_running(conn.get_query_status(query_id)):
  time.sleep(1)
Copy

다음 예에서는 쿼리 결과에 오류가 있는 경우 오류가 발생합니다.

from snowflake.connector import ProgrammingError
import time
...
# Wait for the query to finish running and raise an error
# if a problem occurred with the execution of the query.
try:
  query_id = cur.sfqid
  while conn.is_still_running(conn.get_query_status_throw_if_error(query_id)):
    time.sleep(1)
except ProgrammingError as err:
  print('Programming Error: {0}'.format(err))
Copy

쿼리 ID를 사용하여 쿼리 결과 검색하기

참고

Cursor 오브젝트에 대한 execute() 메서드를 호출하여 비동기 쿼리를 실행한 경우에는 결과를 검색하기 위해 쿼리 ID를 사용할 필요가 없습니다. cursor 를 사용하여 값 가져오기 에서의 설명과 같이, 결과에서 값을 가져오기만 하면 됩니다.

비동기 쿼리 또는 이전에 제출한 동기 쿼리의 결과를 검색하려면, 다음 단계를 따르십시오.

  1. 쿼리의 쿼리 ID를 가져옵니다. Snowflake 쿼리 ID 검색하기 섹션을 참조하십시오.

  2. Cursor 오브젝트의 get_results_from_sfqid() 메서드를 호출하여 결과를 검색합니다.

  3. cursor 를 사용하여 값 가져오기 의 설명과 같이, Cursor 오브젝트를 사용하여 결과에서 값을 가져옵니다.

쿼리가 아직 실행 중인 경우, 페치 메서드(fetchone(), fetchmany(), fetchall() 등)는 쿼리가 완료될 때까지 대기합니다.

예:

# Get the results from a query.
cur.get_results_from_sfqid(query_id)
results = cur.fetchall()
print(f'{results[0]}')
Copy

cursor 를 사용하여 값 가져오기

커서 오브젝트 반복기 메서드를 사용하여 테이블에서 값을 가져옵니다.

예를 들어, 테이블 생성 및 데이터 삽입하기 에서 이전에 생성한 testtable 테이블에서 《col1》 및 《col2》 열을 가져오려면 다음과 유사한 코드를 사용합니다.

cur = conn.cursor()
try:
    cur.execute("SELECT col1, col2 FROM test_table ORDER BY col1")
    for (col1, col2) in cur:
        print('{0}, {1}'.format(col1, col2))
finally:
    cur.close()
Copy

또는 Python용 Snowflake 커넥터가 편리한 바로 가기를 제공합니다.

for (col1, col2) in con.cursor().execute("SELECT col1, col2 FROM testtable"):
    print('{0}, {1}'.format(col1, col2))
Copy

단일 결과(즉, 단일 행)를 가져오려면 fetchone 메서드를 사용합니다.

col1, col2 = con.cursor().execute("SELECT col1, col2 FROM testtable").fetchone()
print('{0}, {1}'.format(col1, col2))
Copy

지정된 행의 개수를 한 번에 가져오려면 행의 개수와 함께 fetchmany 메서드를 사용합니다.

cur = con.cursor().execute("SELECT col1, col2 FROM testtable")
ret = cur.fetchmany(3)
print(ret)
while len(ret) > 0:
    ret = cur.fetchmany(3)
    print(ret)
Copy

참고

결과 세트가 너무 커 메모리에 적합하지 않은 경우에는 fetchone 또는 fetchmany 를 사용합니다.

모든 결과를 한 번에 가져오려면:

results = con.cursor().execute("SELECT col1, col2 FROM testtable").fetchall()
for rec in results:
    print('%s, %s' % (rec[0], rec[1]))
Copy

쿼리에 대한 시간 초과를 설정하려면 《begin》 명령을 실행하고 쿼리에 시간 초과 매개 변수를 포함합니다. 쿼리가 매개 변수 값의 길이를 초과하면 오류가 발생하고 롤백이 수행됩니다.

다음 코드에서 604 오류는 쿼리가 취소되었음을 의미합니다. 시간 초과 매개 변수를 통해 Timer() 가 시작되고 쿼리가 지정된 시간 내에 완료되지 않으면 취소됩니다.

conn.cursor().execute("create or replace table testtbl(a int, b string)")

conn.cursor().execute("begin")
try:
   conn.cursor().execute("insert into testtbl(a,b) values(3, 'test3'), (4,'test4')", timeout=10) # long query

except ProgrammingError as e:
   if e.errno == 604:
      print("timeout")
      conn.cursor().execute("rollback")
   else:
      raise e
else:
   conn.cursor().execute("commit")
Copy

DictCursor 를 사용하여 열 이름을 기준으로 값 가져오기

열 이름을 기준으로 값을 가져오려면, DictCursor 타입의 cursor 오브젝트를 생성합니다.

예:

# Querying data by DictCursor
from snowflake.connector import DictCursor
cur = con.cursor(DictCursor)
try:
    cur.execute("SELECT col1, col2 FROM testtable")
    for rec in cur:
        print('{0}, {1}'.format(rec['COL1'], rec['COL2']))
finally:
    cur.close()
Copy

비동기 쿼리의 예

비동기 쿼리의 간단한 예는 다음과 같습니다.

from snowflake.connector import ProgrammingError
import time

conn = snowflake.connector.connect( ... )
cur = conn.cursor()

# Submit an asynchronous query for execution.
cur.execute_async('select count(*) from table(generator(timeLimit => 25))')

# Retrieve the results.
cur.get_results_from_sfqid(query_id)
results = cur.fetchall()
print(f'{results[0]}')
Copy

다음 예에서는 1개의 연결에서 비동기 쿼리를 제출하고 다른 연결에서 결과를 검색합니다.

from snowflake.connector import ProgrammingError
import time

conn = snowflake.connector.connect( ... )
cur = conn.cursor()

# Submit an asynchronous query for execution.
cur.execute_async('select count(*) from table(generator(timeLimit => 25))')

# Get the query ID for the asynchronous query.
query_id = cur.sfqid

# Close the cursor and the connection.
cur.close()
conn.close()

# Open a new connection.
new_conn = snowflake.connector.connect( ... )

# Create a new cursor.
new_cur = new_conn.cursor()

# Retrieve the results.
new_cur.get_results_from_sfqid(query_id)
results = new_cur.fetchall()
print(f'{results[0]}')
Copy

쿼리 ID를 기준으로 쿼리 취소하기

쿼리 ID 를 기준으로 쿼리를 취소합니다.

cur = cn.cursor()

try:
  cur.execute(r"SELECT SYSTEM$CANCEL_QUERY('queryID')")
  result = cur.fetchall()
  print(len(result))
  print(result[0])
finally:
  cur.close()
Copy

《queryID》 문자열을 실제 쿼리 ID로 바꿉니다. 쿼리의 ID를 가져오려면 Snowflake 쿼리 ID 검색하기 를 참조하십시오.

데이터 변환을 우회하여 쿼리 성능 향상하기

쿼리 성능을 향상하려면, snowflake.connector.converter_null 모듈의 SnowflakeNoConverterToPython 클래스를 사용하여 Snowflake 내부 데이터 타입에서 네이티브 Python 데이터 타입으로의 데이터 변환을 우회합니다. 예:

from snowflake.connector.converter_null import SnowflakeNoConverterToPython

con = snowflake.connector.connect(
    ...
    converter_class=SnowflakeNoConverterToPython
)
for rec in con.cursor().execute("SELECT * FROM large_table"):
    # rec includes raw Snowflake data
Copy

결과적으로, 모든 데이터는 문자열 형식으로 표시되어 애플리케이션이 네이티브 Python 데이터 타입으로 변환을 수행합니다. 예를 들어, TIMESTAMP_NTZTIMESTAMP_LTZ 데이터는 문자열 형식으로 표시되는 Epoch 시간이며 TIMESTAMP_TZ 데이터는 Epoch 시간 다음에 공백이 오고 그 다음에 UTC에 대한 오프셋(분)이 표시되는 문자열 형식입니다.

바인딩 데이터에는 영향을 주지 않으며, 여전히 Python 네이티브 데이터를 바인딩하여 업데이트에서 사용할 수 있습니다.

데이터 바인딩하기

SQL 문에서 사용되는 값을 지정하려면, 문에 리터럴을 포함하거나 변수를 바인딩 할 수 있습니다. 변수를 바인딩할 때 SQL 문의 텍스트에 자리 표시자를 1개 이상 추가하고 각 자리 표시자에 변수(사용할 변수)를 지정합니다.

다음 예는 리터럴과 바인딩을 사용할 때를 비교하여 보여줍니다.

리터럴:

con.cursor().execute("INSERT INTO testtable(col1, col2) VALUES(789, 'test string3')")
Copy

바인딩:

con.cursor().execute(
    "INSERT INTO testtable(col1, col2) "
    "VALUES(%s, %s)", (
        789,
        'test string3'
    ))
Copy

참고

바인딩할 수 있거나 일괄 결합할 수 있는 데이터 크기의 상한에는 제한이 있습니다. 자세한 내용은 쿼리 텍스트 크기 제한 섹션을 참조하십시오.

Snowflake에서 지원되는 바인딩의 타입은 다음과 같습니다.

이와 관련한 각각의 설명은 아래에서 제공됩니다.

pyformat 또는 format 바인딩

pyformat 바인딩 및 format 바인딩 모두 서버측이 아닌 클라이언트측에서 데이터를 바인딩합니다.

기본적으로, Python용 Snowflake 커넥터는 pyformatformat 모두를 지원하므로, 사용자는 %(name)s 또는 %s 를 자리 표시자로 사용할 수 있습니다. 예:

  • %(name)s 를 자리 표시자로 사용:

    conn.cursor().execute(
        "INSERT INTO test_table(col1, col2) "
        "VALUES(%(col1)s, %(col2)s)", {
            'col1': 789,
            'col2': 'test string3',
            })
    
    Copy
  • %s 를 자리 표시자로 사용:

    con.cursor().execute(
        "INSERT INTO testtable(col1, col2) "
        "VALUES(%s, %s)", (
            789,
            'test string3'
        ))
    
    Copy

pyformatformat 을 사용하면 목록 오브젝트를 사용하여 IN 연산자를 위해 데이터를 바인딩할 수 있습니다.

# Binding data for IN operator
con.cursor().execute(
    "SELECT col1, col2 FROM testtable"
    " WHERE col2 IN (%s)", (
        ['test string1', 'test string3'],
    ))
Copy

퍼센트 문자(《%》)는 SQL LIKE용 와일드카드 문자 및 Python용 형식 바인딩 문자로 사용할 수 있습니다. 형식 바인딩을 사용하고 SQL 명령에 퍼센트 문자가 포함된 경우에는 퍼센트 문자를 이스케이프해야 할 수 있습니다. 예를 들어, SQL 문이 다음과 같은 경우:

SELECT col1, col2
    FROM test_table
    WHERE col2 ILIKE '%York' LIMIT 1;  -- Find York, New York, etc.
Copy

Python 코드는 다음과 같아야 합니다(원본 퍼센트 기호를 이스케이프하려면 추가 퍼센트 기호에 유의).

sql_command = "select col1, col2 from test_table "
sql_command += " where col2 like '%%York' limit %(lim)s"
parameter_dictionary = {'lim': 1 }
cur.execute(sql_command, parameter_dictionary)
Copy

qmark 또는 numeric 바인딩

qmark 바인딩 및 numeric 바인딩은 클라이언트측이 아닌 서버측에서 데이터를 바인딩합니다.

  • qmark 바인딩의 경우, 물음표 문자(?)를 사용하여 문자열에서 변수 값을 삽입할 위치를 나타냅니다.

  • numeric 바인딩의 경우, 콜론(:) 뒤에 숫자를 사용하여 해당 위치에 대체될 변수의 위치를 나타냅니다. 예를 들어, :2 는 두 번째 변수를 지정합니다.

    숫자 바인딩을 사용하여 동일한 쿼리에서 동일한 값을 두 번 이상 바인딩합니다. 예를 들어, 두 번 이상 사용할 Long VARCHAR 또는 BINARY 또는 반정형 값이 있는 경우 numeric 바인딩을 사용하면 서버에 값을 한 번 전송하고 여러 번 사용할 수 있습니다.

다음 섹션에서는 qmarknumeric 바인딩의 사용 방법을 설명합니다.

qmark 또는 numeric 바인딩 사용하기

qmark 또는 numeric 스타일 바인딩을 사용하려면 다음 중 하나를 실행합니다.

  • snowflake.connector.paramstyle='qmark'

  • snowflake.connector.paramstyle='numeric'

중요

paramstyle 속성을 설정한 connect() 메서드를 호출합니다.

paramstyleqmark 또는 numeric 을 설정한 경우에는, ? 또는 :N (여기서 N 을 숫자로 대체)을 각각 자리 표시자로 사용해야 합니다.

예:

  • ? 를 자리 표시자로 사용:

    import snowflake.connector
    
    snowflake.connector.paramstyle='qmark'
    
    con = snowflake.connector.connect(...)
    
    con.cursor().execute(
        "INSERT INTO testtable(col1, col2) "
        "VALUES(?, ?)", (
            789,
            'test string3'
        ))
    
    Copy
  • :N 을 자리 표시자로 사용:

    import snowflake.connector
    
    snowflake.connector.paramstyle='numeric'
    
    con = snowflake.connector.connect(...)
    
    con.cursor().execute(
        "INSERT INTO testtable(col1, col2) "
        "VALUES(:1, :2)", (
            789,
            'test string3'
        ))
    
    Copy

    다음 쿼리는 numeric 바인딩을 사용하여 변수를 재사용하는 방법을 보여줍니다.

    con.cursor().execute(
        "INSERT INTO testtable(complete_video, short_sample_of_video) "
        "VALUES(:1, SUBSTRING(:1, :2, :3))", (
            binary_value_that_stores_video,          # variable :1
            starting_offset_in_bytes_of_video_clip,  # variable :2
            length_in_bytes_of_video_clip            # variable :3
        ))
    
    Copy

datetime 오브젝트와 함께 qmark 또는 numeric 바인딩 사용하기

qmark 또는 numeric 바인딩을 사용하여 데이터를 Snowflake TIMESTAMP 데이터 타입으로 바인딩하는 경우, 바인딩 변수를 Snowflake 타임스탬프 데이터 타입(TIMESTAMP_LTZ 또는 TIMESTAMP_TZ) 및 값을 지정하는 튜플로 설정합니다. 예:

import snowflake.connector

snowflake.connector.paramstyle='qmark'

con = snowflake.connector.connect(...)

con.cursor().execute(
    "CREATE OR REPLACE TABLE testtable2 ("
    "   col1 int, "
    "   col2 string, "
    "   col3 timestamp_ltz"
    ")"
)

con.cursor().execute(
    "INSERT INTO testtable2(col1,col2,col3) "
    "VALUES(?,?,?)", (
        987,
        'test string4',
        ("TIMESTAMP_LTZ", datetime.now())
    )
 )
Copy

클라이언트측 바인딩과 달리, 서버측 바인딩에는 열에 대한 Snowflake 데이터 타입이 필요합니다. 가장 일반적인 Python 데이터 타입에는 이미 Snowflake 데이터 타입에 대한 암시적 매핑(예: intFIXED 로 매핑됨)이 있습니다. 그러나 Python datetime 데이터는 여러 Snowflake 데이터 타입 중 1개(TIMESTAMP_NTZ, TIMESTAMP_LTZ 또는 TIMESTAMP_TZ)에 바인딩될 수 있으며 기본 매핑은 TIMESTAMP_NTZ 이므로 사용자가 사용할 Snowflake 데이터 타입을 지정해야 합니다.

IN 연산자와 함께 바인딩 변수 사용하기

qmarknumeric (서버측 바인딩)에서는 IN 연산자와 함께 변수를 바인딩하는 것을 지원하지 않습니다.

바인딩 변수와 IN 연산자를 함께 사용해야 하는 경우에는 클라이언트측 바인딩 (pyformat 또는 format)을 사용하십시오.

일괄 삽입을 위해 매개 변수를 변수에 바인딩하기

애플리케이션 코드에서는 단일 일괄 처리에 여러 행을 삽입할 수 있습니다. 이 작업을 수행하려면 INSERT 문에서 값에 대한 매개 변수를 사용하십시오. 예를 들어, 다음 문에서는 INSERT 문에서 qmark 바인딩을 위해 자리 표시자를 사용합니다.

insert into grocery (item, quantity) values (?, ?)
Copy

그리고 삽입할 데이터를 지정하려면 시퀀스의 시퀀스(예: 튜플 목록)인 변수를 정의합니다.

rows_to_insert = [('milk', 2), ('apple', 3), ('egg', 2)]
Copy

위의 예에서와 같이, 목록의 각 항목은 삽입할 행에 대한 열 값이 포함된 튜플입니다.

바인딩을 실행하려면 executemany() 메서드를 호출하여 변수를 두 번째 인자로 전달합니다. 예:

conn = snowflake.connector.connect( ... )
rows_to_insert = [('milk', 2), ('apple', 3), ('egg', 2)]
conn.cursor().executemany(
    "insert into grocery (item, quantity) values (?, ?)",
    rows_to_insert)
Copy

서버측에서 데이터를 바인딩 (즉, qmark 또는 numeric 바인딩)하는 경우, 커넥터는 바인딩을 통해 일괄 삽입의 성능을 최적화할 수 있습니다.

이러한 방식을 사용하여 값을 대량으로 삽입하는 경우 드라이버는 수집을 위한 임시 스테이지로 데이터를 스트리밍하여(로컬 시스템에 파일을 생성하지 않음) 성능을 향상할 수 있습니다. 값의 개수가 임계값을 초과하는 경우 드라이버는 자동으로 이 작업을 수행합니다.

또한, 세션의 현재 데이터베이스 및 스키마를 설정해야 합니다. 이러한 값이 설정되지 않은 경우에는 드라이버가 실행하는 CREATE TEMPORARY STAGE 명령에서 다음 오류가 발생하며 실패할 수 있습니다.

CREATE TEMPORARY STAGE SYSTEM$BIND file_format=(type=csv field_optionally_enclosed_by='"')
Cannot perform CREATE STAGE. This session does not have a current schema. Call 'USE SCHEMA', or use a qualified name.
Copy

참고

Snowflake 데이터베이스에 데이터를 로드하는 대체 방법(COPY 명령을 사용한 대량 로드 등)과 관련해서는 Snowflake에 데이터 로딩하기 를 참조하십시오.

SQL 삽입 공격 방지하기

SQL 삽입의 위험이 있으므로 Python의 형식 지정 함수를 사용하여 데이터를 바인딩하지 말아야 합니다. 예:

# Binding data (UNSAFE EXAMPLE)
con.cursor().execute(
    "INSERT INTO testtable(col1, col2) "
    "VALUES(%(col1)d, '%(col2)s')" % {
        'col1': 789,
        'col2': 'test string3'
    })
Copy
# Binding data (UNSAFE EXAMPLE)
con.cursor().execute(
    "INSERT INTO testtable(col1, col2) "
    "VALUES(%d, '%s')" % (
        789,
        'test string3'
    ))
Copy
# Binding data (UNSAFE EXAMPLE)
con.cursor().execute(
    "INSERT INTO testtable(col1, col2) "
    "VALUES({col1}, '{col2}')".format(
        col1=789,
        col2='test string3')
    )
Copy

대신에 값을 변수에 저장한 다음 qmark 또는 숫자 바인딩 스타일을 사용하여 해당 변수를 바인딩합니다.

열 메타데이터 검색하기

결과 세트에서 각 열에 대한 메타데이터(예: 각 열의 이름, 타입, 전체 자릿수, 소수 자릿수 등)를 검색하려면 다음 방식 중 하나를 사용하십시오.

  • 쿼리를 실행하기 위해 execute() 메서드를 호출한 후 메타데이터에 액세스하려면 Cursor 오브젝트의 describe 속성을 사용합니다.

  • 쿼리를 실행할 필요 없이 메타데이터에 액세스하려면 describe() 메서드를 호출합니다.

    describe 메서드는 Python용 Snowflake 커넥터 2.4.6 이상 버전에서 사용할 수 있습니다.

description 속성은 다음 값 중 1개로 설정됩니다.

  • 2.4.5 이하 버전: 튜플의 목록.

  • 2.4.6 이상 버전: ResultMetadata 오브젝트의 목록. (describe 메서드도 이 목록을 반환합니다.)

각 튜플 및 ResultMetadata 오브젝트에는 열에 대한 메타데이터(열 이름, 데이터 타입 등)가 포함되어 있습니다. 메타데이터에는 인덱스를 사용하여 또는 2.4.6 이상 버전의 경우 ResultMetadata 속성을 사용하여 액세스할 수 있습니다.

다음 예는 반환된 튜플 및 ResultMetadata 오브젝트에서 메타데이터에 액세스하는 방법을 보여줍니다.

예: 색인을 사용하여 열 이름 메타데이터 가져오기(2.4.5 및 이전 버전):

다음 예에서는 description 속성을 사용하여 쿼리를 실행한 후 열 이름 목록을 검색합니다. 이 속성은 튜플의 목록으로, 이 예에서는 각 튜플의 첫 번째 값에서 열 이름에 액세스합니다.

cur = conn.cursor()
cur.execute("SELECT * FROM test_table")
print(','.join([col[0] for col in cur.description]))
Copy

예: 속성을 사용하여 열 이름 메타데이터 가져오기(2.4.6 이상 버전):

다음 예에서는 description 속성을 사용하여 쿼리를 실행한 후 열 이름 목록을 검색합니다. 이 속성은 ResultMetaData 오브젝트의 목록으로, 이 예에서는 각 ResultMetadata 오브젝트의 name 속성에서 열 이름에 액세스합니다.

cur = conn.cursor()
cur.execute("SELECT * FROM test_table")
print(','.join([col.name for col in cur.description]))
Copy

예: 쿼리를 실행하지 않고 열 이름 메타데이터 가져오기(2.4.6 이상 버전):

다음 예에서는 describe 메서드를 사용하여 쿼리를 실행하지 않고 열 이름 목록을 검색합니다. describe() 메서드는 ResultMetaData 오브젝트의 목록을 반환하는데, 이 예에서는 각 ResultMetadata 오브젝트의 name 속성에서 열 이름에 액세스합니다.

cur = conn.cursor()
result_metadata_list = cur.describe("SELECT * FROM test_table")
print(','.join([col.name for col in result_metadata_list]))
Copy

오류 처리

애플리케이션은 Snowflake 커넥터에서 발생한 예외를 올바르게 처리하고 코드 실행의 계속 또는 중지 여부를 결정합니다.

# Catching the syntax error
cur = con.cursor()
try:
    cur.execute("SELECT * FROM testtable")
except snowflake.connector.errors.ProgrammingError as e:
    # default error message
    print(e)
    # customer error message
    print('Error {0} ({1}): {2} ({3})'.format(e.errno, e.sqlstate, e.msg, e.sfqid))
finally:
    cur.close()
Copy

execute_stream 을 사용하여 SQL 스크립트 실행하기

execute_stream 함수를 사용하면 스트림에서 1개 이상의 SQL 스크립트를 실행할 수 있습니다.

from codecs import open
with open(sqlfile, 'r', encoding='utf-8') as f:
    for cur in con.execute_stream(f):
        for ret in cur:
            print(ret)
Copy

연결 종료하기

close 메서드를 호출하여 연결을 종료하는 것이 모범 사례입니다.

connection.close()
Copy

이를 통해 수집된 클라이언트 메트릭을 서버로 제출하고 세션을 삭제할 수 있습니다. 또한, try-finally 를 사용하면 중간에 예외가 발생하는 경우에도 연결이 종료되지 않도록 할 수 있습니다.

# Connecting to Snowflake
con = snowflake.connector.connect(...)
try:
    # Running queries
    con.cursor().execute(...)
    ...
finally:
    # Closing the connection
    con.close()
Copy

컨텍스트 관리자를 사용한 트랜잭션 연결 및 관리하기

Python용 Snowflake 커넥터는 필요한 경우 리소스를 할당 및 해제하는 컨텍스트 관리자를 지원합니다. 컨텍스트 관리자는 autocommit 이 비활성화된 경우 문의 상태에 따라 트랜잭션을 커밋 또는 롤백하는 데 유용합니다.

# Connecting to Snowflake using the context manager
with snowflake.connector.connect(
  user=USER,
  password=PASSWORD,
  account=ACCOUNT,
  autocommit=False,
) as con:
    con.cursor().execute("INSERT INTO a VALUES(1, 'test1')")
    con.cursor().execute("INSERT INTO a VALUES(2, 'test2')")
    con.cursor().execute("INSERT INTO a VALUES(not numeric value, 'test3')") # fail
Copy

위의 예에서, 세 번째 문이 실패하면 컨텍스트 관리자가 트랜잭션의 변경 사항을 롤백하고 연결을 끊습니다. 모든 문이 성공하면 컨텍스트 관리자가 변경 사항을 커밋하고 연결을 끊습니다.

tryexcept 블록에 해당하는 코드는 다음과 같습니다.

# Connecting to Snowflake using try and except blocks
con = snowflake.connector.connect(
  user=USER,
  password=PASSWORD,
  account=ACCOUNT,
  autocommit=False)
try:
    con.cursor().execute("INSERT INTO a VALUES(1, 'test1')")
    con.cursor().execute("INSERT INTO a VALUES(2, 'test2')")
    con.cursor().execute("INSERT INTO a VALUES(not numeric value, 'test3')") # fail
    con.commit()
except Exception as e:
    con.rollback()
    raise e
finally:
    con.close()
Copy

로깅

Python용 Snowflake 커넥터는 표준 Python logging 모듈을 사용하여 일정 간격으로 상태를 기록함으로써 애플리케이션이 백그라운드로 실행되는 활동을 추적할 수 있도록 해줍니다. 로깅을 활성화하는 가장 간단한 방법은 애플리케이션을 시작할 때 logging.basicConfig() 를 호출하는 것입니다.

예를 들어, 로깅 수준을 INFO 로 설정하고 /tmp/snowflake_python_connector.log 파일에 로그를 저장하려면:

logging.basicConfig(
    filename=file_name,
    level=logging.INFO)
Copy

보다 포괄적인 로깅은 다음과 같이 로깅 수준을 DEBUG 로 설정하여 활성화할 수 있습니다.

# Logging including the timestamp, thread and the source code location
import logging
for logger_name in ['snowflake.connector', 'botocore', 'boto3']:
    logger = logging.getLogger(logger_name)
    logger.setLevel(logging.DEBUG)
    ch = logging.FileHandler('/tmp/python_connector.log')
    ch.setLevel(logging.DEBUG)
    ch.setFormatter(logging.Formatter('%(asctime)s - %(threadName)s %(filename)s:%(lineno)d - %(funcName)s() - %(levelname)s - %(message)s'))
    logger.addHandler(ch)
Copy

선택 사항이지만 권장되는 SecretDetector 포맷터 클래스를 사용하면 알려진 민감한 정보 세트를 마스킹한 후 Snowflake Python Connector 로그 파일에 작성할 수 있습니다. SecretDetector를 사용하려면, 다음과 유사한 코드를 사용합니다.

# Logging including the timestamp, thread and the source code location
import logging
from snowflake.connector.secret_detector import SecretDetector
for logger_name in ['snowflake.connector', 'botocore', 'boto3']:
    logger = logging.getLogger(logger_name)
    logger.setLevel(logging.DEBUG)
    ch = logging.FileHandler('/tmp/python_connector.log')
    ch.setLevel(logging.DEBUG)
    ch.setFormatter(SecretDetector('%(asctime)s - %(threadName)s %(filename)s:%(lineno)d - %(funcName)s() - %(levelname)s - %(message)s'))
    logger.addHandler(ch)
Copy

참고

botocoreboto3 는 Python용 AWS(Amazon Web Services) SDK를 통해 사용할 수 있습니다.

샘플 프로그램

다음 샘플 코드에서는 이전 섹션에서 설명한 여러 예를 작동하는 Python 프로그램에 통합합니다. 이 예에는 다음의 두 부분이 포함됩니다.

  • 상위 클래스(《python_veritas_base》)에는 서버 연결과 같은 여러 일반 작업을 위한 코드가 포함됩니다.

  • 하위 클래스(《python_connector_example》)는 테이블 쿼리와 같은 특정 클라이언트를 위한 사용자 지정 부분을 나타냅니다.

이 샘플 코드는 최신 제품 빌드에서의 실행을 보장하기 위해 테스트 중 1개에서 직접 가져온 코드입니다.

이 코드는 테스트에서 가져온 것이므로 일부 테스트에서 사용되는 대체 포트 및 프로토콜을 설정하기 위한 소량의 코드가 포함되어 있습니다. 사용자는 프로토콜 또는 포트 번호를 설정하지 않아야 하며, 대신 이러한 단계를 생략하고 기본값을 사용해야 합니다.

여기에는 문서에 별도로 가져올 수 있는 코드를 나타내기 위한 섹션 마커(《코드 조각 태그》라고도 함)도 포함되어 있습니다. 섹션 마커는 일반적으로 다음과 같습니다.

# -- (> ---------------------- SECTION=import_connector ---------------------
...
# -- <) ---------------------------- END_SECTION ----------------------------
Copy

이러한 섹션 마커는 사용자 코드에서 필수가 아닙니다.

코드 샘플의 첫 번째 부분에는 다음을 수행하기 위한 공통 서브루틴이 포함되어 있습니다.

  • 연결 정보가 포함된 명령줄 인자(예: 《–warehouse MyWarehouse》) 읽기.

  • 서버에 연결하기.

  • 웨어하우스, 데이터베이스 및 스키마 만들기 및 사용하기.

  • 사용 완료 시 스키마, 데이터베이스 및 웨어하우스 삭제하기.


import logging
import os
import sys


# -- (> ---------------------- SECTION=import_connector ---------------------
import snowflake.connector
# -- <) ---------------------------- END_SECTION ----------------------------


class python_veritas_base:

    """
    PURPOSE:
        This is the Base/Parent class for programs that use the Snowflake
        Connector for Python.
        This class is intended primarily for:
            * Sample programs, e.g. in the documentation.
            * Tests.
    """


    def __init__(self, p_log_file_name = None):

        """
        PURPOSE:
            This does any required initialization steps, which in this class is
            basically just turning on logging.
        """

        file_name = p_log_file_name
        if file_name is None:
            file_name = '/tmp/snowflake_python_connector.log'

        # -- (> ---------- SECTION=begin_logging -----------------------------
        logging.basicConfig(
            filename=file_name,
            level=logging.INFO)
        # -- <) ---------- END_SECTION ---------------------------------------


    # -- (> ---------------------------- SECTION=main ------------------------
    def main(self, argv):

        """
        PURPOSE:
            Most tests follow the same basic pattern in this main() method:
               * Create a connection.
               * Set up, e.g. use (or create and use) the warehouse, database,
                 and schema.
               * Run the queries (or do the other tasks, e.g. load data).
               * Clean up. In this test/demo, we drop the warehouse, database,
                 and schema. In a customer scenario, you'd typically clean up
                 temporary tables, etc., but wouldn't drop your database.
               * Close the connection.
        """

        # Read the connection parameters (e.g. user ID) from the command line
        # and environment variables, then connect to Snowflake.
        connection = self.create_connection(argv)

        # Set up anything we need (e.g. a separate schema for the test/demo).
        self.set_up(connection)

        # Do the "real work", for example, create a table, insert rows, SELECT
        # from the table, etc.
        self.do_the_real_work(connection)

        # Clean up. In this case, we drop the temporary warehouse, database, and
        # schema.
        self.clean_up(connection)

        print("\nClosing connection...")
        # -- (> ------------------- SECTION=close_connection -----------------
        connection.close()
        # -- <) ---------------------------- END_SECTION ---------------------

    # -- <) ---------------------------- END_SECTION=main --------------------


    def args_to_properties(self, args):

        """
        PURPOSE:
            Read the command-line arguments and store them in a dictionary.
            Command-line arguments should come in pairs, e.g.:
                "--user MyUser"
        INPUTS:
            The command line arguments (sys.argv).
        RETURNS:
            Returns the dictionary.
        DESIRABLE ENHANCEMENTS:
            Improve error detection and handling.
        """

        connection_parameters = {}

        i = 1
        while i < len(args) - 1:
            property_name = args[i]
            # Strip off the leading "--" from the tag, e.g. from "--user".
            property_name = property_name[2:]
            property_value = args[i + 1]
            connection_parameters[property_name] = property_value
            i += 2

        return connection_parameters


    def create_connection(self, argv):

        """
        PURPOSE:
            This gets account identifier and login information from the
            environment variables and command-line parameters, connects to the
            server, and returns the connection object.
        INPUTS:
            argv: This is usually sys.argv, which contains the command-line
                  parameters. It could be an equivalent substitute if you get
                  the parameter information from another source.
        RETURNS:
            A connection.
        """

        # Get account identifier and login information from environment variables and command-line parameters.
        # For information about account identifiers, see
        # https://docs.snowflake.com/en/user-guide/admin-account-identifier.html .
        # -- (> ----------------------- SECTION=set_login_info ---------------

        # Get the password from an appropriate environment variable, if
        # available.
        PASSWORD = os.getenv('SNOWSQL_PWD')

        # Get the other login info etc. from the command line.
        if len(argv) < 11:
            msg = "ERROR: Please pass the following command-line parameters:\n"
            msg += "--warehouse <warehouse> --database <db> --schema <schema> "
            msg += "--user <user> --account <account_identifier> "
            print(msg)
            sys.exit(-1)
        else:
            connection_parameters = self.args_to_properties(argv)
            USER = connection_parameters["user"]
            ACCOUNT = connection_parameters["account"]
            WAREHOUSE = connection_parameters["warehouse"]
            DATABASE = connection_parameters["database"]
            SCHEMA = connection_parameters["schema"]
            # Optional: for internal testing only.
            try:
                PORT = connection_parameters["port"]
            except:
                PORT = ""
            try:
                PROTOCOL = connection_parameters["protocol"]
            except:
                PROTOCOL = ""

        # If the password is set by both command line and env var, the
        # command-line value takes precedence over (is written over) the
        # env var value.

        # If the password wasn't set either in the environment var or on
        # the command line...
        if PASSWORD is None or PASSWORD == '':
            print("ERROR: Set password, e.g. with SNOWSQL_PWD environment variable")
            sys.exit(-2)
        # -- <) ---------------------------- END_SECTION ---------------------

        # Optional diagnostic:
        #print("USER:", USER)
        #print("ACCOUNT:", ACCOUNT)
        #print("WAREHOUSE:", WAREHOUSE)
        #print("DATABASE:", DATABASE)
        #print("SCHEMA:", SCHEMA)
        #print("PASSWORD:", PASSWORD)
        #print("PROTOCOL:" "'" + PROTOCOL + "'")
        #print("PORT:" + "'" + PORT + "'")

        print("Connecting...")
        # If the PORT is set but the protocol is not, we ignore the PORT (bug!!).
        if PROTOCOL is None or PROTOCOL == "" or PORT is None or PORT == "":
            # -- (> ------------------- SECTION=connect_to_snowflake ---------
            conn = snowflake.connector.connect(
                user=USER,
                password=PASSWORD,
                account=ACCOUNT,
                warehouse=WAREHOUSE,
                database=DATABASE,
                schema=SCHEMA
                )
            # -- <) ---------------------------- END_SECTION -----------------
        else:

            conn = snowflake.connector.connect(
                user=USER,
                password=PASSWORD,
                account=ACCOUNT,
                warehouse=WAREHOUSE,
                database=DATABASE,
                schema=SCHEMA,
                # Optional: for internal testing only.
                protocol=PROTOCOL,
                port=PORT
                )

        return conn


    def set_up(self, connection):

        """
        PURPOSE:
            Set up to run a test. You can override this method with one
            appropriate to your test/demo.
        """

        # Create a temporary warehouse, database, and schema.
        self.create_warehouse_database_and_schema(connection)


    def do_the_real_work(self, conn):

        """
        PURPOSE:
            Your sub-class should override this to include the code required for
            your documentation sample or your test case.
            This default method does a very simple self-test that shows that the
            connection was successful.
        """

        # Create a cursor for this connection.
        cursor1 = conn.cursor()
        # This is an example of an SQL statement we might want to run.
        command = "SELECT PI()"
        # Run the statement.
        cursor1.execute(command)
        # Get the results (should be only one):
        for row in cursor1:
            print(row[0])
        # Close this cursor.
        cursor1.close()


    def clean_up(self, connection):

        """
        PURPOSE:
            Clean up after a test. You can override this method with one
            appropriate to your test/demo.
        """

        # Create a temporary warehouse, database, and schema.
        self.drop_warehouse_database_and_schema(connection)


    def create_warehouse_database_and_schema(self, conn):

        """
        PURPOSE:
            Create the temporary schema, database, and warehouse that we use
            for most tests/demos.
        """

        # Create a database, schema, and warehouse if they don't already exist.
        print("\nCreating warehouse, database, schema...")
        # -- (> ------------- SECTION=create_warehouse_database_schema -------
        conn.cursor().execute("CREATE WAREHOUSE IF NOT EXISTS tiny_warehouse_mg")
        conn.cursor().execute("CREATE DATABASE IF NOT EXISTS testdb_mg")
        conn.cursor().execute("USE DATABASE testdb_mg")
        conn.cursor().execute("CREATE SCHEMA IF NOT EXISTS testschema_mg")
        # -- <) ---------------------------- END_SECTION ---------------------

        # -- (> --------------- SECTION=use_warehouse_database_schema --------
        conn.cursor().execute("USE WAREHOUSE tiny_warehouse_mg")
        conn.cursor().execute("USE DATABASE testdb_mg")
        conn.cursor().execute("USE SCHEMA testdb_mg.testschema_mg")
        # -- <) ---------------------------- END_SECTION ---------------------


    def drop_warehouse_database_and_schema(self, conn):

        """
        PURPOSE:
            Drop the temporary schema, database, and warehouse that we create
            for most tests/demos.
        """

        # -- (> ------------- SECTION=drop_warehouse_database_schema ---------
        conn.cursor().execute("DROP SCHEMA IF EXISTS testschema_mg")
        conn.cursor().execute("DROP DATABASE IF EXISTS testdb_mg")
        conn.cursor().execute("DROP WAREHOUSE IF EXISTS tiny_warehouse_mg")
        # -- <) ---------------------------- END_SECTION ---------------------


# ----------------------------------------------------------------------------

if __name__ == '__main__':
    pvb = python_veritas_base()
    pvb.main(sys.argv)


Copy

코드 샘플의 두 번째 부품에서는 테이블을 생성하고 테이블에 행을 삽입하는 등의 작업을 수행합니다.


import sys

# -- (> ---------------------- SECTION=import_connector ---------------------
import snowflake.connector
# -- <) ---------------------------- END_SECTION ----------------------------


# Import the base class that contains methods used in many tests and code 
# examples.
from python_veritas_base import python_veritas_base


class python_connector_example (python_veritas_base):

  """
  PURPOSE:
      This is a simple example program that shows how to use the Snowflake 
      Python Connector to create and query a table.
  """

  def __init__(self):
    pass


  def do_the_real_work(self, conn):

    """
    INPUTS:
        conn is a Connection object returned from snowflake.connector.connect().
    """

    print("\nCreating table test_table...")
    # -- (> ----------------------- SECTION=create_table ---------------------
    conn.cursor().execute(
        "CREATE OR REPLACE TABLE "
        "test_table(col1 integer, col2 string)")

    conn.cursor().execute(
        "INSERT INTO test_table(col1, col2) VALUES " + 
        "    (123, 'test string1'), " + 
        "    (456, 'test string2')")
    # -- <) ---------------------------- END_SECTION -------------------------


    print("\nSelecting from test_table...")
    # -- (> ----------------------- SECTION=querying_data --------------------
    cur = conn.cursor()
    try:
        cur.execute("SELECT col1, col2 FROM test_table ORDER BY col1")
        for (col1, col2) in cur:
            print('{0}, {1}'.format(col1, col2))
    finally:
        cur.close()
    # -- <) ---------------------------- END_SECTION -------------------------


# ============================================================================

if __name__ == '__main__':

    test_case = python_connector_example()
    test_case.main(sys.argv)

Copy

이 샘플을 실행하려면 다음을 수행해야 합니다.

  1. 코드의 첫 번째 부분을 《python_veritas_base.py》 파일로 복사합니다.

  2. 코드의 두 번째 부분을 《python_connector_example.py》 파일로 복사합니다.

  3. SNOWSQL_PWD 환경 변수를 비밀번호에 설정합니다. 예:

    export SNOWSQL_PWD='MyPassword'
    
    Copy
  4. 다음과 유사한 명령줄을 사용하여 프로그램을 실행합니다(사용자 및 계정 정보를 사용자 및 계정 정보로 바꿔야 함).

    경고

    이 작업을 수행하면 프로그램의 마지막에 웨어하우스, 데이터베이스 및 스키마가 삭제됩니다! 손실될 수 있으므로 기존 데이터베이스의 이름을 사용하지 마십시오.

    python3 python_connector_example.py --warehouse <unique_warehouse_name> --database <new_warehouse_zzz_test> --schema <new_schema_zzz_test> --account myorganization-myaccount --user MyUserName
    
    Copy

출력은 다음과 같습니다.

Connecting...

Creating warehouse, database, schema...

Creating table test_table...

Selecting from test_table...
123, test string1
456, test string2

Closing connection...
Copy

길이가 더 긴 예는 다음과 같습니다.

참고

계정 및 로그인 정보를 설정한 섹션에서 Snowflake 로그인 정보(이름, 비밀번호 등)와 일치하도록 변수를 바꿨는지 확인하십시오.

이 예에서는 format() 함수를 사용하여 문을 구성합니다. 환경에 SQL 삽입 공격의 위험이 있는 경우에는 format() 함수를 사용하는 대신 값을 바인딩하는 것이 좋을 수 있습니다.

#!/usr/bin/env python
#
# Snowflake Connector for Python Sample Program
#

# Logging
import logging
logging.basicConfig(
    filename='/tmp/snowflake_python_connector.log',
    level=logging.INFO)

import snowflake.connector

# Set your account and login information (replace the variables with
# the necessary values).
ACCOUNT = '<account_identifier>'
USER = '<login_name>'
PASSWORD = '<password>'

import os

# Only required if you copy data from your S3 bucket
AWS_ACCESS_KEY_ID = os.getenv('AWS_ACCESS_KEY_ID')
AWS_SECRET_ACCESS_KEY = os.getenv('AWS_SECRET_ACCESS_KEY')

# Connecting to Snowflake
con = snowflake.connector.connect(
  user=USER,
  password=PASSWORD,
  account=ACCOUNT,
)

# Creating a database, schema, and warehouse if none exists
con.cursor().execute("CREATE WAREHOUSE IF NOT EXISTS tiny_warehouse")
con.cursor().execute("CREATE DATABASE IF NOT EXISTS testdb")
con.cursor().execute("USE DATABASE testdb")
con.cursor().execute("CREATE SCHEMA IF NOT EXISTS testschema")

# Using the database, schema and warehouse
con.cursor().execute("USE WAREHOUSE tiny_warehouse")
con.cursor().execute("USE SCHEMA testdb.testschema")

# Creating a table and inserting data
con.cursor().execute(
    "CREATE OR REPLACE TABLE "
    "testtable(col1 integer, col2 string)")
con.cursor().execute(
    "INSERT INTO testtable(col1, col2) "
    "VALUES(123, 'test string1'),(456, 'test string2')")

# Copying data from internal stage (for testtable table)
con.cursor().execute("PUT file:///tmp/data0/file* @%testtable")
con.cursor().execute("COPY INTO testtable")

# Copying data from external stage (S3 bucket -
# replace <s3_bucket> with the name of your bucket)
con.cursor().execute("""
COPY INTO testtable FROM s3://<s3_bucket>/data/
     STORAGE_INTEGRATION = myint
     FILE_FORMAT=(field_delimiter=',')
""".format(
    aws_access_key_id=AWS_ACCESS_KEY_ID,
    aws_secret_access_key=AWS_SECRET_ACCESS_KEY))

# Querying data
cur = con.cursor()
try:
    cur.execute("SELECT col1, col2 FROM testtable")
    for (col1, col2) in cur:
        print('{0}, {1}'.format(col1, col2))
finally:
    cur.close()

# Binding data
con.cursor().execute(
    "INSERT INTO testtable(col1, col2) "
    "VALUES(%(col1)s, %(col2)s)", {
        'col1': 789,
        'col2': 'test string3',
        })

# Retrieving column names
cur = con.cursor()
cur.execute("SELECT * FROM testtable")
print(','.join([col[0] for col in cur.description]))

# Catching syntax errors
cur = con.cursor()
try:
    cur.execute("SELECT * FROM testtable")
except snowflake.connector.errors.ProgrammingError as e:
    # default error message
    print(e)
    # user error message
    print('Error {0} ({1}): {2} ({3})'.format(e.errno, e.sqlstate, e.msg, e.sfqid))
finally:
    cur.close()

# Retrieving the Snowflake query ID
cur = con.cursor()
cur.execute("SELECT * FROM testtable")
print(cur.sfqid)

# Closing the connection
con.close()
Copy