Integrate customer-hosted Python artifact repositories
Customer-hosted artifact repositories connect private Python artifact repository solutions directly to Snowflake. By integrating these external repositories, you can use the same package management workflows you already apply internally.
Bemerkung
Warehouse-based Snowflake Notebooks, Streamlit, Snowflake Native Apps, and SPCS services are currently not supported.
Customer-hosted artifact repositories let you reuse the same package management and governance systems you already rely on, while making them available to Snowflake Python workloads. You can configure these repositories using API integrations and secrets, even setting them as account-wide defaults to simplify deployment.
Customer-hosted artifact repositories support PrivateLink for enhanced networking. This effectively bridges the gap between internal security standards and cloud-based data science workflows.
Key ways this integration improves security and governance include:
Flexibility: Snowflake Package Policy has been expanded to support all Artifact Repositories, including customer-hosted repository objects.
Security and Compliance: Use existing package governance and policies in customer-hosted repositories.
Consistency: Customers can manage Snowflake packages using the same repositories they manage other code bases.
Authentication methods
During the Private Preview, the supported authentication methods for customer-hosted artifact repositories are:
Username and password
Tokens
These credentials must be stored securely within a Snowflake SECRET object. OAuth and IAM-based authentication are not supported during the Private Preview.
Configure a customer-hosted artifact repository
To configure a customer-hosted artifact repository in Snowflake, you must create and link three primary Snowflake objects:
Snowflake SECRET: This object is used to securely store the repository credentials, such as a username and password or a token.
API integration: This object describes the network path to reach the repository, specifying whether the connection should go through the public Internet or via a PrivateLink endpoint for enhanced security.
Artifact repository object: This is the core object that ties together the API integration, the index URL of the repository, and the associated secret.
The following steps outline how to set this up:
Create a Secret for credentials
First, you must create a Snowflake SECRET to securely store the credentials (username/password or token) required to access your repository.
Create an API integration
Create an API integration to describe the route to the repository. You have two options:
Public HTTPS: For repositories accessible over the Internet.
Egress IP: You can securely allow ingress access from Snowflake to your package repository by allowing egress IP address ranges generated from Snowflake through the repository’s network firewall. To generate and use Snowflake egress IP addresses, follow these steps:
Bemerkung
Egress IP is available only for external access on AWS.
Call SYSTEM$GET_SNOWFLAKE_EGRESS_IP_RANGES to get the current and upcoming IP ranges and their expiration times.
Use the IP ranges you obtain to update firewall rules by using APIs, CLIs, or configuration management tools, as described in Automatisieren von Aktualisierungen für IP-Adressbereiche.
PrivateLink: For internal repositories, use the parameter
USE_PRIVATELINK_ENDPOINT = TRUEto ensure traffic stays within a VPC/VNet.Bemerkung
Private Link requires Business Critical Edition (or higher).
Provision a private connectivity endpoint in the Snowflake VPC or VNet to enable Snowflake to connect to your repository service. For information about how to do this, see SYSTEM$PROVISION_PRIVATELINK_ENDPOINT.
Use the following code to create an API integration that uses private connectivity:
Create the Artifact Repository object
This object ties the previous components together with your repository’s index URL.
Following is an example of a Python UDF:
You can use customer-hosted repositories in Python stored procedures too. Note that your repository needs to host Snowpark for stored procedures to work.
Private Link setup
For Business Critical and VPS (Virtual Private Snowflake) customers, Snowflake supports the outbound private connectivity feature, which lets you set up a private connection between your Snowflake account and your cloud infrastructure.
To use this functionality, you must ensure proper setup of all infrastructure components on both sides: the Snowflake console and your own infrastructure.
Bemerkung
Snowflake supports only connections within the same cloud provider. For example, both Snowflake and your components must be in AWS.
Step 1: Set up Private Link Service and redirect HTTPS traffic to the repository server
On the customer infrastructure side, a Private Link Service needs to be created so the Private Endpoint provisioned in Step 2 can reach out. If the target Private Link Service is a VPC endpoint service, it needs to accept Snowflake’s principal ARN, which can be obtained from the SYSTEM$GET_PRIVATELINK_CONFIG system function.
With the Private Link Service, you should add necessary infrastructure components on your side to redirect the traffic to your repository server. The setup depends on where the repository server is located.
Repository server outside of the VPC
If the repository server is located outside of the cloud provider, then the traffic that goes from Snowflake to the Private Link Service needs to be redirected to this server. The recommended component for this is an nginx proxy. The proxy redirects all HTTPS (port 443) traffic to the repository server.
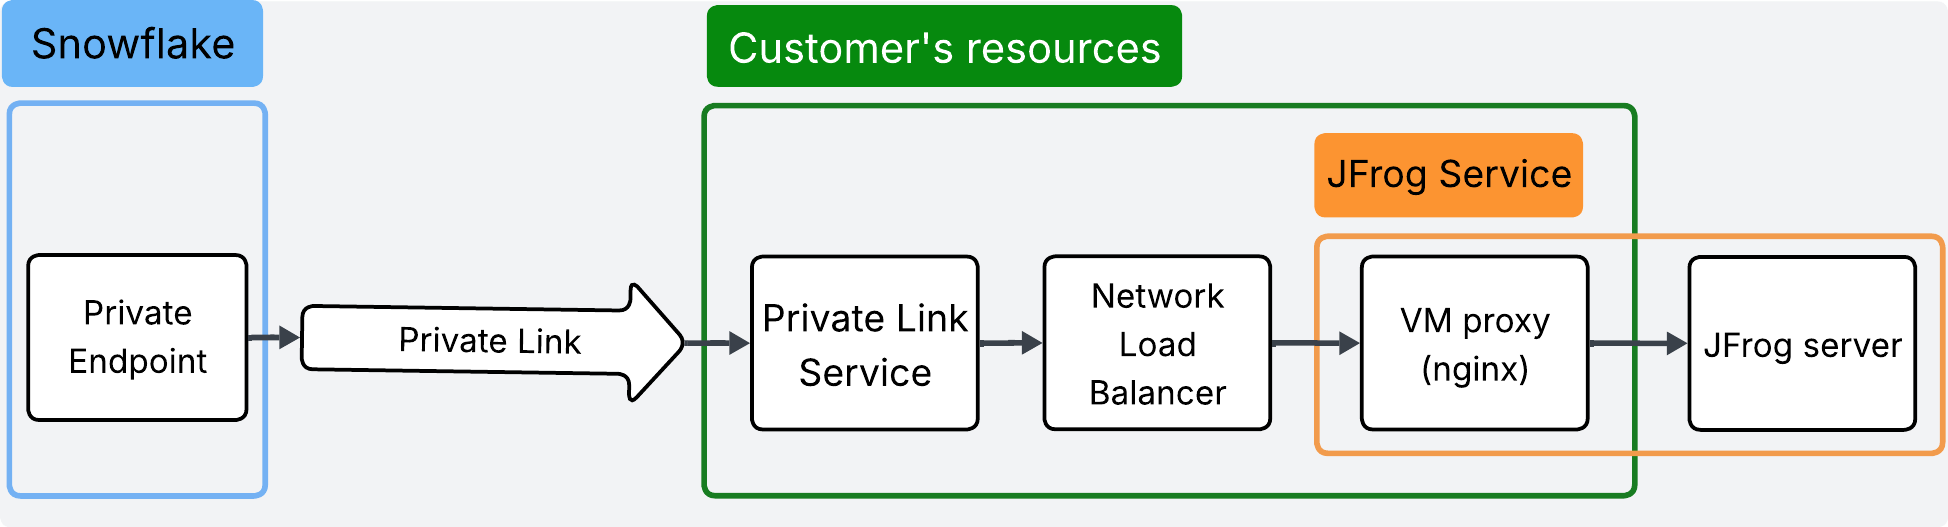
Bemerkung
This diagram uses JFrog as an example. You can replace JFrog with any PyPI-compatible repository.
Bemerkung
This setup assumes that the repository server is reachable from your cloud infrastructure. If not, you need to provide a connection between the proxy and the repository server. If the repository server has an IP allow-list, the proxy can have a static IP assigned, and this IP can be added to the allow-list on the repository server side.
For detailed manual setup instructions, see the following guides:
Repository server within the VPC
If the repository server is located within the same cloud (for example, Azure DevOps in Azure cloud), the setup is less complex. You only need to pass the traffic from the Private Link Service to the repository server on HTTPS (port 443).
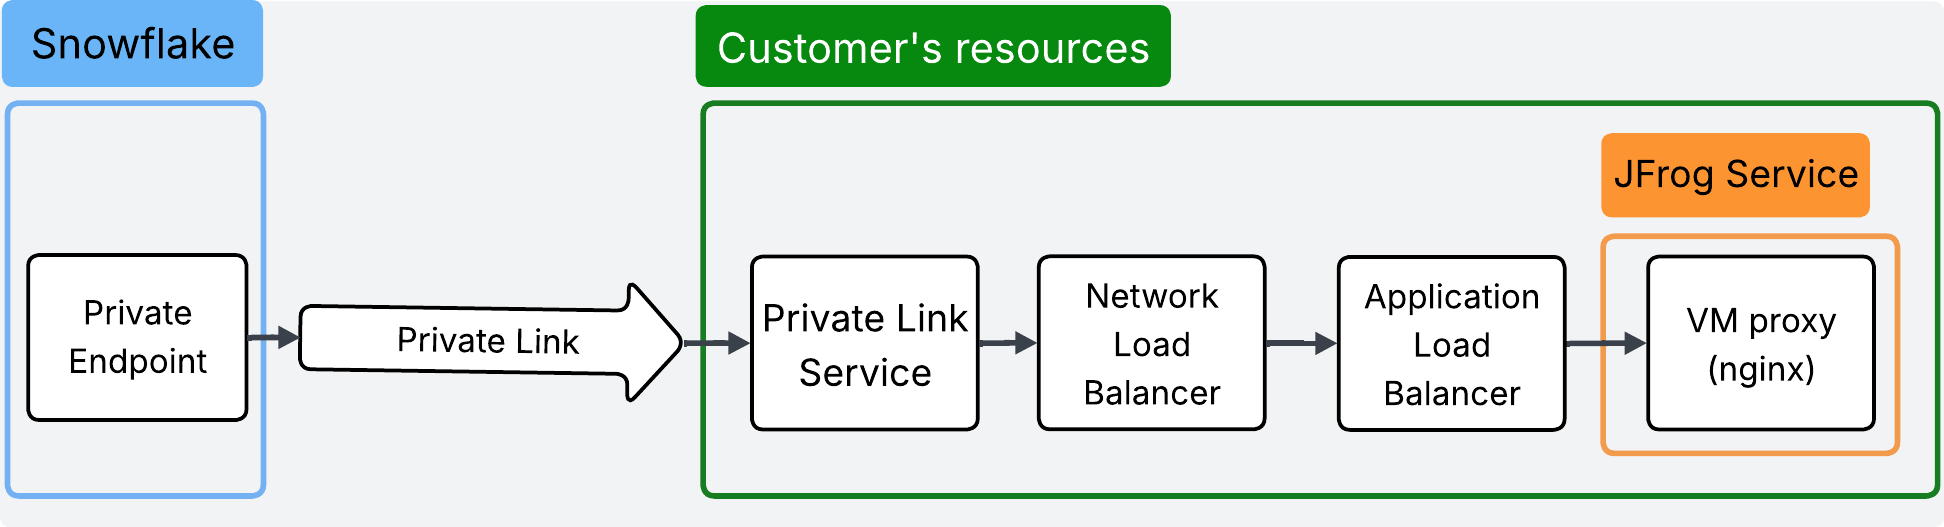
Bemerkung
This diagram uses JFrog as an example. You can replace JFrog with any PyPI-compatible repository.
Step 2: Provision Private Endpoint
On the Snowflake side, you need to provision a Private Endpoint that reaches your infrastructure through a private IP.
When provisioning the Private Endpoint, you need to provide two arguments: the Private Link Service ID from your cloud provider and the repository server domain name.
Since Snowflake reaches your repository server through the HTTPS protocol, the domain name must have a valid certificate.
Bemerkung
Customer-hosted artifact repositories currently do not support self-signed certificates (not CA-signed).
Private Endpoint provision for AWS:
Private Endpoint provision for Azure:
Step 3: Accept Private Endpoint request in Private Link Service
After the Private Endpoint is provisioned, you should see the awaiting Private Endpoint connection in your cloud Private Link Service. To finish the Private Endpoint setup, accept the connection request.
You can check the status of provisioning by calling the SYSTEM$GET_PRIVATELINK_ENDPOINTS_INFO system function. After you accept the Private Endpoint, the status field should change from:
AWS:
PendingtoAvailableAzure:
PendingtoAPPROVEDGCP:
PendingtoACCEPTED
Step-by-step manual config for AWS (repository server outside of the VPC)
Create and set up an EC2 proxy instance
Create an EC2 instance with Amazon Linux that allows SSH traffic from your local machine. Make sure its Security Group allows inbound traffic on ports 22 (SSH) and 443 (HTTPS).
Connect to the EC2 instance and install Docker:
Replace
jfrog_address.comwith your repository server domain and run:Create a Target Group for the EC2 proxy instance
Create a Target Group that points to the EC2 instance (from the previous step) on TCP port 443.
Create a Network Load Balancer
Create a Network Load Balancer of type Internal in the same availability zone as the EC2 instance (for example,
us-west-2b).If the Network Load Balancer operates in more than one zone (for example,
us-west-2aandus-west-2b), enable the Cross-zone load balancing option so traffic from all zones goes to the EC2 instance.The load balancer should listen on TCP port 443 and forward traffic to the Target Group from the previous step.
Create a VPC Endpoint Service
Create a VPC Endpoint Service that sends traffic to the Network Load Balancer from the previous step.
After creating the service, use the Service Name value for Step 2: Provision Private Endpoint.
Step-by-step manual config for Azure (repository server outside of the VPC)
Create and set up a VM instance
Create a VM instance with a VNet that allows SSH traffic from your local machine. Make sure network rules allow inbound traffic on ports 22 (SSH) and 443 (HTTPS).
Connect to the VM instance:
Install Docker (see Docker installation for Ubuntu) and start it:
Replace
jfrog_address.comwith your repository server domain and run:Create a Load Balancer
The load balancer should listen on TCP port 443 and forward traffic to the VM from the previous step.
Create a Private Link Service
Create a Private Link Service that sends traffic to the Load Balancer from the previous step.
After creating the service, use the ResourceID value for Step 2: Provision Private Endpoint.
Step-by-step manual config for GCP (repository server outside of the VPC)
Create and set up a VM instance
Create a VM instance with firewall rules that allow HTTPS (port 443) traffic.
Connect to the VM instance, install Docker (see Docker installation for Ubuntu), and start it:
Replace
jfrog_address.comwith your repository server domain and run:Add the VM to an instance group
Create an unmanaged Instance Group that points to the created VM.
Create a Load Balancer
Create a Network Passthrough Internal Load Balancer with:
Backend configuration: TCP protocol with a health check set on port 443.
Frontend configuration: Receives traffic only on port 443.
Create a Private Service Connect
In the Private Service Connect section, publish a service that sends traffic to the Load Balancer from the previous step.
Reserve a new subnet for your service, or use an existing one. Either automatically accept connections or define projects that will be accepted. Snowflake’s project ID can be retrieved from the result of calling:
After creating the service, use the Service attachment field for Step 2: Provision Private Endpoint.