Integrate customer-hosted Python artifact repositories
Customer-hosted artifact repositories connect private Python artifact repository solutions directly to Snowflake. By integrating these external repositories, you can use the same package management workflows you already apply internally.
Note
Warehouse-based Snowflake Notebooks, Streamlit, Snowflake Native Apps, and SPCS services are currently not supported.
Customer-hosted artifact repositories let you reuse the same package management and governance systems you already rely on, while making them available to Snowflake Python workloads. You can configure these repositories using API integrations and secrets, even setting them as account-wide defaults to simplify deployment.
Customer-hosted artifact repositories support PrivateLink for enhanced networking. This effectively bridges the gap between internal security standards and cloud-based data science workflows.
Key ways this integration improves security and governance include:
- Flexibility: Snowflake Package Policy has been expanded to support all Artifact Repositories, including customer-hosted repository objects.
- Security and Compliance: Use existing package governance and policies in customer-hosted repositories.
- Consistency: Customers can manage Snowflake packages using the same repositories they manage other code bases.
Authentication methods
During the Private Preview, the supported authentication methods for customer-hosted artifact repositories are:
- Username and password
- Tokens
These credentials must be stored securely within a Snowflake SECRET object. OAuth and IAM-based authentication are not supported during the Private Preview.
Configure a customer-hosted artifact repository
To configure a customer-hosted artifact repository in Snowflake, you must create and link three primary Snowflake objects:
- Snowflake SECRET: This object is used to securely store the repository credentials, such as a username and password or a token.
- API integration: This object describes the network path to reach the repository, specifying whether the connection should go through the public Internet or via a PrivateLink endpoint for enhanced security.
- Artifact repository object: This is the core object that ties together the API integration, the index URL of the repository, and the associated secret.
The following steps outline how to set this up:
-
Create a Secret for credentials
First, you must create a Snowflake SECRET to securely store the credentials (username/password or token) required to access your repository.
-
Create an API integration
Create an API integration to describe the route to the repository. You have two options:
-
Public HTTPS: For repositories accessible over the Internet.
Egress IP: You can securely allow ingress access from Snowflake to your package repository by allowing egress IP address ranges generated from Snowflake through the repository’s network firewall. To generate and use Snowflake egress IP addresses, follow these steps:
Note
Egress IP is available only for external access on AWS.
- Call SYSTEM$GET_SNOWFLAKE_EGRESS_IP_RANGES to get the current and upcoming IP ranges and their expiration times.
- Use the IP ranges you obtain to update firewall rules by using APIs, CLIs, or configuration management tools, as described in Automate IP address range refreshes.
-
PrivateLink: For internal repositories, use the parameter
USE_PRIVATELINK_ENDPOINT = TRUEto ensure traffic stays within a VPC/VNet.Note
Private Link requires Business Critical Edition (or higher).
- Provision a private connectivity endpoint in the Snowflake VPC or VNet to enable Snowflake to connect to your repository service. For information about how to do this, see SYSTEM$PROVISION_PRIVATELINK_ENDPOINT.
- Use the following code to create an API integration that uses private connectivity:
-
-
Create the Artifact Repository object
This object ties the previous components together with your repository’s index URL.
Following is an example of a Python UDF:
You can use customer-hosted repositories in Python stored procedures too. Note that your repository needs to host Snowpark for stored procedures to work.
Package retention and caching
When you create a UDF or stored procedure that installs packages from a customer-hosted repository, Snowflake can retain those packages by storing a copy of the exact files in Snowflake-managed storage. After a package is retained, Snowflake serves it from that copy instead of fetching it from your repository at runtime. As a result, your functions keep working even if the upstream repository later changes a package, removes a version, or becomes temporarily unreachable.
Retention applies to the Python UDFs and stored procedures you create against a customer-hosted repository. Packages are pinned when the function or procedure is created and reused on every later execution.
Control retention with PACKAGE_
The PACKAGE_RETENTION property on an artifact repository controls when packages are retained:
- Default (property not set): Asynchronous retention. Packages are retained automatically in the background after each
CREATE FUNCTIONorCREATE PROCEDURE. Until retention completes, executions are served from your repository; afterward they’re served from the retained copy. PACKAGE_RETENTION = ON_OBJECT_CREATION: Synchronous retention.CREATE FUNCTIONandCREATE PROCEDUREdownload and retain every package before the statement returns. If any package can’t be retained, the statement fails. Use this when you want packages guaranteed to be retained at creation time.
Set the property when you create the repository:
You can also change it on an existing repository:
Note
Snowflake requires a SHA256 hash for every retained package. If your repository doesn’t publish a SHA256 hash for a package, retention of that package fails. Most PyPI-compatible repositories publish these hashes by default.
Example: retained packages survive an unreachable repository
The following example creates a repository with synchronous retention, defines a UDF against it, then points the repository at an invalid URL to simulate the upstream becoming unreachable. Because the package was retained when the function was created, the UDF keeps executing — even on a new warehouse with no local cache. The same protection applies to asynchronous retention once background retention has completed.
Note
Retention protects execution, not creation. CREATE FUNCTION and CREATE PROCEDURE still resolve packages against your upstream repository, so the repository must be reachable whenever you create or replace a function or procedure — even for packages that are already retained. In the example above, defining a new function against the invalid URL would fail; only the already-created test_udf keeps working.
Encryption of retained packages
Retained packages are encrypted at rest in Snowflake-managed storage using Snowflake’s client-side encryption. If Tri-Secret Secure is enabled on your account, retained packages are protected by your customer-managed key as well.
Private Link setup
For Business Critical and VPS (Virtual Private Snowflake) customers, Snowflake supports the outbound private connectivity feature, which lets you set up a private connection between your Snowflake account and your cloud infrastructure.
To use this functionality, you must ensure proper setup of all infrastructure components on both sides: the Snowflake console and your own infrastructure.
Note
Snowflake supports only connections within the same cloud provider. For example, both Snowflake and your components must be in AWS.
Step 1: Set up Private Link Service and redirect HTTPS traffic to the repository server
On the customer infrastructure side, a Private Link Service needs to be created so the Private Endpoint provisioned in Step 2 can reach out. If the target Private Link Service is a VPC endpoint service, it needs to accept Snowflake’s principal ARN, which can be obtained from the SYSTEM$GET_PRIVATELINK_CONFIG system function.
With the Private Link Service, you should add necessary infrastructure components on your side to redirect the traffic to your repository server. The setup depends on where the repository server is located.
Repository server outside of the VPC
If the repository server is located outside of the cloud provider, then the traffic that goes from Snowflake to the Private Link Service needs to be redirected to this server. The recommended component for this is an nginx proxy. The proxy redirects all HTTPS (port 443) traffic to the repository server.
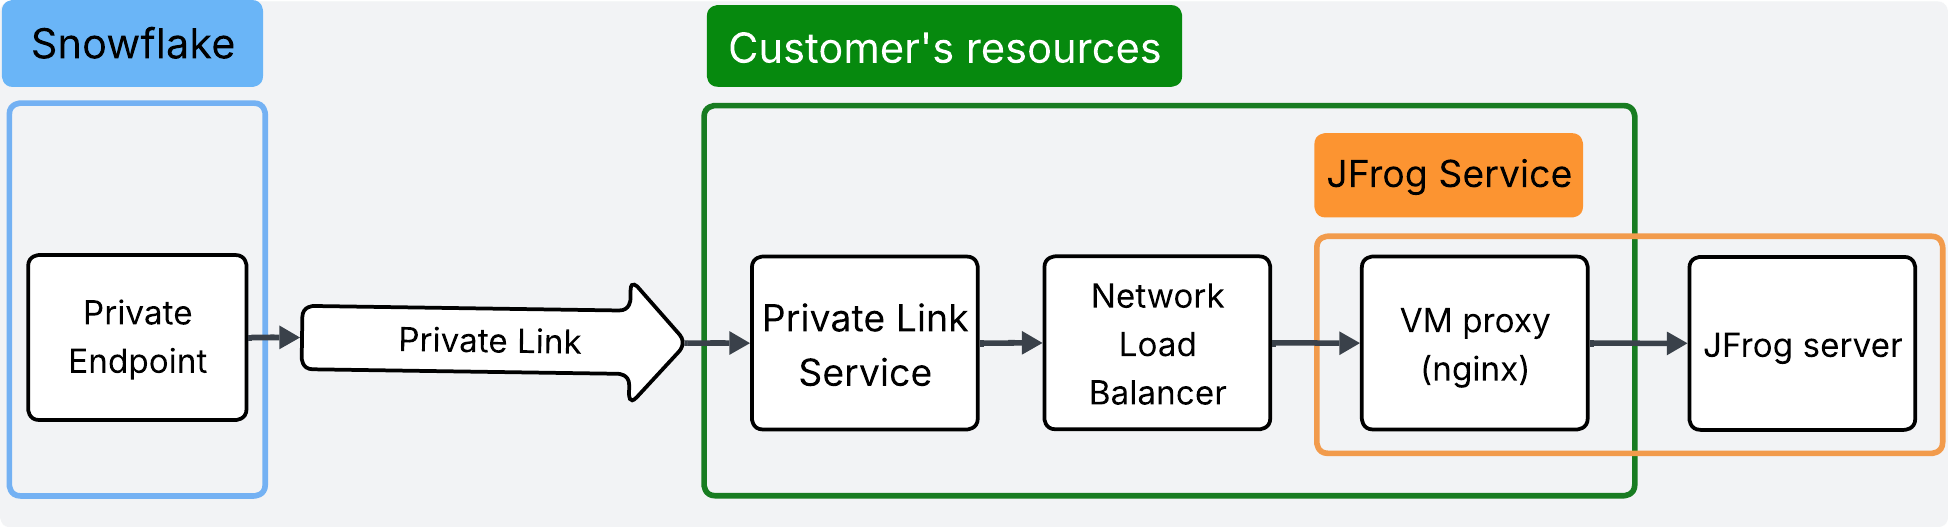
Note
This diagram uses JFrog as an example. You can replace JFrog with any PyPI-compatible repository.
Note
This setup assumes that the repository server is reachable from your cloud infrastructure. If not, you need to provide a connection between the proxy and the repository server. If the repository server has an IP allow-list, the proxy can have a static IP assigned, and this IP can be added to the allow-list on the repository server side.
For detailed manual setup instructions, see the following guides:
Repository server within the VPC
If the repository server is located within the same cloud (for example, Azure DevOps in Azure cloud), the setup is less complex. You only need to pass the traffic from the Private Link Service to the repository server on HTTPS (port 443).
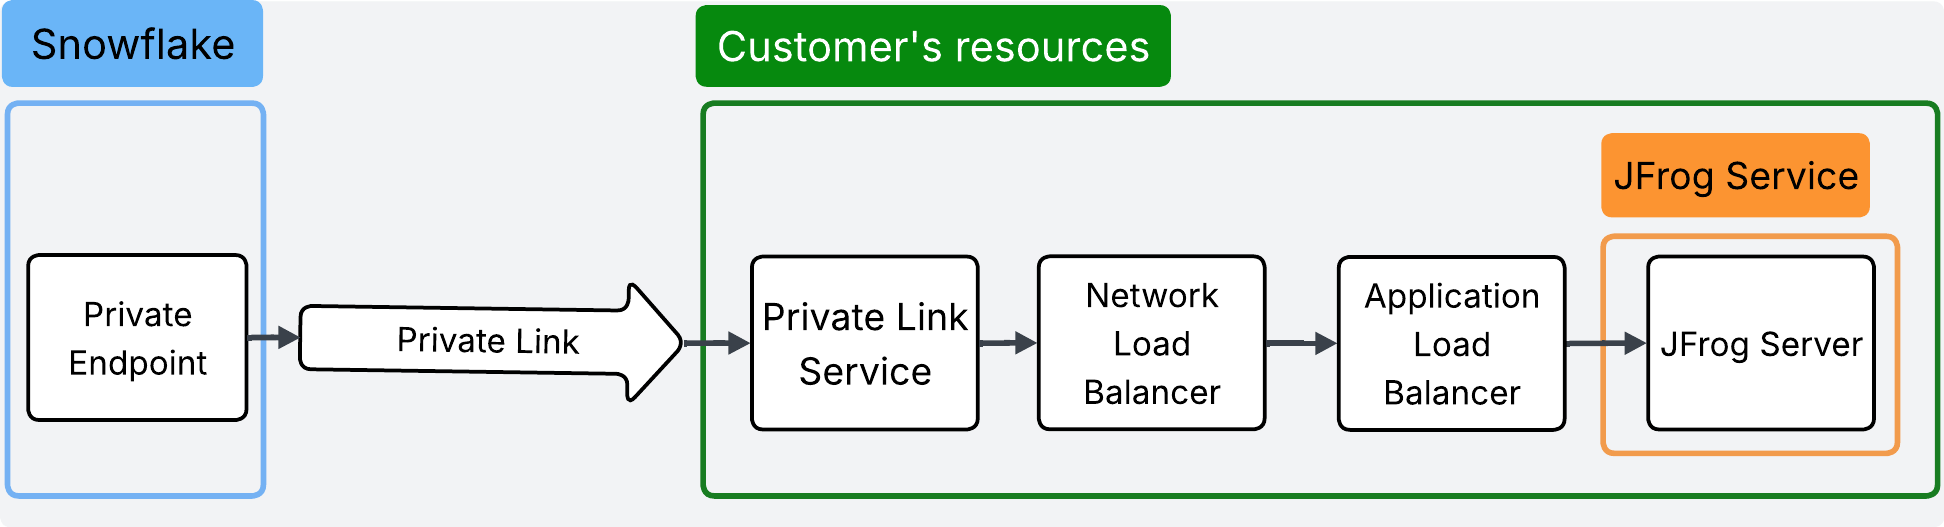
Note
This diagram uses JFrog as an example. You can replace JFrog with any PyPI-compatible repository.
Step 2: Provision Private Endpoint
On the Snowflake side, you need to provision a Private Endpoint that reaches your infrastructure through a private IP.
When provisioning the Private Endpoint, you need to provide two arguments: the Private Link Service ID from your cloud provider and the repository server domain name.
Since Snowflake reaches your repository server through the HTTPS protocol, the domain name must have a valid certificate.
Note
Customer-hosted artifact repositories currently do not support self-signed certificates (not CA-signed).
Private Endpoint provision for AWS:
Private Endpoint provision for Azure:
Step 3: Accept Private Endpoint request in Private Link Service
After the Private Endpoint is provisioned, you should see the awaiting Private Endpoint connection in your cloud Private Link Service. To finish the Private Endpoint setup, accept the connection request.
You can check the status of provisioning by calling the SYSTEM$GET_PRIVATELINK_ENDPOINTS_INFO system function. After you accept the Private Endpoint, the status field should change from:
- AWS:
PendingtoAvailable - Azure:
PendingtoAPPROVED - GCP:
PendingtoACCEPTED
Step-by-step manual config for AWS (repository server outside of the VPC)
-
Create and set up an EC2 proxy instance
Create an EC2 instance with Amazon Linux that allows SSH traffic from your local machine. Make sure its Security Group allows inbound traffic on ports 22 (SSH) and 443 (HTTPS).
Connect to the EC2 instance and install Docker:
Replace
jfrog_address.comwith your repository server domain and run: -
Create a Target Group for the EC2 proxy instance
Create a Target Group that points to the EC2 instance (from the previous step) on TCP port 443.
-
Create a Network Load Balancer
Create a Network Load Balancer of type Internal in the same availability zone as the EC2 instance (for example,
us-west-2b).If the Network Load Balancer operates in more than one zone (for example,
us-west-2aandus-west-2b), enable the Cross-zone load balancing option so traffic from all zones goes to the EC2 instance.The load balancer should listen on TCP port 443 and forward traffic to the Target Group from the previous step.
-
Create a VPC Endpoint Service
Create a VPC Endpoint Service that sends traffic to the Network Load Balancer from the previous step.
After creating the service, use the Service Name value for Step 2: Provision Private Endpoint.
Step-by-step manual config for Azure (repository server outside of the VPC)
-
Create and set up a VM instance
Create a VM instance with a VNet that allows SSH traffic from your local machine. Make sure network rules allow inbound traffic on ports 22 (SSH) and 443 (HTTPS).
Connect to the VM instance:
Install Docker (see Docker installation for Ubuntu) and start it:
Replace
jfrog_address.comwith your repository server domain and run: -
Create a Load Balancer
The load balancer should listen on TCP port 443 and forward traffic to the VM from the previous step.
-
Create a Private Link Service
Create a Private Link Service that sends traffic to the Load Balancer from the previous step.
After creating the service, use the ResourceID value for Step 2: Provision Private Endpoint.
Step-by-step manual config for GCP (repository server outside of the VPC)
-
Create and set up a VM instance
Create a VM instance with firewall rules that allow HTTPS (port 443) traffic.
Connect to the VM instance, install Docker (see Docker installation for Ubuntu), and start it:
Replace
jfrog_address.comwith your repository server domain and run: -
Add the VM to an instance group
Create an unmanaged Instance Group that points to the created VM.
-
Create a Load Balancer
Create a Network Passthrough Internal Load Balancer with:
- Backend configuration: TCP protocol with a health check set on port 443.
- Frontend configuration: Receives traffic only on port 443.
-
Create a Private Service Connect
In the Private Service Connect section, publish a service that sends traffic to the Load Balancer from the previous step.
Reserve a new subnet for your service, or use an existing one. Either automatically accept connections or define projects that will be accepted. Snowflake’s project ID can be retrieved from the result of calling:
After creating the service, use the Service attachment field for Step 2: Provision Private Endpoint.
Troubleshooting
Most artifact-repository failures fall into one of a few patterns: a missing entry in API_ALLOWED_PREFIXES, incorrect credentials in the SECRET, or a package that the upstream repository cannot serve. The HTTP status code in the error message is usually the strongest diagnostic signal. Start with the status-code table below, then run one or more of the four reproduction steps to confirm and narrow down the root cause. If you still need help, the last section lists what information to provide when you contact Snowflake support.
General guidelines:
- 5xx errors almost always indicate a Snowflake-side issue.
- 401 / 403 errors almost always indicate a repository-side issue.
- 400 errors almost always indicate a missing entry in
API_ALLOWED_PREFIXES.
HTTP status code reference
| HTTP status | What it usually means | First thing to try |
|---|---|---|
| 400 Bad Request | Snowflake. The URL Snowflake is about to fetch is not in API_ALLOWED_PREFIXES. Most often the wheel URL listed in your repo’s simple-index page points to a CDN/blob host (CloudFront for JFrog Cloud, a CDN host for Azure DevOps Artifacts, S3 for Sonatype Nexus) that isn’t in your allowlist. Look for error code: 10003. | Repro #3 to capture every host involved, then add the missing host(s) to API_ALLOWED_PREFIXES. |
| 401 Unauthorized | Repository-side. The credentials in your SECRET are not authenticating against your upstream repository. | Repro #2 with the same credentials. If curl also fails, recreate the secret. If curl succeeds but Snowflake still returns 401 — particularly with the message Authentication failed. Please check your credentials. — contact Snowflake support. |
| 403 Forbidden | Either side. (a) Your upstream repository is blocking that specific package or version (Nexus quarantine, Azure DevOps ACL, JFrog rule). (b) The same API_ALLOWED_PREFIXES problem as 400, but caught later: Snowflake began fetching from an allowed URL and the repository redirected (3xx) to a host that is not in the allowlist. | Repro #2 against the failing URL. If curl returns 403, the issue is on the repository side — contact your repository administrator. If curl succeeds, run Repro #3 to find the redirect target you need to add to API_ALLOWED_PREFIXES. |
| 404 Not Found | Either. (a) Your ARTIFACT REPOSITORY object doesn’t exist on this account, or your role lacks USAGE on it. (b) The package is blocked by the repository’s package policy (blocked packages deliberately appear non-existent). (c) The package/version genuinely doesn’t exist on your upstream. | Repro #1 to rule out (a) and (b). If those are clean, run Repro #2 and confirm the package is listed in the simple-index page. |
| 422 Unprocessable Entity | Snowflake. Internal request-validation error. You should not normally see this. | Capture the query ID and contact Snowflake support. |
| 500 Internal Server Error | Snowflake in nearly every case. JFrog and Nexus rarely emit 500s in practice. | Retry. If it persists, run Repro #4 to capture a clean query ID and contact Snowflake support. |
| 502 Bad Gateway | Snowflake. Snowflake could not reach your upstream repository — DNS resolution failed, TLS handshake failed, the connection timed out, the redirect chain exceeded 20 hops, or the repository returned an unparseable Location header. | Repro #2 from a workstation. If curl succeeds, the repository is reachable from the public Internet but Snowflake cannot reach it — contact Snowflake support with the query ID. For PrivateLink setups, see the PrivateLink section below. |
| 503 Service Unavailable | Snowflake. Transient backend condition. JFrog and Nexus rarely emit 503 errors. | Retry after a minute. If the error persists across multiple retries, contact Snowflake support. |
Unable to connect to the artifact repository server. 'null' | Snowflake. Transient internal connectivity issue. There is typically no query ID attached. | Retry. If the error persists, contact Snowflake support with the timestamp and your account locator. |
Repro #1 — Verify your Snowflake setup
Run this first. It confirms your four Snowflake objects (secret, API integration, artifact repository, and grants) are wired up correctly, and rules out the simplest causes — including both branches of the 404 row.
Confirm:
SHOW GRANTSshowsUSAGEon the artifact repository for the role that runs the UDF / stored procedure.DESCRIBE INTEGRATIONshowsAPI_PROVIDER = ARTIFACT_REPOSITORY_API,ENABLED = TRUE, your secret inALLOWED_AUTHENTICATION_SECRETS, and every host from Repro #3 inAPI_ALLOWED_PREFIXES.DESCRIBE ARTIFACT REPOSITORYshows anINDEX_URLending in/simple/, pointing at a host that is inAPI_ALLOWED_PREFIXES, withAUTHENTICATION_SECRETset to the same secret as on the API integration.SYSTEM$GET_ARTIFACT_REPOSITORY_INFOshows the same view, plus the currentpackages_policy_jsonif you have a package policy configured (which can cause 404 on blocked packages).
If this did not resolve the issue, include the output of all of the commands above (with the secret password redacted — DESCRIBE SECRET does not display it, but double-check) when you contact Snowflake support.
Repro #2 — Test your repo’s auth from outside Snowflake
Use this when you suspect an authentication or connectivity problem (typically a 401, 403, 404, or 502 in the table above). The idea is to send the same Authorization header Snowflake would send, from a machine that can reach your repo. For PrivateLink-only repositories, run these commands from a machine within your VPC that can reach the repository endpoint. Two styles, depending on which TYPE your SECRET uses.
Style A — TYPE = PASSWORD (username + password or PAT). This is the typical pattern for JFrog Cloud, Sonatype Nexus, and Azure DevOps Artifacts. The PAT goes in the PASSWORD field even though it isn’t a literal password. Snowflake sends Authorization: Basic base64(USERNAME:PASSWORD) — exactly what curl -u "USERNAME:PASSWORD" does.
Style B — TYPE = GENERIC_STRING (single opaque token). Use this when your repo expects a single token with no separate username — the form pip configures as https://<token>@<host>/simple/. Snowflake sends Authorization: Basic base64(SECRET_STRING).
Note
Redact your credentials before sharing the command or its output with anyone, including Snowflake support.
Interpret what curl returns:
- HTTP 200 + a list of wheels — auth is good. Move to Repro #3.
- HTTP 401 — your secret is wrong, the password/PAT has expired, or your repo expects a different username format (some repos want an email, some want an account name, some want the literal string
oauth2). Recreate the secret withALTER SECRET ... SET .... - HTTP 403 — you can reach the repository but it is refusing to serve this package or path. Contact your repository administrator (quarantine, ACL).
- Connection refused / timeout — network or firewall problem, not auth.
If this did not resolve the issue, include the exact curl command (with credentials redacted), the HTTP status it returned, and the first ~20 lines of the response body (also redacted) when you contact Snowflake support.
Repro #3 — Capture every host the install actually touches
Use this when the table or Repro #2 points at API_ALLOWED_PREFIXES — typically a 400 Bad Request (error code: 10003) or a 403 you confirmed isn’t from your repo.
On a clean Python virtualenv, reproduce the install with the same INDEX_URL Snowflake uses and ask pip to print everything it does:
If you’d rather use curl, the equivalent is to follow redirects on a wheel URL and print every hop:
List every distinct host that appears in the output — the index host, the wheel/blob host, any CDN redirect target. Every one of those hosts must be in API_ALLOWED_PREFIXES on your API INTEGRATION.
Examples of hosts that are commonly missed:
- JFrog Cloud —
<tenant>.jfrog.ioand a*.cloudfront.nethost. - Azure DevOps Artifacts —
pkgs.dev.azure.comand a separate CDN/blob host for downloads. - Sonatype Nexus with S3 blob storage — the Nexus host and the S3 host.
If this did not resolve the issue, include the full list of distinct hosts you observed (or the verbose pip output, with credentials redacted), and the current value of API_ALLOWED_PREFIXES from DESCRIBE INTEGRATION when you contact Snowflake support.
Repro #4 — Smallest possible repro inside Snowflake
Use this once Repro #2 and Repro #3 have confirmed your repository is reachable and configured. The goal is a clean, isolated query_id that Snowflake support can trace.
Tips:
- Test packages one at a time. If
setuptoolsis blocked upstream, every install will look broken. - Try a different
RUNTIME_VERSION(3.9,3.10,3.11) — wheels often exist for one Python version but not another.
If this did not resolve the issue, include the failing UDF SQL, the query_id from SELECT LAST_QUERY_ID();, and the full untruncated error message when you contact Snowflake support.
Other common pitfalls
- Upstream-side blocks (quarantine, ACL). Your repository can refuse to serve specific packages or versions — Nexus quarantine, Azure DevOps ACLs, JFrog repository rules. Snowflake surfaces these as HTTP 403 errors. Confirm with your repository administrator.
- Snowflake-side package policy blocks. If your
ARTIFACT REPOSITORYhas a package allow/deny policy, blocked packages return 404 (not 403) — they deliberately look as if they don’t exist. - Pinning around blocked transitive deps. If an indirect dep (e.g.
setuptools<82) is blocked, pin around it:PACKAGES = ('mypkg==1.2', 'setuptools<82'). - Python runtime mismatch. Wheels exist for 3.10 but not 3.11 (or vice versa). Try the other runtime.
- Trailing slash on
INDEX_URL.pipcares about the trailing/simple/. Re-paste the URL fromDESCRIBEand visually check it. - Token rotated on your side. Update the secret with
ALTER SECRET ... SET PASSWORD = '<new>'(re-test with Repro #2 first). - Embedded credentials in
INDEX_URL. Not allowed. Use aSECRET. - Handler / file-naming typos. The package may install fine and the real failure is
ModuleNotFoundErrorfor your code, not the package.
When you contact Snowflake support
If the steps above have not resolved the issue, submit a support case and provide as much of the following information as possible:
- Your account locator and region.
- The
query_idfrom the failing call (SELECT LAST_QUERY_ID();right after the failure). - The full error message — do not truncate. The upstream URL embedded in the error is the most diagnostic single piece of information.
- DDL of the
SECRET(withPASSWORDredacted), theAPI INTEGRATION, and theARTIFACT REPOSITORY, exactly asDESCRIBEreturns them. - Output of
SELECT SYSTEM$GET_ARTIFACT_REPOSITORY_INFO('<repo>');. - Output of
SELECT SYSTEM$GET_PRIVATELINK_ENDPOINTS_INFO();if you’re using PrivateLink. - The exact
curlandpip installcommands you ran in Repros #2 and #3, with credentials redacted, and their outputs. - Repository platform and edition (JFrog Cloud, JFrog self-hosted, Sonatype Nexus, Azure DevOps Artifacts, GCP Artifact Registry, AWS CodeArtifact, other).
- Whether the connection is over the public Internet or PrivateLink.