Unload into Microsoft Azure
If you already have a Microsoft Azure account and use Azure containers for storing and managing your files, you can make use of your existing containers and folder paths when unloading data from Snowflake tables. This topic describes how to use the COPY command to unload data from a table into an Azure container. You can then download the unloaded data files to your local file system.
Snowflake supports the following types of blob storage accounts:
- Blob storage
- Data Lake Storage Gen2
- General-purpose v1
- General-purpose v2
Snowflake does not support Data Lake Storage Gen1.
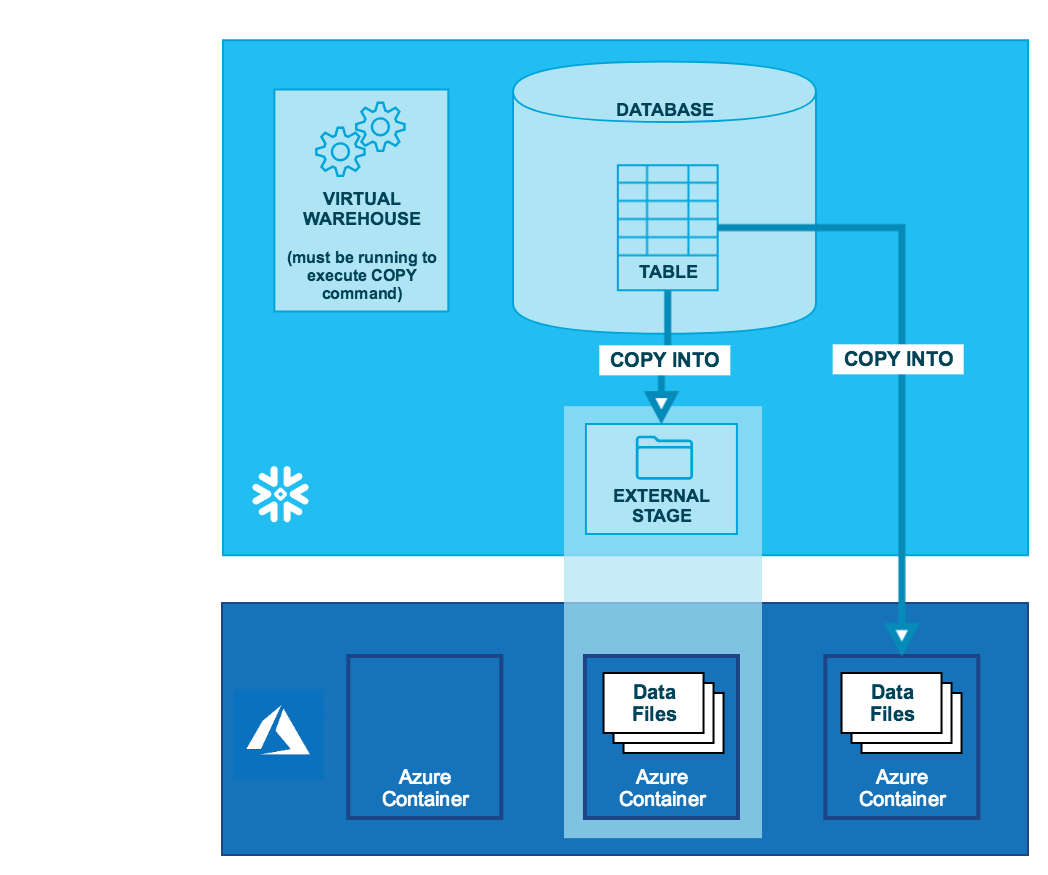
As illustrated in the diagram below, unloading data into an Azure container is performed in two steps:
- Step 1:
Use the COPY INTO <location> command to copy the data from the Snowflake database table into one or more files in an Azure container bucket. In the command, you specify a named external stage object that references the Azure container (recommended) or you can choose to unload directly to the container by specifying the URI and security credentials (if required) for the container.
Regardless of the method you use, this step requires a running, current virtual warehouse for the session if you execute the command manually or within a script. The warehouse provides the compute resources to write rows from the table.
- Step 2:
Use the interfaces/tools provided by Microsoft to download the files from the Azure container.
Tip
The instructions in this set of topics assume you have read File formats to unload data and have created a named file format, if desired.
Before you begin, you may also want to read Data unloading considerations for best practices, tips, and other guidance.
Allow the Azure Virtual Network subnet IDs
If an Azure administrator in your organization has not explicitly granted Snowflake access to your Azure storage account, you can do so now. Follow the steps in Allow the VNet subnet IDs in the data loading configuration instructions.
Configure an Azure container for unloading data
For Snowflake to write to an Azure container, you must configure access to your storage account. For instructions, see Configure an Azure container for loading data. Note that we provide a single set of instructions, which call out the specific permissions required for data loading or unloading operations.
Unload data into an external stage
External stages are named database objects that provide the greatest degree of flexibility for data unloading. Because they are database objects, privileges for named stages can be granted to any role.
You can create an external named stage using either Snowsight or SQL:
- Snowsight:
In the navigation menu, select Catalog » Database Explorer » <db_name> » Stages » Create
- SQL:
Create a named stage
The following example creates an external stage named my_ext_unload_stage with a container named mycontainer and a folder path named unload. The stage references the named file format object called my_csv_unload_format that was created in File formats to unload data:
Note
Use the blob.core.windows.net endpoint for all supported types of Azure blob storage accounts, including Data Lake Storage Gen2.
Note that the AZURE_SAS_TOKEN and MASTER_KEY values used in this example are for illustration purposes only.
Unload data to the named stage
-
Use the COPY INTO <location> command to unload data from a table into an Azure container using the external stage.
The following example uses the
my_ext_unload_stagestage to unload all the rows in themytabletable into one or more files into the Azure container. Ad1filename prefix is applied to the files: -
Use the tools provided by Azure to retrieve the objects (i.e. files generated by the command) from the container.
Unload data directly into an Azure container
-
Use the COPY INTO <location> command to unload data from a table directly into a specified Azure container. This option works well for ad hoc unloading, when you aren’t planning regular data unloading with the same table and container parameters.
You must specify the URI for the Azure container and the security credentials for accessing the container in the COPY command.
The following example unloads all the rows in the
mytabletable into one or more files with the folder path prefixunload/in an Azure container.This example references a storage integration created using CREATE STORAGE INTEGRATION by an account administrator (i.e. a user with the ACCOUNTADMIN role) or a role with the global CREATE INTEGRATION privilege. A storage integration allows users to avoid supplying credentials to access a private storage location:
-
Use the Azure console (or equivalent client application) to retrieve the objects (i.e. files generated by the command) from the container.