Executing SQL statements
The snow sql command lets you execute ad-hoc SQL queries or files containing SQL queries using the following options:
-
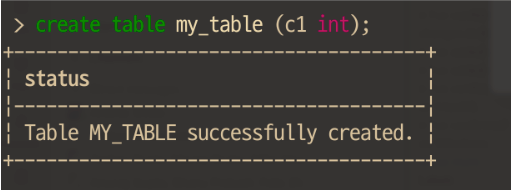
To execute an ad-hoc query, use the
-qcommand-line option. For example, to execute a simple SQL SELECT query, as shown in the following example: -
To execute a file containing a SQL query, use the
-fcommand-line option to specify the path to the file. For example, to execute a file containing a SQL query, as shown in the following example:
The snow sql command also can execute multiple statements; in that case, multiple result sets are returned. For example running:
results in the following output:
You can also execute scripting blocks in Snowflake CLI with a caveat relating to the $$ delimiter.
For example:
Some operating systems interpret $$, such as a process ID (PID), instead of recognizing it as a scripting block delimiter. To address this limitation, you can use the following alternatives:
- If you still want to specify the scripting block on the command line, you can escape the
$$delimiters, as in\$\$.- You can also put the scripting block with the default
$$delimiters into a separate file and call it with thesnow sql -f <filename>command.
For more information, see the snow sql command.
Using variables for SQL templates
In certain situations, you might want to change your SQL queries based on the context. The snow sql command supports client-side variable substitution that lets you use variables in the command that are resolved locally before submitting the query. Variables in the SQL string take the form <% variable_name %>, and the -D (or --variable) option specifies the value of the variable.
Note
You can currently use the SnowSQL
&variable_nameand<% variable_name %>syntax for templates. However, Snowflake recommends using the<% variable_name %>syntax.
For example, to specify a database using a client-side variable, you can enter a command similar to the following:
When executed, the command substitutes the value dev in the <% database %> variable to create the dev.logs filename and then sends the select * from dev.logs SQL query to Snowflake for processing.
You can also specify multiple variable inputs, as shown:
This example generates the following SQL query:
The --enable-templating option lets you specify which templating syntaxes are resolved in a SQL query. Snowflake CLI supports the following syntaxes:
STANDARD: Support the standard Snowflake CLI variable syntax (<% variable_name %>). Enabled by default.LEGACY: Support the SnowSQL variable syntax (&{ variable_name }or&variable_name). Enabled by default.JINJA: Support the jinja variable syntax ({{ variable_name }}). Disabled by default.ALL: Allow all supported syntaxes. Disabled by default.NONE: Do not support templating. Disabled by default.
The following examples illustrate different ways to support templating:
-
Disable templating, so that neither of the query variables is resolved:
-
Allow JINJA and STANDARD templating, while disallowing LEGACY templating:
-
Enable all syntaxes, so the SQL query resolves all three syntaxes:
Note
JINJA variables, if enabled, are resolved after STANDARD and LEGACY variables.
Storing variables in the snowflake.yml project definition file
Specifying variables as snow sql command-line options might not always be practical, or perhaps you might not want to specify sensitive values on the command line. In such cases, you can define variables and values in the snowflake.yml project definition file. Then you can just specify the variable names in the form <% ctx.env.<variable_name> %> instead of using the -D "<variable> = <value>" option.
Using the example from the previous section, you could store the database and role variables in snowflake.yml file and change the query to:
In this example, the snow sql command looks for the variable definitions in the project definition file and extracts the values without making them visible on the command line.
The snowflake.yml file should be located either in the current working directory or in the location specified with the -p option.
For more information about storing these values in the project definition file, see Use variables in SQL.
Executing SQL queries asynchronously
Snowflake CLI lets you execute one or more SQL queries asynchronously. Instead of waiting for a result, the snow sql command schedules the queries at Snowflake and returns a query ID. After a query finishes, you can get the result using the !result query command or the SQL RESULT_SCAN command.
To execute a SQL query asynchronously, end the query with ;> instead of ;, as shown:
The following example executes a single query asynchronously:
You can then use the returned query ID in the !result query command to display the query result:
You can also execute multiple queries in the query string, both asynchronously and synchronously, as shown:
Working with SQL query commands
Snowflake CLI provides the following commands that you can use inside your SQL queries:
- !source, which executes SQL in local files or URLs.
- !queries, which lists all SQL queries.
- !result, which displays the result of a SQL query.
- !abort, which aborts an active SQL query.
- !edit, which opens an external editor to modify and execute SQL commands.
Tip
If you enclose your SQL query in double quotes ("") instead of single quotes (''), you might
need to escape the exclamation point (!) based on which shell you use.
Execute SQL in local files or URLs
You can use the !source query command in your SQL query to execute SQL in local files or a URL-based file. For example, the following command executes all SQL commands in a local file named my_sql_code.sql:
You can also nest !source commands in the SQL files, such as:
In this example, the command executes the SELECT query and then executes the SQL commands in the code_file_2.sql file.
To execute multiple SQL files using !source, place each directive on a separate line in a wrapper file. For example, create a file named run_all.sql with the following contents:
Then execute the wrapper file:
All three files are executed sequentially on a single connection. Alternatively, you can use multiple -f options to achieve the same result without a wrapper file, such as snow sql -f script1.sql -f script2.sql -f script3.sql.
Before executing !source queries, Snowflake CLI does the following:
- Evaluates variable substitutions and templates.
- Reads the contents of all nested files to ensure that no recursion occurs.
When the variables and templates are resolved and no recursion is detected, the command sends the code to Snowflake for execution.
Note
If you use double quotes ("") instead of single quotes ('') around a !source query, you might need to escape the ! (\!) depending on which shell you use.
The following examples illustrate different ways you can execute source files.
-
Execute code in a local file.
This example assumes you have a simple query in a local SQL file.
To execute the code in the file, enter the following command:
-
Execute code in a URL-based file.
This example assumes you have the same simple query in a SQL file at a URL.
To execute the code in the file, enter the following command:
-
Execute code that uses variable substitution and templating.
This example assumes you have a query in a local SQL file that uses a template variable.
To execute the code in the file, enter the following command that defines the variable value:
Note
The !source command supports the legacy !load alias.
List all SQL queries
The !queries query command lists all queries for an account. By default, the command lists the 25 most recent queries executed in the current session.
For example, the following !queries query command returns the three most recent queries for a specific user:
You can use the following filters to narrow the list of returned queries:
| Filter | Default | Description |
|---|---|---|
| amount (integer) | 25 | Number of recent queries to return (default: 25). |
| session (boolean) | N/A | If provided, return only queries executed in the current session. |
| warehouse (string) | None | Return queries executed only on the specified warehouse. |
| user (string) | None | Return queries executed only by the specified user. |
| duration (milliseconds) | 0 | Return only queries that took at least the specified number of milliseconds. |
| start_date (string) | None | Return only queries executed after the specified date. Date is expected to be provided in ISO format (for example 2025-01-01T09:00:00) |
| end_date (string) | None | Return only queries executed before the specified date. Date is expected to be provided in ISO format (for example 2025-01-01T09:00:00) |
| start (integer) | None | Return only queries executed after the specified Unix timestamp (in milliseconds). |
| end (integer) | None | Return only queries executed before the specified Unix timestamp (in milliseconds). |
| status (enum) | None | Return only queries in one of the following statuses:
|
| type | None | Return only queries of one of the following types:
|
The following examples return queries using different filters:
-
Return the 25 most recent queries executed in the current session:
-
Return the 20 most recent queries executed in the account:
-
Return the 20 most recent queries executed in the account that took longer than 200 milliseconds to run:
-
Return the 25 most recent queries executed in the specified warehouse:
Return a completed SQL query result
The !result query command returns the result of a completed query, given its query ID. You can obtain the query ID in the following ways:
- Check the Query History page in Snowsight.
- Run the
!queriesSQL query command. - Use the ID returned by an asynchronous query.
Abort an active SQL query
The !abort query command aborts an active query, given its query ID. You can obtain the query ID in the following ways:
- Check the Query History page in Snowsight.
- Run the
!queriesSQL query command. - Use the ID returned by an asynchronous query.
Open an external editor to modify and execute SQL commands
The !edit query command opens an external editor where you can modify SQL commands to execute when you exit the editor. The editor is specified in the EDITOR environment variable or, if the environment variable is not set, the default system editor is used.
To enter commands in an external editor, follow these steps:
-
If not already defined in your shell, set the
EDITORenvironment variable to your preferred text editor. -
Enter the
snow sqlcommand: -
At the
>prompt, enter the!editcommand:The command opens the specified text editor.
-
Enter your SQL commands in the editor, as shown:
-
Save the file and exit the editor.
The commands you entered are displayed, as shown:
-
To execute the commands, select
ENTER.The command output is displayed, as shown:
Entering multiple commands in a single transaction
The --single-transaction option lets you enter multiple SQL commands to execute as an all-or-nothing set of commands.
By executing commands in a single transaction, you can ensure that all of the commands are completed successfully before committing any of the changes.
If any of the commands fail, none of the changes from the successful commands persist.
The following examples show successful and unsuccessful transactions:
-
Successful command execution
You can then verify that the commands were committed to the database:
-
Unsuccessful single transaction
You can then verify that the commands were not committed to the database:
Entering SQL commands in interactive mode
The snow sql command supports an interactive mode that lets you enter SQL commands one at a time. Interactive mode provides the following features:
-
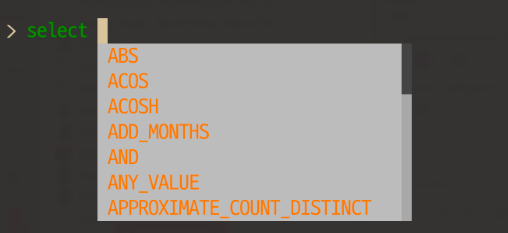
Syntax highlighting
-
Code completion while typing
-
Searchable history
Pressing
CTRL-R: lets you search your command history: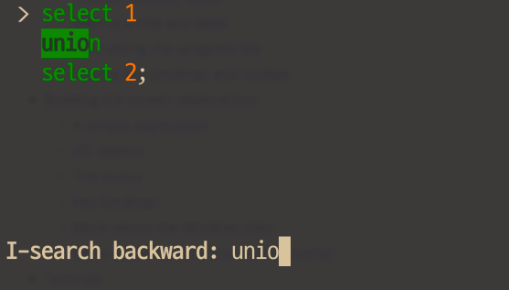
-
Multi-line input
Pressing
ENTERon a line that does not end with a semicolon (;) moves the cursor to the next line for more commands until a statement ends with a semicolon.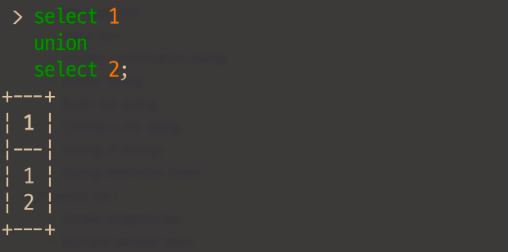
To use interactive mode, enter the snow sql command followed by ENTER, as shown:
The command opens a sub-shell with a > prompt where you can enter SQL commands interactively:
You can then enter SQL commands, as shown:
Note
You must end each SQL statement with a semicolon (;).
To exit interactive mode, enter exit, quit, or CTRL-D.