pandas on Snowflake
pandas on Snowflake lets you run your pandas code directly on your data in Snowflake. By simply changing the import statement and a few lines of code, you can get the familiar pandas experience to develop robust pipelines, while seamlessly benefiting from Snowflake’s performance and scalability as your pipelines scale.
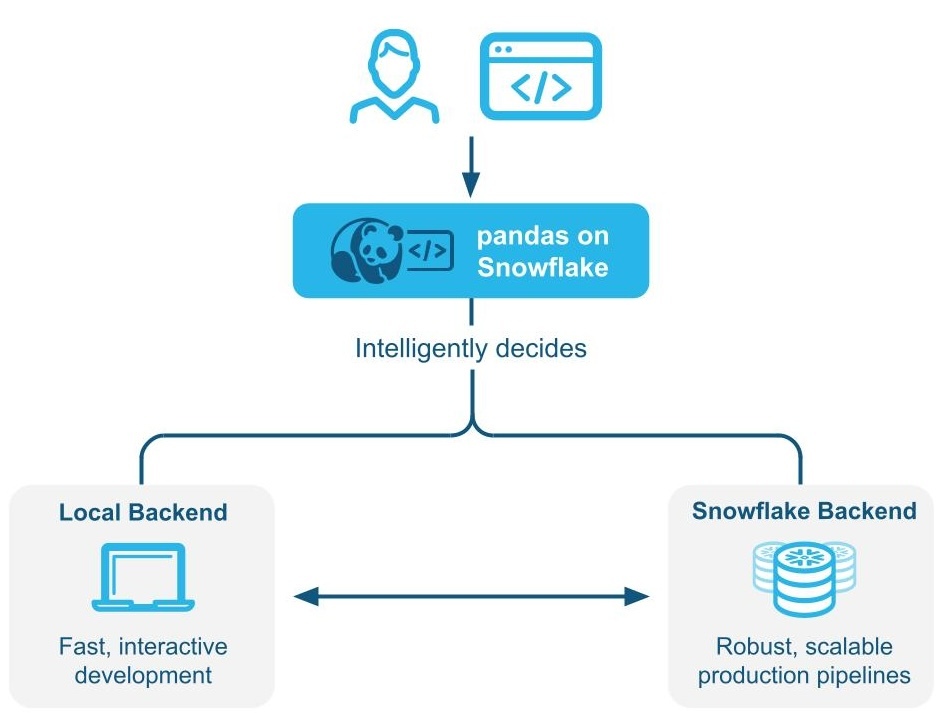
pandas on Snowflake는 :ref:`하이브리드 실행<label-pandas-hybrid-execution>`을 사용하여 pandas 코드를 로컬에서 실행할지 또는 Snowflake 엔진을 사용하여 규모를 확장하고 성능을 개선할지를 지능적으로 결정합니다. Snowflake에서 대규모 데이터 세트로 작업하는 경우 SQL로의 변환을 통해 Snowflake에서 기본적으로 워크로드를 실행하여 병렬화와 Snowflake의 데이터 거버넌스 및 보안 이점을 활용할 수 있습니다.
pandas on Snowflake는 Snowpark pandas API를 통해 제공되며, 이는 Snowflake 플랫폼 내에서 Python 코드의 확장 가능한 데이터 처리를 활성화하는 :doc:`Snowpark Python 라이브러리</developer-guide/snowpark/python/index>`의 일부로 제공됩니다.
pandas on Snowflake 사용의 이점
Meeting Python developers where they are: pandas on Snowflake offers a familiar interface to Python developers by providing a pandas-compatible layer that can run natively in Snowflake.
Scalable distributed pandas: pandas on Snowflake bridges the convenience of pandas with the scalability of Snowflake by leveraging existing query optimization techniques in Snowflake. Minimal code rewrites are required, simplifying the migration journey, so you can seamlessly move from prototype to production.
No additional compute infrastructure to manage and tune: pandas on Snowflake leverages the Snowflake’s powerful compute engine, so you do not need to set up or manage any additional compute infrastructure.
pandas on Snowflake 시작하기
참고
pandas on Snowflake를 사용하는 방법에 대한 실습 예제는 이 `Notebook<https://github.com/Snowflake-Labs/snowflake-python-recipes/blob/main/pandas%20on%20Snowflake%20101/pandas%20on%20Snowflake%20101.ipynb>`_을 확인하고 이 `동영상<https://www.youtube.com/watch?v=p9eX0QQGiZE>`_을 시청하세요.
pandas on Snowflake를 설치하려면 conda 또는 pip를 사용하여 패키지를 설치할 수 있습니다. 자세한 지침은 설치 섹션을 참조하십시오.
pip install "snowflake-snowpark-python[modin]"
pandas on Snowflake가 설치되면 pandas를 import pandas as pd 로 가져오는 대신 다음 두 줄을 사용합니다.
import modin.pandas as pd
import snowflake.snowpark.modin.plugin
Here is an example of how you can start using pandas on Snowflake through the pandas on Snowpark Python library with Modin:
import modin.pandas as pd
import snowflake.snowpark.modin.plugin
# Create a Snowpark session with a default connection.
from snowflake.snowpark.session import Session
session = Session.builder.create()
# Create a Snowpark pandas DataFrame from existing Snowflake table
df = pd.read_snowflake('SNOWFALL')
# Inspect the DataFrame
df
DAY LOCATION SNOWFALL
0 1 Big Bear 8.0
1 2 Big Bear 10.0
2 3 Big Bear NaN
3 1 Tahoe 3.0
4 2 Tahoe NaN
5 3 Tahoe 13.0
6 1 Whistler NaN
7 Friday Whistler 40.0
8 3 Whistler 25.0
# In-place point update to fix data error.
df.loc[df["DAY"]=="Friday","DAY"]=2
# Inspect the columns after update.
# Note how the data type is updated automatically after transformation.
df["DAY"]
0 1
1 2
2 3
3 1
4 2
5 3
6 1
7 2
8 3
Name: DAY, dtype: int64
# Drop rows with null values.
df.dropna()
DAY LOCATION SNOWFALL
0 1 Big Bear 8.0
1 2 Big Bear 10.0
3 1 Tahoe 3.0
5 3 Tahoe 13.0
7 2 Whistler 40.0
8 3 Whistler 25.0
# Compute the average daily snowfall across locations.
df.groupby("LOCATION").mean()["SNOWFALL"]
LOCATION
Big Bear 9.0
Tahoe 8.0
Whistler 32.5
Name: SNOWFALL, dtype: float64
:code:`read_snowflake`는 Snowflake 뷰, 동적 테이블, Iceberg 테이블 등에서 읽기를 지원합니다. SQL 쿼리를 직접 전달하고 pandas on Snowflake DataFrame를 다시 가져와 SQL과 pandas on Snowflake 간을 쉽고 원활하게 이동할 수도 있습니다.
summary_df = pd.read_snowflake("SELECT LOCATION, AVG(SNOWFALL) AS avg_snowfall FROM SNOWFALL GROUP BY LOCATION")
summary_df
하이브리드 실행의 작동 방식
참고
Snowpark Python 버전 1.40.0부터는 pandas on Snowflake를 사용할 때 하이브리드 실행이 기본적으로 활성화됩니다.
pandas on Snowflake는 하이브리드 실행을 사용하여 pandas 코드를 로컬에서 실행할지 Snowflake 엔진을 사용하여 규모를 확장하고 성능을 개선할지를 결정합니다. 이를 통해 코드를 실행하는 가장 최적의 효율적인 방법을 생각할 필요 없이 친숙한 pandas 코드를 계속 작성하여 강력한 파이프라인을 개발하면서, 파이프라인이 확장됨에 따라 Snowflake의 성능과 확장성을 원활하게 활용할 수 있습니다.
예 1: 작은 11행 DataFrame를 인라인으로 만듭니다. 하이브리드 실행을 사용하면 Snowflake는 작업을 실행하기 위해 로컬 메모리 내 pandas 백엔드를 선택합니다.
# Create a basic dataframe with 11 rows
df = pd.DataFrame([
("New Year's Day", "2025-01-01"),
("Martin Luther King Jr. Day", "2025-01-20"),
("Presidents' Day", "2025-02-17"),
("Memorial Day", "2025-05-26"),
("Juneteenth National Independence Day", "2025-06-19"),
("Independence Day", "2025-07-04"),
("Labor Day", "2025-09-01"),
("Columbus Day", "2025-10-13"),
("Veterans Day", "2025-11-11"),
("Thanksgiving Day", "2025-11-27"),
("Christmas Day", "2025-12-25")
], columns=["Holiday", "Date"])
# Print out the backend used for this dataframe
df.get_backend()
# >> Output: 'Pandas'
예 2: 1,000만 개의 트랜잭션 행이 있는 테이블 시드
# Create a 10M row table in Snowflake and populate with sythentic data
session.sql('''CREATE OR REPLACE TABLE revenue_transactions (Transaction_ID STRING, Date DATE, Revenue FLOAT);''').collect()
session.sql('''SET num_days = (SELECT DATEDIFF(DAY, '2024-01-01', CURRENT_DATE));''').collect()
session.sql('''INSERT INTO revenue_transactions (Transaction_ID, Date, Revenue) SELECT UUID_STRING() AS Transaction_ID, DATEADD(DAY, UNIFORM(0, $num_days, RANDOM()), '2024-01-01') AS Date, UNIFORM(10, 1000, RANDOM()) AS Revenue FROM TABLE(GENERATOR(ROWCOUNT => 10000000));''').collect()
# Read Snowflake table as Snowpark pandas dataframe
df_transactions = pd.read_snowflake("REVENUE_TRANSACTIONS")
Snowflake에 있는 대규모 테이블이므로 테이블이 Snowflake를 백엔드로 활용하는 것을 볼 수 있습니다.
print(f"The dataset size is {len(df_transactions)} and the data is located in {df_transactions.get_backend()}.")
# >> Output: The dataset size is 10000000 and the data is located in Snowflake.
#Perform some operations on 10M rows with Snowflake
df_transactions["DATE"] = pd.to_datetime(df_transactions["DATE"])
df_transactions.groupby("DATE").sum()["REVENUE"]
예 3: 데이터를 필터링하고 groupby 집계를 수행하여 7개 행의 데이터를 생성합니다.
데이터가 필터링되면 출력이 7행의 데이터에 불과하므로 Snowflake는 백엔드 엔진 변경 사항의 백엔드 선택 항목을 Snowflake에서 pandas로 암시적으로 인식합니다.
# Filter to data in last 7 days
df_transactions_filter1 = df_transactions[(df_transactions["DATE"] >= pd.Timestamp.today().date() - pd.Timedelta('7 days')) & (df_transactions["DATE"] < pd.Timestamp.today().date())]
# Since filter is not yet evaluated, data stays in Snowflake
assert df_transactions_filter1.get_backend() == "Snowflake"
# After groupby operation, result is transfered from Snowflake to Pandas
df_transactions_filter1.groupby("DATE").sum()["REVENUE"]
Notes and limitations
DataFrame 유형은 백엔드가 변경되는 경우에도 항상 :code:`modin.pandas.DataFrame/Series/etc`이므로 다운스트림 코드와의 상호 운용성 및 호환성이 보장됩니다.
사용할 백엔드를 결정하기 위해 Snowflake는 각 단계에서 DataFrame의 정확한 길이를 계산하는 대신, 행 크기 추정치를 사용하는 경우가 있습니다. 즉, Snowflake는 데이터 세트가 더 커지거나 작아질 때(예: 필터, 집계) 작업 직후에 항상 최적의 백엔드로 전환하지는 못할 수 있습니다.
여러 백엔드 간에 둘 이상의 DataFrames를 결합하는 작업이 있는 경우 Snowflake는 가장 낮은 데이터 전송 비용을 기준으로 데이터를 이동할 위치를 결정합니다.
Snowflake가 필터링된 기본 데이터의 크기를 추정하지 못할 수 있으므로 필터 작업을 수행해도 데이터가 이동되지 않을 수 있습니다.
메모리 내 Python 데이터로 구성된 DataFrames는 다음과 같이 pandas 백엔드를 사용합니다.
pd.DataFrame([1])
pd.DataFrame(pandas.DataFrame([1]))
pd.Series({'a': [4]})
An empty DataFrame: pd.DataFrame()
DataFrames는 제한된 작업 세트에서 Snowflake 엔진으로부터 pandas 엔진으로 자동 이동합니다. 이러한 작업에는
df.apply,df.plot,df.iterrows,df.itertuples, :code:`series.items`가 포함되고, 축소 작업을 통해 더 작은 데이터 크기가 보장될 수 있습니다. 데이터 마이그레이션이 발생할 수 있는 지점에서 모든 작업이 지원되는 것은 아닙니다.:code:`pd.concat`와 같은 작업이 여러 DataFrames에서 수행되는 경우를 제외하고 하이브리드 실행은 pandas 엔진에서 Snowflake로 DataFrame을 자동으로 이동하지 않습니다.
:code:`pd.concat`과 같은 작업이 여러 DataFrames에 작동하지 않는 한, Snowflake는 DataFrame을 pandas 엔진에서 Snowflake로 자동으로 다시 이동하지 않습니다.
When you should use pandas on Snowflake
다음 중 하나라도 해당하는 경우 pandas on Snowflake를 사용해야 합니다.
You are familiar with the pandas API and the broader PyData ecosystem.
You work on a team with others who are familiar with pandas and want to collaborate on the same codebase.
You have existing code written in pandas.
You prefer more accurate code completion from AI-based copilot tools.
자세한 내용은 Snowpark DataFrames vs Snowpark pandas DataFrame: 어떤 것을 선택해야 할까요? 섹션을 참조하십시오.
Snowpark DataFrames과 함께 pandas on Snowflake 사용하기
pandas on Snowflake와 DataFrame API는 상호 운용성이 뛰어나기 때문에 두 가지 APIs를 모두 활용하는 파이프라인을 구축할 수 있습니다. 자세한 내용은 Snowpark DataFrames vs Snowpark pandas DataFrame: 어떤 것을 선택해야 할까요? 섹션을 참조하십시오.
다음 작업을 사용하여 Snowpark DataFrames와 Snowpark pandas DataFrames 간의 변환을 수행할 수 있습니다.
작업 |
입력 |
출력 |
|---|---|---|
Snowpark DataFrame |
Snowpark pandas DataFrame |
|
Snowpark pandas DataFrame 또는 Snowpark pandas 시리즈 |
Snowpark DataFrame |
pandas on Snowflake와 네이티브 pandas 비교 방법
pandas on Snowflake and native pandas have similar DataFrame APIs with matching signatures and similar semantics. pandas on Snowflake provides the same API signature as native pandas and provides scalable computation with Snowflake. pandas on Snowflake respects the semantics described in the native pandas documentation as much as possible, but it uses the Snowflake computation and type system. However, when native pandas executes on a client machine, it uses the Python computation and type system. For information about the type mapping between pandas on Snowflake and Snowflake, see Data types.
Starting with Snowpark Python 1.40.0, pandas on Snowflake is best used with data which is already in Snowflake. To convert between native pandas and pandas on Snowflake type, use the following operations:
작업 |
입력 |
출력 |
|---|---|---|
Snowpark pandas DataFrame |
Native pandas DataFrame - Materialize all data to the local environment. If the dataset is large, this may result in an out-of-memory error. |
|
네이티브 pandas DataFrame, 원시 데이터, Snowpark pandas 오브젝트 |
Snowpark pandas DataFrame |
실행 환경
pandas: Operates on a single machine and processes in-memory data.pandas on Snowflake: Integrates with Snowflake, which allows for distributed computing across a cluster of machines for large datasets, while leveraging in memory pandas for processing small datasets. This integration enables handling of much larger datasets that exceed the memory capacity of a single machine. Note that using the Snowpark pandas API requires a connection to Snowflake.
Lazy versus eager evaluation
pandas: Executes operations immediately and materializes results fully in memory after each operation. This eager evaluation of operations might lead to increased memory pressure because data must be moved extensively within a machine.pandas on Snowflake: pandas와 동일한 API 경험을 제공합니다. pandas의 즉시 평가 모델을 모방하지만, 내부적으로는 지연 평가 쿼리 그래프를 구축하여 작업 전반에 걸쳐 최적화를 가능하게 합니다.쿼리 그래프를 통해 작업을 융합하고 트랜스파일링하면 기본 분산형 Snowflake 컴퓨팅 엔진에 대한 추가적인 최적화 기회를 얻을 수 있어, pandas를 Snowflake 내에서 직접 실행할 때보다 비용과 엔드투엔드 파이프라인 런타임이 모두 감소합니다.
참고
I/O-related APIs and APIs whose return value is not a Snowpark pandas object (that is,
DataFrame,SeriesorIndex) always evaluate eagerly. For example:read_snowflaketo_snowflaketo_pandasto_dictto_list__repr__The dunder method,
__array__which can be called automatically by some third-party libraries such as scikit-learn. Calls to this method will materialize results to the local machine.
데이터 소스 및 저장소
pandas: IO 도구(텍스트, CSV, HDF5, …) 에서 pandas 설명서에 나열된 다양한 독자 및 작성자를 지원합니다.pandas on Snowflake: Can read and write from Snowflake tables and read local or staged CSV, JSON, or Parquet files. For more information, see IO(읽기 및 쓰기).
데이터 타입
pandas: 정수, 부동 소수점, 문자열,datetime타입, 범주형 타입 등 다양한 데이터 타입을 지원합니다. 또한 사용자 정의 데이터 타입도 지원합니다. pandas의 데이터 타입은 일반적으로 기본 데이터에서 파생되며 엄격하게 적용됩니다.pandas on Snowflake: Is constrained by Snowflake type system, which maps pandas objects to SQL by translating the pandas data types to the SQL types in Snowflake. A majority of pandas types have a natural equivalent in Snowflake, but the mapping is not always one to one. In some cases, multiple pandas types are mapped to the same SQL type.
다음 테이블에는 pandas와 Snowflake SQL 간 유형 매핑이 나와 있습니다.
pandas 타입 |
Snowflake 유형 |
|---|---|
모든 부호화/부호화되지 않은 정수 유형, pandas 확장 정수 유형 포함 |
NUMBER(38, 0) |
모든 부동소수점 타입, pandas 확장 부동소수점 데이터 타입 포함 |
FLOAT |
|
BOOLEAN |
|
STRING |
|
TIME |
|
DATE |
모든 시간대 무관 |
TIMESTAMP_NTZ |
모든 시간대 인식 |
TIMESTAMP_TZ |
|
ARRAY |
|
MAP |
혼합 데이터 타입을 갖는 오브젝트 열 |
VARIANT |
Timedelta64[ns] |
NUMBER(38, 0) |
참고
범주형, 기간형, 간격형, 희소형 및 사용자 정의 데이터 타입은 지원되지 않습니다. Timedelta는 현재 Snowpark 클라이언트의 panda에서만 지원됩니다. Timedelta를 다시 Snowflake에 쓰면 Number 유형으로 저장됩니다.
다음 테이블은 df.dtypes 를 사용하여 Snowflake SQL 유형을 pandas on Snowflake 유형에 다시 매핑한 것입니다.
Snowflake 유형 |
pandas on Snowflake 유형( |
|---|---|
NUMBER( |
|
NUMBER ( |
|
BOOLEAN |
|
STRING, TEXT |
|
VARIANT, BINARY, GEOMETRY, GEOGRAPHY |
|
ARRAY |
|
OBJECT |
|
TIME |
|
TIMESTAMP, TIMESTAMP_NTZ, TIMESTAMP_LTZ, TIMESTAMP_TZ |
|
DATE |
|
When you convert from the Snowpark pandas DataFrame to the native pandas DataFrame with to_pandas(), the native pandas DataFrame will
have refined data types compared to the pandas on Snowflake types, which are compatible with the SQL-Python 데이터 타입 매핑 for
functions and procedures.
형변환 및 타입 추론
pandas: NumPy 를 준수하며 기본적으로 암시적 형변환과 추론을 위해 NumPy 및 Python 타입 시스템을 따릅니다. 예를 들어, 부울을 정수형으로 취급하므로1 + True는2를 반환합니다.pandas on Snowflake: 앞의 테이블에 따라 NumPy 및 Python 유형을 Snowflake 유형에 매핑하고, 암시적 타입 형변환 및 추론 에 기본 Snowflake 타입 시스템을 사용합니다. 예를 들어, 논리 데이터 타입 에 따라 부울을 정수 유형으로 암시적으로 변환하지 않으므로1 + True는 형변환 오류가 발생합니다.
Null 값 처리
pandas: pandas 1.x 버전에서는 누락된 데이터를 처리 할 때 유연성이 우수하므로 모든 PythonNone,np.nan,pd.NaN,pd.NA및pd.NaT를 누락된 값으로 처리했습니다. 이후 버전의 pandas(2.2.x)에서는 이러한 값이 다른 값으로 처리됩니다.pandas on Snowflake: 나열된 모든 앞의 값을 누락된 값으로 처리하는 이전 pandas 버전과 유사한 접근법을 채택합니다. Snowpark는 pandas의NaN,NA및NaT를 재사용합니다. 그러나 이러한 모든 누락된 값은 서로 교환 가능하도록 취급되며 Snowflake 테이블에 SQL NULL로 저장됩니다.
오프셋/빈도 별칭
pandas: 버전 2.2.1에서는 pandas의 날짜 오프셋이 변경되었습니다. 한 글자 별칭'M','Q','Y'등은 더 이상 두 글자 오프셋용으로 사용되지 않습니다.pandas on Snowflake: pandas 시계열 설명서 에 설명되는 새로운 오프셋을 독점적으로 사용합니다.
Install the pandas on Snowflake library
전제 조건
다음 패키지 버전이 필요합니다.
Python 3.9(사용 중단됨), 3.10, 3.11, 3.12 또는 3.13
Modin version 0.32.0
pandas 버전 2.2.*
팁
Snowflake Notebooks 에서 pandas on Snowflake를 사용하려면 노트북의 pandas on Snowflake 의 설정 지침을 참조하십시오.
To install pandas on Snowflake in your development environment, follow these steps:
프로젝트 디렉터리로 변경하고 Python 가상 환경을 활성화합니다.
참고
The API is under active development, so we recommend installing it in a Python virtual environment instead of system-wide. This practice allows each project you create to use a specific version, which insulates you from changes in future versions.
You can create a Python virtual environment for a particular Python version by using tools like Anaconda, Miniconda, or virtualenv.
For example, to use conda to create a Python 3.12 virtual environment, run these commands:
conda create --name snowpark_pandas python=3.12 conda activate snowpark_pandas
참고
If you previously installed an older version of pandas on Snowflake using Python 3.9 and pandas 1.5.3, you will need to upgrade your Python and pandas versions as described above. Follow the steps to create a new environment with Python 3.10 to 3.13.
Install the Snowpark Python library with Modin:
pip install "snowflake-snowpark-python[modin]"
또는
conda install snowflake-snowpark-python modin==0.28.1
참고
Confirm that
snowflake-snowpark-pythonversion 1.17.0 or later is installed.
Snowflake에 인증하기
Before using pandas on Snowflake, you must establish a session with the Snowflake database. You can use a config file to choose the connection parameters for your session, or you can enumerate them in your code. For more information, see Creating a Session for Snowpark Python. If a unique active Snowpark Python session exists, pandas on Snowflake will automatically use it. For example:
import modin.pandas as pd
import snowflake.snowpark.modin.plugin
from snowflake.snowpark import Session
CONNECTION_PARAMETERS = {
'account': '<myaccount>',
'user': '<myuser>',
'password': '<mypassword>',
'role': '<myrole>',
'database': '<mydatabase>',
'schema': '<myschema>',
'warehouse': '<mywarehouse>',
}
session = Session.builder.configs(CONNECTION_PARAMETERS).create()
# pandas on Snowflake will automatically pick up the Snowpark session created above.
# It will use that session to create new DataFrames.
df = pd.DataFrame([1, 2])
df2 = pd.read_snowflake('CUSTOMER')
The pd.session is a Snowpark session, so you can do anything with it that you can do with any other Snowpark session. For example, you can use it to execute an arbitrary SQL query,
which results in a Snowpark DataFrame as per the Session API, but note that
the result is a Snowpark DataFrame, not a Snowpark pandas DataFrame.
# pd.session is the session that pandas on Snowflake is using for new DataFrames.
# In this case it is the same as the Snowpark session that we've created.
assert pd.session is session
# Run SQL query with returned result as Snowpark DataFrame
snowpark_df = pd.session.sql('select * from customer')
snowpark_df.show()
Alternatively, you can configure your Snowpark connection parameters in a configuration file. This eliminates the need to enumerate connection parameters in your code, which allows you to write your pandas on Snowflake code almost as you would normally write pandas code.
Create a configuration file located at
~/.snowflake/connections.tomlthat looks something like this:default_connection_name = "default" [default] account = "<myaccount>" user = "<myuser>" password = "<mypassword>" role="<myrole>" database = "<mydatabase>" schema = "<myschema>" warehouse = "<mywarehouse>"
To create a session using these credentials, use
snowflake.snowpark.Session.builder.create():import modin.pandas as pd import snowflake.snowpark.modin.plugin from snowflake.snowpark import Session # Session.builder.create() will create a default Snowflake connection. Session.builder.create() # create a DataFrame. df = pd.DataFrame([[1, 2], [3, 4]])
You can also create multiple Snowpark sessions, then assign one of them to pandas on Snowflake. pandas on Snowflake only uses one session, so you have to explicitly assign one
of the sessions to pandas on Snowflake with pd.session = pandas_session:
import modin.pandas as pd
import snowflake.snowpark.modin.plugin
from snowflake.snowpark import Session
pandas_session = Session.builder.configs({"user": "<user>", "password": "<password>", "account": "<account1>").create()
other_session = Session.builder.configs({"user": "<user>", "password": "<password>", "account": "<account2>").create()
pd.session = pandas_session
df = pd.DataFrame([1, 2, 3])
The following example shows that trying to use pandas on Snowflake when there is no active Snowpark session will raise a SnowparkSessionException with an
error like “pandas on Snowflake requires an active snowpark session, but there is none.” After you create a session, you can use pandas on Snowflake. For example:
import modin.pandas as pd
import snowflake.snowpark.modin.plugin
df = pd.DataFrame([1, 2, 3])
다음 예제에서는 활성 Snowpark 세션이 여러 개 있을 때 pandas on Snowflake를 사용하려고 하면 “There are multiple active snowpark sessions, but you need to choose one for pandas on Snowflake.”라는 메시지와 함께 SnowparkSessionException 이 발생한다는 것을 보여 줍니다.
import modin.pandas as pd
import snowflake.snowpark.modin.plugin
from snowflake.snowpark import Session
pandas_session = Session.builder.configs({"user": "<user>", "password": "<password>", "account": "<account1>"}).create()
other_session = Session.builder.configs({"user": "<user>", "password": "<password>", "account": "<account2>"}).create()
df = pd.DataFrame([1, 2, 3])
참고
You must set the session used for a new pandas on Snowflake DataFrame or Series via modin.pandas.session.
However, joining or merging DataFrames created with different sessions is not supported, so you should avoid repeatedly setting different sessions
and creating DataFrames with different sessions in a workflow.
API reference
현재 구현된 APIs와 사용 가능한 메서드의 전체 목록은 pandas on Snowflake API 참조 섹션을 참조하십시오.
지원되는 작업의 전체 목록은 pandas on Snowflake 참조의 다음 테이블을 참조하십시오.
하이브리드 실행을 위한 APIs 및 구성 매개 변수
하이브리드 실행은 데이터 세트 크기 추정과 DataFrame에 적용되는 작업의 조합을 사용하여 백엔드 선택을 결정합니다. 일반적으로 100,000개 행 미만의 데이터 세트는 로컬 pandas를 사용하는 경향이 있습니다. 데이터 세트가 로컬 파일에서 로드되지 않는 한, 100,000개 행을 초과하는 행은 Snowflake를 사용하는 경향이 있습니다.
전송 비용 구성
기본 전환 임계값을 다른 행 제한 값으로 변경하려면 DataFrame를 초기화하기 전에 환경 변수를 수정하면 됩니다.
# Change row transfer threshold to 500k
from modin.config.envvars import SnowflakePandasTransferThreshold
SnowflakePandasTransferThreshold.put(500_000)
이 값을 설정하면 Snowflake 외부로 행을 전송하는 데 패널티가 적용됩니다.
로컬 실행 제한 구성
DataFrame이 로컬이고, 병합을 위해 Snowflake로 다시 이동할 필요가 없는 한 일반적으로 로컬로 유지되지만, 로컬에서 처리할 수 있는 데이터의 최대 크기에 대해 고려되는 상한이 있습니다. 현재 이 경계는 1,000만 개 행입니다.
백엔드 확인 및 설정
선택한 현재 백엔드를 확인하려면 `df.getbackend()<https://docs.snowflake.com/en/developer-guide/snowpark/reference/python/latest/modin/pandas_api/modin.pandas.DataFrame.get_backend#modin.pandas.DataFrame.get_backend>`_ 명령을 사용할 수 있습니다. 이 명령은 로컬 실행의 경우 ``Pandas``를 반환하고, 푸시다운 실행의 경우 ``Snowflake``를 반환합니다.
set_backend 또는 해당 별칭 :code:`move_to`를 사용하여 선택한 현재 백엔드를 설정하려면:
df_local = df.set_backend('Pandas')
df_local = df.move_to('Pandas')
df_snow = df.set_backend('Snowflake')
백엔드를 고정할 수도 있습니다.
df.set_backend('Pandas', inplace=True)
데이터가 이동된 *이유*에 대한 정보를 검사하고 표시하려면:
pd.explain_switch()
백엔드를 고정하여 백엔드 선택 수동 재정의
기본적으로, Snowflake는 주어진 DataFrame 및 작업에 가장 적합한 백엔드를 자동으로 선택합니다. 자동 엔진 선택을 재정의하려면 `pin_backend()<https://docs.snowflake.com/en/developer-guide/snowpark/reference/python/latest/modin/pandas_api/modin.pandas.DataFrame.pin_backend#modin.pandas.DataFrame.pin_backend>`_ 메서드를 사용하여 오브젝트와 그로부터 생성된 모든 결과 데이터의 자동 전환을 비활성화할 수 있습니다.
pinned_df_snow = df.move_to('Snowflake').pin_backend()
To re-enable automatic backend switching, call unpin_backend():
unpinned_df_snow = pinned_df_snow.unpin_backend()
Snowpark pandas를 Snowflake Notebook에 사용하기
Snowflake 노트북에서 pandas on Snowflake를 사용하려면 Snowflake 노트북의 pandas on Snowflake 를 참고하십시오.
Python 워크시트에서 Snowpark pandas 사용하기
Snowpark pandas를 사용하려면 Python 워크시트 환경의 Packages 에서 modin 을 선택하여 Modin을 설치해야 합니다.
Python 함수의 반환 유형은 Settings > Return type 에서 선택할 수 있습니다. 기본적으로 Snowpark 테이블로 설정되어 있습니다. 결과적으로 Snowpark pandas DataFrame 을 표시하려면 to_snowpark() 를 호출하여 Snowpark pandas DataFrame 을 Snowpark DataFrame 으로 변환할 수 있습니다. 이 변환에는 I/O 비용이 발생하지 않습니다.
다음은 Python 워크시트와 함께 Snowpark pandas를 사용하는 예입니다.
import snowflake.snowpark as snowpark
def main(session: snowpark.Session):
import modin.pandas as pd
import snowflake.snowpark.modin.plugin
df = pd.DataFrame([[1, 'Big Bear', 8],[2, 'Big Bear', 10],[3, 'Big Bear', None],
[1, 'Tahoe', 3],[2, 'Tahoe', None],[3, 'Tahoe', 13],
[1, 'Whistler', None],['Friday', 'Whistler', 40],[3, 'Whistler', 25]],
columns=["DAY", "LOCATION", "SNOWFALL"])
# Print a sample of the dataframe to standard output.
print(df)
snowpark_df = df.to_snowpark(index=None)
# Return value will appear in the Results tab.
return snowpark_df
저장 프로시저에서 pandas on Snowflake 사용하기
저장 프로시저 에서 pandas on Snowflake를 사용하여 데이터 파이프라인을 구축하고 작업 으로 저장 프로시저의 실행을 예약할 수 있습니다.
SQL 을 사용하여 저장 프로시저를 만드는 방법은 다음과 같습니다.
CREATE OR REPLACE PROCEDURE run_data_transformation_pipeline_sp()
RETURNS VARCHAR
LANGUAGE PYTHON
RUNTIME_VERSION = 3.12
PACKAGES = ('snowflake-snowpark-python','modin')
HANDLER='data_transformation_pipeline'
AS $$
def data_transformation_pipeline(session):
import modin.pandas as pd
import snowflake.snowpark.modin.plugin
from datetime import datetime
# Create a Snowpark pandas DataFrame with sample data.
df = pd.DataFrame([[1, 'Big Bear', 8],[2, 'Big Bear', 10],[3, 'Big Bear', None],
[1, 'Tahoe', 3],[2, 'Tahoe', None],[3, 'Tahoe', 13],
[1, 'Whistler', None],['Friday', 'Whistler', 40],[3, 'Whistler', 25]],
columns=["DAY", "LOCATION", "SNOWFALL"])
# Drop rows with null values.
df = df.dropna()
# In-place point update to fix data error.
df.loc[df["DAY"]=="Friday","DAY"]=2
# Save Results as a Snowflake Table
timestamp = datetime.now().strftime("%Y_%m_%d_%H_%M")
save_path = f"OUTPUT_{timestamp}"
df.to_snowflake(name=save_path, if_exists="replace", index=False)
return f'Transformed DataFrame saved to {save_path}.'
$$;
다음은 Snowflake Python API 를 사용하여 저장 프로시저를 생성하는 방법입니다.
from snowflake.snowpark.context import get_active_session
session = get_active_session()
from snowflake.snowpark import Session
def data_transformation_pipeline(session: Session) -> str:
import modin.pandas as pd
import snowflake.snowpark.modin.plugin
from datetime import datetime
# Create a Snowpark pandas DataFrame with sample data.
df = pd.DataFrame([[1, 'Big Bear', 8],[2, 'Big Bear', 10],[3, 'Big Bear', None],
[1, 'Tahoe', 3],[2, 'Tahoe', None],[3, 'Tahoe', 13],
[1, 'Whistler', None],['Friday', 'Whistler', 40],[3, 'Whistler', 25]],
columns=["DAY", "LOCATION", "SNOWFALL"])
# Drop rows with null values.
df = df.dropna()
# In-place point update to fix data error.
df.loc[df["DAY"]=="Friday","DAY"]=2
# Save Results as a Snowflake Table
timestamp = datetime.now().strftime("%Y_%m_%d_%H_%M")
save_path = f"OUTPUT_{timestamp}"
df.to_snowflake(name=save_path, if_exists="replace", index=False)
return f'Transformed DataFrame saved to {save_path}.'
dt_pipeline_sproc = session.sproc.register(name="run_data_transformation_pipeline_sp",
func=data_transformation_pipeline,
replace=True,
packages=['modin', 'snowflake-snowpark-python'])
저장 프로시저를 호출하려면 Python에서 CALL run_data_transformation_pipeline_sp() 를 실행하거나 SQL에서 dt_pipeline_sproc() 를 실행하면 됩니다.
서드 파티 라이브러리와 함께 pandas on Snowflake 사용하기
pandas는 흔히 시각화 및 머신 러닝 애플리케이션을 위해 서드 파티 라이브러리 API와 함께 사용됩니다. pandas on Snowflake는 이러한 라이브러리 대부분과 상호 운용이 가능하므로 pandas DataFrames 로 명시적으로 변환하지 않고도 사용할 수 있습니다. 그러나 대부분의 서드 파티 라이브러리에서는 제한된 사용 사례를 제외하고는 분산 실행이 지원되지 않는 경우가 많다는 점에 유의하십시오. 따라서 대규모 데이터 세트에서는 성능이 느려질 수 있습니다.
지원되는 서드 파티 라이브러리
아래 목록에 있는 라이브러리는 pandas on Snowflake DataFrames 를 입력으로 허용하지만 모든 메서드가 테스트된 것은 아닙니다. API 수준에서 심층적인 상호 운용성 상태는 서드 파티 라이브러리와의 상호 운용성 섹션을 참조하십시오.
Plotly
Altair
Seaborn
Matplotlib
Numpy
scikit-learn
XGBoost
NLTK
Streamlit
pandas on Snowflake는 현재 np.where 에 대한 분산 구현 및 df.plot 과의 상호 운용성 등 특정 NumPy 및 Matplotlib APIs 에 대한 호환성이 제한되어 있습니다. 이러한 서드 파티 라이브러리로 작업할 때 to_pandas() 를 통해 Snowpark pandas DataFrames을 변환하면 여러 번의 I/O 호출을 피할 수 있습니다.
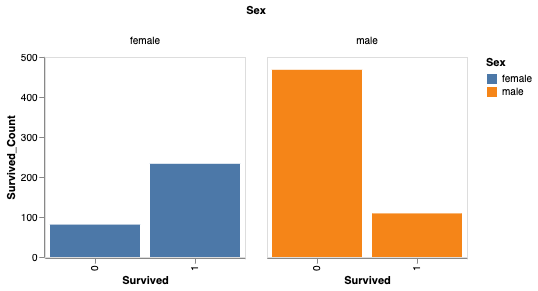
다음은 시각화용 Altair 와 머신 러닝용 scikit-learn 을 사용한 예제입니다.
# Create a Snowpark session with a default connection.
session = Session.builder.create()
train = pd.read_snowflake('TITANIC')
train[['Pclass', 'Parch', 'Sex', 'Survived']].head()
Pclass Parch Sex Survived
0 3 0 male 0
1 1 0 female 1
2 3 0 female 1
3 1 0 female 1
4 3 0 male 0
import altair as alt
survived_per_age_plot = alt.Chart(train).mark_bar(
).encode(
x=alt.X('Age', bin=alt.Bin(maxbins=25)),
y='count()',
column='Survived:N',
color='Survived:N',
).properties(
width=300,
height=300
).configure_axis(
grid=False
)
성별에 따라 생존율을 분석할 수도 있습니다.
# Perform groupby aggregation with Snowpark pandas
survived_per_gender = train.groupby(['Sex','Survived']).agg(count_survived=('Survived', 'count')).reset_index()
survived_per_gender_pandas = survived_per_gender
survived_per_gender_plot = alt.Chart(survived_per_gender).mark_bar().encode(
x='Survived:N',
y='Survived_Count',
color='Sex',
column='Sex'
).properties(
width=200,
height=200
).configure_axis(
grid=False
)
You can now use scikit-learn to train a simple model.
feature_cols = ['Pclass', 'Parch']
X_pandas = train.loc[:, feature_cols]
y_pandas = train["Survived"]
from sklearn.linear_model import LogisticRegression
logreg = LogisticRegression()
logreg.fit(X_pandas, y_pandas)
y_pred_pandas = logreg.predict(X_pandas)
acc_eval = accuracy_score(y_pandas, y_pred_pandas)
참고
성능을 높이려면 to_pandas() 를 통해 pandas DataFrames 로 변환하는 것이 좋습니다. 특히 scikit-learn과 같은 머신 러닝 라이브러리를 사용하는 경우 더욱 그렇습니다. 그러나 to_pandas() 함수는 모든 행을 수집하므로 sample(frac=0.1) 또는 head(10) 을 사용하여 데이터 프레임 크기를 먼저 줄이는 것이 좋습니다.
지원되지 않는 라이브러리
지원되지 않는 서드 파티 라이브러리를 pandas on Snowflake DataFrame 과 함께 사용하는 경우, DataFrame 을 서드 파티 라이브러리 메서드에 전달하기 전에 to_pandas() 를 호출하여 pandas on Snowflake DataFrame 을 pandas DataFrame 으로 변환하는 것이 좋습니다.
참고
to_pandas() 를 호출하면 데이터를 Snowflake에서 메모리로 가져오므로 대규모 데이터 세트와 민감한 사용 사례의 경우 이를 고려하십시오.
Snowpark pandas와 함께 Snowflake Cortex LLM 함수 사용하기
Snowpark pandas apply 함수 를 통해 Snowflake Cortex LLM 함수 를 사용할 수 있습니다.
특수 키워드 인자를 사용하여 함수를 적용합니다. 현재 지원되는 Cortex 함수는 다음과 같습니다.
다음은 Snowpark pandas DataFrame 의 여러 레코드에 걸쳐 TRANSLATE 함수를 사용하는 예입니다.
import modin.pandas as pd
import snowflake.snowpark.modin.plugin
from snowflake.cortex import Translate
content_df = pd.DataFrame(["good morning","hello", "goodbye"], columns=["content"])
result = content_df.apply(Translate, from_language="en", to_language="de")
result["content"]
출력:
Guten Morgen
Hallo
Auf Wiedersehen
Name: content, dtype: object
다음 예제는 ``reviews``라는 Snowflake 테이블에서 SENTIMENT (SNOWFLAKE.CORTEX) 함수를 사용합니다.
from snowflake.cortex import Sentiment
s = pd.read_snowflake("reviews")["content"]
result = s.apply(Sentiment)
result
다음은 EXTRACT_ANSWER (SNOWFLAKE.CORTEX) 를 사용하여 질문에 답변하는 예입니다.
from snowflake.cortex import ExtractAnswer
content = "The Snowflake company was co-founded by Thierry Cruanes, Marcin Zukowski, and Benoit Dageville in 2012 and is headquartered in Bozeman, Montana."
df = pd.DataFrame([content])
result = df.apply(ExtractAnswer, question="When was Snowflake founded?")
result[0][0][0]["answer"]
출력:
'2012'
참고
snowflake-ml-python 패키지를 설치해야 Cortex LLM 함수를 사용할 수 있습니다.
제한 사항
pandas on Snowflake에는 다음과 같은 제한 사항이 있습니다.
pandas on Snowflake는 OSS 서드 파티 라이브러리와의 호환성을 보장하지 않습니다. 그러나 1.14.0a1 버전부터 Snowpark pandas에는 NumPy, 특히
np.where사용에 대한 제한적 호환성이 적용됩니다. 자세한 내용은 NumPy 상호 운용성 섹션을 참조하십시오.When you call third-party library APIs with a Snowpark pandas DataFrame, Snowflake recommends that you convert the Snowpark pandas DataFrame to a pandas DataFrame by calling
to_pandas()before passing the DataFrame to the third-party library call. For more information, see 서드 파티 라이브러리와 함께 pandas on Snowflake 사용하기.pandas on Snowflake is not integrated with Snowpark ML. When you use Snowpark ML, we recommend that you convert the Snowpark pandas DataFrame to a Snowpark DataFrame using to_snowpark() before calling Snowpark ML.
지연
MultiIndex오브젝트는 지원되지 않습니다.MultiIndex를 사용하면 모든 데이터를 클라이언트 측으로 가져와야 하는 네이티브 pandasMultiIndex오브젝트를 반환합니다.Not all pandas APIs have a distributed implementation in pandas on Snowflake, although some are being added. For unsupported APIs,
NotImplementedErroris thrown. For information about supported APIs, see the API reference documentation.pandas on Snowflake는 pandas 2.2의 모든 패치 버전과 호환성을 제공합니다.
Snowpark pandas cannot be referenced within Snowpark pandas
applyfunction. You can only use native pandas insideapply.다음은 그 예입니다.
import modin.pandas as pd import pandas df.apply(lambda row: pandas.to_datetime(f"{row.date} {row.time}"), axis=1)
문제 해결하기
This section describes troubleshooting tips for using pandas on Snowflake.
When troubleshooting, try running the same operation on a native pandas DataFrame (or a sample) to see whether the same error persists. This approach might provide hints on how to fix your query. For example:
df = pd.DataFrame({"a": [1,2,3], "b": ["x", "y", "z"]}) # Running this in Snowpark pandas throws an error df["A"].sum() # Convert a small sample of 10 rows to pandas DataFrame for testing pandas_df = df.head(10).to_pandas() # Run the same operation. KeyError indicates that the column reference is incorrect pandas_df["A"].sum() # Fix the column reference to get the Snowpark pandas query working df["a"].sum()
If you have a long-running notebook opened, note that by default Snowflake sessions time out after the session is idle for 240 minutes (4 hours). When the session expires, if you run additional pandas on Snowflake queries, the following message appears: “Authentication token has expired. The user must authenticate again.” At this point, you must re-establish the connection to Snowflake. This might cause the loss of any unpersisted session variables. For more information about how to configure the session idle timeout parameter, see Session policies.
모범 사례
이 섹션에서는 pandas on Snowflake를 사용할 때 따라야 할 모범 사례에 대해 설명합니다.
Avoid using iterative code patterns, such as
forloops,iterrows, anditeritems. Iterative code patterns quickly increase the generated query complexity. Let pandas on Snowflake, not the client code, perform the data distribution and computation parallelization. With regard to iterative code patterns, look for operations that can be performed on the whole DataFrame, and use the corresponding operations instead.
for i in np.arange(0, 50):
if i % 2 == 0:
data = pd.concat([data, pd.DataFrame({'A': i, 'B': i + 1}, index=[0])], ignore_index=True)
else:
data = pd.concat([data, pd.DataFrame({'A': i}, index=[0])], ignore_index=True)
# Instead of creating one DataFrame per row and concatenating them,
# try to directly create the DataFrame out of the data, like this:
data = pd.DataFrame(
{
"A": range(0, 50),
"B": [i + 1 if i % 2 == 0 else None for i in range(50)],
},
)
Avoid calling
apply,applymap, andtransform, which are eventually implemented with UDFs or UDTFs, which might not be as performant as regular SQL queries. If the function applied has an equivalent DataFrame or series operation, use that operation instead. For example, instead ofdf.groupby('col1').apply('sum'), directly calldf.groupby('col1').sum().서드 파티 라이브러리 호출에 DataFrame 또는 계열을 전달하기 전에
to_pandas()를 호출합니다. pandas on Snowflake는 서드 파티 라이브러리와의 호환성을 보장하지 않습니다.Use a materialized regular Snowflake table to avoid extra I/O overhead. pandas on Snowflake works on top of a data snapshot that only works for regular tables. For other types, including external tables, views, and Apache Iceberg™ tables, a temporary table is created before the snapshot is taken, which introduces extra materialization overhead.
pandas on Snowflake는 빠른 제로 카피 복제 기능을 제공하는 동시에 DataFrames 를 사용하여 Snowflake 테이블에서 :code:`read_snowflake`을 생성합니다.
다른 작업을 진행하기 전에 결과 타입을 다시 확인하고 필요한 경우
astype을 사용하여 명시적 타입 형변환을 수행합니다.유형 추론 기능이 제한되어 있기 때문에 유형 힌트가 제공되지 않으면 결과에 모든 정수 값이 포함되어 있어도
df.apply는 오브젝트(베리언트) 유형의 결과를 반환합니다. 다른 작업에서dtype가int여야 하는 경우 계속하기 전에astype메서드를 호출하여 열 타입을 수정하여 명시적 타입 형변환을 수행할 수 있습니다.Avoid calling APIs that require evaluation and materialization unless necessary.
Series또는Dataframe을 반환하지 않는 APIs가 올바른 유형으로 결과를 도출하려면 즉시 평가와 구체화가 필요합니다. 플로팅 방법에도 마찬가지입니다. 불필요한 평가와 구체화를 최소화하기 위해 해당 APIs에 대한 호출을 줄이십시오.대규모 데이터 세트에서는
np.where(<cond>, <스칼라>, n)를 호출하지 마십시오.<스칼라>가 DataFrame에<cond>의 크기로 브로드캐스트되어 속도가 느려질 수 있습니다.반복적으로 구축된 쿼리로 작업할 때
df.cache_result를 사용하여 중간 결과를 구체화함으로써 반복되는 평가를 줄이고 전체 쿼리의 지연 시간을 개선하고 복잡성을 줄일 수 있습니다. 예:df = pd.read_snowflake('pandas_test') df2 = pd.pivot_table(df, index='index_col', columns='pivot_col') # expensive operation df3 = df.merge(df2) df4 = df3.where(df2 == True)
In the example above, the query to produce
df2is expensive to compute and is reused in the creation of bothdf3anddf4. Materializingdf2into a temporary table (making subsequent operations involvingdf2a table scan instead of a pivot) can reduce the overall latency of the code block:df = pd.read_snowflake('pandas_test') df2 = pd.pivot_table(df, index='index_col', columns='pivot_col') # expensive operation df2.cache_result(inplace=True) df3 = df.merge(df2) df4 = df3.where(df2 == True)
예
다음은 pandas 작업이 포함된 코드 예제입니다. 세 개의 열(COL_STR, COL_FLOAT 및 COL_INT)을 포함하는 pandas_test 라는 이름의 Snowpark pandas DataFrame으로 시작합니다. 이 예제와 관련된 노트북을 보려면 Snowflake-Labs 리포지토리의 pandas on Snowflake 예제 를 참조하십시오.
import modin.pandas as pd
import snowflake.snowpark.modin.plugin
from snowflake.snowpark import Session
CONNECTION_PARAMETERS = {
'account': '<myaccount>',
'user': '<myuser>',
'password': '<mypassword>',
'role': '<myrole>',
'database': '<mydatabase>',
'schema': '<myschema>',
'warehouse': '<mywarehouse>',
}
session = Session.builder.configs(CONNECTION_PARAMETERS).create()
df = pd.DataFrame([['a', 2.1, 1],['b', 4.2, 2],['c', 6.3, None]], columns=["COL_STR", "COL_FLOAT", "COL_INT"])
df
COL_STR COL_FLOAT COL_INT
0 a 2.1 1.0
1 b 4.2 2.0
2 c 6.3 NaN
We save the DataFrame as a Snowflake table named pandas_test, which we will use throughout our examples.
df.to_snowflake("pandas_test", if_exists='replace',index=False)
다음으로, Snowflake 테이블에서 DataFrame을 생성합니다. 열 COL_INT 를 삭제한 다음 결과를 row_position 열을 사용하여 Snowflake에 다시 저장합니다.
# Create a DataFrame out of a Snowflake table.
df = pd.read_snowflake('pandas_test')
df.shape
(3, 3)
df.head(2)
COL_STR COL_FLOAT COL_INT
0 a 2.1 1
1 b 4.2 2
df.dropna(subset=["COL_FLOAT"], inplace=True)
df
COL_STR COL_FLOAT COL_INT
0 a 2.1 1
1 c 6.3 2
df.shape
(2, 3)
df.dtypes
COL_STR object
COL_FLOAT float64
COL_INT int64
dtype: object
# Save the result back to Snowflake with a row_pos column.
df.reset_index(drop=True).to_snowflake('pandas_test2', if_exists='replace', index=True, index_label=['row_pos'])
The result is a new table, pandas_test2, which looks like this:
row_pos COL_STR COL_FLOAT COL_INT
0 1 a 2.0 1
1 2 b 4.0 2
IO(읽기 및 쓰기)
# Reading and writing to Snowflake
df = pd.DataFrame({"fruit": ["apple", "orange"], "size": [3.4, 5.4], "weight": [1.4, 3.2]})
df.to_snowflake("test_table", if_exists="replace", index=False )
df_table = pd.read_snowflake("test_table")
# Generate sample CSV file
with open("data.csv", "w") as f:
f.write('fruit,size,weight\napple,3.4,1.4\norange,5.4,3.2')
# Read from local CSV file
df_csv = pd.read_csv("data.csv")
# Generate sample JSON file
with open("data.json", "w") as f:
f.write('{"fruit":"apple", "size":3.4, "weight":1.4},{"fruit":"orange", "size":5.4, "weight":3.2}')
# Read from local JSON file
df_json = pd.read_json('data.json')
# Upload data.json and data.csv to Snowflake stage named @TEST_STAGE
# Read CSV and JSON file from stage
df_csv = pd.read_csv('@TEST_STAGE/data.csv')
df_json = pd.read_json('@TEST_STAGE/data.json')
자세한 내용은 입력/출력 섹션을 참조하십시오.
인덱싱
df = pd.DataFrame({"a": [1,2,3], "b": ["x", "y", "z"]})
df.columns
Index(['a', 'b'], dtype='object')
df.index
Index([0, 1, 2], dtype='int8')
df["a"]
0 1
1 2
2 3
Name: a, dtype: int8
df["b"]
0 x
1 y
2 z
Name: b, dtype: object
df.iloc[0,1]
'x'
df.loc[df["a"] > 2]
a b
2 3 z
df.columns = ["c", "d"]
df
c d
0 1 x
1 2 y
2 3 z
df = df.set_index("c")
df
d
c
1 x
2 y
3 z
df.rename(columns={"d": "renamed"})
renamed
c
1 x
2 y
3 z
누락된 값
import numpy as np
df = pd.DataFrame([[np.nan, 2, np.nan, 0],
[3, 4, np.nan, 1],
[np.nan, np.nan, np.nan, np.nan],
[np.nan, 3, np.nan, 4]],
columns=list("ABCD"))
df
A B C D
0 NaN 2.0 NaN 0.0
1 3.0 4.0 NaN 1.0
2 NaN NaN NaN NaN
3 NaN 3.0 NaN 4.0
df.isna()
A B C D
0 True False True False
1 False False True False
2 True True True True
3 True False True False
df.fillna(0)
A B C D
0 0.0 2.0 0.0 0.0
1 3.0 4.0 0.0 1.0
2 0.0 0.0 0.0 0.0
3 0.0 3.0 0.0 4.0
df.dropna(how="all")
A B C D
0 NaN 2.0 NaN 0.0
1 3.0 4.0 NaN 1.0
3 NaN 3.0 NaN 4.0
형식 변환
df = pd.DataFrame({"int": [1,2,3], "str": ["4", "5", "6"]})
df
int str
0 1 4
1 2 5
2 3 6
df_float = df.astype(float)
df_float
int str
0 1.0 4.0
1 2.0 5.0
2 3.0 6.0
df_float.dtypes
int float64
str float64
dtype: object
pd.to_numeric(df.str)
0 4.0
1 5.0
2 6.0
Name: str, dtype: float64
df = pd.DataFrame({'year': [2015, 2016],
'month': [2, 3],
'day': [4, 5]})
pd.to_datetime(df)
0 2015-02-04
1 2016-03-05
dtype: datetime64[ns]
이진 연산
df_1 = pd.DataFrame([[1,2,3],[4,5,6]])
df_2 = pd.DataFrame([[6,7,8]])
df_1.add(df_2)
0 1 2
0 7.0 9.0 11.0
1 NaN NaN NaN
s1 = pd.Series([1, 2, 3])
s2 = pd.Series([2, 2, 2])
s1 + s2
0 3
1 4
2 5
dtype: int64
df = pd.DataFrame({"A": [1,2,3], "B": [4,5,6]})
df["A+B"] = df["A"] + df["B"]
df
A B A+B
0 1 4 5
1 2 5 7
2 3 6 9
집계
df = pd.DataFrame([[1, 2, 3],
[4, 5, 6],
[7, 8, 9],
[np.nan, np.nan, np.nan]],
columns=['A', 'B', 'C'])
df.agg(['sum', 'min'])
A B C
sum 12.0 15.0 18.0
min 1.0 2.0 3.0
df.median()
A 4.0
B 5.0
C 6.0
dtype: float64
병합
df1 = pd.DataFrame({'lkey': ['foo', 'bar', 'baz', 'foo'],
'value': [1, 2, 3, 5]})
df1
lkey value
0 foo 1
1 bar 2
2 baz 3
3 foo 5
df2 = pd.DataFrame({'rkey': ['foo', 'bar', 'baz', 'foo'],
'value': [5, 6, 7, 8]})
df2
rkey value
0 foo 5
1 bar 6
2 baz 7
3 foo 8
df1.merge(df2, left_on='lkey', right_on='rkey')
lkey value_x rkey value_y
0 foo 1 foo 5
1 foo 1 foo 8
2 bar 2 bar 6
3 baz 3 baz 7
4 foo 5 foo 5
5 foo 5 foo 8
df = pd.DataFrame({'key': ['K0', 'K1', 'K2', 'K3', 'K4', 'K5'],
'A': ['A0', 'A1', 'A2', 'A3', 'A4', 'A5']})
df
key A
0 K0 A0
1 K1 A1
2 K2 A2
3 K3 A3
4 K4 A4
5 K5 A5
other = pd.DataFrame({'key': ['K0', 'K1', 'K2'],
'B': ['B0', 'B1', 'B2']})
df.join(other, lsuffix='_caller', rsuffix='_other')
key_caller A key_other B
0 K0 A0 K0 B0
1 K1 A1 K1 B1
2 K2 A2 K2 B2
3 K3 A3 None None
4 K4 A4 None None
5 K5 A5 None None
Groupby
df = pd.DataFrame({'Animal': ['Falcon', 'Falcon','Parrot', 'Parrot'],
'Max Speed': [380., 370., 24., 26.]})
df
Animal Max Speed
0 Falcon 380.0
1 Falcon 370.0
2 Parrot 24.0
3 Parrot 26.0
df.groupby(['Animal']).mean()
Max Speed
Animal
Falcon 375.0
Parrot 25.0
자세한 내용은 GroupBy 섹션을 참조하십시오.
피벗
df = pd.DataFrame({"A": ["foo", "foo", "foo", "foo", "foo",
"bar", "bar", "bar", "bar"],
"B": ["one", "one", "one", "two", "two",
"one", "one", "two", "two"],
"C": ["small", "large", "large", "small",
"small", "large", "small", "small",
"large"],
"D": [1, 2, 2, 3, 3, 4, 5, 6, 7],
"E": [2, 4, 5, 5, 6, 6, 8, 9, 9]})
df
A B C D E
0 foo one small 1 2
1 foo one large 2 4
2 foo one large 2 5
3 foo two small 3 5
4 foo two small 3 6
5 bar one large 4 6
6 bar one small 5 8
7 bar two small 6 9
8 bar two large 7 9
pd.pivot_table(df, values='D', index=['A', 'B'],
columns=['C'], aggfunc="sum")
C large small
A B
bar one 4.0 5
two 7.0 6
foo one 4.0 1
two NaN 6
df = pd.DataFrame({'foo': ['one', 'one', 'one', 'two', 'two', 'two'],
'bar': ['A', 'B', 'C', 'A', 'B', 'C'],
'baz': [1, 2, 3, 4, 5, 6],
'zoo': ['x', 'y', 'z', 'q', 'w', 't']})
df
foo bar baz zoo
0 one A 1 x
1 one B 2 y
2 one C 3 z
3 two A 4 q
4 two B 5 w
5 two C 6 t