Replicating databases across multiple accounts
Important
This section describes a limited database replication feature that is different from the account replication feature. Snowflake strongly recommends using the account replication feature to replicate and failover databases.
This topic describes the steps necessary to replicate databases across multiple Snowflake accounts and keep the database objects and stored data synchronized. Database replication can occur across Snowflake accounts in the same or different regions.
Region support for database replication and failover/failback
All Snowflake regions across Amazon Web Services, Google Cloud Platform, and Microsoft Azure support Database Replication and Failover/Failback.
Note that accounts can replicate databases between Region groups (for example, between Virtual Private Snowflake (VPS) and multi-tenant regions) to facilitate data sharing and account migrations between these regions. This ability is disabled by default. You can contact Snowflake Support to enable access.
Web interface for database replication and failover/failback
Attention
Managing and monitoring replication and failover/failback in Snowsight and Classic Console are only available to accounts using private connectivity.
For all other accounts, see Use Snowsight to monitor replication and Replicating account objects and databases.
Account administrators (users with the ACCOUNTADMIN role) can manage replication and failover/failback actions in Snowsight or Classic Console
Snowsight
- Navigation:
Data » Databases
Manage primary databases
Attention
Only available to accounts using private connectivity. For all other accounts, see Use Snowsight to monitor replication and Replicating account objects and databases.
Sign in to Snowsight to a Snowflake account that contains a primary database.
Select the dropdown menu in the upper left (next to your login name) » Switch Role »
ACCOUNTADMIN.From the left-hand navigation pane, select Data » Databases. Select a primary database in the database object explorer. The database details page opens.
Alternatively, to view only databases that have been enabled for replication, use the Replication Status » Primary filter to list primary databases in the account. Select a database from the list to open the details page.
Note
The Replication Status filter is only available if an account is a source or target account for database replication.
Select
 » Enable Replication. The Enable replication dialog opens.
Choose the action that you want to perform:
Enable failover. This feature requires Business Critical Edition (or higher).
Create a secondary database in one or more target accounts.
If a primary database in another account is enabled for replication to the current account, you can create a secondary database in the current account. To add additional target accounts, use the ALTER DATABASE command in the source account to update the primary database.
Refresh each secondary database once, after it is created.
For each target account for this database, check the options to create a secondary database and refresh the database.
Sign in to the target account as a user who was previously granted the ACCOUNTADMIN role in that account.
Snowflake performs the requested actions and displays a success dialog.
Manage replication for this database from the Replication tab in the database details.
Manage secondary databases
Attention
Only available to accounts using private connectivity. For all other accounts, see Use Snowsight to monitor replication and Replicating account objects and databases.
Sign in to Snowsight to a Snowflake account that contains a secondary database.
Select the dropdown menu in the upper left (next to your login name) » Switch Role »
ACCOUNTADMIN.From the left-hand navigation pane, select Data » Databases.
The following actions are available from the actions (…) button in the upper-right corner of the page:
Create a secondary database.
Note
This option is only available if an account is a source or target account for database replication.
If a primary database in another account is enabled for replication to the current account, you can create a secondary database in the current account. To add additional target accounts, use the ALTER DATABASE command in the source account to update the primary database.
Select a secondary database in the database object explorer. The database details page opens.
Select the Replication tab.
The following actions are available from the actions (…) button in the upper-right corner of the page:
Promote the secondary database to serve as the primary database. This feature requires Business Critical Edition (or higher).
Note
In order to promote a secondary database to serve as the primary, the primary database must have failover enabled to the target account where the secondary database is located.
If this option is not available, you can use the ALTER DATABASE command in the source account to enable failover for the primary database to the target account. For more information, see Step 3: Enabling failover for a primary database.
Refresh the secondary database.
Copy a template to create a task that refreshes the secondary database on a schedule. Paste the template into a Snowsight worksheet and edit it to specify the desired schedule.
Classic Console
Attention
Only available to accounts using private connectivity. For all other accounts, see Use Snowsight to monitor replication and Replicating account objects and databases.
Use the Replication area of the Databases ![]() tab in the Classic Console to perform most actions related to configuring and managing database replication, including the following actions:
tab in the Classic Console to perform most actions related to configuring and managing database replication, including the following actions:
Enable replication for a local database. This promotes the database to serve as a primary database.
Enable failover for a primary database (Business Critical Edition accounts or higher).
Refresh a secondary database, either once (manually) or repeatedly (on a schedule, using a task).
Promote a secondary database to serve as a primary database (Business Critical Edition accounts or higher).
Note
In order to be able to promote a secondary database to serve as primary, the primary database must have failover enabled to the target account where the secondary database is located.
If this option is not available:
Sign in to the source account with the primary database.
From the Databases area, select Replication.
Select the Primary tab to list primary databases. Select the row with the primary database.
Find the target account for which you want to enable failover and select Failover.
Disable replication and/or failover for a primary database.
Replicating a database to another account
The instructions in this section explain how to prepare your accounts for replication, promote a local database to serve as a primary database, perform the initial replication of this primary database to another account, and schedule refreshing of secondary databases.
Important
Target accounts do not have Tri-Secret Secure or private connectivity to the Snowflake service, such as AWS PrivateLink, enabled by default. If you require Tri-Secret Secure or private connectivity to the Snowflake service for compliance, security or other purposes, it is your responsibility to configure and enable those features in the target account.
Prerequisite: Enable replication for accounts in the organization
The organization administrator must enable replication for the source and target accounts before replicating a database. For detailed instructions, see Prerequisite: Enable replication for accounts in the organization.
Enable database replication and failover, and refresh secondary databases
Note
Except where noted, only account administrators (users with the ACCOUNTADMIN role) can execute the SQL statements in this section.
Step 1: Viewing all accounts in your organization
Retrieve the list of accounts in your organization in which replication has been enabled. Any existing permanent or transient database in these accounts can be modified to serve as a primary database. Replicas of a primary database (i.e. secondary databases) can only be created in these accounts.
To view the list of accounts in your organization, query SHOW REPLICATION ACCOUNTS.
SHOW REPLICATION ACCOUNTS;

+------------------+---------------------------------+---------------+------------------+---------+-------------------+
| snowflake_region | created_on                      | account_name  | account_locator  | comment | organization_name |
|------------------+---------------------------------+---------------+------------------+---------+-------------------|
| AWS_US_WEST_2    | 2018-11-19 16:11:12.720 -0700   | ACCOUNT1      | MYACCOUNT1       |         | MYORG             |
| AWS_US_EAST_1    | 2019-06-02 14:12:23.192 -0700   | ACCOUNT2      | MYACCOUNT2       |         | MYORG             |
+------------------+---------------------------------+---------------+------------------+---------+-------------------+
See the complete list of Region IDs.
Step 2: Promoting a local database to serve as a primary database
Modify an existing permanent or transient database to serve as a primary database using an ALTER DATABASE … ENABLE REPLICATION TO ACCOUNTS statement. Provide a comma-separated list of accounts in your organization that can store a replica of this database (i.e. a secondary database), allowing users in those accounts to query objects in the secondary database.
Example
Promote local database mydb1 (in account account1) to serve as a primary database and specify that accounts account2 and
account3 can each store a replica of this database:
ALTER DATABASE mydb1 ENABLE REPLICATION TO ACCOUNTS myorg.account2, myorg.account3;
Step 3: Enabling failover for a primary database
Note
Failover/Failback requires Business Critical (or higher). To inquire about upgrading, please contact Snowflake Support.
Enable failover for a primary database to one or more accounts in your organization using an ALTER DATABASE … ENABLE FAILOVER TO ACCOUNTS statement. The replica of this primary database in any one of these accounts (i.e. a secondary database) can be promoted to serve as the primary database.
Note that enabling failover for a primary database can be done either before or after a replica of the primary database has been created in a specified account.
Example
Enable failover for primary database mydb1 to accounts account2 and account3.
-- Executed from primary account
ALTER DATABASE mydb1 ENABLE FAILOVER TO ACCOUNTS myorg.account2, myorg.account3;
Step 4: Creating a secondary database
Create a replica of an existing primary database in the same account that stores the primary database, or a different account (in the same or a different region). Note that you can only create a secondary database in an account specified in the ALTER DATABASE … ENABLE REPLICATION TO ACCOUNTS statement in Step 2: Promoting a Local Database to Serve as a Primary Database.
Note
Replication commands (e.g. promoting a database to a primary database in a source account) typically trigger operations across regions and can take a few seconds to take effect. For example, if you are programmatically promoting a database to serve as the primary database in a source account and creating a secondary database in a target account, it may be a few seconds before you can create the secondary database.
Execute a CREATE DATABASE … AS REPLICA OF statement in each target account to create a replica of the specified primary database.
Important
As a best practice, we recommend giving each secondary database the same name as its primary database. This practice supports referencing fully-qualified objects (i.e. '<db>.<schema>.<object>') by other objects in the same database, such as querying a fully-qualified table name in a view.
If a secondary database has a different name from the primary database, then these object references would break in the secondary database.
To view the list of primary and secondary databases in your organization, query SHOW REPLICATION DATABASES. After a secondary database is created, an account administrator can transfer ownership of the database to another role (using GRANT OWNERSHIP.)
Example
The following example creates a replica of the myorg.account1.mydb1 primary database in the myorg.account2 account:
-- Log into the ACCOUNT2 account.

-- Query the set of primary and secondary databases in your organization.
-- In this example, the MYORG.ACCOUNT1 primary database is available to replicate.
SHOW REPLICATION DATABASES;

+------------------+-------------------------------+-----------------+----------+---------+------------+----------------------------+---------------------------------+------------------------------+-------------------+-----------------+
| snowflake_region | created_on                    | account_name    | name     | comment | is_primary | primary                    | replication_allowed_to_accounts | failover_allowed_to_accounts | organization_name | account_locator |
|------------------+-------------------------------+-----------------+----------+---------+------------+----------------------------+---------------------------------+------------------------------+-------------------+-----------------|
| AWS_US_WEST_2    | 2019-11-15 00:51:45.473 -0700 | ACCOUNT1        | MYDB1    | NULL    | true       | MYORG.ACCOUNT1.MYDB1       | MYORG.ACCOUNT2, MYORG,ACCOUNT1  | MYORG.ACCOUNT1               | MYORG             | MYACCOUNT1      |
+------------------+-------------------------------+-----------------+----------+---------+------------+----------------------------+---------------------------------+------------------------------+-------------------+-----------------+

-- Create a replica of the 'mydb1' primary database
-- If the primary database has the DATA_RETENTION_TIME_IN_DAYS parameter set to a value other than the default value,
-- set the same value for the parameter on the secondary database.
CREATE DATABASE mydb1
  AS REPLICA OF myorg.account1.mydb1
  DATA_RETENTION_TIME_IN_DAYS = 10;

-- Verify the secondary database
SHOW REPLICATION DATABASES;

+------------------+-------------------------------+---------------+----------+---------+------------+-------------------------+---------------------------------+------------------------------+-------------------+-----------------+
| snowflake_region | created_on                    | account_name  | name     | comment | is_primary | primary                 | replication_allowed_to_accounts | failover_allowed_to_accounts | organization_name | account_locator |
|------------------+-------------------------------+---------------+----------+---------+------------+------------------------------------------+----------------+------------------------------+-------------------------------------|
| AWS_US_WEST_2    | 2019-11-15 00:51:45.473 -0700 | ACCOUNT1      | MYDB1    | NULL    | true       | MYORG.ACCOUNT1.MYDB1    | MYORG.ACCOUNT2, MYORG.ACCOUNT1  | MYORG.ACCOUNT1               | MYORG             | MYACCOUNT1      |
| AWS_US_EAST_1    | 2019-08-15 15:51:49.094 -0700 | ACCOUNT2      | MYDB1    | NULL    | false      | MYORG.ACCOUNT1.MYDB1    |                                 |                              | MYORG             | MYACCOUNT2      |
+------------------+-------------------------------+---------------+----------+---------+------------+-------------------------+---------------------------------+------------------------------+-------------------+-----------------+
Step 5. Refreshing each secondary database
The instructions in this section explain how to refresh a secondary database from a snapshot of its primary database (using ALTER DATABASE … REFRESH). A snapshot includes changes to the objects and data. For the initial replication of a very large primary database, we recommend increasing the statement timeout.
Note
To refresh a secondary database, the role used to perform the operation must have the OWNERSHIP privilege on the database or the role must be a granted a role that has the OWNERSHIP privilege on the database.
The role that executes the refresh operation owns any new objects added as a result of a database refresh.
To verify the current region after you log into an account, query the CURRENT_REGION function.
ALTER DATABASE mydb1 REFRESH;
You can also refresh a secondary database in the web ui.
Step 6. Refreshing a secondary database on a schedule
As a best practice, we recommend scheduling your secondary database refreshes. This section provides instructions for starting a database refresh automatically on a specified schedule.
The frequency with which you refresh a secondary database depends on the Recovery Point Objective (RPO) for the data in the secondary database. For example, if applications that rely on the data can tolerate up to 1 hour of data loss, then you must refresh the data at least every hour. If the data loss tolerance is 5 minutes, then refresh the secondary database at least every 5 minutes.
Note
We recommend that you execute the initial replication of a primary database manually (using ALTER DATABASE … REFRESH), and only schedule subsequent refreshes.
There is a 60 minute default limit on a single run of a task. This limitation was implemented as a safeguard against non-terminating tasks. In rare circumstances, a refresh of a very large database could exceed the default task run limit. To determine if this occurred, query the TASK_HISTORY table function. Consider increasing the timeout limit for the task by executing ALTER TASK … SET USER_TASK_TIMEOUT_MS = <num>.
Complete the steps in this section to start a database refresh automatically on a specified schedule.
- Prerequisites:
The following Snowflake objects are required in the account that stores the secondary database:
The secondary database.
A separate database to store the new objects created in this section. Because secondary databases are read-only, this database must be separate from the secondary database. This database must also include the following objects:
Schema. Use the PUBLIC schema, or create a new schema using CREATE SCHEMA.
Warehouse. Any warehouse can be provided here to meet the syntax requirement but is not used for the database refresh. Create a new warehouse using CREATE WAREHOUSE.
Task that refreshes the secondary database on a schedule.
- Required privileges:
The steps in this section require a role with the following privileges in the account in which the secondary database is refreshed:
Object Type
Object
Privilege
Notes
Account
Account that stores the secondary database
EXECUTE TASK
Required to run the new task.
Database
Secondary database
OWNERSHIP
Required to refresh the secondary database.
Database
Database that stores the new task
USAGE
Schema
Schema that stores the new task
USAGE, CREATE TASK
Task
OWNERSHIP
The role that creates the task owns the object by default. Ownership can be transferred to a different role using GRANT
privileges… TO ROLE.Warehouse
Warehouse used to configure the task
USAGE
Specifying a warehouse is required to configure the task, however the warehouse is not used to run the task or for the refresh operation.
- Steps:
Complete the following steps for each secondary database you want to refresh on a schedule:
Create a task that starts the database refresh on a schedule (using CREATE TASK). Note that although the CREATE TASK syntax for specifying a replication schedule requires a warehouse, the warehouse is not used for replication.
For example, create a task named
refresh_mydb1_taskthat refreshes a secondary database namedmydb1every 10 minutes with a 4 hour timeout. The task is configured using the existing warehousemywh:CREATE TASK refresh_mydb1_task WAREHOUSE = mywh SCHEDULE = '10 minute' USER_TASK_TIMEOUT_MS = 14400000 AS ALTER DATABASE mydb1 REFRESH;
A task is suspended by default when it is created. Resume the task to allow it to run based on the parameters specified in the task definition:
ALTER TASK refresh_mydb1_task RESUME;
Example
Execute the following SQL statements in your preferred Snowflake client to enable replication and failover, do an initial database refresh and set up scheduled refreshes.
Execute from source account
-- The commands below are executed from the source account

-- View replication enabled accounts
SHOW REPLICATION ACCOUNTS;

ALTER DATABASE mydb ENABLE REPLICATION TO ACCOUNTS myorg.account2, myorg.account3;
ALTER DATABASE mydb ENABLE FAILOVER TO ACCOUNTS myorg.account2, myorg.account3;
Execute from each target account
-- The commands below are executed from each target account

-- View replication enabled databases
-- Note the primary column of the source database for the CREATE DATABASE statement below
SHOW REPLICATION DATABASES;

-- If the primary database has the DATA_RETENTION_TIME_IN_DAYS parameter set to a value other than the default value,
-- set the same value for the parameter on the secondary database.
CREATE DATABASE mydb
  AS REPLICA OF myorg.account1.mydb
  DATA_RETENTION_TIME_IN_DAYS = 10;

-- Increase statement timeout for initial refresh
-- Optional but recommended for initial refresh of a large database
ALTER SESSION SET STATEMENT_TIMEOUT_IN_SECONDS = 604800;
-- If you have an active warehouse in current session, update warehouse statement timeout
SELECT CURRENT_WAREHOUSE();
ALTER WAREHOUSE my_wh SET STATEMENT_TIMEOUT_IN_SECONDS = 604800;
-- Reset warehouse statement timeout after initial refresh
ALTER WAREHOUSE my_wh UNSET STATEMENT_TIMEOUT_IN_SECONDS;

-- Refresh a secondary database
ALTER DATABASE mydb REFRESH;

-- Create task
-- Set up refresh schedule for each secondary database using a separate database
USE DATABASE my_db2;

-- Create a task and RESUME the task for each secondary database
-- Edit the task schedule and timeout for your specific use case
CREATE TASK my_refresh_task
  WAREHOUSE = my_wh
  SCHEDULE = '10 minute'
  USER_TASK_TIMEOUT_MS = 14400000
AS
  ALTER DATABASE mydb REFRESH;

-- Start task
ALTER TASK my_refresh_task RESUME;
Using the legacy account locator
Though the legacy snowflake_region.account_locator format is currently supported when identifying an account in
replication and failover commands, its use is discouraged as it may stop working in the future.
Increasing the statement timeout for the initial replication
Database replication uses Snowflake-provided compute resources instead of your own virtual warehouse to copy objects and data. However, the STATEMENT_TIMEOUT_IN_SECONDS session/object parameter still controls how long a statement runs before it is canceled. The default value is 172800 (2 days). Because the initial replication of a very large primary database can take longer than 2 days to complete (depending on the amount of metadata in the database as well as the amount of data in database objects), we recommend increasing the STATEMENT_TIMEOUT_IN_SECONDS value to 604800 (7 days, the maximum value) for the session in which you run the replication operation.
Run the following ALTER SESSION statement prior to executing the ALTER DATABASE secondary_db_name REFRESH statement in the same session:
ALTER SESSION SET STATEMENT_TIMEOUT_IN_SECONDS = 604800;
Note that the STATEMENT_TIMEOUT_IN_SECONDS parameter also applies to the active warehouse in a session. The parameter honors the lower value set at the session or warehouse level. If you have an active warehouse in the current session, set STATEMENT_TIMEOUT_IN_SECONDS to 604800 for this warehouse (using ALTER WAREHOUSE), too.
For example:
-- determine the active warehouse in the current session (if any)
SELECT CURRENT_WAREHOUSE();

+---------------------+
| CURRENT_WAREHOUSE() |
|---------------------|
| MY_WH               |
+---------------------+

-- change the STATEMENT_TIMEOUT_IN_SECONDS value for the active warehouse

ALTER WAREHOUSE my_wh SET STATEMENT_TIMEOUT_IN_SECONDS = 604800;
You can reset the parameter value to the default after the replication operation is completed:
ALTER WAREHOUSE my_wh UNSET STATEMENT_TIMEOUT_IN_SECONDS;
Monitoring the progress of a database refresh
To determine the current status of the initial database replication or a subsequent secondary database refresh, query the DATABASE_REFRESH_PROGRESS , DATABASE_REFRESH_PROGRESS_BY_JOB table function (in the Snowflake Information Schema).
A database refresh operation can require several hours or longer to complete depending on the amount of data to replicate.
To view the replication history for a specified database within a specified date range, query either of the following:
DATABASE_REPLICATION_USAGE_HISTORY table function (in the Snowflake Information Schema). This function returns replication usage activity within the last 14 days.
DATABASE_REPLICATION_USAGE_HISTORY view (in Account Usage). This view returns replication usage activity within the last 365 days (1 year).
Example
Monitor the progress of the mydb1 secondary database refresh:
select *
  from table(information_schema.database_refresh_progress(mydb1));
Monitoring the progress of a database refresh in the Classic Console
Manually start a secondary database refresh in the Classic Console to view a dynamic progress bar showing the current status of the refresh operation with statistics.
To start a secondary database refresh operation:
In the Classic Console, select the Databases
 tab » Replication.
Select the secondary database to refresh.
Select the Refresh now button. The Refresh Database dialog opens.
Select the Refresh button.
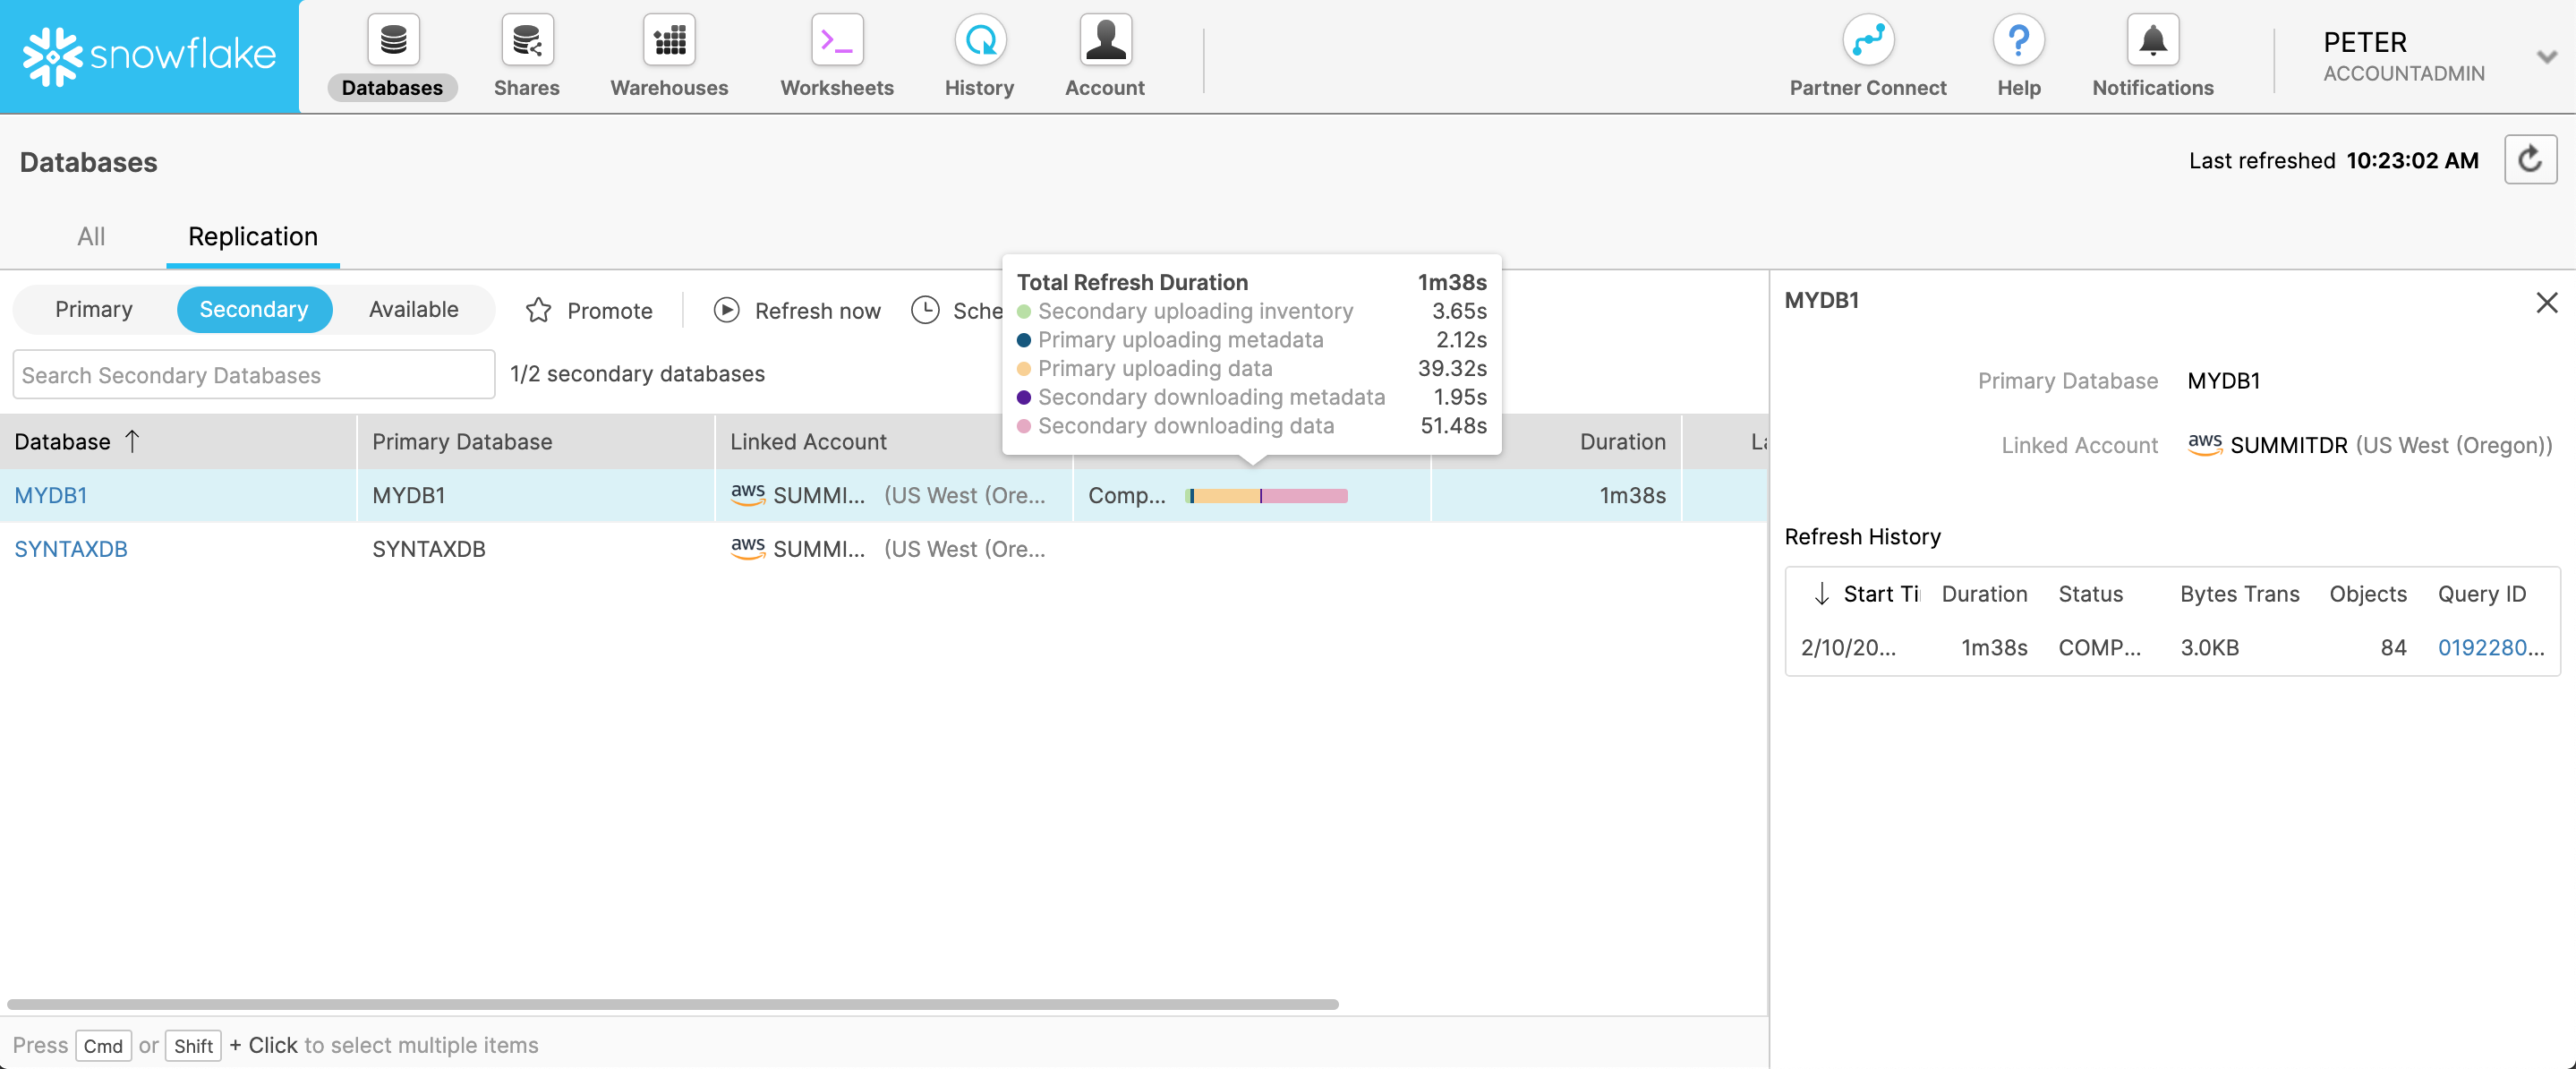
The Last Refresh Status column displays the status of the current refresh operation. The progress bar is updated dynamically.
The Refresh History statistics in the side window also display the current refresh status, along with the refresh start time, number of bytes transferred, and other statistics.
Viewing the database refresh history
To view the history of secondary database refresh operations, query the DATABASE_REFRESH_HISTORY table function (in the Snowflake Information Schema). This function returns database refresh activity within the last 14 days.
or
Query the DATABASE_REPLICATION_USAGE_HISTORY view (in the Account Usage schema in the shared Snowflake database). This view returns database replication usage activity within the last 365 days (1 year).
Example
View the history of the mydb1 secondary database refresh operation:
select *
  from table(information_schema.database_refresh_history(mydb1));
Monitoring database replication cost
For individual databases replicated using database replication, users with the ACCOUNTADMIN role can use Snowsight, the Classic Console, or SQL to view the amount of replication data transferred (in bytes) for your Snowflake account within a specified date range.
To view the data transfer amounts for your account:
- Snowsight:
Select Admin » Cost Management.
- Classic Console:
Select Account
» Billing & Usage.
Replication utilization is shown as a special Snowflake-provided warehouse named
REPLICATION. Select Data Transfer to view the data transfer costs. Note that the web interface does not break down data transfer costs for replication.
- SQL:
Query either of the following:
DATABASE_REPLICATION_USAGE_HISTORY table function (in the Snowflake Information Schema). This function returns database replication usage activity within the last 14 days.
DATABASE_REPLICATION_USAGE_HISTORY view view (in Account Usage). This view returns database replication usage activity within the last 365 days (1 year).
The following queries can be executed against the DATABASE_REPLICATION_USAGE_HISTORY view:
Query: Replication cost history (by day, by object)
This query provides a full list of replicated databases and the volume of credits consumed via the replication service over the last 30 days, broken out by day. Any irregularities in the credit consumption or consistently high consumption are flags for additional investigation.
SELECT TO_DATE(start_time) AS date, database_name, SUM(credits_used) AS credits_used FROM snowflake.account_usage.database_replication_usage_history WHERE start_time >= DATEADD(month,-1,CURRENT_TIMESTAMP()) GROUP BY 1,2 ORDER BY 3 DESC;Query: Replication History & m-day average
This query shows the average daily credits consumed by Replication grouped by week over the last year. This helps identify any anomalies in the daily average so you can investigate any spikes or changes in consumption.
WITH credits_by_day AS (
  SELECT TO_DATE(start_time) AS date,
    SUM(credits_used) AS credits_used
  FROM snowflake.account_usage.database_replication_usage_history
  WHERE start_time >= DATEADD(year,-1,CURRENT_TIMESTAMP())
  GROUP BY 1
  ORDER BY 2 DESC
)

SELECT DATE_TRUNC('week',date),
  AVG(credits_used) AS avg_daily_credits
FROM credits_by_day
GROUP BY 1
ORDER BY 1;
Comparing data sets in primary and secondary databases
Optionally use the HASH_AGG function to compare the rows in a random set of tables in a primary and secondary database to verify data consistency. The HASH_AGG function returns an aggregate signed 64-bit hash value over the (unordered) set of input rows. Query this function on all or a random subset of tables in a secondary database and on the primary database (as of the timestamp for the primary database snapshot) and compare the output.
Example
Executed on the secondary database
On the secondary database, query the DATABASE_REFRESH_PROGRESS table function (in the Snowflake Information Schema). Note the
snapshot_transaction_timestampin theDETAILScolumn for thePRIMARY_UPLOADING_DATAphase. This is the timestamp for the latest snapshot of the primary database.select parse_json(details)['snapshot_transaction_timestamp'] from table(information_schema.database_refresh_progress(mydb)) where phase_name = 'PRIMARY_UPLOADING_DATA';
Query the HASH_AGG function for a specified table. The following query returns a hash value for all rows in the
mytabletable:SELECT HASH_AGG( * ) FROM mytable;
Executed on the primary database
On the primary database, query the HASH_AGG function for the same table. Using Time Travel, specify the timestamp when the latest snapshot was taken for the secondary database:
SELECT HASH_AGG( * ) FROM mytable AT(TIMESTAMP => '<snapshot_transaction_timestamp>'::TIMESTAMP);
Compare the results from the two queries. The output should be identical.
Dropping a secondary database
You can drop a secondary database at any time using the DROP DATABASE command. Only the database owner (i.e. the role with the OWNERSHIP privilege on the database) can drop the database.
Dropping a primary database
A primary database cannot be dropped if one or more replicas of the database (i.e. secondary databases) exist. To drop the primary database, first promote a secondary database to serve as the primary database, and then drop the former primary database. Alternatively, drop all of the secondary databases for the primary database, and then drop the primary database.
Note that only the database owner can drop the database.