Replicating databases and account objects across multiple accounts
This topic describes the steps necessary to replicate account objects and data across Snowflake accounts in the same organization, and keep the objects and data synchronized. Account replication can occur across Snowflake accounts in different regions and across cloud platforms.
Note
When you upgrade an account to Business Critical Edition (or higher), it might take up to 12 hours for failover capabilities to become available.
Region support for replication and failover/failback
Customers can replicate across all regions within a Region Group. To replicate between regions in different Region groups (for example, from a Snowflake commercial region to a Snowflake government region), please contact Snowflake Support to enable access.
Transitioning from database replication to group-based replication
Databases that have been enabled for replication using ALTER DATABASE must have replication disabled before they can be added to a replication or failover group.
Note
Execute the SQL statements in this section using the ACCOUNTADMIN role.
Step 1. Disable replication for a replication enabled database
Execute the SYSTEM$DISABLE_DATABASE_REPLICATION function to disable replication for a primary database, along with any secondary databases linked to it, in order to add it to a replication or failover group.
Execute the following SQL statement from the source account with the primary database:
Step 2. Add the database to a primary failover group and create a secondary failover group
Once you have successfully disabled replication for a database, you can add the primary database to a failover group in the source account.
Then create a secondary failover group in the target account. When the secondary failover group is refreshed in the target account, the previously secondary database will automatically be added as a member of the secondary failover group and refreshed with the changes from the primary database.
For more details on creating primary and secondary failover groups, see Workflow.
Note
When you add a previously replicated database to a replication or failover group, Snowflake does not re-replicate the data that has already been replicated for that database. Only changes since the last refresh are replicated when the group is refreshed.
Workflow
The following SQL statements demonstrate the workflow for enabling account and database object replication and refreshing objects. Each step is discussed in detail below.
Note
The following examples require replication be enabled for the source and target accounts. For details, see Prerequisite: Enable replication for accounts in the organization.
Examples
Execute the following SQL statements in your preferred Snowflake client to enable account and database object replication and failover, and refresh objects.
Executed on source account
-
Create a role and grant it the CREATE FAILOVER GROUP privilege. This step is optional:
-
Create a failover group in the source account and enable replication to specific target accounts.
Note
- If you have databases to add to a replication or failover group that have been previously enabled for database replication and failover using ALTER DATABASE, follow the Transitioning from database replication to group-based replication instructions (in this topic) before adding them to a group.
- To add a database to a failover group, the active role must have the MONITOR privilege on the database. For details on database privileges, see Database privileges (in a separate topic).
Executed on target account
-
Create a role in the target account and grant it the CREATE FAILOVER GROUP privilege. This step is optional:
-
Create a failover group in the target account as a replica of the failover group in the source account.
Note
If account objects (for example, users or roles) exist in the target account that do not exist in the source account, refer to Initial replication of users and roles before creating a secondary group.
-
Manually refresh the secondary failover group. This is an optional step. If the primary failover group is created with a replication schedule, the initial refresh of the secondary failover group is automatically executed when the secondary failover group is created.
-
Create a role with the REPLICATE privilege on the failover group. This step is optional.
Execute in the target account using a role with the OWNERSHIP privilege on the failover group:
-
Execute the refresh statement using a role with the REPLICATE privilege:
-
-
Create a role with the FAILOVER privilege on the failover group. This step is optional.
Execute in the target account using a role with the OWNERSHIP privilege on the failover group:
Replicating account objects and databases
The instructions in this section explain how to prepare your accounts for replication, enable the replication of specific objects from the source account to the target account, and synchronize the objects in the target account.
Important
Target accounts do not have Tri-Secret Secure or private connectivity to the Snowflake service, such as AWS PrivateLink, enabled by default. If you require Tri-Secret Secure or private connectivity to the Snowflake service for compliance, security or other purposes, it is your responsibility to configure and enable those features in the target account.
Prerequisite: Enable replication for accounts in the organization
The organization administrator must enable replication for the source and target accounts.
To enable replication for accounts, an organization administrator uses the
SYSTEM$GLOBAL_ACCOUNT_SET_PARAMETER function to set the ENABLE_ACCOUNT_DATABASE_REPLICATION
parameter to true.
As an organization administrator, enable replication for each source and target account in your organization.
Though the SYSTEM$GLOBAL_ACCOUNT_SET_PARAMETER function supports the legacy account locator identifier, it causes unexpected results when an organization has multiple accounts that share the same locator (in different regions).
Step 1: Create a role with the CREATE FAILOVER GROUP privilege in the source account — Optional
Create a role and grant it the CREATE FAILOVER GROUP privilege. This step is optional. If you have already created this role, skip to Step 3: Create a primary failover group in a source account.
Step 2: Identify accounts enabled for replication and group membership
Before creating a primary failover group, identify the accounts enabled for replication and the existing failover and replication groups.
View all accounts enabled for replication
To retrieve the list of accounts in your organization that are enabled for replication, use SHOW REPLICATION ACCOUNTS.
Execute the following SQL statement using the ACCOUNTADMIN role:
Returns:
See the complete list of Region IDs.
View failover and replication group membership
Account, database, and share objects have constraints on group membership. Before creating new groups or adding objects to existing groups, you can review the list of existing failover groups and the objects in each group.
Note
Only an account administrator (user with the ACCOUNTADMIN role) or the group owner (role with the OWNERSHIP privilege on the group) can execute the SQL statements in this section.
View all failover groups linked to the current account, and the object types in each group:
View all the databases in failover group myfg:
View all the shares in failover group myfg:
Step 3: Create a primary failover group in a source account
Create a primary failover group and enable the replication and failover of specific objects from the current (source) account to one or more target accounts in the same organization.
You can create a replication or failover group using Snowsight or SQL.
Note
If you have databases to add to a replication or failover group that have been previously enabled for database replication using ALTER DATABASE, follow the Transitioning from database replication to group-based replication instructions (in this topic) before adding them to a group.
Create a replication or failover group using Snowsight
Note
-
Only account administrators can create a replication or failover group using Snowsight (refer to Limitations of using Snowsight for replication configuration).
-
You must be signed in to the target account as a user with the ACCOUNTADMIN role. If you are not, you will be prompted to sign in.
Both the source account and the target account must use the same connection type (public internet). Otherwise, signing in to the target account fails.
Complete the following steps to create a new replication or failover group:
-
Sign in to Snowsight.
-
In the navigation menu, select Admin » Accounts.
-
Select Replication, then complete one of these actions on the Groups tab:
-
For Business Critical Edition (or higher) accounts, complete one of these actions:
- If there are no replication groups or connections, select Get started to configure a replication group and a connection. The Setup business continuity wizard appears.
- Select + Group to configure a replication group without configuring a connection. The Create a group wizard appears.
-
For Standard Edition and Enterprise Edition accounts, complete one of these actions:
- If there are no replication groups or connections, select Get started to configure a replication group. The Setup replication wizard appears.
- If one or more replication groups exist, select + Group to configure a replication group. The Create a group wizard appears.
-
-
On the Select a target account page, select a target account and sign into it, then select Next.
-
On the Create a group page, in the Group name box, enter a name for the group that meets the following requirements:
-
Must start with an alphabetic character and cannot contain spaces or special characters unless the identifier string is enclosed in double quotes (for example, “My object”). Identifiers enclosed in double quotes are also case-sensitive.
For more information, see Identifier requirements.
-
Must be unique across failover and replication groups in an account.
-
-
Choose Edit objects to add share and account objects to your group.
Note
Account objects can only be added to one replication or failover group. If a replication or failover group with any account objects already exists in your account, you cannot select those objects.
-
Choose Select databases to add database objects to your group.
-
Select the Replication frequency.
-
If the account is Business Critical Edition or higher, a failover group is created by default. You can choose to create a replication group instead. To create a replication group, select Advanced options, then unselect Enable failover.
-
Complete one of the following actions:
- For Business Critical Edition (or higher) accounts, select Next.
- For Standard Edition and Enterprise Edition accounts, select Start replication to create the replication group.
- For Business Critical Edition (or higher) accounts, on the Create connection page, enter a connection name in the Connection name box, then select Start replication.
If creating the replication group is unsuccessful, refer to Troubleshoot issues with creating and editing replication groups using Snowsight for common errors and how to resolve them.
Create a failover group using SQL
Create a failover group of specified account and database objects in the source account and enable replication and failover to a list of target accounts. See CREATE FAILOVER GROUP for syntax.
For example, enable replication of users, roles, warehouses, resources monitors, and databases db1 and db2 from the source account
to the myaccount2 account in the same organization. Set the replication schedule to automatically refresh myaccount2 every 10
minutes.
Execute the following statement on the source account:
Step 4: Create a role with the CREATE FAILOVER GROUP privilege in the target account — Optional
Create a role in the target account and grant it the CREATE FAILOVER GROUP privilege. This step is optional. If you have already created this role, skip to Step 5: Create a secondary failover group in the target account.
Step 5: Create a secondary failover group in the target account
Note
If account objects (for example, users or roles) exist in the target account that do not exist in the source account, refer to Initial replication of users and roles before creating a secondary group.
Create a secondary failover group in the target account as a replica of the primary failover group in the source account.
Execute a CREATE FAILOVER GROUP … AS REPLICA OF statement in each target account for which you enabled replication in Step 3: Create a primary failover group in a source account (in this topic).
Executed from each target account:
Step 6. Refresh a secondary failover group in the target account manually — Optional
To manually refresh the objects in a target account, execute the ALTER FAILOVER GROUP … REFRESH command.
As a best practice, we recommend scheduling your secondary refreshes by setting the REPLICATION_SCHEDULE parameter using CREATE FAILOVER GROUP or ALTER FAILOVER GROUP.
Note
If the user who calls the function in the target account was dropped in the source account, the refresh operation fails.
Grant the REPLICATE privilege on failover group to role — Optional
To execute the command to refresh a secondary replication or failover group in the target account, you must use a role with the REPLICATE privilege on the failover group. The REPLICATE privilege is currently not replicated and must be granted on a failover (or replication) group in both the source and target accounts.
Execute this statement from the source account using a role with the OWNERSHIP privilege on the group:
Execute this statement from the target account using a role with the OWNERSHIP privilege on the group:
Manually refresh a secondary failover group
For example, to refresh the objects in the failover group myfg, execute the following statement from the target account:
Step 7. Grant the FAILOVER privilege on failover group to role — Optional
To execute the command to fail over a secondary failover group in a target account, you must use a role with the FAILOVER privilege on the failover group. The FAILOVER privilege is currently not replicated and must be granted in each source and target account.
For more information, see Replication of roles and grants.
For example, to grant the FAILOVER privilege to role my_failover_role on failover group my_fg, execute the
following statement in the target account using a role with the OWNERSHIP privilege on the group:
For instructions on creating a custom role with a specified set of privileges, see Creating custom roles.
For general information about roles and privilege grants for performing SQL actions on securable objects, see Overview of Access Control.
Schema-level replication for failover groups
For databases in failover groups, you can optionally configure the REPLICABLE_WITH_FAILOVER_GROUPS parameter on the database and/or individual schemas in the database to specify a subset of schemas for replication.
This feature enables you to control the schemas in a failover group that are replicated, which is useful if only a subset of data in a database needs the added disaster recovery protection provided by failover.
Because this parameter is enabled by default for all databases and the schemas they contain, you adjust the replication granularity by choosing which databases and/or schemas to omit from replication. You can further fine-tune the replication settings by allowing certain schemas to be replicated even though the database that contains them isn’t replicated.
Specify schemas to replicate or skip
You can explicitly specify schemas to replicate or skip in a database in a failover group using the optional REPLICABLE_WITH_FAILOVER_GROUPS parameter.
REPLICABLE_
The REPLICABLE_WITH_FAILOVER_GROUPS parameter specifies whether a schema that belongs to a database in a failover group is replicated. This parameter can be set on a database and any/all schemas in the database. If the parameter is set for a database, all of the schemas in the database inherit the value, unless a different value is explicitly set for any given schema.
The parameter accepts two values, 'YES' or 'NO' (case-insensitive), and is optional:
- If REPLICABLE_WITH_FAILOVER_GROUPS is not explicitly set on a database (or explicitly unset), the database follows the standard replication
behavior, which is equivalent to setting the parameter to
'YES'. - If REPLICABLE_WITH_FAILOVER_GROUPS is not explicitly set on a schema (or explicitly unset), the replication behavior is inherited from its parent database.
Security requirements
To set or unset this parameter on a database or a schema, the following privileges are required:
- REPLICATE (account-level privilege). Prior to the schema-level replication feature, this privilege was only an object-level privilege on replication groups and failover groups. Users with the ACCOUNTADMIN role can grant this privilege to other roles.
- USAGE (database and schema privilege) or any similar privileges that enable taking action on the database and schema.
Examples
Grant necessary privileges on a pre-existing role, replicationadmin:
Replicate only one schema, sch1, in the db1 database:
Replicate all schemas except one schema, sch2, in the db2 database:
Refresh of schemas with REPLICABLE_
During a database refresh:
- Schemas with REPLICABLE_WITH_FAILOVER_GROUPS set to
'YES'are replicated from the source account to the target account. - Schemas with REPLICABLE_WITH_FAILOVER_GROUPS set to
'NO'are not replicated, except in the following two scenarios:- The target schema is a replica of the source account schema. In this case, the target schema is always synchronized with its source schema.
- The target schema has a name conflict with the source account schema. In this situation, the replication job fails due to the name conflict.
List databases and schemas with REPLICABLE_
You can list the values set for the REPLICABLE_WITH_FAILOVER_GROUPS parameter in the current account by querying the ACCOUNT_USAGE and INFORMATION_SCHEMA views.
Tip
If you aren’t familiar with why you might use the ACCOUNT_USAGE or INFORMATION_SCHEMA views, see Differences between Account Usage and Information Schema.
Examples
For these examples, we’ll use the INFORMATION_SCHEMA views. That way, you can see the settings immediately after making any changes.
Using the pre-existing replicationadmin role, return all the parameter values for the account, which has two databases:
db1database explicitly set toNOandsch1schema in the database explicitly set toYES. Only that one schema in the database is eligible for replication.db2database explicitly set toYESandsch2schema in the database explicitly set toNO. All schemas in the database are eligible for replication except for that one schema.
Optimized refresh for failover groups
![]() Preview Feature — Open
Preview Feature — Open
Available to all Business Critical Edition (or higher) accounts.
Optimized refresh is a refresh mode for failover groups that makes refreshes more efficient and predictable as the number of objects in your account grows. Each refresh scans and applies only the data and metadata changes since the previous refresh, so refresh duration scales with your rate of change rather than the number of objects within the failover group.
The existing refresh experience continues to be available and is referred to as Replication Classic. Failover groups that you have today keep running as Replication Classic by default; no action is required to keep using them.
You opt in per failover group by setting a single property on the primary failover group: OPTIMIZED_REFRESH = TRUE.
Benefits
- Lower, more predictable RPO as you grow. Because each refresh moves only what changed since the previous refresh, refresh duration is governed by your rate of change rather than the total object count in your account. Accounts with large numbers of databases, schemas, tables, roles, and grants see the largest improvement.
- Faster refreshes on stable workloads. Periods of low metadata change result in correspondingly small refresh cycles.
- Simpler, more forecastable pricing. The pricing model that applies to optimized refresh is anchored primarily on the volume of replicated data, with a generous monthly free allowance on the per-object-change dimension. For details, see Pricing for optimized refresh.
- Drop-in compatibility. Optimized refresh works with the same failover group SQL surface you already use. Replication, failover, and failback semantics are unchanged.
Requirements
When you enable optimized refresh on a failover group:
- The failover group must have a REPLICATION_SCHEDULE set, and the schedule interval must be no more than 6 hours. If the most recent successful refresh for the failover group is older than 6 hours, the next refresh falls back to a full refresh that re-establishes the baseline before incremental refreshes resume.
- The
OPTIMIZED_REFRESHproperty can be set on the primary failover group only. Setting it on a secondary failover group fails. - Business Critical Edition (or higher) is required (inherited from the failover group feature itself).
Tip
For the best experience with optimized refresh, Snowflake recommends a REPLICATION_SCHEDULE of 10 MINUTE or less. Frequent refreshes
keep each incremental cycle small, which delivers the low RPO and the most predictable refresh durations.
Enable optimized refresh on a new failover group
Run this on the source account. The example creates a failover group named myfg that uses optimized refresh to replicate database db1
to the target account myaccount2, refreshing every 10 minutes:
On the target account, create the secondary failover group as usual. No additional property is required on the secondary:
Switch an existing failover group to optimized refresh
Run this on the source account. If the existing failover group does not already have a REPLICATION_SCHEDULE that meets the 6-hour
requirement, set or adjust it in the same statement:
After the ALTER succeeds, the next refresh runs as optimized refresh, with the first-refresh behavior described in What to expect the first time you enable optimized refresh.
Switch a failover group back to Replication Classic
Optimized refresh is fully reversible. To revert a failover group to Replication Classic, unset the property:
The next refresh runs under Replication Classic and is billed under the existing replication pricing.
Verify the current mode
Use SHOW FAILOVER GROUPS to confirm which mode each group is using. The output includes an
is_optimized_refresh_enabled column:
A value of TRUE means subsequent refreshes for the group use optimized refresh. A value of FALSE means they use Replication Classic.
You can also query the REPLICATION_GROUPS view in ACCOUNT_USAGE to see the
IS_OPTIMIZED_REFRESH_ENABLED column.
What to expect the first time you enable optimized refresh
When you set OPTIMIZED_REFRESH = TRUE on an existing failover group, or create a new failover group with the property set, the first
refresh after enabling is a one-time bootstrapping refresh that establishes the baseline from which Snowflake then applies incremental
changes.
Plan for the following:
- The bootstrapping refresh takes longer than steady-state refreshes. Its duration is comparable to a Replication Classic refresh on the same failover group.
- The bootstrapping refresh is billed under the optimized-refresh pricing model (replicated data volume plus changed objects, subject to the monthly free allowance). For details, see Pricing for optimized refresh.
- Subsequent refreshes are incremental and fast. Beginning with the second refresh, only changes since the previous refresh are sent to the target account.
If you enable optimized refresh on a failover group whose REPLICATION_SCHEDULE would produce a refresh imminently, that refresh is the
one that runs as the bootstrapping refresh. You don’t need to trigger anything manually.
After the bootstrapping refresh, all standard failover group operations behave exactly as they did before. Scheduled refreshes, manual refreshes, promotion, failover, and failback are unchanged.
Limitations during Public Preview
- Under certain rare conditions, for example, a new Snowflake release that introduces replication support for a new feature, an individual refresh can run as a full refresh instead of an incremental one. That refresh takes longer than usual.
Mix optimized refresh and Replication Classic in the same account
The OPTIMIZED_REFRESH setting is per failover group. Some failover groups in an account can use optimized refresh while others stay on
Replication Classic. Replication, failover, and failback work the same way for failover groups regardless of refresh mode.
Apply global IDs to objects created by scripts in target accounts
If you created account objects, for example, users and roles, in your target account by any means other than via replication (for example, using scripts), these users and roles have no global identifier by default. The refresh operation uses global identifiers to synchronize these objects to the same objects in the source account.
In most cases, when a target account is refreshed from the source account, the refresh operation drops any account objects of the
types in the OBJECT_TYPES list in the target account that have no global identifier. The initial replication of users and roles to
a target account, however, might cause the first refresh operation to fail. For details on this behavior, refer to
Initial replication of users and roles.
Use SYSTEM$LINK_
You can prevent the loss of some object types by linking matching objects with the same name in the source and target accounts. The SYSTEM$LINK_ACCOUNT_OBJECTS_BY_NAME function adds a global identifier to account objects in the target account.
Note
Global identifiers are only added to account objects that are included in a replication or failover group for the following object types:
RESOURCE_MONITORROLEUSERWAREHOUSE
Apply global identifiers to account objects in the target account of the types included in the object_types list for failover
group myfg:
Execute the following SQL statement using the ACCOUNTADMIN role:
Initial replication of users and roles
The behavior of the initial refresh operation for USERS and ROLES object types can vary depending on whether or not there are matching objects with the same name in the target account.
Note
- The behavior described in this section applies only the first time these object types are replicated to the target account.
- The scenarios below describe the replication of USERS. The same also applies to the replication of ROLES.
-
If there are existing users in the target account with the same name as users in the source account, the initial refresh operation fails and describes the two options you have to continue:
-
Force the refresh operation and allow any existing users in the target account to be dropped. The users in the source account will be replicated to the target account.
To force a refresh for a group, use the FORCE parameter for the refresh command. For example, to force the refresh of a failover group, execute the following command:
-
Link the account objects by name. The SYSTEM$LINK_ACCOUNT_OBJECTS_BY_NAME function links users with the same name in both the target account and the source account. Users in the target account that are linked are not deleted.
To link account objects by name, execute the following command:
Note
Any user in the target account that does not have a matching user in the source account with the same name is dropped.
-
-
If there are no users in the target account with names matching users in the source account, the initial refresh operation in the target account drops all users. This can result in the following data and metadata loss:
-
If USERS are included in the OBJECT_TYPES list for a replication or failover group:
- Worksheets are lost.
- Query history is lost.
-
If USERS are included in the OBJECT_TYPES list, but ROLES is not:
- Privilege grants to users are lost.
-
If ROLES are included in the OBJECT_TYPES list:
- Privilege grants to share objects are lost.
-
To avoid dropping users or roles in the target account:
- In the source account, manually recreate any users or roles that exist only in the target account before the initial replication.
- In the target account, link matching objects with the same name in both accounts using the SYSTEM$LINK_ACCOUNT_OBJECTS_BY_NAME function.
Configure cloud storage access for secondary storage integrations
If you enable storage integration replication, you must take additional steps after the storage integration is replicated to target accounts. The replicated integration has its own identity and access management (IAM) entity that is different from the identity and IAM entity of the primary integration. Therefore, you must update your cloud provider permissions to grant the replicated integration access to your cloud storage.
You only need to configure this trust relationship on target accounts one time.
The process is similar to granting access in the source account. See the following pages for more information:
- Configuring a Snowflake storage integration to access Amazon S3
- Configure an integration for Google Cloud Storage
- Configuring a Snowflake storage integration for Azure
Configure automated refresh for directory tables on secondary stages
If you replicate an external stage with a directory table, and you have configured automated refresh for the source directory table, you must take steps to configure automated refresh for the secondary directory table.
The process is similar to setting up automated refresh in your source account. See the following for more information:
-
Amazon S3: The configuration process depends on how you set up event notifications.
- If you use Amazon S3 Event Notifications with Amazon Simple Queue Service (SQS), follow the instructions in Step 2: Configure event notifications. You can also migrate from SQS to SNS. For more information, see Migrate to Amazon Simple Notification Service (SNS).
- If you use Amazon Simple Notification Service (SNS), see Subscribing the Snowflake SQS Queue to your SNS topic.
-
Google Cloud Storage: Create a new subscription to your Pub/Sub topic and a new notification integration in your target account. Then, grant Snowflake access to the Pub/Sub subscription. For instructions, see Configure automation using GCS Pub/Sub.
-
Azure Blob Storage: Create a new Event Grid subscription and storage queue. Then, create a new notification integration in the target account and grant Snowflake access to your storage queue. For instructions, see Configure automation with Azure Event Grid.
Important
- After you complete these configuration steps in your target account, you should perform a full refresh of your directory table to ensure that it has not missed any notifications.
- For Google Cloud Storage and Azure Blob Storage, the name of the notification integration in each target account must match the name of the notification integration in the source account.
Configure notifications for secondary auto-ingest pipes
You must take additional steps to configure cloud notifications for secondary auto-ingest pipes before failover. This section covers why this additional configuration is required, and how to complete it for each supported cloud provider.
Amazon S3
The configuration process depends on how you set up event notifications. For example, suppose you have an auto-ingest pipe that relies on an Amazon Simple Notification Service (SNS) topic to publish messages about the Snowflake stage location.
When you replicate the pipe to a target account, Snowflake automatically creates a new Amazon Simple Queue Service (SQS) queue. You must subscribe this SQS queue for your target account to the SNS topic to get notifications about the stage location.
-
If you use Amazon S3 Event Notifications with Amazon Simple Queue Service (SQS), follow the instructions in Step 4: Configure event notifications.
Important
To ensure that the pipe has not missed any notifications, you should refresh the pipe after switching to the new SQS queue.
You can also migrate from SQS to SNS. For more information, see Migrate to Amazon Simple Notification Service (SNS).
-
If you use Amazon Simple Notification Service (SNS), see Subscribing the Snowflake SQS Queue to your SNS topic.
-
If you use Amazon EventBridge, see Option 3: Setting up Amazon EventBridge to automate Snowpipe.
Microsoft Azure Blob Storage
A pipe that automatically loads data from files located on a stage in Microsoft Azure blob storage requires an Event Grid subscription, storage queue, and a notification integration bound to the storage queue. A secondary pipe in a target account needs a separate Event Grid, storage queue, and notification integration bound to the storage queue. The Event Grid in both source and target accounts must be configured as endpoints for the same Azure Storage source.
See the diagram below for configuration details:
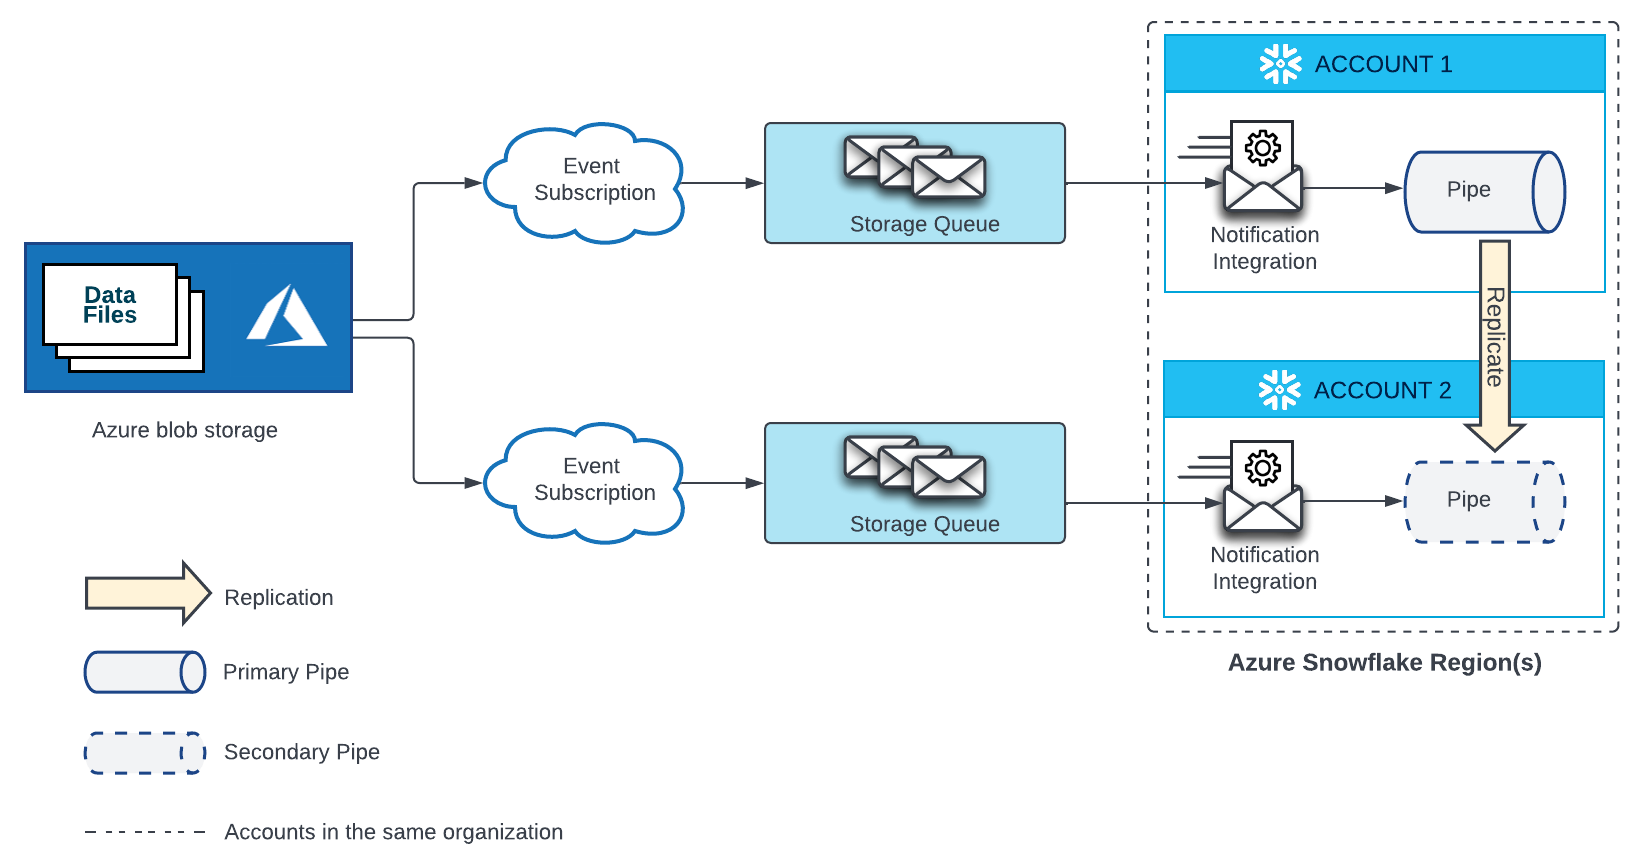
Create a new Event Grid subscription and storage queue. Then, create a new notification integration in the target account and grant Snowflake access to your storage queue. For instructions, see Configuring Automation With Azure Event Grid.
Important
The name of the notification integration in each target account must match the name of the notification integration in the source account.
External stage for Google Cloud Storage
A pipe that automatically loads data from files located in Google Cloud Storage requires a Google Pub/Sub subscription and a notification integration that references that subscription. Each replicated pipe in a target account also requires a Google Pub/Sub subscription and a notification integration that references that subscription. The Pub/Sub subscription in each source and target account must be subscribed to the same Pub/Sub Topic that receives notifications from the Google Cloud Storage source.
See the diagram below for configuration details:
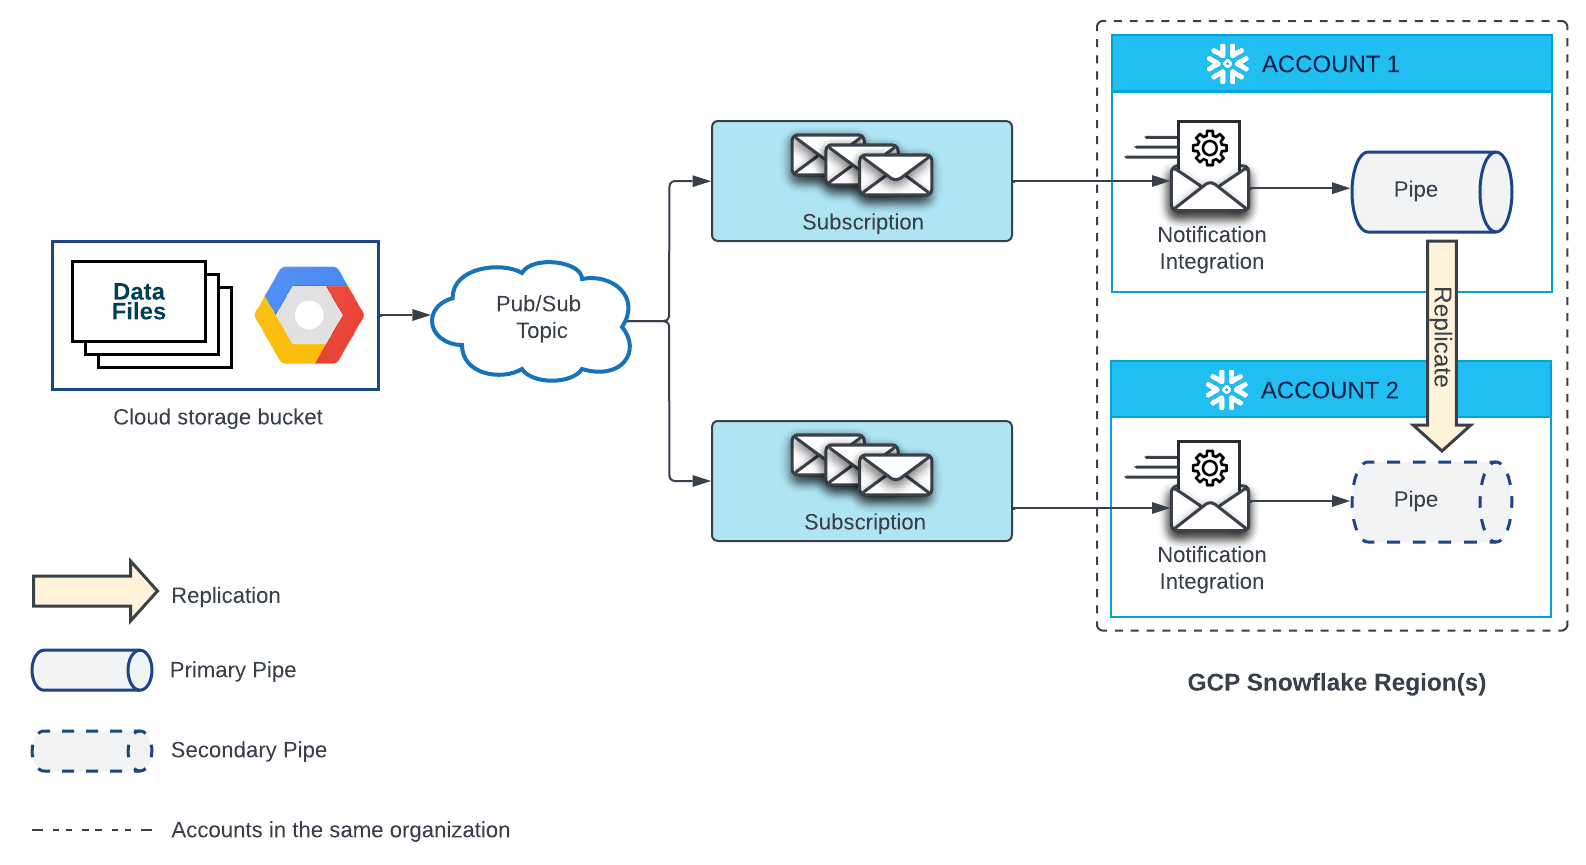
- Create a new subscription to your Pub/Sub topic and a new notification integration in your target account.
Then, grant Snowflake access to the Pub/Sub subscription. For instructions, see Configuring Automation Using GCS Pub/Sub.
Important
The name of the notification integration in each target account must match the name of the notification integration in the source account.
Updating the remote service for API integrations
If you have enabled API integration replication, additional steps are required after the API integration is replicated to the target account. The replicated integration has its own identity and access management (IAM) entity that are different from the identity and IAM entity of the primary integration. Therefore, you must update the permissions on the remote service to grant access to replicated functions. The process is similar to granting access to the functions on the primary account. See the below links for more details:
- Amazon Web Services Set up the trust relationship(s) between Snowflake and the new IAM role.
- Google Cloud Platform: Create a GCP Security Policy for the Proxy Service.
- Microsoft Azure:
- Step 1. Link the API integration for Azure
- Step 2. Create a validate-JWT policy
Comparing data sets in primary and secondary databases
Snowflake performs automatic verification checks as part of each replication refresh operation. If a verification failure occurs, the refresh fails. Therefore, you don’t have to manually verify the replicated data. If you need additional verification for compliance reasons, you can perform manual verification steps after the refresh operation finishes.
Automatic verification by Snowflake
Snowflake currently performs the following checks between the primary and secondary account, after each refresh operation:
- Snowflake compares the hash values between the primary and secondary account, for all files that were replicated.
- For each table, Snowflake compares the following values between the primary and secondary account:
- File count.
- Row count.
- Byte count.
Manual verification
If database objects are replicated in a replication or failover group, you can use the HASH_AGG function to compare the rows in some or all tables in a primary and secondary database to verify data consistency. The HASH_AGG function returns an aggregate signed 64-bit hash value over the set of input rows. The hash value is the same regardless of the ordering of the input rows.
Query this function on all tables, or a random subset of tables, in both the secondary account and the primary account. On the primary account, use an AT | BEFORE clause to specify the point in time of the latest refresh for the associated database. Compare the output between the queries on both accounts.
Example of manually verifying data after a refresh
In the following examples, the database mydb is included in the failover group myfg. The
database mydb contains the table myschema.mytable.
Commands to run on target account
-
Query the REPLICATION_GROUP_REFRESH_PROGRESS table function (in the Snowflake Information Schema). Note the
primarySnapshotTimestampin theDETAILScolumn for thePRIMARY_UPLOADING_METADATAphase. This is the timestamp for the latest refresh of that database on the primary account. -
Query the HASH_AGG function for a specified table in the secondary account. The following query returns a hash value for all rows in the
myschema.mytabletable:
Commands to run on source account
-
Query the HASH_AGG function for the same table in the primary account. Using Time Travel, specify the timestamp when the latest refresh was performed for the secondary database:
-
Compare the results from the two queries. The output should be identical.
Modifying a replication or failover group in a source account
You can edit the name, included objects, and replication schedule of a replication or failover group in a source account using Snowsight or SQL.
Note
Replication groups can’t be changed to failover groups or vice versa. To enable or disable failover, delete the group and recreate it with the correct failover setting.
Modify a replication or failover group in a source account using Snowsight
Note
Only account administrators can edit a replication or failover group using Snowsight (refer to Limitations of using Snowsight for replication configuration).
To perform these actions, you must be signed in to the source account. If you are not signed in, the Status column displays a sign in message instead of the refresh status.
-
Sign in to Snowsight.
-
In the navigation menu, select Admin » Accounts.
-
Select Replication, then select Groups.
-
Locate the replication or failover group you want to edit, and select the More menu (…) in the last column of the row.
-
Select Edit.
-
To change the group name, enter a new name in the Group name box that meets the following requirements:
-
Must start with an alphabetic character and cannot contain spaces or special characters unless the identifier string is enclosed in double quotes (for example, “My object”). Identifiers enclosed in double quotes are also case-sensitive.
For more information, see Identifier requirements.
-
Names for failover groups and replication groups in an account must be unique.
-
-
Choose Edit objects to add or remove share and account objects.
Note
Account objects can only be added to one replication or failover group. If a replication or failover group with any account objects already exists in your account, you can’t select those objects.
-
Choose Select databases to add or remove database objects.
-
Select the Replication frequency to change the replication schedule for a group.
-
Select Save to update the group.
If saving the changes to the group is unsuccessful, refer to Troubleshoot issues with creating and editing replication groups using Snowsight for common errors and how to resolve them.
Modify a replication or failover group in a source account using SQL
You can modify a replication or failover group properties using the ALTER REPLICATION GROUP or ALTER FAILOVER GROUP command.
Pause or resume a replication schedule in a target account
You can pause (suspend) or resume a replication schedule in a target account using Snowsight or SQL.
Pause or resume a replication schedule in a target account using Snowsight
Note
Only account administrators can edit a replication or failover group using Snowsight (refer to Limitations of using Snowsight for replication configuration).
To pause or resume a replication schedule, you must be signed in to the target account.
- Sign in to Snowsight.
- In the navigation menu, select Admin » Accounts.
- Select Replication, then select Groups.
- Locate the replication or failover group you want to edit, and select the More menu (…) in the last column of the row.
- Select Pause or Resume.
Pause or resume a replication schedule in a target account using SQL
You can pause or resume a replication schedule in a target account using the ALTER REPLICATION GROUP or
ALTER FAILOVER GROUP command. To pause, specify the SUSPEND parameter. To resume, specify the
RESUME parameter.
Dropping a secondary replication or failover group
You can drop a secondary replication or failover using the DROP REPLICATION GROUP or the DROP FAILOVER GROUP command. Only the replication or failover group owner (that is, the role with the OWNERSHIP privilege on the group) can drop the group.
To drop a secondary replication or failover group using Snowsight, you must drop the group in the source account. See Drop a replication or failover group using Snowsight.
Dropping a primary replication or failover group
You can drop a primary replication or failover group using Snowsight or SQL. If you are deleting a primary group using SQL, you must first drop all secondary groups. See Dropping a secondary replication or failover group.
Drop a primary replication or failover group using SQL
A primary replication or failover group can only be dropped after all the replicas of the group (that is, secondary replication or failover groups) have been dropped. Alternatively, you can promote a secondary failover group to serve as the primary failover group, then drop the former primary failover group.
Note that only the group owner can drop the group.
Drop a replication or failover group using Snowsight
Note
Only account administrators can delete a replication or failover group using Snowsight (refer to Limitations of using Snowsight for replication configuration).
You can delete a primary replication or failover group and any linked secondary groups.
- Sign in to Snowsight.
- In the navigation menu, select Admin » Accounts.
- Select Replication, select Groups.
- Locate the replication or failover group you want to delete. Select the More menu (…) in the last column of the row.
- Select Drop, then select Drop group.
Troubleshoot issues with creating and editing replication groups using Snowsight
The following scenarios can help you troubleshoot common issues that can occur when creating or editing replication or failover group using Snowsight.
You cannot add a database to a group
| Error | |
| Cause | A database can only be in one replication or failover group. One of the databases you selected for the group is already included in another replication or failover group. |
| Solution | Choose Select Databases and unselect any database(s) that are already included in another group. |
| Error | |
| Cause | The database you want to add to a replication or failover group was previously configured for database replication. |
| Solution | Disable database replication for the database. See Transitioning from database replication to group-based replication. |
You cannot add a share to a group
| Error | |
| Cause | A share can only be in one replication or failover group. One of the shares you selected for the group is already included in another replication or failover group. |
| Solution | Choose Select Objects and unselect any share(s) that are already included in another group. |
Limitations of using Snowsight for replication configuration
- Only a user with the ACCOUNTADMIN role can create a replication or failover group using Snowsight. A user with a role with the CREATE REPLICATION GROUP or CREATE FAILOVER GROUP privilege can create a group using the respective SQL commands.
- Only a user with the ACCOUNTADMIN role can edit or drop a replication or failover group using Snowsight. A user with a role with the OWNERSHIP privilege on a replication or failover group can edit and drop groups using the respective SQL commands.
- If your account uses private connectivity, you can’t use Snowsight to create, modify, or drop groups. You can use SQL to complete these actions.