Application Packages in Declarative Sharing in the Native Application Framework
As a provider, you create an application package to bundle your data content and notebooks into a Declarative Native App. This topic explains what an app package is and describes the high-level steps to create one, from creating the initial package to adding your manifest and notebook files.
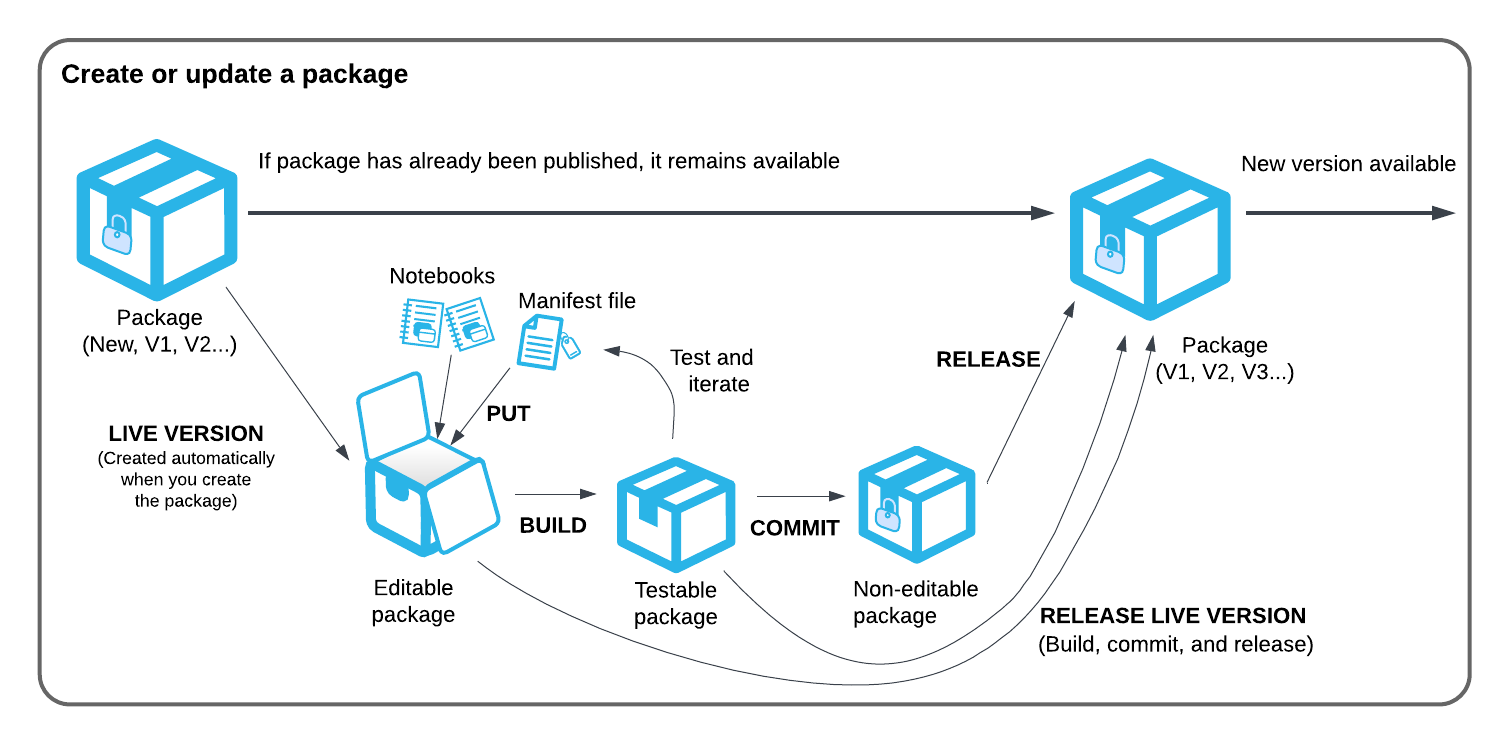
The application package and the live version
The app package is a container for all the files that make up the app, including the manifest file and any Snowflake Notebooks. When you create an app package, a live (staged) version of the app package is also created. The live version is a development workspace where you can add or update files, such as the manifest file and notebook files, and preview and test the experience before publishing.
Once you’re satisfied with the live version of the app, you can commit the live version to create a new immutable version of the app package, that you can then publish.
Using the live version for development simplifies version management by maintaining a single immutable version of the app package that is ready to be published, and a single live version for development. The Snowflake Native App Framework automatically manages the versioning of the app package, so you don’t need to manually track version numbers.
The Snowflake Native App Framework maintains a live version for any app package automatically. Even if you remove the live version, a new live version is created automatically from the last committed version of the app package.
Create an application package
Providers develop and test an application (app) package. An app package includes files necessary to share the data in the app, and defines how data can be accessed by consumers.
The process involves the following steps:
-
Create an app package project (first time only): creates an app package project that will later be published. This also creates the live version of the app package.
-
Add content to the app package:
- Create or update a manifest file: This file describes the app package and its contents.
- Download notebook files. If notebooks are to be included, download a copy to be included in the app package.
- Add the files to the live version of the app package.
-
Build the app package: allows you to verify that the manifest file is valid and that all links in the manifest file are correct.
-
Test the app. Install the app and try it out. Make changes, and rebuild.
-
Commit the app package: creates a new immutable version of the app that can be published.
-
Release the app package. With a released package, you can create a new listing, either privately or publicly on the Snowflake Marketplace.
This process is described in the Tutorial: Getting started with Declarative Native Apps. This section includes additional details of options available at the different stages of development.
Create a new application package
First, create a new Declarative Native App package to hold the app’s files, either via Snowsight or SQL commands from Snowflake CLI, using the snow://package/<DECL_SHARE_APP_PKG>/versions/LIVE/ URL scheme.
To use Snowsight to create a new app package:
- Sign in to Snowsight.
- In the navigation menu, select Projects » App Packages.
- In the Share Data + Code card, select Create.
- Enter a name for your app package, and then select Create.
To use SQL in Snowflake CLI to create a new app package:
- Create a Declarative Native App package using the CREATE APPLICATION PACKAGE … TYPE=DATA command, replacing <DECL_SHARE_APP_PKG> with the name you want to give the app package:
The new empty app package is created. This also creates a live version of the app package that you can edit.
Assemble content for the application package
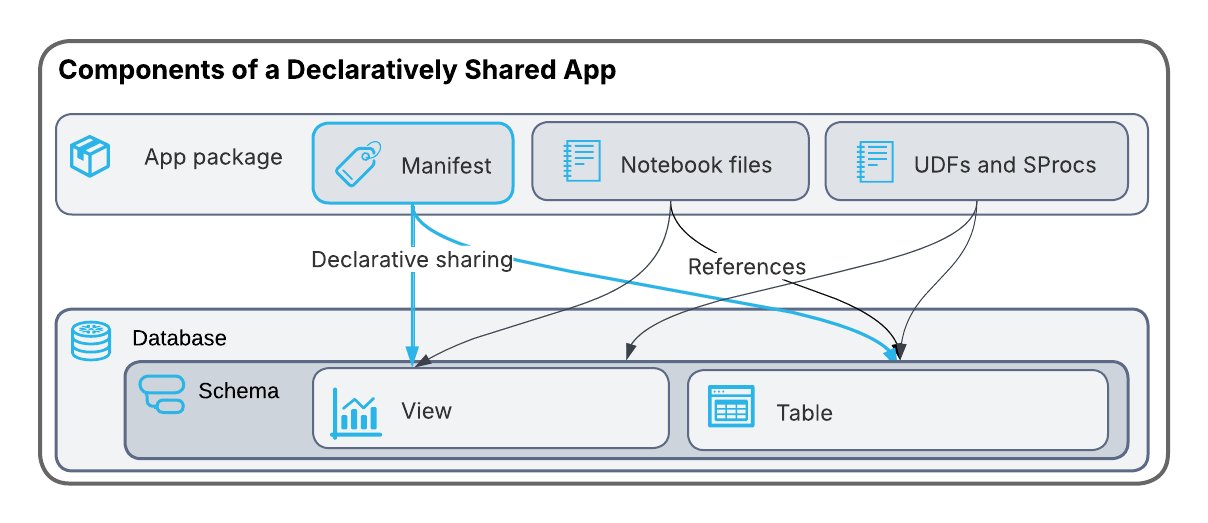
An app package includes the following components:
- A manifest file (required): A text-based file that defines the app’s structure.
- Snowflake Notebook files (optional): One or more text-based files that can act as a front end to the consumer experience, referencing the shared views and tables. They can also include code, reference visualizations, and include logic to help present the data.
Create or update a manifest file
You can create or update a manifest file, which describes the app package and its shared content–for example, notebooks, tables, and views. It defines other metadata, such as app roles included with the app.
The manifest file must be named manifest.yml, and must be added to the root level of the app package.
For more information, see Declarative Native App manifest reference. The associated Tutorial: Getting started with Declarative Native Apps includes an example manifest file.
Create or update a manifest file from a Snowflake data share
Note
The following content is not supported by Snowflake. All code is provided “AS IS” and without warranty.
If you have an existing data share in Snowflake, you can automatically create a manifest file using the open-source Manifest from Share tool. This Snowflake-provided tool generates a manifest file based on the objects in a specified share. The tool also includes options to customize the generated manifest file. You can use this tool in the following ways:
- Generate a manifest file using the command-line interface (CLI).
- Integrate the tool into an existing Python automation workflow as a library.
For more information about how to download and use the tool, see the Snowflake Manifest from Share repository on GitHub.
Note
The Manifest from Share tool only creates the manifest file using the data share’s databases, schemas, tables and views. The tool doesn’t include any other objects in the generated manifest file.
Get notebook files
If Snowflake Notebooks are to be included in the app, download a copy of each notebook file so you can include it in the app package.
From Snowsight:
- In the navigation menu, select Projects » Notebooks, and then select the notebook you want to download.
- In the left pane, next to your notebook, select … » Download.
The file is downloaded to your local machine, as a file named <notebook_name>.ipynb.
Note
The notebook environment has a set of pre-installed Anaconda packages, including Python and Streamlit. If your notebook uses additional Anaconda packages, you must add those as packages to your notebook so they can be used in the consumer’s environment. For information about how to add Anaconda packages to your notebook, see the Add Anaconda packages to a notebook.
Add files to the live version
Add the manifest and notebook files to the live version of the app package:
To use Snowsight to populate the app package:
- If you’re not already viewing the app package’s listing, from the navigation menu, select Projects » App Packages, and then select the app package you want to add files to.
- Select Upload files. (If you are replacing or adding additional files, select Manage files, and then select Upload files.)
- Drag the notebook files and the manifest from your hard disk to the Upload files dialog where indicated, or select Browse to locate and select the files.
- Select Upload to upload the files to the live stage and trigger a build.
-
To use SQL in Snowflake CLI to populate the app package, use the following commands, replacing the file paths with your own and <DECL_SHARE_APP_PKG> with the name of the app package:
-
Manifest file:
-
Notebook file:
-
-
Verify the files are in the application package with the following command:
The output shows the files in the live version of the app package, similar to the following:
Download a file from the application package
You can download a file from the app package using the GET SQL command in Snowflake CLI:
Remove content from the application package
You can remove files from the application package.
Using Snowsight:
- If you’re not already viewing the app package’s listing, from the navigation menu, select Projects » App Packages, and then select the app package you want to remove files from.
- Select Manage files » Remove files.
- Select the file(s) you want to remove, and then select Delete.
- In the Remove files dialog, choose the files to remove, and then select Remove & build.
Using the REMOVE (or RM) SQL command in Snowflake CLI:
Build the application package
Next, build a testable version of the app.
In Snowsight:
- When you upload a complete set of files to the app package, a build kicks off automatically.
- To perform a build at any other time, select the Build button on the app package’s page.
If there are any errors in the manifest file, the build fails and gives information on how to fix the error. Correct the errors and rebuild the app package.
The ALTER APPLICATION PACKAGE … BUILD command builds a testable version of the app package and verifies that the manifest file is valid and that all links work.
If there are any errors in the manifest file, the build fails and gives information on how to fix the error. Correct those errors and rebuild the app package.
The built app remains in the live state, and you can continue to make changes to the application package.
Skip ahead!
For updates that don’t require further testing, you can skip ahead by building, committing, and releasing an app package all at once using the ALTER APPLICATION PACKAGE … RELEASE LIVE VERSION command.
Test the application
After building the app package, you can perform basic tests on it from the live environment.
Install the app from an app package using the command: CREATE APPLICATION … FROM APPLICATION PACKAGE, replacing <DECL_SHARE_APP> with the name of the app. For example:
Update the files in the app package as needed, and then see if it worked by using the command: ALTER APPLICATION … UPGRADE USING VERSION LIVE.
To test some features, such as app roles, you must first release a new version of the app package, and then test using a separate consumer account. For more information, see Install a Declarative Native App and Access content in a Declarative Native App.
Optional: Reset edits on a live version
If the edits made to the live version of the app package are no longer needed, you can reset the app package to the state before the edits were made with the ALTER APPLICATION PACKAGE … ABORT LIVE VERSION command.
When you use the preceding command to remove the current live version, a new live version is created with the same contents as the last committed version of the app package. The live version is reset to the last committed version, and all changes made to the live version are discarded.
Commit and release the application package
Committing the app package builds a new immutable version of the app that can’t be edited and is ready to be published. Releasing the app package does the following:
- Makes a committed app ready to be shared with consumers.
- If the provider has already shared the app with consumers, the new version is automatically available to those consumers.
- If there’s already a live version of the app on the Snowflake Marketplace, the new version is automatically available to consumers who have installed the app.
To use Snowsight to commit and release the app package:
- If you’re not already viewing the app package’s listing, from the navigation menu, select Projects » App Packages, and then select the app package you want to release.
- Select Commit & release.
- In the confirmation dialog, select Acknowledge & continue.
The committed app package is released, and the live version of the app package is removed. A new live version of the app package is created from the new committed version for further development.
Once you’ve committed and released the app package, the Latest release tab shows the contents of the release, which is the same as the contents of the last build.
-
In SQL, use the ALTER APPLICATION PACKAGE commands as shown:
The live version of the app package is removed. A new live version of the app package is created from the new committed version for further development.
-
Next, release the committed app package:
You can also build, commit, and release a live version of the app package, all at once:
After you release the app package, you can create a new listing for the app, either privately or publicly on the Snowflake Marketplace. For more information, see Creating a Listing using Declarative Sharing.