Unload into Google Cloud Storage
If you already have a Google Cloud Storage account and use Cloud Storage buckets for storing and managing your files, you can make use of your existing buckets and folder paths when unloading data from Snowflake tables. This topic describes how to use the COPY command to unload data from a table into a Cloud Storage bucket. You can then download the unloaded data files to your local file system.
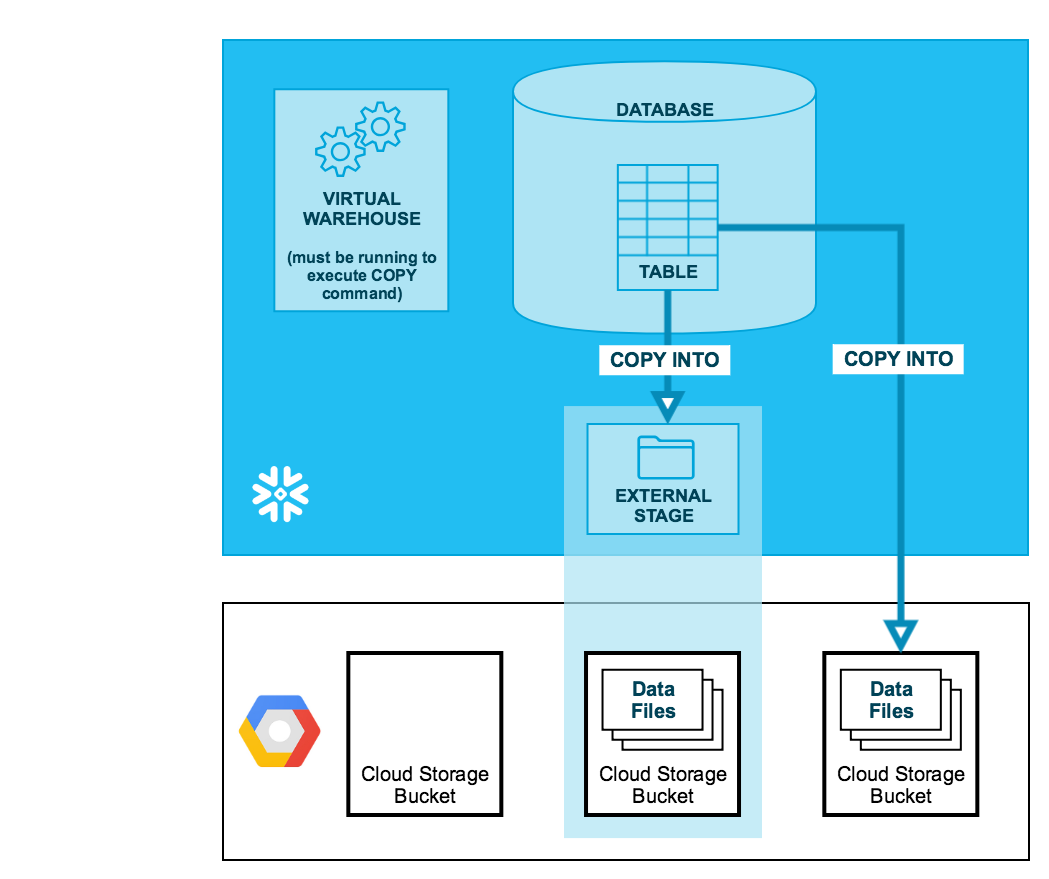
As illustrated in the diagram below, unloading data into a Cloud Storage bucket is performed in two steps:
- Step 1:
Use the COPY INTO <location> command to copy the data from the Snowflake database table into one or more files in a Cloud Storage bucket. In the command, you specify a named external stage object that references the Cloud Storage bucket (recommended) or you can choose to unload directly to the bucket by specifying the URI and storage integration (if required) for the bucket.
Regardless of the method you use, this step requires a running, current virtual warehouse for the session if you execute the command manually or within a script. The warehouse provides the compute resources to write rows from the table.
- Step 2:
Use the interfaces/tools provided by Google to download the files from the Cloud Storage bucket.
Tip
The instructions in this set of topics assume you have read File formats to unload data and have created a named file format, if desired.
Before you begin, you may also want to read Data unloading considerations for best practices, tips, and other guidance.
Configure Cloud Storage for unloading data
For Snowflake to write to a Cloud Storage bucket, you must configure a storage integration object to delegate authentication responsibility for external cloud storage to a Snowflake identity and access management (IAM) entity.
For configuration instructions, see Configure an integration for Google Cloud Storage.
Unload data into an external stage
External stages are named database objects that provide the greatest degree of flexibility for data unloading. Because they are database objects, privileges for named stages can be granted to any role.
You can create an external named stage using either the web interface or SQL:
- Snowsight:
In the navigation menu, select Catalog » Database Explorer. Then select the <db_name> » Stages.
- SQL:
Create a named stage
Snowflake uses multipart uploads when uploading to Amazon S3 and Google Cloud Storage. This process might leave incomplete uploads in the storage location for your external stage.
To prevent incomplete uploads from accumulating, we recommend that you set a lifecycle rule. For instructions, see the Amazon S3 or Google Cloud Storage documentation.
The following example creates an external stage named my_ext_unload_stage with a folder path named unload. The stage references the following objects:
- A named storage integration called
gcs_int. For instructions, see Configure an integration for Google Cloud Storage. - A named file format called
my_csv_unload_format. For instructions, see File formats to unload data.
Unload data to the named stage
-
Use the COPY INTO <location> command to unload data from a table into a Cloud Storage bucket using the external stage.
The following example uses the
my_ext_unload_stagestage to unload all the rows in themytabletable into one or more files into the Cloud Storage bucket. Ad1filename prefix is applied to the files: -
Use the tools provided by Cloud Storage to retrieve the objects (i.e. files generated by the command) from the bucket.
Unload data directly into a Cloud Storage bucket
-
Use the COPY INTO <location> command to unload data from a table directly into a specified Cloud Storage bucket. This option works well for ad hoc unloading, when you aren’t planning regular data unloading with the same table and bucket parameters.
You must specify the URI for the Cloud Storage bucket and the storage integration for accessing the bucket.
The following example unloads all the rows in the
mytabletable into one or more files with the folder path prefixunload/in a Cloud Storage bucket: -
Use the Cloud Storage console (or equivalent client application) to retrieve the objects (i.e. files generated by the command) from the bucket.