Provider workflows
This section describes the workflows that providers follow to become a Snowflake Marketplace provider and to offer data/share listings and Snowflake Native App listings on Snowflake Marketplace.
Provider approval process
The image below shows the approval process for becoming a Snowflake Marketplace provider. The steps below the image describe the actions that providers take when following the workflow.

-
If you don’t have one already, create a Snowflake account.
-
Configure your provider profile.
- Sign in to Snowsight.
- In the navigation menu, select Marketplace » Provider Studio.
- Select the Profiles tab.
- Select + Create profile » External profile.
For more information, see Manage your provider profile.
-
Submit your profile for approval.
Snowflake will review your profile and respond to you within approximately 1 business day.
If your submission is approved, you can then begin publishing listings on Snowflake Marketplace.
If your submission is rejected because of a policy violation, Snowflake will provide instructions via email on what needs to be corrected. You can then revise your profile and resubmit it.
For more information on details for provider profile requirements, see the Snowflake Provider and Consumer Policies.
Note
Provider profiles won’t be visible on Snowflake Marketplace until a public listing is published.
Data/share listing approval flow
The following image shows the approval process for publishing listings on Snowflake Marketplace. The steps below the image describe the actions that providers take when following the workflow.
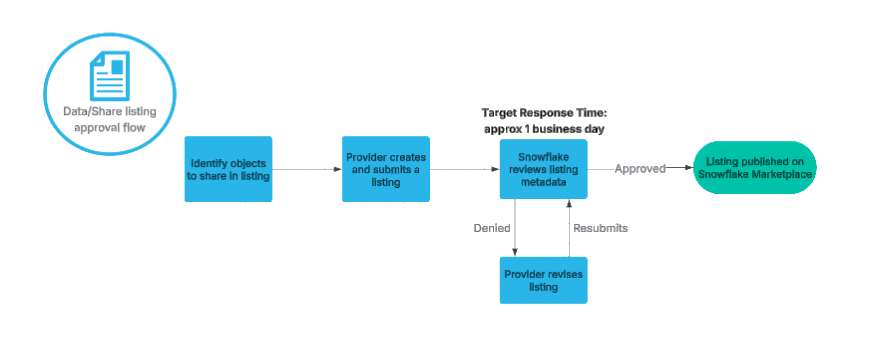
-
Identify the objects that you want to share in a listing.
For more information, see Prepare to create a listing.
-
Create a listing and submit it for publishing.
-
Sign in to Snowsight.
-
In the navigation menu, select Marketplace » Provider Studio.
-
To create your listing, select Create Listing » Snowflake Marketplace.
For more information on how to create a Snowflake Marketplace listing, see Share data or apps publicly on Snowflake Marketplace.
-
Submit your listing for approval.
-
-
Snowflake reviews the listing metadata and will respond within approximately 1 business day.
-
If your listing is approved, then it will be published and available on Snowflake Marketplace.
Note
If you submitted your listing using manual publishing, the listing will not be published. The listing will remain approved until you manually publish the listing. For more information, see Submit your listing for approval.
-
If your listing is rejected, Snowflake will provide instructions via email on what needs to be corrected. You can then revise your listing and resubmit it.
For more information on details for provider profile requirements, see the Snowflake Provider and Consumer Policies.
-
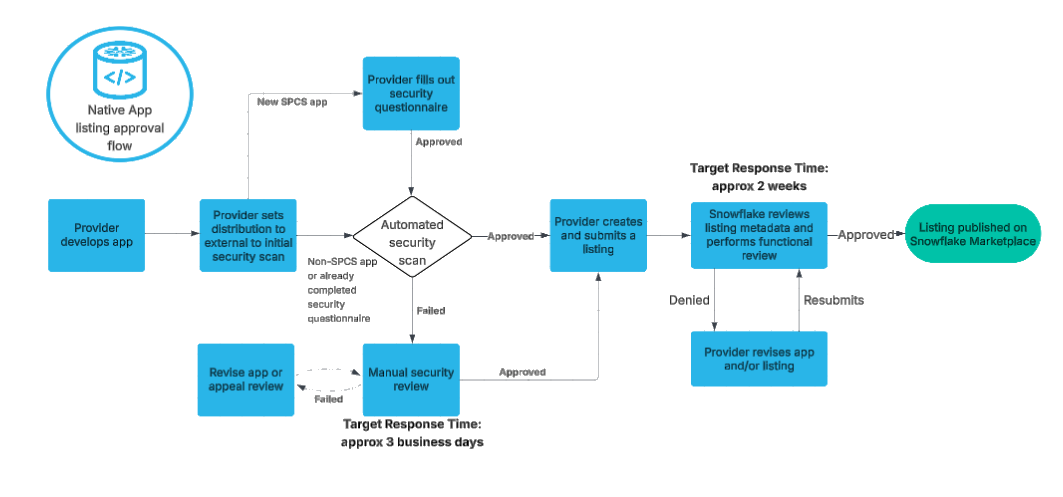
Snowflake Native App listing approval flow
The image below shows the approval process for a Snowflake Native App listing on Snowflake Marketplace. The steps below the image describe the actions that providers take when following the workflow.
Note
Snowflake recommends that you test your application by privately sharing it with another account prior to submitting for publishing. This may expedite the review process.
-
Create a Snowflake Native App package.
For more information, see Tutorial 1: Create a basic Snowflake Native App.
-
To initiate an automated security scan, set the DISTRIBUTION property for the application package to
EXTERNAL.- If the automated security scan fails, Snowflake will perform a manual security review that can take approximately 3 business days.
- If the Snowflake Native App uses Snowpark Container Services (SPCS), then you must complete a security questionnaire. After the questionnaire is approved, the automated security scan starts.
-
Create a listing and submit it for approval.
For more information, see Publish an app to consumers.
-
Snowflake reviews the listing metadata and conducts a functional review of the Native App, ensuring that it meets all Snowflake Marketplace enforced requirements.
-
If your listing is approved, it will then be published and available on Snowflake Marketplace.
Note
If you submitted your listing using manual publishing, the listing will not be published. The listing will remain approved until you manually publish the listing. For more information, see Submit your listing for approval.
-
If your listing is rejected, Snowflake will reach out using the emails listed in the profile contacts (business and technical) with feedback on the application. Reviews may take up to 14 days.
-