Connect to a Git repository over a private network
You can configure Snowflake to establish connectivity through an outbound private link connection between Snowflake and your cloud infrastructure. Snowflake routes Git traffic through this connection to the Git repository server.
With a private link connection, Snowflake routes Git traffic through a dedicated private network connection, avoiding the public internet entirely. This section describes the steps at a high level.
-
Configure the private link connection.
You’ll apply configuration changes to both Snowflake and your cloud service infrastructure. This topic describes the steps on the Snowflake side. For details about all the steps, including about configuring your cloud service provider, see the knowledge base article Configuring Git Integration with Snowflake over Private Link.
Note
Snowflake supports only connections within the same cloud and region. For example, if your Snowflake deployment is on AWS in the us-west-2 region, then your other components must also be in that region.
Configure the private link connection
Before you can configure Snowflake for access to the remote Git repository, you must set up a private link between Snowflake and your cloud service provider.
To apply configuration changes to both Snowflake and your infrastructure, follow these steps:
-
In your cloud service provider, create a private link service to receive requests from the Snowflake private endpoint service.
For details, see the knowledge base article Configuring Git Integration with Snowflake over Private Link.
-
In Snowflake, provision a private endpoint that will reach your infrastructure through a private IP.
To provision the endpoint, use the SYSTEM$PROVISION_PRIVATELINK_ENDPOINT function with the following two arguments:
- Your cloud provider’s private link service ID
- Your Git server’s domain name
- In your cloud service provider, accept the Snowflake private endpoint setup to finish setting up the private link connection.
- To check status of the provisioning, call the SYSTEM$GET_PRIVATELINK_ENDPOINTS_INFO system function.
Configure Snowflake access to the remote Git repository
After you set up a private link between Snowflake and your cloud service provider, you can configure Snowflake access to the remote Git repository.
-
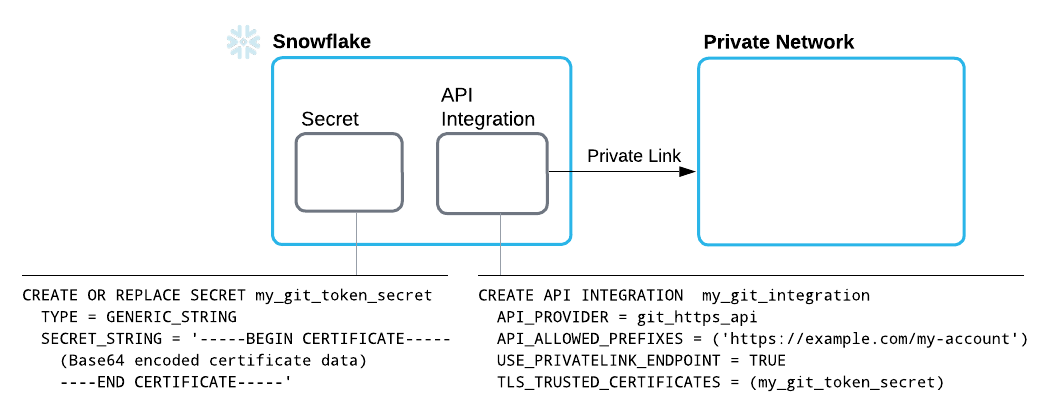
Create an API integration that supports authenticating with a certificate.
Because Snowflake will reach your Git server using the HTTPS protocol, the domain name needs to have a valid certificate. The configuration you use differs depending on whether you use a self-signed certificate or a certificate signed by a certificate authority.
-
Using a self-signed certificate:
-
Provide credentials in a generic string secret.
This should be a public key of a self-signed domain to establish an HTTPS connection. To provide to Snowflake the credentials it will use to authenticate with the server, create a secret that contains the following details:
-
A TYPE parameter value of
GENERIC_STRING -
A public certificate string as the value of the SECRET_STRING parameter
For the parameter’s value, specify a secret string, such as a public certificate body.
-
-
Create an API integration to integrate with the Git API, and specify the following details:
- An API_PROVIDER parameter set to
git_https_api - An API_ALLOWED_PREFIXES set to the base URL beneath which access is allowed
- A USE_PRIVATELINK_ENDPOINT parameter set to
TRUE - A TLS_TRUSTED_CERTIFICATES parameter set to the name of the secret you created, which contains the certificate
For more information, see CREATE API INTEGRATION.
- An API_PROVIDER parameter set to
-
-
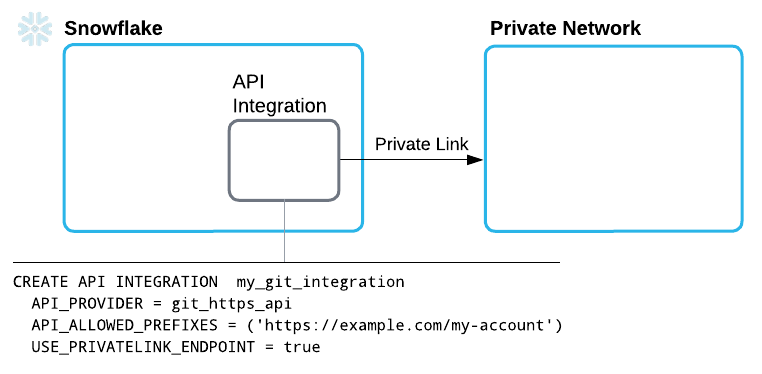
Using a certificate signed by a certificate authority:
-
Create an API integration to integrate with the Git API, and specify the following details:
- An API_PROVIDER parameter set to
git_https_api - An API_ALLOWED_PREFIXES set to the base URL beneath which access is allowed
- A USE_PRIVATELINK_ENDPOINT parameter set to
TRUE - A TLS_TRUSTED_CERTIFICATES parameter set to the name of the secret you created, which contains the certificate
For more information, see CREATE API INTEGRATION.
- An API_PROVIDER parameter set to
-
-
-
Provide credentials in a basic authentication secret.
After successfully connecting to the Git server over private link, you must still authenticate with the repository by creating another secret that provides credentials for the repository.
To provide the credentials that Snowflake uses to authenticate with the repository, create a secret that contains the following:
-
A TYPE value of
password -
A username and token, such as a personal access token (PAT)
Note
For information about creating a personal access token in GitHub, see Managing your personal access tokens in the GitHub documentation.
For more information on the SQL command for creating a secret, see the CREATE SECRET.
-
-
Create a Git repository clone as described in Create a Snowflake Git repository clone.
Create a Snowflake Git repository clone
After you configure Snowflake for access to your remote repository, create a Git repository clone in Snowflake to contain files fetched from the remote repository.
Note
For information on creating a Git workspace in Snowsight, see Create a Git workspace.
A Git repository clone in Snowflake specifies the following details:
-
The remote repository’s origin
In Git,
originis the remote repository’s URL. Use that URL when setting up Snowflake to use a remote Git repository. The URL must use HTTPS. For example, you can retrieve the origin URL in the following ways:-
In the GitHub user interface, you can get the origin URL from the repository home page. Select the Code button, and then copy the HTTPS URL from the box displayed beneath the button.
-
From the command line, use the
git configcommand from within your local repository, as in the following example:The command produces output such as the following:
For reference information about
git config, see the git documentation.
-
-
Credentials, if needed, for Snowflake to use when authenticating with the repository
For the GIT_CREDENTIALS parameter, specify a Snowflake secret you created.
-
An API integration specifying details for Snowflake interaction with the repository API
You can create a Git repository clone by using either Snowsight or SQL.
Note
Before creating a Git repository clone, you’ll need to create a secret (if the remote repository requires authentication) and an API integration.
Code in the following example creates a Git repository clone called snowflake_extensions. The clone specifies
the my_git_api_integration API integration and the my_git_secret secret with credentials for authenticating.
-
Sign in to Snowsight.
-
In the navigation menu, select Catalog » Database Explorer.
-
In the object explorer, select the database and schema that you want to contain the Git repository clone you’re creating.
-
Select Create » Git Repository.
-
In the Create Git Repository dialog, for Repository Name, enter a name that will uniquely identify this repository clone in the schema.
For naming guidelines, see Identifier requirements.
-
For Origin, enter the remote repository’s origin URL.
-
From the API Integration drop-down menu, select the API integration to reference when creating the Git repository clone.
If you don’t have an API integration to use, select Create new API integration in Worksheets to use SQL to create one. For more information, see CREATE API INTEGRATION.
-
Optional: For the Comment, enter text describing this integration for others.
-
Optional: If the remote repository requires authentication, set the Authentication toggle to the on position.
-
If you turned on the toggle, from the Secret menu, select the secret that should be referenced by the Git integration to authenticate with the remote repository.
If you don’t have a secret to use, select Create new secret in Worksheets to use SQL to create one. For more information, see CREATE SECRET.
-
-
Select Create.
When you successfully create the integration, the Git repository clone appears beneath the schema, in a Git Repositories directory. You’ll also see a page that lists repository directories, branches, and tags.