Serverless compute
With serverless compute, a Snowflake App Runtime app runs only while people use
it. Snowflake starts the app when a request arrives and stops it after an idle
period, so you don’t pay to keep it running between uses. You opt in per app by
setting compute_resource: SERVERLESS in
app.yml.
Serverless compute suits apps that people open at different times: a dashboard checked each morning, an approval tool used through the week, or a report used at month end. It supports Node.js and Python apps.
How serverless compute works
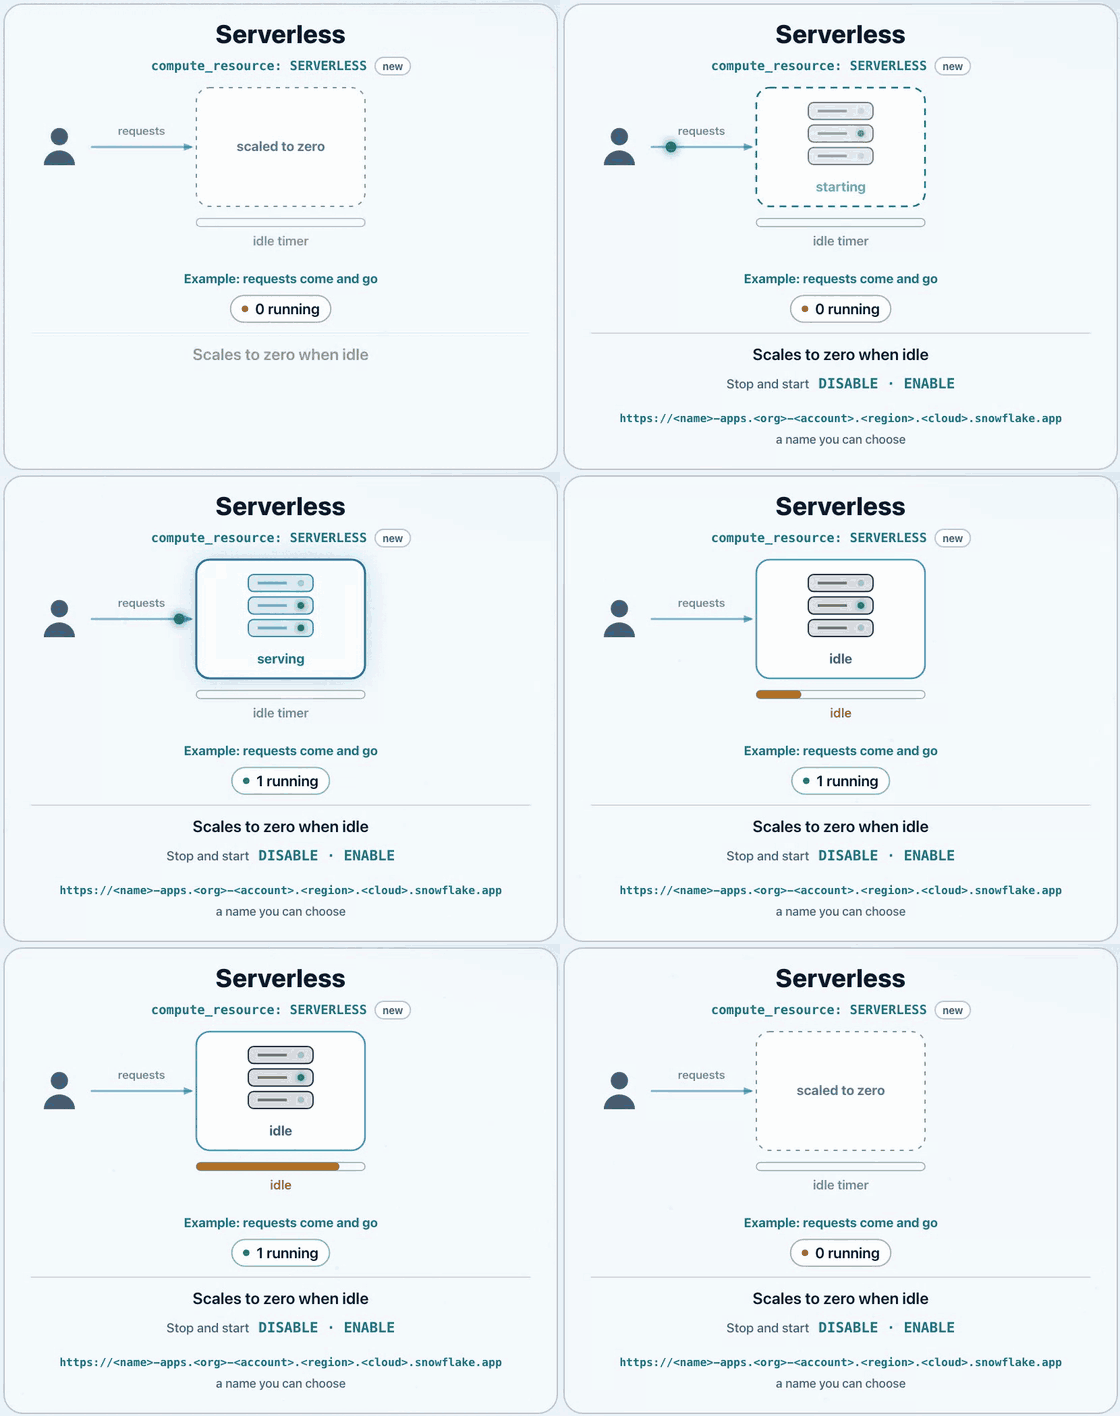
- A request arrives and Snowflake starts the app. The request waits, then gets its response when the app is up.
- The app serves requests while people use it.
- When no requests arrive for the idle period, 3600 seconds (1 hour) by default, Snowflake stops the app. To change the idle period, see Set the idle timeout for a serverless app.
- The next request starts the app again.
The Application Service, its deployed package, its configuration, and its URL persist across these cycles. Only the running container stops and starts.
Requests arrive over HTTPS on the account’s snowflake.app domain. Snowflake
terminates TLS and authenticates the user before it forwards the request to the
app. See Runtime environment for Snowflake App Runtime apps.
What a serverless app gets
- A URL you choose. Set
url_prefixto name the app’s address:<url_prefix>-apps.<org>-<account>.<region>.<cloud>.snowflake.app. The address stays the same across redeploys. See URL prefix. - Per-app cost. Each serverless app has its own credit usage.
- Fixed size. The app runs as one instance with 2 vCPU and 4 GiB of memory. Test your busiest apps under realistic load before you move them.
- Disable and enable. Use
DISABLEandENABLEto take the app offline and bring it back. See Disable and enable a serverless app. - Caller’s rights. Requests carry the caller token alone. See Query Snowflake from a Snowflake App Runtime app.
- Logs. Event tables receive the app’s logs. See Monitor a Snowflake App Runtime app.
For the full list of limits, see Serverless compute limitations.
Create a serverless app
Serverless compute must be enabled for your account. If it isn’t, contact your Snowflake representative. See Serverless compute isn’t enabled.
-
Use the latest version of Snowflake CLI.
-
In an
app.ymlmanifest, setcompute_resource: SERVERLESS. Optionally, seturl_prefixto choose the app’s URL. If your project still usessnowflake.yml, migrate toapp.ymlfirst.Without
url_prefix, Snowflake generates the name for you. Either way, the address stays the same across redeploys and disable-and-enable cycles. -
Deploy the project:
To check the resolved manifest first, run
snow app validate.The first serverless deploy in an account can stop while Snowflake issues the TLS certificate, which can take up to three hours. See Serverless deploy stops while the TLS certificate is issued.
You can also build and deploy a serverless app from Snowsight Workspaces.
Move an existing app to serverless compute
You can’t convert an existing Application Service to serverless. Instead, deploy a new service on serverless compute, move users to it, and then retire the old service.
Before you start, check that the app doesn’t depend on in-memory or local state. See Design for ephemeral compute.
-
In
app.yml, add a named target with a newnameandcompute_resource: SERVERLESS. Keep the existing target so the current service stays unchanged:For the serverless fields, see compute_resource.
-
Deploy the new target:
-
Open the new app and verify that it works:
-
Grant access to the new service. Grants on the old service don’t carry over. Grant
USAGEon the new Application Service to each role that uses the app:For other privileges and patterns, see Share a Snowflake App Runtime app.
-
Update links, bookmarks, and docs to point to the new URL.
-
Set
default_target: serverlessinapp.yml. This step is required so that later deploys go to the new service and not the old one: -
Keep the old service running while people move to the new URL. Its URL works only while the service exists, so dropping it breaks old links and bookmarks. To send visitors on, deploy a version of the old app that redirects to the new URL.
Design for ephemeral compute
Design your app so it can serve requests after starting with an empty cache. When a serverless app stops, in-process caches and files written to its local filesystem don’t persist. The next request starts a new runtime.
Check for data held in module-level variables, in-memory caches, or local files. Store anything the app must retain in durable storage.
Choose a caching strategy based on what must persist across a restart:
In-process memory: Use it for disposable data that the app can fetch or calculate again on a cache miss. Don’t depend on it for durable state.
Local disk: Use /tmp for disposable scratch files, not as the source of
truth.
Snowflake query result reuse: For repeated SQL queries, consider Snowflake’s built-in result reuse before adding an application cache. Reuse depends on the query, underlying data, privileges, and other conditions; identical SQL alone doesn’t guarantee it.
Snowflake tables: Use a table when cached data must persist across restarts. Consider hybrid tables for low-latency primary-key lookups, subject to their availability and limitations. Define when entries expire and how the app refreshes them.
If you cache caller’s rights query results, preserve user isolation. Reading a stored result doesn’t rerun the original query’s authorization checks. Restrict who can read the cache and verify that each user is authorized to receive the cached data. See Stateless design and session isolation.
Serverless and managed compute
An app without compute_resource runs on managed compute, which is generally
available. You set the compute option when you create the app and can’t change
it later.
| Feature | Serverless compute | Managed compute |
|---|---|---|
| Status | Public Preview, opt in with compute_resource: SERVERLESS | Generally available, the default |
| Start and stop | Starts on the first request and stops after an idle period | Always on until you suspend the app |
| Requests while stopped | The request waits while the app starts, then gets its response | Requests fail with an error until the app finishes resuming |
| URL | <url_prefix>-apps.<org>-<account>.<region>.<cloud>.snowflake.app | <id>-<org>-<account>-<region>.snowflakecomputing.app |
| Cost attribution | Each app has its own credit usage | Credits are reported for the account’s compute, not for each app |
| Observability | Event-table logs only | Event-table logs, metrics, and lifecycle events |
Next steps
- Change how long a serverless app stays idle before it stops: Set the idle timeout.
- Build a Python app, which runs on serverless compute: Build a Python app for Snowflake App Runtime.