Snowflake ML: End-to-End Agentic ML
Snowflake ML is an integrated set of capabilities for end-to-end machine learning in a single platform on top of your governed data. This is a unified environment for ML development and productionization that is optimized for large-scale distributed feature engineering, model training and inference on CPU and GPU compute without manual tuning or configuration.
Data scientists and ML engineers can accelerate the entire machine learning lifecycle with agentic ML from Snowflake CoCo. ML teams can now automate development of data and context-aware, production-ready ML pipelines from simple natural language prompts on the same platform as the governed data.
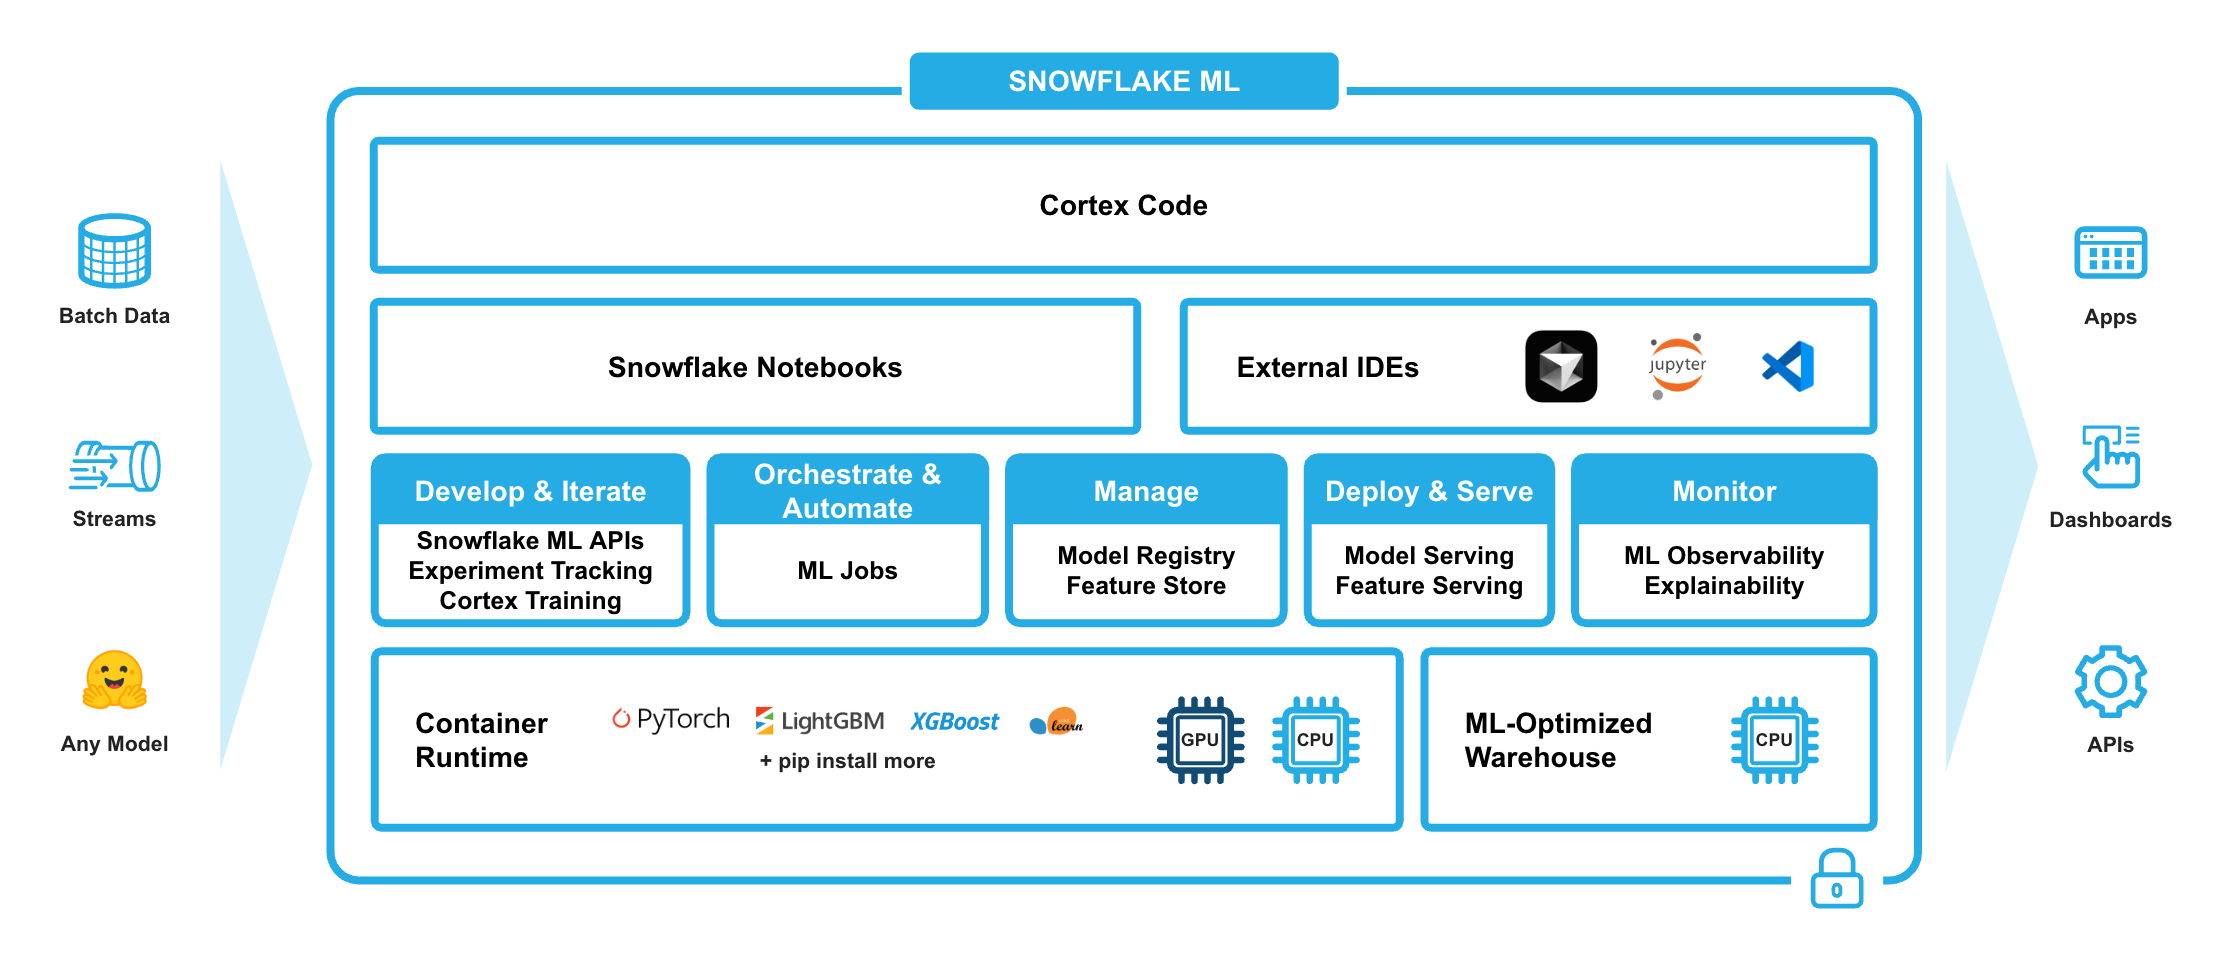
Scaling end-to-end ML workflows in Snowflake is seamless. You can automate the following all from simple prompts in CoCo with native context awareness across your data, models, notebooks, features on a unified platform:
- Prepare data
- Create and use features with the Snowflake Feature Store
- Train models with CPUs or GPUs using any open-source package from Snowflake Notebooks on Container Runtime
- Create experiments to evaluate your trained models against set metrics
- Operationalize your pipelines using Snowflake ML Jobs
- Deploy your model for inference at scale with the Snowflake Model Registry
- Monitor your production models with ML Observability and Explainability
- Use ML Lineage to track the source data to features, datasets, and models throughout your ML pipeline
Snowflake ML is also flexible and modular. You can deploy the models that you’ve developed in Snowflake outside of Snowflake and externally-trained models can easily be brought into Snowflake for inference.
Agentic ML
Snowflake CoCo powers agentic ML by autonomously planning, executing, and iterating on machine learning workflows on your behalf. You can ask it to complete a single task or pursue a broader goal that requires multi-step reasoning and action. From a natural language prompt, CoCo can explore data, engineer features, train and evaluate models, debug issues, and prepare models for deployment.
Model Training
ML training in Snowflake runs in Container Runtime, a pre-built ML environment optimized for efficient data loading, distributed model training, and hyperparameter tuning on large amounts of data. Start training with preinstalled packages such as PyTorch, XGBoost, or Scikit-learn, or install any package from open-source repositories like HuggingFace or PyPI. You can access Container Runtime directly from Snowflake Notebooks which provide a Jupyter-like environment for training and fine-tuning large-scale models in Snowflake, without infrastructure management.
Manage and Serve Features
The Snowflake Feature Store is an integrated solution for defining, managing, storing and discovering ML features derived from your data. The Snowflake Feature Store supports automated, incremental refresh from batch and streaming data sources, so that feature pipelines need be defined only once to be continuously updated with new data. It supports both batch and low-latency online feature retrieval, and ensures consistency between training and inference to reduce training-serving skew.
Orchestrate and Automate
Use Snowflake ML Jobs to develop and automate ML pipelines. ML Jobs also enable teams that prefer working from an external IDE (VS Code, PyCharm, SageMaker Notebooks) to dispatch functions, files or modules down to Snowflake’s Container Runtime.
Experiment Tracking
Use experiments to record the results of your model training, and evaluate a collection of models in an organized way. Experiments help you select the best model for your use case to bring live to production. Training can either be logged in an experiment during model training on Snowflake, or you can upload your own metadata and artifacts from prior training. After concluding your training, view all of the results in Snowsight and pick the right model for your needs.
Model Management and Serving
The Snowflake Model Registry allows for the logging and management of all your ML models, regardless of whether they’re trained on Snowflake or other platforms. You can use the models from the model registry to run inference at scale. You can use Model Serving to deploy the models to Snowpark Container Service for inference.
ML Observability
ML Observability provides tools to monitor model performance metrics in Snowflake. You can track models in production, monitor performance and drift metrics, and set alerts for performance thresholds. Additionally, use the ML Explainability function to compute Shapley values for models in the Snowflake Model Registry, regardless of where they were trained.
ML Lineage
ML Lineage is a capability to trace end-to-end lineage of ML artifacts from source data to features, datasets, and models. This enables reproducibility, compliance, and debugging across the full lifecycle of ML assets.
Additional Resources
See the following resources to get started with Snowflake ML: