Snowflake Model Registry user interface
Note
Model Registry Snowsight UI is generally available in all deployments.
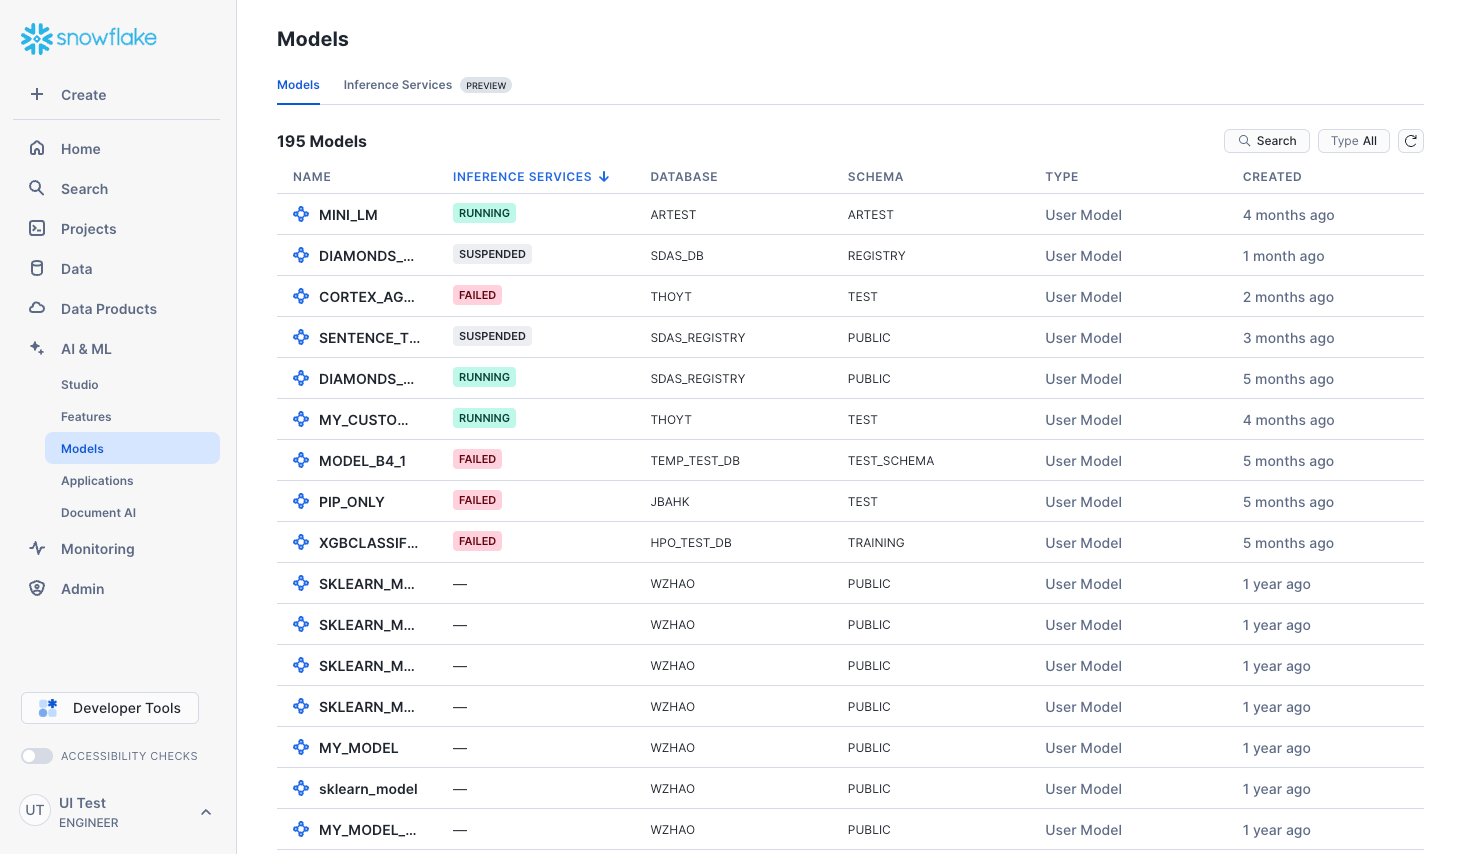
On the Models page in Snowsight, you can find all your machine learning models. You can also view their metadata and deployments.
Model details
The Models page displays the models that you’ve created and logged into the Snowflake Model Registry or have access to the models via the USAGE or READ privilege. These are both models that have been developed with Snowpark ML and externally sourced models (such as models from Hugging Face). It also shows Cortex Fine-tuned models, and may include other model types that you can create in Snowflake in future releases.
To display the Models page, in the navigation menu, select AI & ML » Models. The resulting list contains all the models in the Snowflake Model Registry in all the databases and schemas that your current role has access to.
Note
If you don’t see any models, make sure your role has the required privileges.
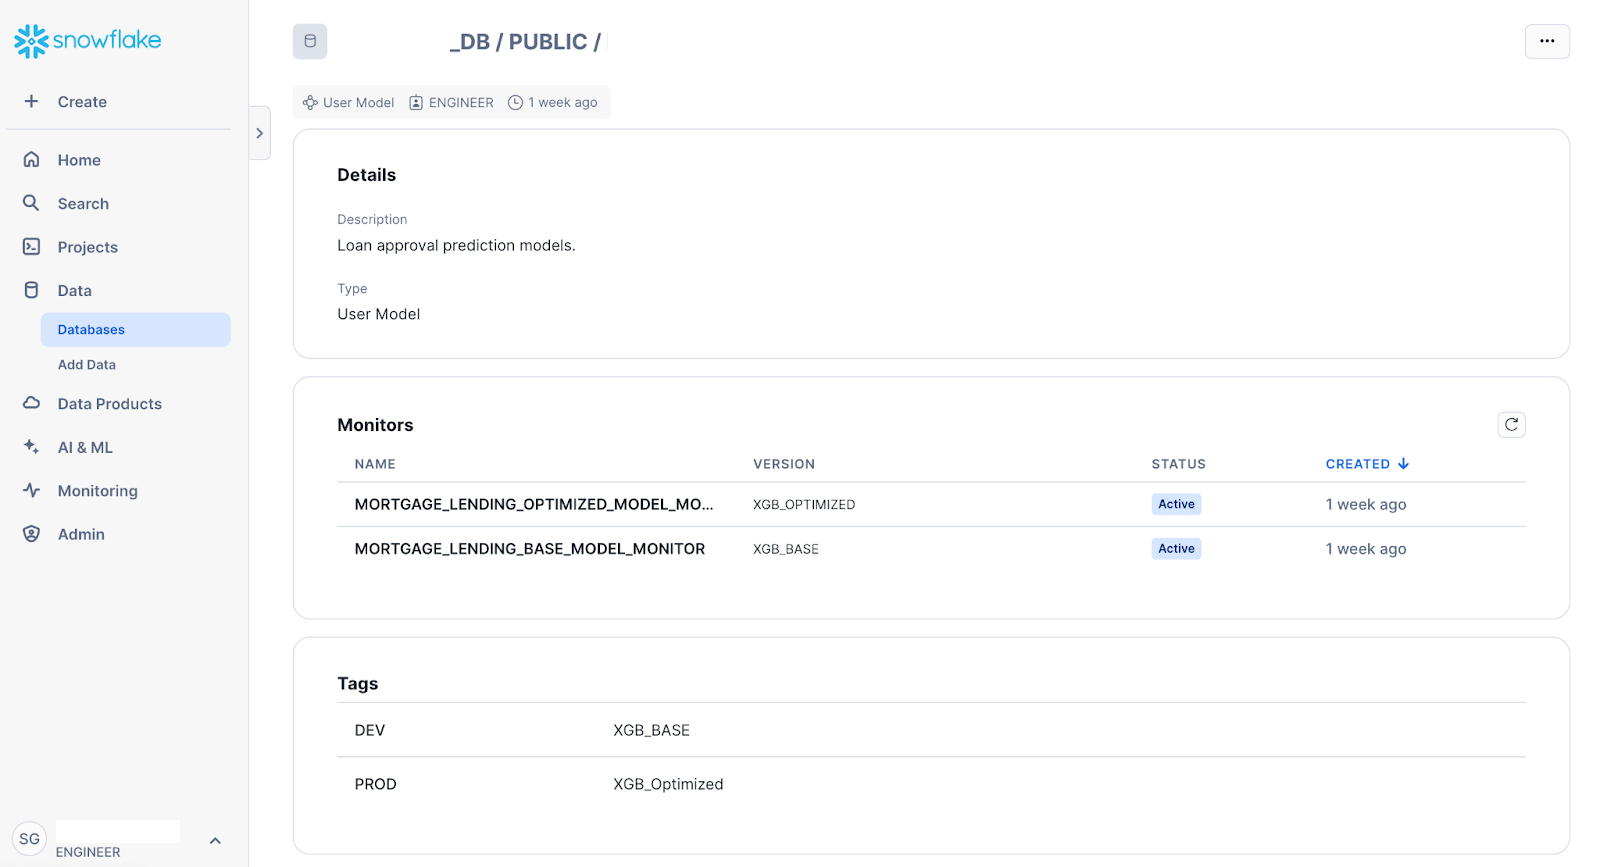
To open a model’s details page, select the corresponding row in the Models list. The details page displays key model information, including the model’s description, tags, and versions.
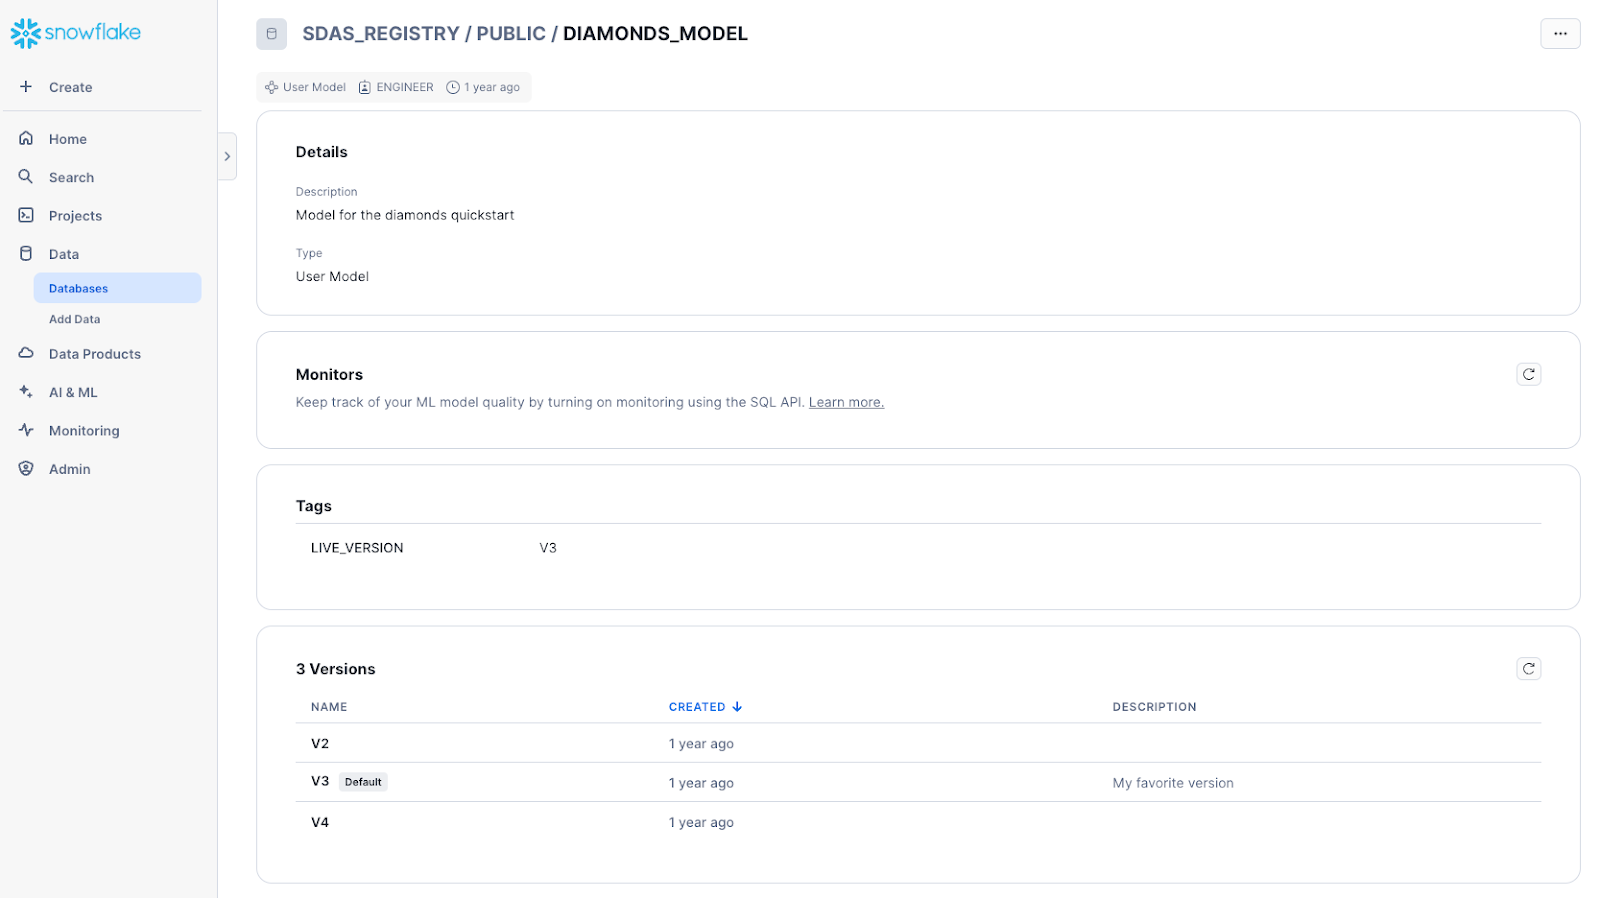
To edit the model description or delete the model, select … in the top right corner.
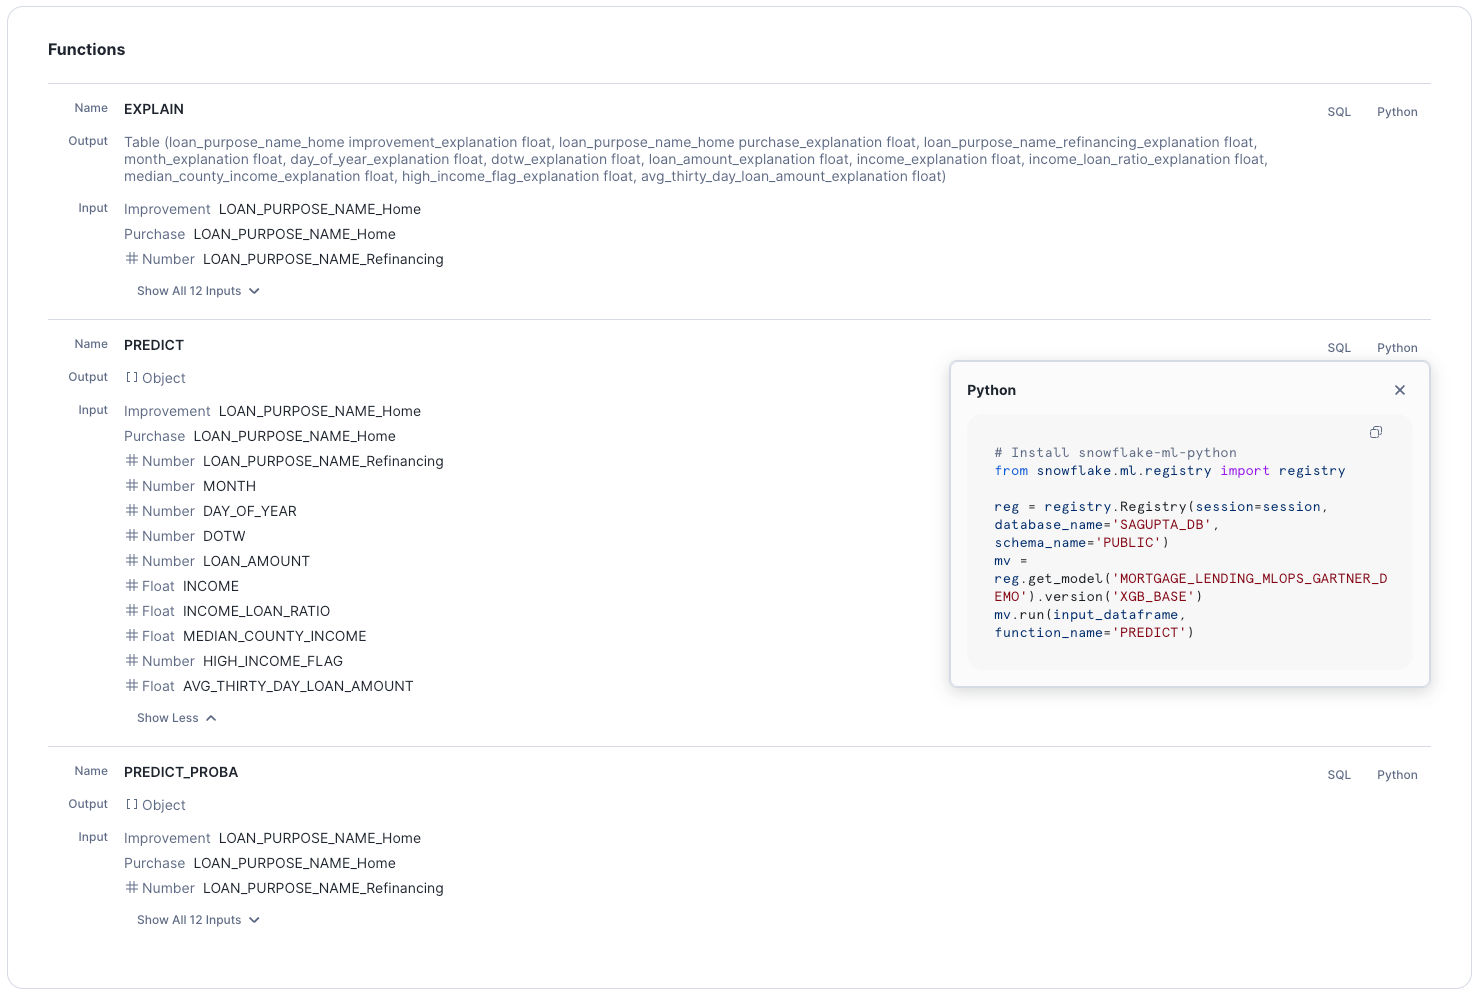
To open the version’s details page, select a model version. This page displays model version metadata, such as metrics, and a list of available methods that can be called from Python or SQL.
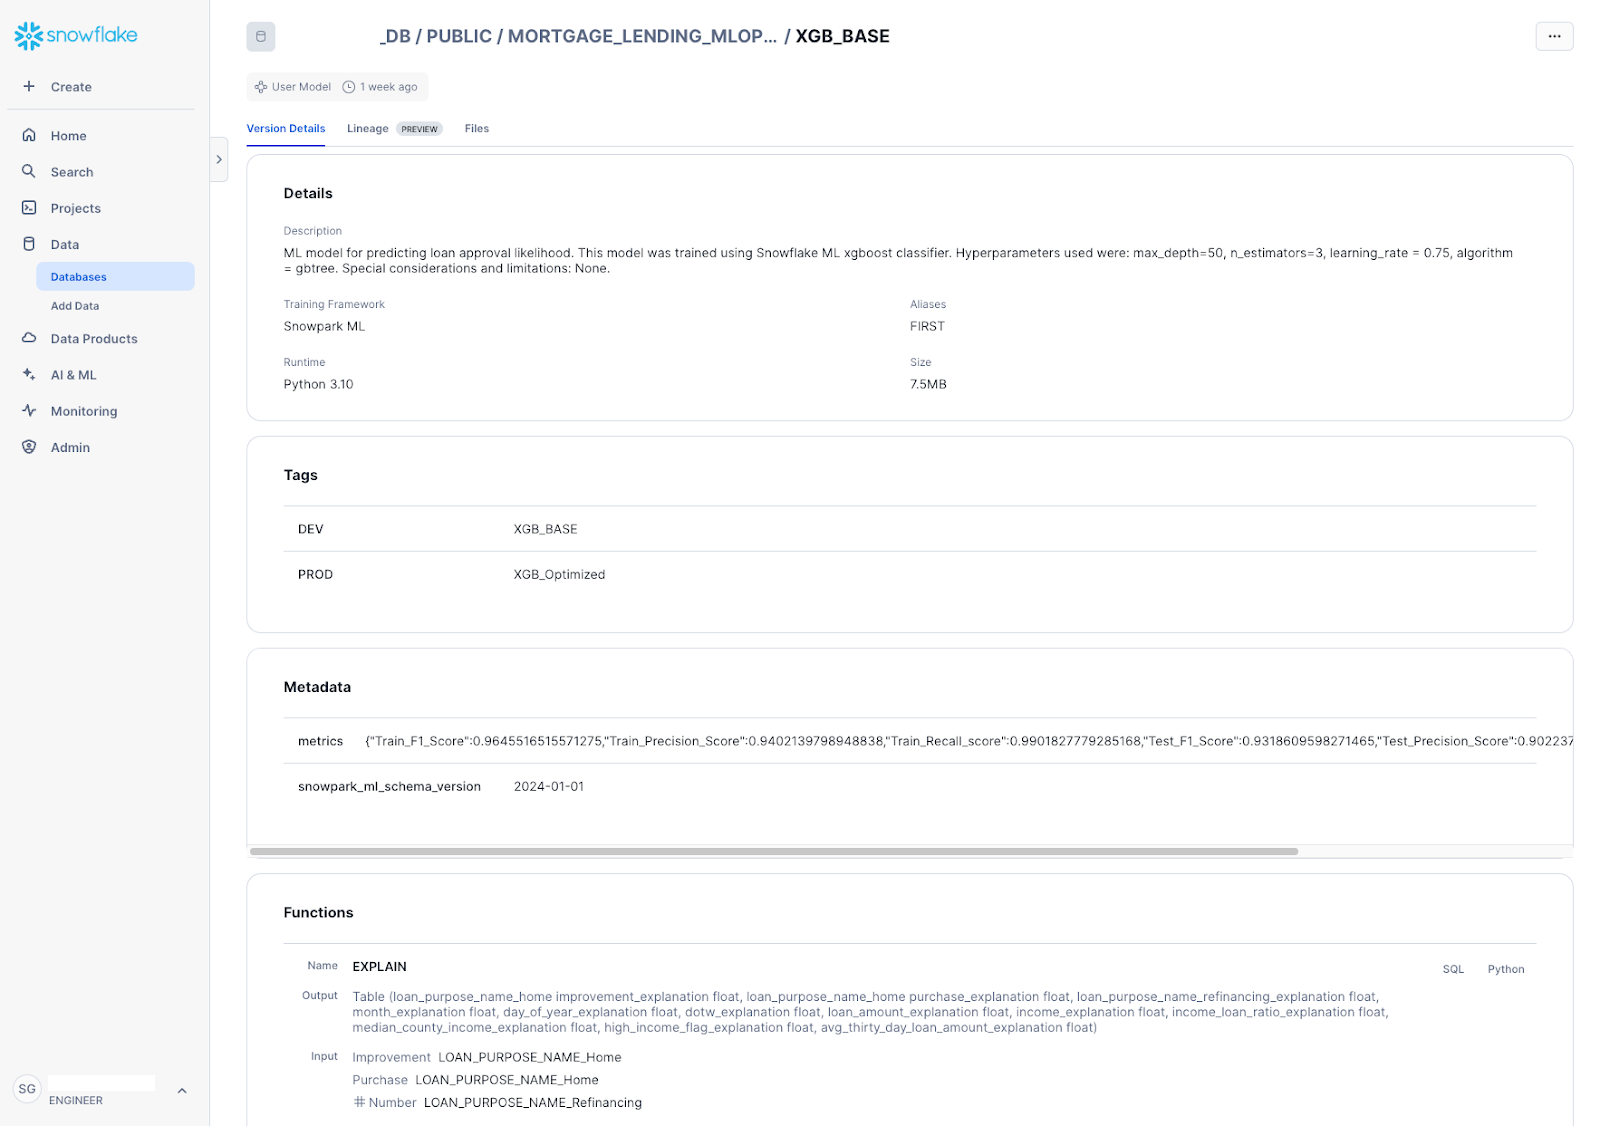
To view code that calls the model function, select the SQL or Python link next to it. You can copy this code snippet into a Snowsight SQL worksheet or a Python notebook.
To add or modify metadata or delete the model version, select the … in top right corner.
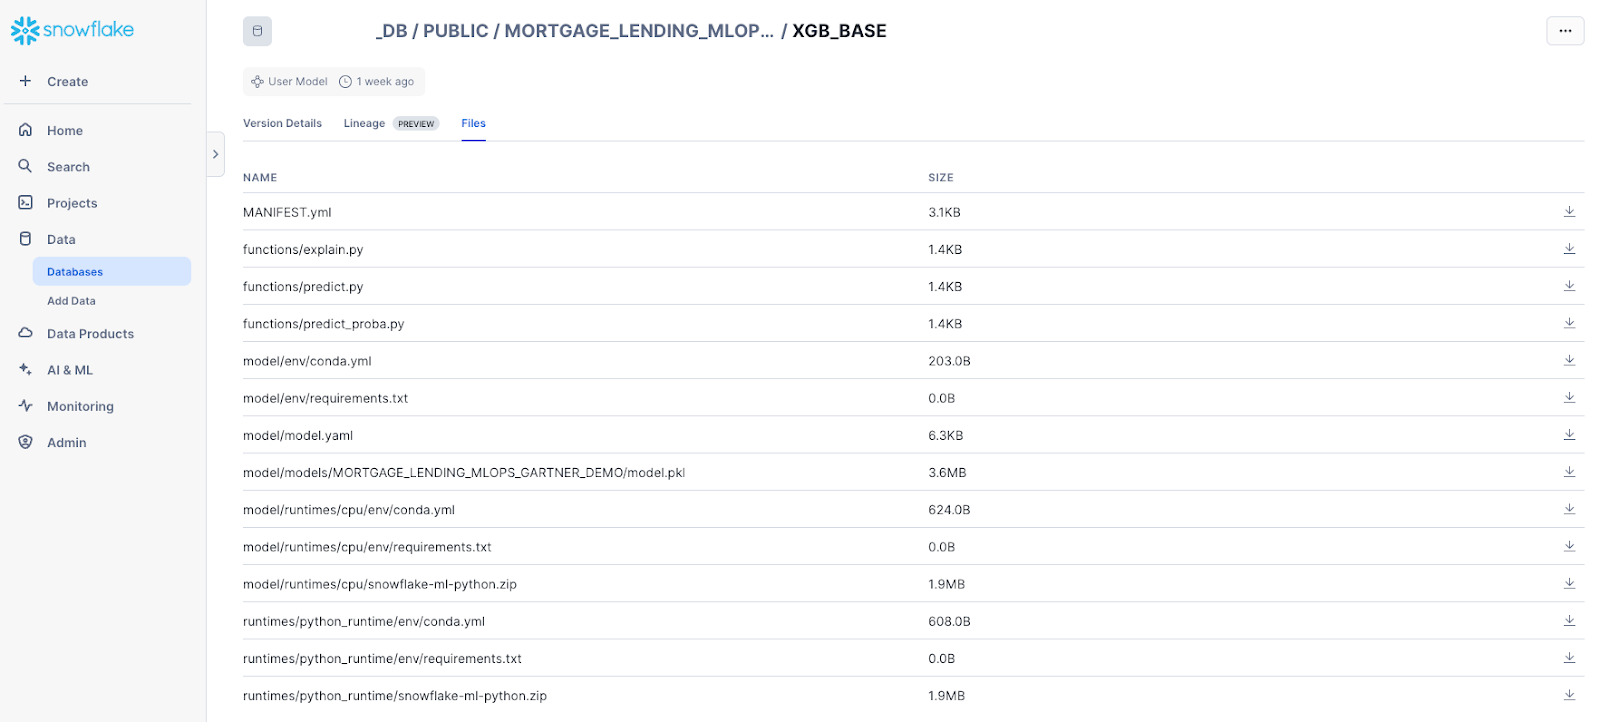
The Files tab contains a list of the model version’s underlying artifacts. You can download individual files from this page. This page is only available if the user has either OWNERSHIP or READ privilege on the model.
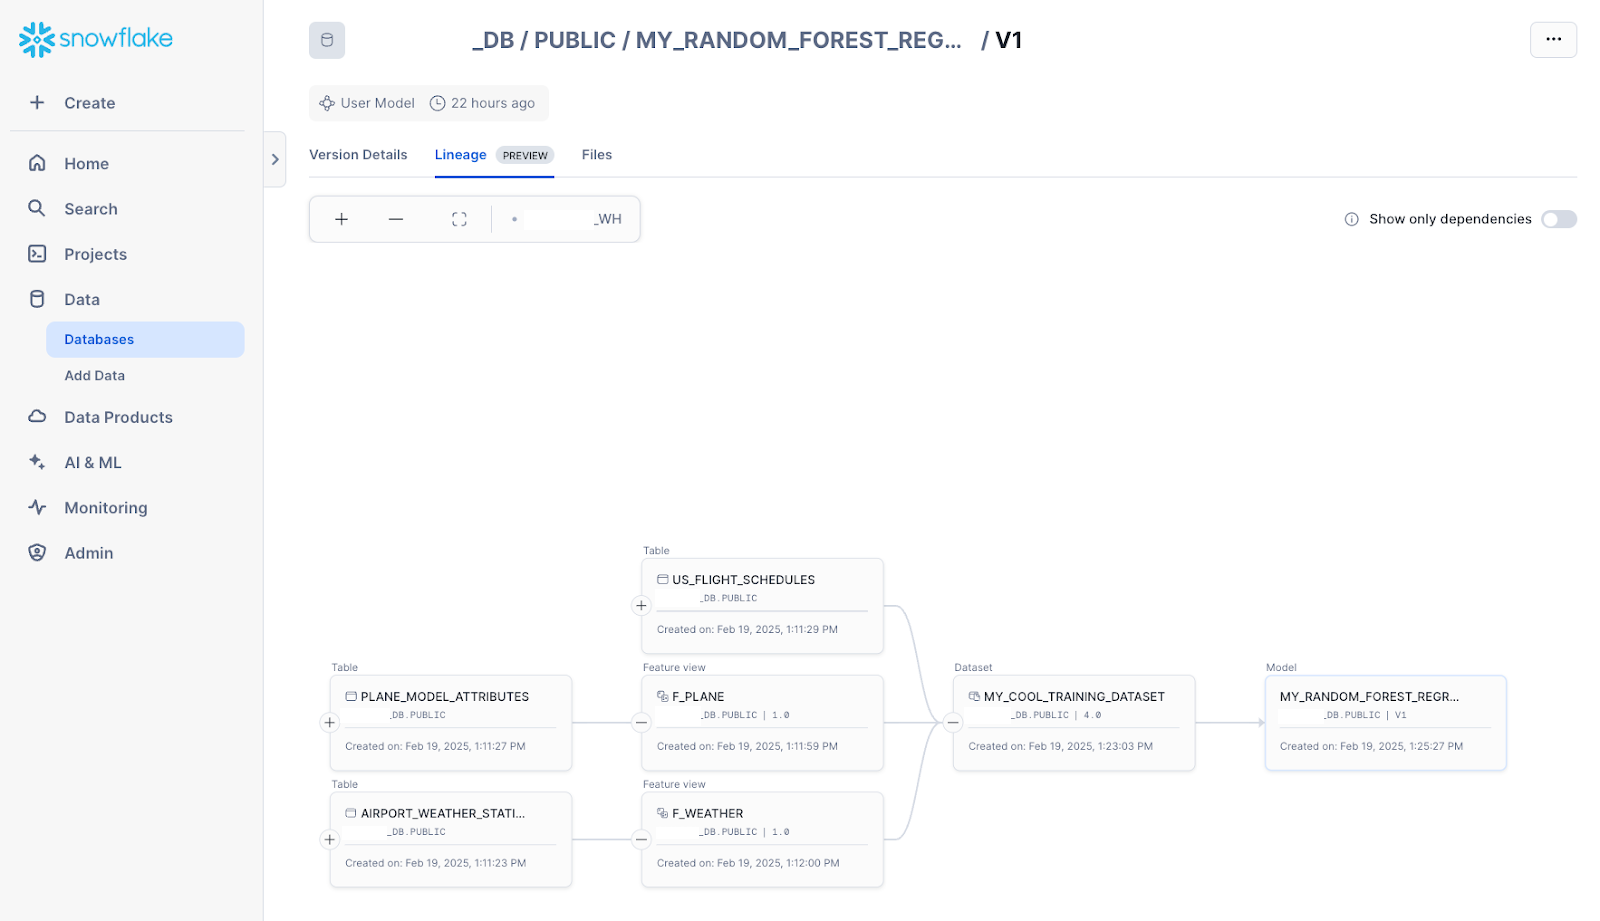
The Lineage tab shows the full data flow lineage information for the model, including any datasets that were used to train the model, any feature views from Feature Store, and the source data tables.
Deploy user models
You can deploy models to SPCS Model Serving directly from the Model Registry page.
Note
Snowflake Model Registry only supports deploying user models to SPCS Model Serving.
To deploy a model, complete the following steps:
-
Select a model from the list of models.
-
From the model details page, navigate to the Versions section.
-
To open the version details page, select a model version from the list of versions.
-
From the version details page, select the Deploy button.
-
From the opened pane, enter a name for the service to be deployed.
-
Select whether to create a REST API endpoint for the deployed service.
-
Select a compute pool for the deployed service.
-
(Optional) To customize performance and resource usage, you can adjust details, such as the number of workers, CPU, and memory, from the advanced settings.
-
Select Deploy.
The deployment process can take up to 15 minutes to create the service.
After the deployment is complete, the service is displayed on the Inference Services tab on the main Model Registry page.
Import and deploy models from an external service
![]() Preview Feature — Open
Preview Feature — Open
Available to all accounts.
Note
Currently, only Hugging Face is supported as a model provider.
You can import pre-trained models from an external provider and deploy them as Snowflake services for inference. To import an external model, follow these steps:
-
In the navigation menu, select AI & ML » Models.
-
Select Import model. The Import model dialog opens.
-
In the Model handle field, enter the model handle from your provider, or select one from the list of Snowflake-verified models.
-
In the Task list, select the task that the model will perform.
-
Optional: To enable downloading custom Python code from the model repository, select the Trust remote code checkbox.
Warning
Allowing models to download arbitrary code should be considered a security risk. Only allow remote code from models you’ve thoroughly evaluated and trust to run on Snowflake.
-
Optional: To import a gated model, enter the name of the Snowflake secret for your Hugging Face token in the Hugging Face token secret field. Your Hugging Face token secret should be a generic text secret, with your Hugging Face token as a value. For information on how to create a generic text secret, see CREATE SECRET.
-
Optional: Expand Advanced settings:
- To perform input and output token conversion for your model, in the Tokenizer model field, enter a tokenizer model.
- To add a hyperparameter, select Add parameter, and then enter a name and value that are recognized by the model.
-
In the Model name field, enter a name for use in the Snowflake model registry.
-
In the Version name field, enter a version for registration.
-
In the Database and schema list, select a database to link this model to.
-
Optional: Expand Advanced settings:
-
To add pip requirements to the model’s runtime environment, select Add Pip requirement, and then add a pip requirement specifier for your package. Only packages served from PyPi are supported.
-
In the Comment field, enter any useful information about the model.
-
Select Continue to deployment. The Deploy (model handle) dialog opens.
To deploy your model, follow these steps:
-
In the Service name field, enter a name that the service will run under. Snowflake provides a default based on the model name and version.
-
Optional: To change whether an API endpoint is automatically created for your model’s service, select or clear Create REST API endpoint.
-
In the Compute pool list, select an existing compute pool for the service to run on.
-
Optional: Adjust the number of instances in the compute pool that the service runs on. The maximum is limited by the number of nodes in your compute pool.
-
Optional for CPU compute pools: To provide details for the service’s available resources in the compute pool, expand Advanced settings:
- Number of workers
- Max batch rows
- CPU: The number of virtual cores, in milli-units
- GPU: The number of physical GPUs (Required for GPU compute pools)
- Memory: The amount of maximum available memory
-
To import the model and create the service that users access your model through, select Deploy. You can also cancel the model import or return to the model details.
Once deployment starts, a dialog displays a Query ID. This query creates the jobs to import the model and deploy your service; it is not a query to monitor either job.
- Do one of the following:
- To dismiss the dialog, select Done.
- To monitor the query, select Open query monitoring.
Snowflake performs the following actions for your model and service deployment:
- Downloads the required files from your provider.
- Uploads and logs the model to your model registry.
- Creates a model-specific container image for your service to run in.
- Deploys the model image as a service.
Note
The length of time that Snowflake takes to perform these operations is dependent on several factors, including the model size, available compute resources, and network setup.
If an error occurs in deployment, find the associated SQL query for more information. In the navigation menu, select Monitoring » Query History to find your deployment query, which contains a call to SYSTEM$DEPLOY_MODEL.
Monitoring model and service deployment
When external models are loaded and prepared for deployment, Snowflake automatically starts registering the associated service. Monitor the deployment by following these steps:
-
In the navigation menu, select Monitoring » Services & jobs.
-
On the Jobs tab, select the job that matches your service’s location and compute pool, created at the time you started the import. This job has a name in the form
MODEL_DEPLOY_IDENTIFIER. Each service deployment performed by a model import creates a unique identifier for the associated jobs. -
To monitor the model deployment, select the Logs tab. When the model deployment is complete, Snowflake starts a job to build and deploy your service.
-
Return to the Jobs tab, and select the job named
MODEL_BUILD_IDENTIFIER. This identifier is the same as your model deployment job. -
To monitor the service container build, return to the Logs tab. When this job is complete, your service is deployed and ready.
Model inference services
You can see the model inference services created with SPCS Model Serving in the Model Registry UI. The main model listing page shows the status of inference services created for any model.

If you select model name and a model version, you can use the Inference Services tab in the model version details page to see more details about the deployed inference service, as well as suspend the inference service. This also shows the list of functions that the service exposes. And you can see or copy the SQL or Python usage code snippet.
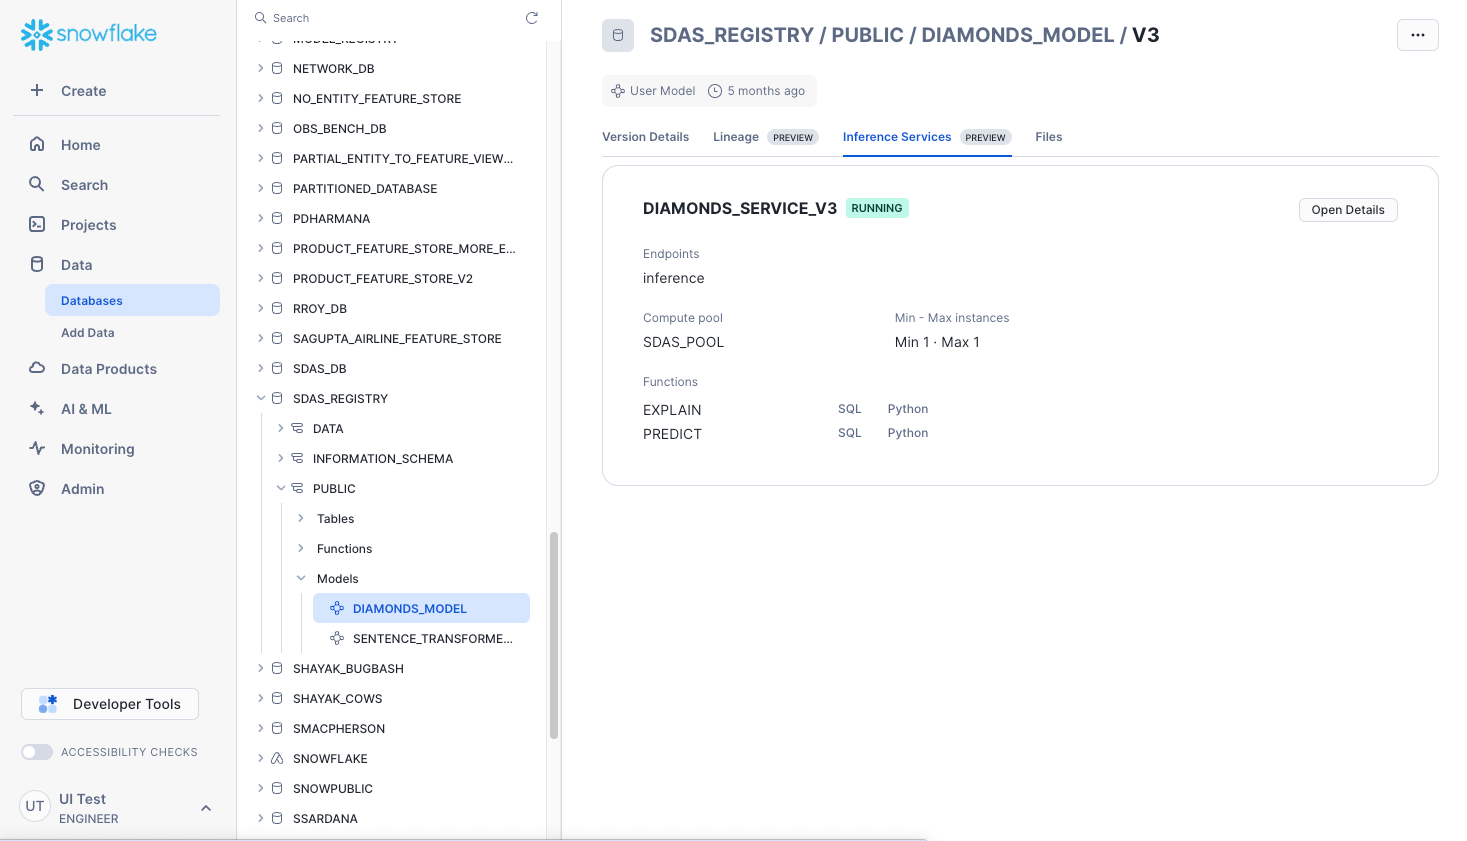
Select Open Details to display service parameters. To view more details about the deployed inference service, select Open Service Details from the service parameters pane. You can also access the service details from the Inference Services tab on the main Model Registry page.
Model monitoring
For any models that have Model Monitors attached to them, you can visualize model monitoring metrics using the Model Monitors in the model details page.
Select the desired model monitors to display the Monitoring dashboard:

Select Compare to view the menu of model version select a second model version to compare this model version against:
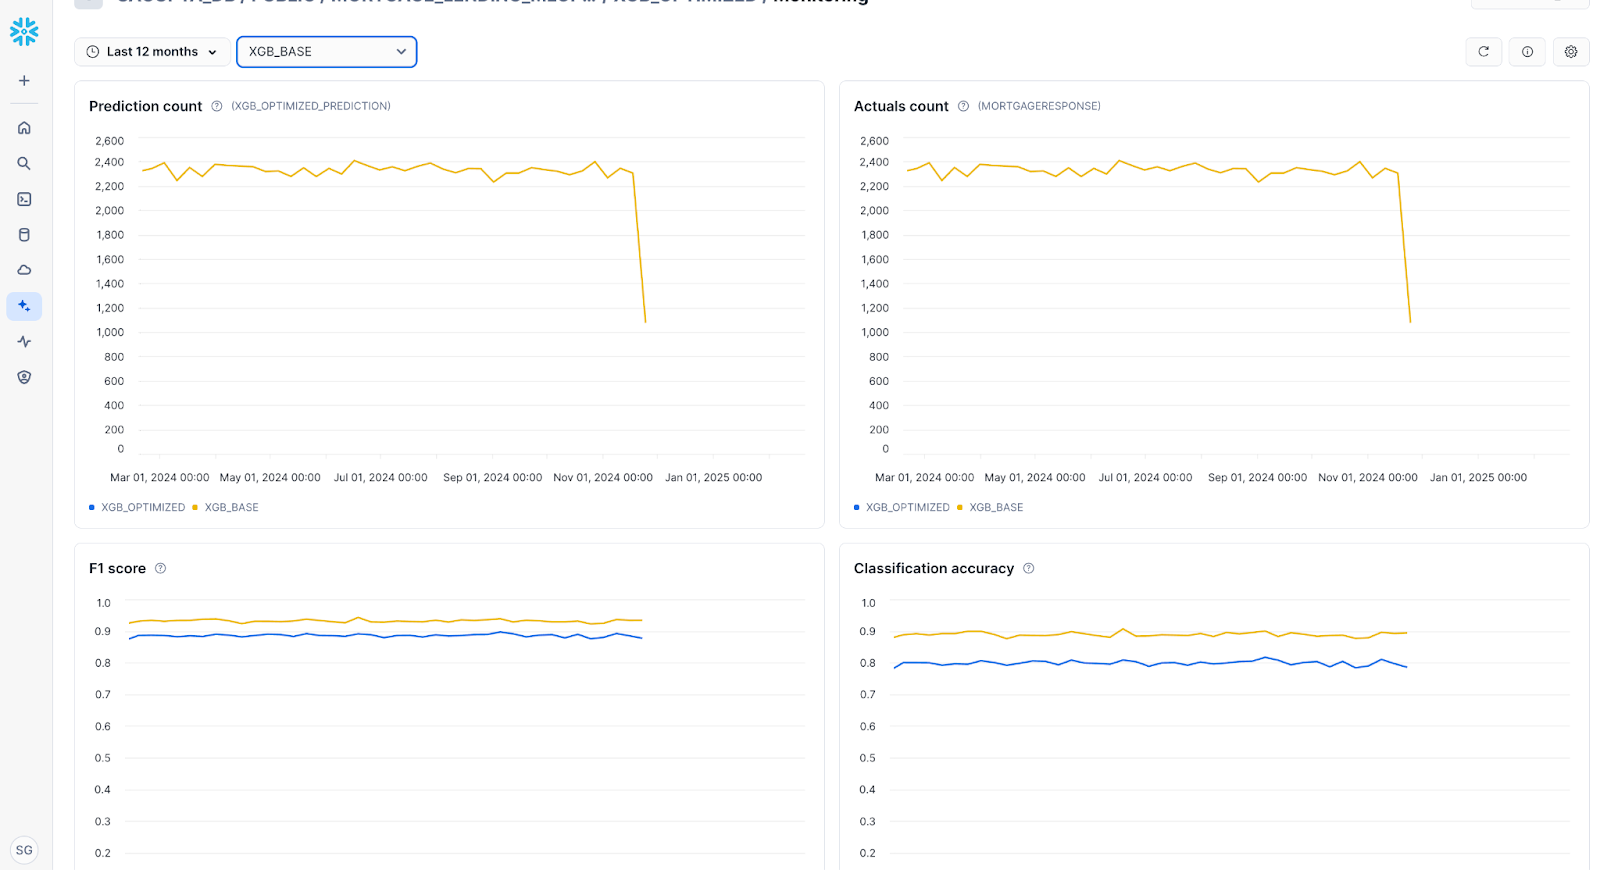
Monitoring supports a large number of model accuracy, model drift, and feature drift metrics. To select the metrics that are computed and displayed, select Settings icon to choose the desired metrics:
