Snowflake ML: End-to-End Machine Learning

Note

This documentation applies to Snowpark ML (the snowflake-ml-python package) version 1.5.0 and later. As of this release, the Snowpark ML Modeling API and Snowflake Model Registry are generally available, and Snowflake Feature Store is in preview. For early access to documentation for upcoming Snowflake ML features, contact your Snowflake representative.

Snowflake ML is an integrated set of capabilities for end-to-end machine learning in a single platform on top of your governed data. Snowflake ML can be used for both fully custom and out-of-the-box workflows.

For custom ML, data scientists and ML engineers can easily and securely develop and productionize scalable features and models without any data movement, silos, or governance tradeoffs. These custom ML capabilities can be accessed through Python APIs from the Snowpark ML library.

For analysts, the ready-to-use ML Functions can help shorten development time and democratize ML across your organization.

Tip

See Introduction to Machine Learning with Snowpark ML for an example of an end-to-end workflow in Snowpark ML.

Custom Workflows in Snowflake ML

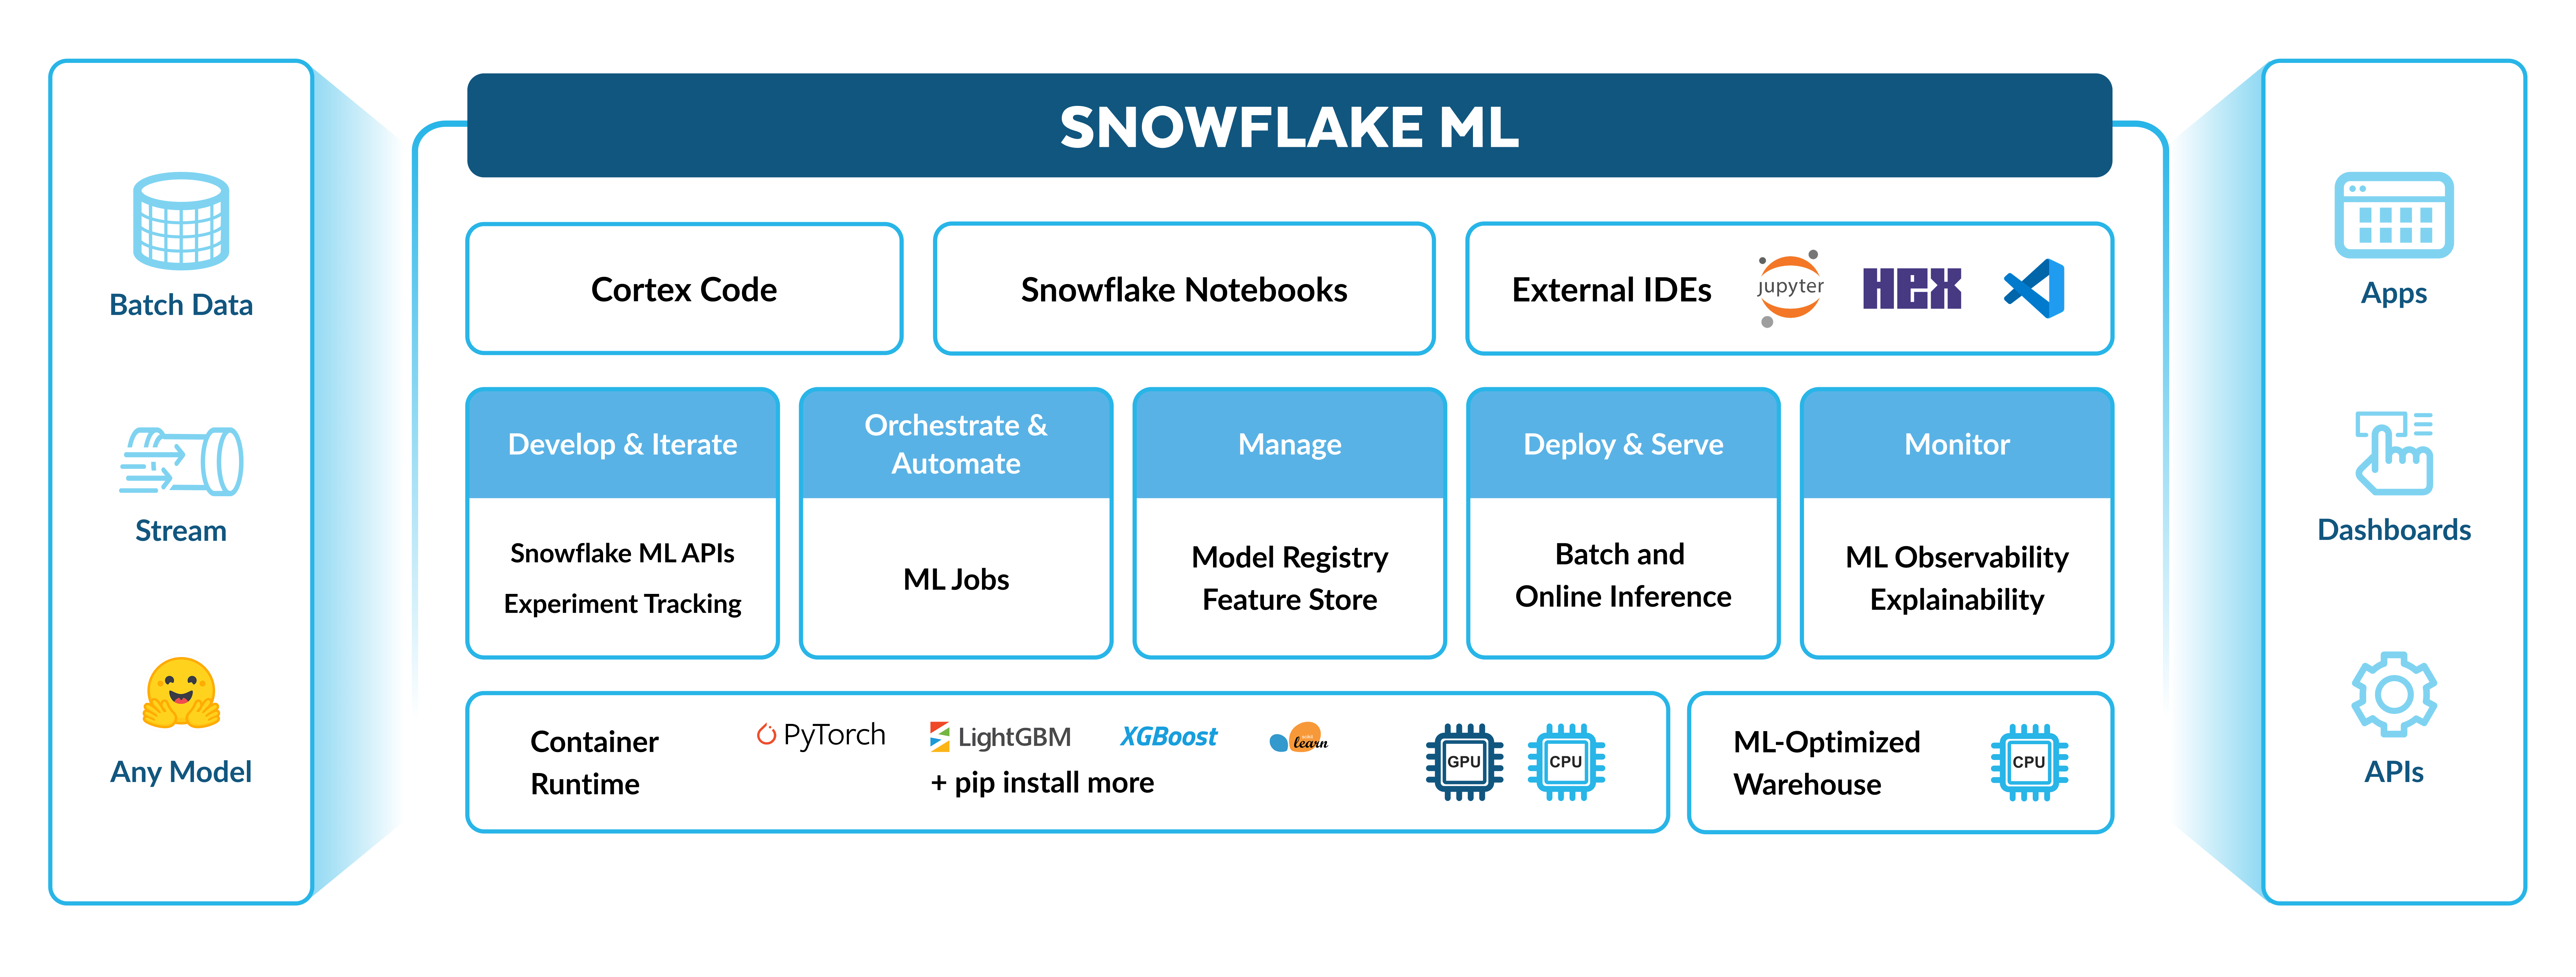
For custom workflows, Snowflake ML makes it easy to build and operationalize features and models you develop using Snowflake Notebooks or your IDE of choice. For development, Snowflake ML offers Snowpark ML Modeling for scalable feature engineering and model training with distributed processing using CPUs or GPUs. For ML Operations (MLOps), Snowflake ML includes the Feature Store and Model Registry for centralized management of features and models across the entire ML lifecycle.

To get started with Snowflake ML, developers can use the Python APIs from the Snowpark ML library to interact with all development and operations features across the ML workflow.

Key components of Snowflake ML: ML Modeling, Feature Store, and Model Registry

Snowflake ML components help to streamline the ML lifecycle, as shown here.

The ML development and deployment process supported by Snowflake ML

Snowpark ML Modeling

Snowpark ML Modeling supports data preprocessing, feature engineering, and model training in Snowflake using popular machine learning frameworks, such as scikit-learn, xgboost, and lightgbm. This API also includes a preprocessing module that can use compute resources provided by a Snowpark-optimized warehouse to provide scalable data transformations.

Snowflake Model Registry

The Snowflake Model Registry, complements the Snowpark ML Modeling APIs. The model registry allows secure deployment and management of models in Snowflake, and supports models trained both inside and outside of Snowflake.

Snowflake Feature Store

The Snowflake Feature Store is an integrated solution for defining, managing, storing and discovering ML features derived from your data. The Snowflake Feature Store supports automated, incremental refresh from batch and streaming data sources, so that feature pipelines need be defined only once to be continuously updated with new data.

Snowpark ML Data Access

The Dataset API provides a Python fsspec-compliant API for materializing data into a Snowflake Dataset from a query or a Snowpark DataFrame. It also provides convenient methods for working with the data and feeding it to popular ML frameworks. This API also provides provide optimized, secure, and performant data ingestion for PyTorch and TensorFlow frameworks in their native data loader formats.

Installing Snowpark ML

Snowpark ML is the library of Python APIs that gives access to the set of capabilities for custom workflows in Snowflake ML. All Snowpark ML features are available in a single package, snowflake-ml-python.

You can install Snowpark ML from the Snowflake conda channel using the conda command or from the Python Package Index (PyPI) using pip. Conda is preferred.

Using Snowpark ML from Snowflake Notebooks

Snowflake Notebooks provide an easy-to-use notebook interface for your data work, blending Python, SQL, and Markdown. The Snowpark ML Python APIs come preinstalled in notebooks, making it easy to get started with Snowflake ML features.

Installing Snowpark ML from the Snowflake conda Channel

Warning

Installing Snowpark ML from conda on an arm-based Mac (with M1 or M2 chip) requires specifying the system architecture when creating the conda environment. This is done by setting CONDA_SUBDIR=osx-arm64 in the conda create command: CONDA_SUBDIR=osx-arm64 conda create --name snowpark-ml.

  1. Create the conda environment where you will install Snowpark ML. If you prefer to use an existing environment, skip this step.

    conda create --name snowpark-ml
    
    Copy
  2. Activate the conda environment:

    conda activate snowpark-ml
    
    Copy
  3. Install Snowpark ML from the Snowflake conda channel:

    conda install --override-channels --channel https://repo.anaconda.com/pkgs/snowflake/ snowflake-ml-python
    
    Copy

Tip

When working with Snowpark ML, install packages from the Snowflake conda channel whenever possible to ensure that you receive packages that have been validated with Snowpark ML.

Installing Snowpark ML from PyPI

You can install the Snowpark ML package from the Python Package Index (PyPI) by using the standard Python package manager, pip.

Warning

Do not use this installation procedure if you are using a conda environment. Use the conda instructions instead.

  1. Change to your project directory and activate your Python virtual environment:

    cd ~/projects/ml
    source .venv/bin/activate
    
    Copy
  2. Install the Snowpark ML package:

    python -m pip install snowflake-ml-python
    
    Copy

Installing Optional Modeling Dependencies

Some Snowpark ML Modeling APIs require dependencies that are not installed as dependencies of Snowpark ML. The scikit-learn and xgboost packages installed by default when you install Snowpark ML Modeling, but lightgbm is an optional dependency. If you plan to use classes in the snowflake.ml.modeling.lightgbm namespace, install lightgbm yourself.

Use the following commands to activate your conda environment and install lightgbm from the Snowflake conda channel.

conda activate snowpark-ml
conda install --override-channels --channel https://repo.anaconda.com/pkgs/snowflake/ lightgbm
Copy

Use the following commands to activate your virtual environment and install lightgbm using pip.

.venv/bin/activate
python -m pip install 'snowflake-ml-python[lightgbm]'
Copy

Snowflake might add additional optional dependencies to Snowpark ML from time to time. To install all optional dependencies using pip:

.venv/bin/activate
python -m pip install 'snowflake-ml-python[all]'
Copy

Setting Up Snowpark Python

Snowpark Python is a dependency of Snowpark ML and is installed automatically with Snowpark ML. If Snowpark Python is not set up on your system, you might need to perform additional configuration steps. See Setting Up Your Development Environment for Snowpark Python for Snowpark Python setup instructions.

Connecting to Snowflake

Snowpark ML requires that you connect to Snowflake using a Snowpark Session object. Use the SnowflakeLoginOptions function in the snowflake.ml.utils.connection_params module to get the configuration settings to create the session. The function can read the connection settings from a named connection in your SnowSQL configuration file or from environment variables that you set. It returns a dictionary containing these parameters, which can be used to create a connection.

The following examples read the connection parameters from the named connection myaccount in the SnowSQL configuration file. To create a Snowpark Python session, create a builder for the Session class, and pass the connection information to the builder’s configs method:

from snowflake.snowpark import Session
from snowflake.ml.utils import connection_params

params = connection_params.SnowflakeLoginOptions("myaccount")
sp_session = Session.builder.configs(params).create()
Copy

You can now pass the session to any Snowpark ML function that needs it.

Tip

To create a Snowpark Python session from an existing Snowflake Connector for Python connection, pass the connection object to the session builder. Here, connection is the Snowflake Connector for Python connection.

session = Session.builder.configs({"connection": connection}).create()
Copy

Specifying a Warehouse

Many parts of Snowpark ML, for example training a model or running inference, run code in a Snowflake warehouse. These operations run in the warehouse specified by the session you use to connect. For example, if you create a session from a named connection in your SnowSQL configuration file, you can specify a warehouse using the warehousename parameter in the named configuration.

You can add the warehouse setting when creating the Session object, as shown here, if it does not already exist in the configuration.

from snowflake.snowpark import Session
from snowflake.ml.utils import connection_params
# Get named connection from SnowQSL configuration file
params = connection_params.SnowflakeLoginOptions("myaccount")
# Add warehouse name for model method calls if it's not already present
if "warehouse" not in params:
    params["warehouse"] = "mlwarehouse"
sp_session = Session.builder.configs(params).create()
Copy

If no warehouse is specified in the session, or if you want to use a different warehouse, call the session’s use_warehouse method.

sp_session.use_warehouse("mlwarehouse")
Copy

Cost Considerations

When you train and use models in Snowflake, you run code in a virtual warehouse, which incurs compute costs. These costs vary depending on the type of model and the quantity of data used in training and prediction. See Understanding compute cost for general information about Snowflake compute costs.

Further Reading

See the following resources for information about Snowpark ML.

End-to-End ML Workflows

Modeling

Data Access

Model Registry

Contact your Snowflake representative for early access to documentation on other features currently under development.

API Reference

The Snowpark ML API reference includes documentation on all publicly-released functionality. You can also obtain detailed API documentation for any class by using Python’s help function in an interactive Python session. For example:

from snowflake.ml.modeling.preprocessing import OneHotEncoder

help(OneHotEncoder)
Copy