Configuring a client, driver, library, or third-party application to connect to Snowflake
To configure a client, driver, library, or third-party application to connect to Snowflake, you must specify your Snowflake account identifier. In addition, you might need to specify the warehouse, database, schema, and role that should be used.
You can find this information in Snowsight or by executing SQL commands:
Using Snowsight to get connection settings
To get the settings that you can use to configure a client, driver, library, or third-party application:
-
Sign in to Snowsight.
-
Open the user menu by selecting your user name.
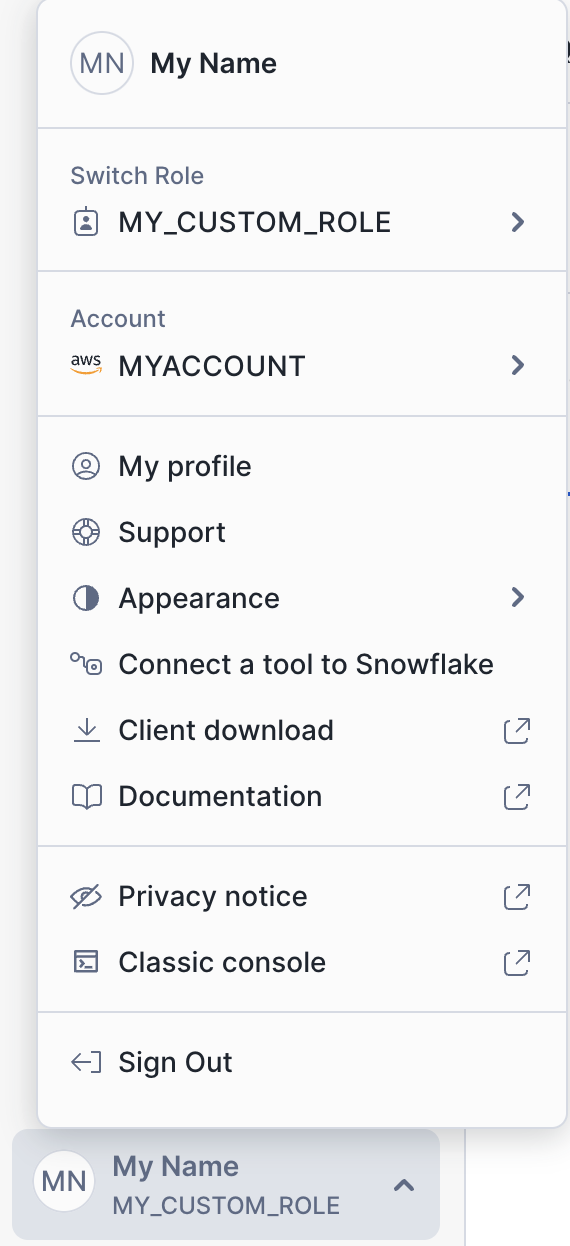
-
From the user menu, select Connect a tool to Snowflake to display the Account Details dialog.
Tip
You can also display the account details from the account selector.
-
Select one of the following tabs:
-
If your client, driver, library, or third-party application supports using a TOML configuration file (for example, Snowflake CLI, Snowflake Python APIs, or the Snowflake Connector for Python:
-
Select the Config file tab.
-
To specify a warehouse in the configuration file, select the warehouse from the Warehouse menu.
-
To specify a database and schema in the configuration file, use the Database menu to select the database and schema.
-
From the Connection Method menu, select the method that you plan to use to authenticate:
- To use browser-based single sign-on (SSO), select Web Browser.
- To use a password, select Password.
Note
Clients, drivers, libraries, and third-party applications support additional authentication methods not listed in the menu. For information, see Securing Snowflake.
-
Select the copy icon (
 ) to copy the content for the configuration file.
Note
For the Snowflake Python APIs, underscores are not supported in the
accountsetting. If the account identifier includes underscores, replace them with dashes. -
-
If your client, driver, library, or third-party application supports specifying a connection string (for example, the ODBC Driver, JDBC Driver, Go Snowflake Driver, or .NET Driver):
-
Select the Connectors/Drivers tab.
-
From the Select Connector or Driver menu, select the driver that you want to use.
-
To specify a warehouse in the connection string, select the warehouse from the Warehouse menu. (Note that this menu is not present for ODBC and .NET.)
-
To specify a database and schema in the connection string, use the Database menu to select the database and schema.
-
From the Connection Method menu, select the method that you plan to use to authenticate:
- To use browser-based single sign-on (SSO), select Web Browser.
- To use a password, select Password.
Note
Clients, drivers, libraries, and third-party applications support additional authentication methods not listed in the menu. For information, see Securing Snowflake.
-
Select the copy icon (
) to copy the resulting connection string.
-
-
To execute SQL commands to get the configuration information:
- Select the SQL Commands tab.
- Select the copy icon () next to the command that provides the information that you need, paste the
command into a worksheet, and execute the command.
-
Using SQL commands to get connection settings
You can execute SQL commands to get the following information needed to configure your client, driver, library, or application:
| Setting | SQL command |
|---|---|
| Account identifier for the current account |
|
| Current user name | |
| Current role | |
| Current region | |
| Current warehouse | |
| Current database | |
| Current schema |
Account formats used by clients and drivers
For different clients and drivers, you use different syntaxes for specifying your account.
In general, you should use the variation that includes the organization name (orgname) and account name
(account_name).
One exception to this rule is when you’re using the Client Redirect feature. If you’re
using this feature, replace the name of the account (account_name) with the name of the connection
(connection_name). For examples of this syntax, see Using a connection URL.
To configure a private connection to the Snowflake service, add .privatelink to either the account name or the account
locator syntax. To determine which value you should use to connect to Snowflake when using private connectivity, call the
SYSTEM$GET_PRIVATELINK_CONFIG function in your Snowflake account.
If you need to use the account locator, you might also need to specify the cloud region ID, the cloud, and the level of government
compliance as additional segments after the account locator. For the format to use, see Format 2: Account locator in a region. In the
examples below, account_locator_with_additional_segments represents the account location with any additional segments
that are required.
- Snowflake CLI:
- Account name:
snow sql --account orgname-account_name - Account locator:
snow sql --account account_locator_with_additional_segments
You can also specify this information in the
accountparameter for the connection in the Snowflake CLIconfig.tomlconfiguration file.For additional information, see Configuring Snowflake CLI and connecting to Snowflake.
- Account name:
- SnowSQL:
- Account name:
snowsql -a orgname-account_name - Account locator:
snowsql -a account_locator_with_additional_segments
For additional information, see Connection syntax.
- Account name:
- JDBC:
- Account name:
jdbc:snowflake://orgname-account_name.snowflakecomputing.com/?connection_params - Account locator:
jdbc:snowflake://account_locator_with_additional_segments.snowflakecomputing.com/?connection_params
For additional information, see JDBC Driver connection string.
- Account name:
- ODBC:
-
Account name:
- Server:
orgname-account_name.snowflakecomputing.com
- Server:
-
Account locator:
- Server:
account_locator_with_additional_segments.snowflakecomputing.com}
- Server:
For additional information, see ODBC configuration and connection parameters.
-
- Python:
-
Account name:
- Set the
ACCOUNTparameter value asorgname-account_name.
- Set the
-
Account locator:
- Set the
ACCOUNTparameter value asaccount_locator_with_additional_segments.
- Set the
For additional information, see Connecting to Snowflake with the Python Connector.
-
- .Net:
-
Account name:
- Set the
ACCOUNTparameter value asorgname-account_name. - Set the
HOSTparameter value as the default (.snowflakecomputing.com).
- Set the
-
Account locator:
- Set the
ACCOUNTparameter value asaccount_locator_with_additional_segments. - Set the
HOSTparameter value as the default.snowflakecomputing.com. Specify if your Snowflake account is not in theus-westregion.
- Set the
For additional information, see Connecting.
-
- Golang:
- Account name:
db, err := sql.Open("snowflake", "jsmith:mypassword@orgname-account_name/mydb/testschema?warehouse=mywh") - Account locator:
sql.Open("snowflake", "jsmith:mypassword@account_locator_with_additional_segments/mydb/testschema?warehouse=mywh")
For additional information, see Connection String.
- Account name:
- node.js:
- Account name: Set the
ACCOUNTparameter value asorgname-account_name. - Account locator: Set the
ACCOUNTparameter value asaccount_locator_with_additional_segments.
For additional information, see Managing connections.
- Account name: Set the
- Spark (connector):
- Account name: Same as JDBC
- Account locator: Same as JDBC
For additional information, see Setting Configuration Options for the Connector.
- Spark (Databricks):
- Account name:
{Account URL for Snowflake account} - Account locator:
{Account Locator URL for Snowflake account}
For additional information, see Configuring Snowflake for Spark in Databricks.
- Account name:
- Spark (Qubole):
- Account name: Set the Host Address field value as
orgname-account_name.snowflakecomputing.com. - Account locator: Set the Host Address field value as
account_locator_with_additional_segments.snowflakecomputing.com.
For additional information, see Configuring Snowflake for Spark in Qubole.
- Account name: Set the Host Address field value as
- PHP:
-
Account name:
- Set the
ACCOUNTparameter value asorgname-account_name. - Leave the
REGIONparameter value blank for all regions.
- Set the
-
Account locator:
- Set the
ACCOUNTparameter value asaccount_locator. - Set the
REGIONparameter value if your Snowflake account is not in theus-westregion.
- Set the
For additional information, see Connecting to the Snowflake database.
-
- SQLAlchemy:
- Account name:
snowflake://user_login_name:password@orgname-account_name - Account locator:
snowflake://user_login_name:password@account_locator_with_additional_segments
For additional information, see Using the Snowflake SQLAlchemy toolkit with the Python Connector.
- Account name:
Additional configuration steps
The next topics cover specific areas of configuring a connection: