Configuring access control
This topic describes how to configure access control security for securable objects in your account.
Account administration
Designating additional users as account administrators
By default, each account has one user who has been designated as an account administrator (that is, user granted the system-defined ACCOUNTADMIN role). We recommend designating at least one other user as an account administrator. This helps ensure that your account always has at least one user who can perform account-level tasks, particularly if one of your account administrators is unable to log in.
For these additional account administrators, you can choose to create new users or designate existing users, but make sure to specify the following:
- Grant the ACCOUNTADMIN role to the user(s), but do not set this role as their default. Instead, designate a lower-level administrative role (for example, SYSADMIN) or custom role as their default. This helps prevent account administrators from inadvertently using the ACCOUNTADMIN role to create objects.
- Ensure an email address is specified for each user (required for multi-factor authentication).
For example, grant the ACCOUNTADMIN and SYSADMIN roles to an existing user named user2 and specify SYSADMIN as the default role:
Enabling MFA for each account administrator
To ensure the highest level of security for your Snowflake account, we strongly recommend that any user who can modify or view sensitive data be required to use multi-factor authentication (MFA) for login.
This recommendation applies particularly to users with the ACCOUNTADMIN role, but can also be expanded to include users with the SECURITYADMIN and SYSADMIN roles.
For more details, see Access control best practices and Multi-factor authentication (MFA).
Creating custom roles
To follow the general principle of “least privilege”, we recommend creating custom roles that align with the business functions in your organization to permit SQL actions on a narrow set of securable objects.
You can create custom roles using Snowsight or SQL.
The workflow is as follows:
- Create a custom role.
- Grant a set of privileges to the role.
- Grant the role to one or more users who require the privileges granted to the role to perform SQL actions for their business needs.
- Grant the role to another role to create or add to a role hierarchy. While not required, this step is highly recommended. For more information, see Creating a role hierarchy.
This section provides instructions for creating a role named r1 and granting the following privileges to the role. The privileges allow
a user who activates the role in a session to query a single table, d1.s1.t1:
| Privilege | Object | Notes |
|---|---|---|
| USAGE | Warehouse Database Schema | To query an object (for example, a table or view), a role must have the USAGE privilege on a warehouse. The warehouse provides the compute resources to execute the query. To operate on any object in a schema, a role must have the USAGE privilege on the container database and schema. |
| SELECT | Table t1 |
After a role is created, additional privileges can be granted to it to allow users with the role to perform additional SQL actions on the same or additional objects.
Create a role
Only user administrators (that is, users with the USERADMIN system role or higher), or another role with the CREATE ROLE privilege on the account, can create roles.
- SQL:
- Create the
r1role using a CREATE ROLE statement:
- Create the
- Snowsight:
-
Sign in to Snowsight.
-
Switch to a role with privileges to create roles in the account.
-
In the navigation menu, select Governance & security » Users & roles, and then select Roles.
-
Select + Role.
A New Role dialog appears.
-
For Name, enter the name of the role. For example,
r1. -
For Grant to role, optionally choose to grant the new role to an existing role and inherit the privileges of the existing role.
-
Optionally add a comment.
-
Select Create Role.
-
Grant privileges to a role
You can use the SECURITYADMIN role to grant privileges on objects to roles. For more information, see GRANT <privileges> … TO ROLE.
- SQL:
- Grant to the
r1role the privileges defined in the table earlier in this section.
- Grant to the
- Snowsight:
- Sign in to Snowsight.
- In the navigation menu, select Catalog » Database Explorer.
- For a specific database and schema, select a database object to which you want to grant privileges. For example, a database
named
d1. - In the Object Details, locate the Privileges section.
- Select + Privilege.
- Select the role or user to which you want to grant privileges. For example,
r1oru1.
Tip
You can search for users by username, email, or first/last name.
- Select the privilege you want to grant to the role or user. For example,
USAGE. - If you want the role to be able to grant the privilege to other roles or users, select the checkbox for Grant option.
- Select Grant Privileges.
For this example, repeat the steps to grant USAGE on the schema
s1, SELECT on the tablet1.To grant USAGE on the warehouse
w1, complete the following steps:- Sign in to Snowsight.
- In the navigation menu, select Compute » Warehouses.
- Locate and select the warehouse to which you want to grant privileges. For example,
w1. - In the Privileges section, select + Privilege.
- Select the role or user to which you want to grant privileges. For example,
r1oru1. - For Privileges, select the privilege to grant. For example, USAGE.
- If you want the role to be able to grant the privilege to other roles or users, select the checkbox for Grant option.
- Select Grant Privileges.
Grant the role to users
You can use the SECURITYADMIN role to grant roles to users. For additional options, see GRANT ROLE.
- SQL:
-
Assign the
r1role to usersmithusing a GRANT ROLE statement: -
Optionally set the new custom role as the default role for the user. The next time the user logs into Snowflake, the default role is automatically active in the session.
Only the role with the OWNERSHIP privilege on the user, or a higher role, can execute this command.
The following command sets the default role for user
smith:
-
- Snowsight:
- Sign in to Snowsight.
- Switch to a role with privileges to grant privileges to roles in the account.
- In the navigation menu, select Governance & security » Users & roles, and then select Roles.
- Select Table and locate and select the role that you created.
- In the section 0 users have been granted R1, select Grant to User.
- For User to receive grant, select a user to grant the role to. For example, smith.
- Select Grant.
Grant global privileges to a role
You can also grant a global privilege to a role. See Access control privileges for the list of global privileges available to grant to a role.
- SQL:
Use the GRANT PRIVILEGE command. See Privilege management for details.
- Snowsight:
- Sign in to Snowsight.
- Switch to a role with privileges to grant privileges to roles in the account.
- In the navigation menu, select Governance & security » Users & roles, and then select Roles.
- Select Table and locate and select the role that you created.
- In the role details page, select
 » Manage global privileges.
 - For Global privilege to grant, select the privilege that you want to grant to the role.
- If you want the role to be able to grant the privilege to other roles, select the checkbox for Grant option.
- Select Update Privileges.
Creating custom read-only roles
Suppose you need a role that is limited to querying all tables in a specific schema (for example, d1.s1). Users who execute
commands using this role cannot update the table data, create additional database objects, or drop tables. The role is limited to querying
table data.
To create a read-only role, complete the basic steps described in Creating custom roles. In the
Grant privileges to a role section, grant the read-only role (named read_only in these instructions) the
following object privileges:
| Privilege | Object | Notes |
|---|---|---|
| USAGE | Warehouse | To query an object (for example, a table or view), a role must have the USAGE privilege on a warehouse. The warehouse provides the compute resources to execute the query. |
| SELECT | Table | To operate on any object in a schema, a role must have the USAGE privilege on the container database and schema. |
The GRANT <privilege> statements are as follows:
Note
The GRANT SELECT ON ALL TABLES IN SCHEMA <schema> statement grants the SELECT privilege on all existing tables only. To
grant the SELECT privilege on all future tables to the role, execute the following
statement:
Creating a role hierarchy
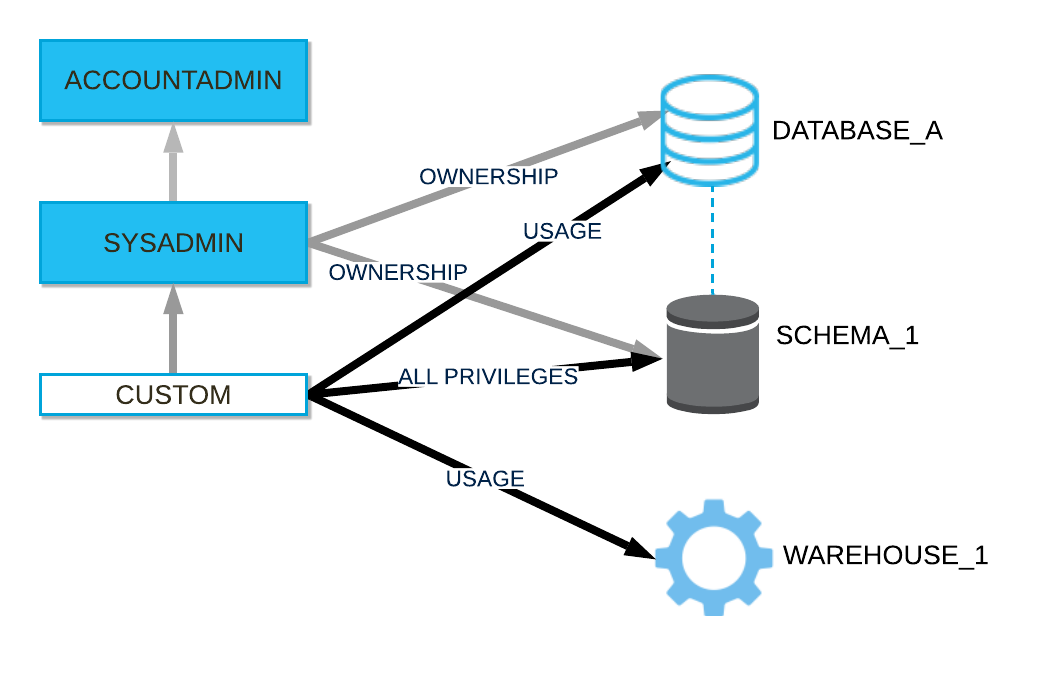
When creating custom roles, consider creating a role hierarchy ultimately assigned to a high-level administrator role. In general, the SYSADMIN role works well as the role all other roles are assigned to in a hierarchy, although it is important to note that any role with sufficient privileges could serve this function. The SYSADMIN role is a system-defined role that has privileges to create warehouses, databases, and database objects in an account and grant those privileges to other roles. In the default system hierarchy, the top-level ACCOUNTADMIN role manages the system administrator role.
Create a role hierarchy by granting a role to a second role. You can then grant that second role to a third role. The privileges associated with a role are inherited by any roles above that role in the hierarchy (that is, the parent role).
The following diagram shows an example role hierarchy and the privileges granted to each role:
Grant a role to another role
Assign the role to a higher-level role in a role hierarchy. In this example, we are assigning the r1 role created in
Creating custom roles to the SYSADMIN role. The SYSADMIN role inherits any object privileges granted to the
r1 role:
- SQL:
- Snowsight:
- Sign in to Snowsight.
- In the navigation menu, select Governance & security » Users & roles, and then select Roles.
- Select Table and locate the role that you want to grant to another role. For example,
r1. - In the section 0 roles have been granted R1, select Grant to Role.
- For Role to receive grant, select SYSADMIN.
- Select Grant.
Note
In a more complex example, you could assign the custom role to another child role of SYSADMIN (or another administrator role,
such as a custom role with sufficient privileges to create databases). The SYSADMIN role would inherit the combined privileges assigned
to the custom role and its parent role. If the role above custom in the hierarchy owned any objects, then the role hierarchy
would ensure that members of the SYSADMIN role also owned those objects (indirectly) and could manage them as expected.
Explore role hierarchies in Snowsight
Snowsight includes a roles graph that displays the hierarchy of roles in your account. The graph is organized in descending order of hierarchy, with paths representing inheritance from parent to child roles. In accounts with lots of roles, the graph can take some time to load.
Note
Database roles are not displayed in the roles graph.
To open the roles graph, do the following:
- Sign in to Snowsight.
- In the navigation menu, select Governance & security » Users & roles.
When viewing the roles graph, you can select an individual role or user which then becomes the focus of the roles graph. To explore, you can zoom in and out, and center the graph on the focused role or user.
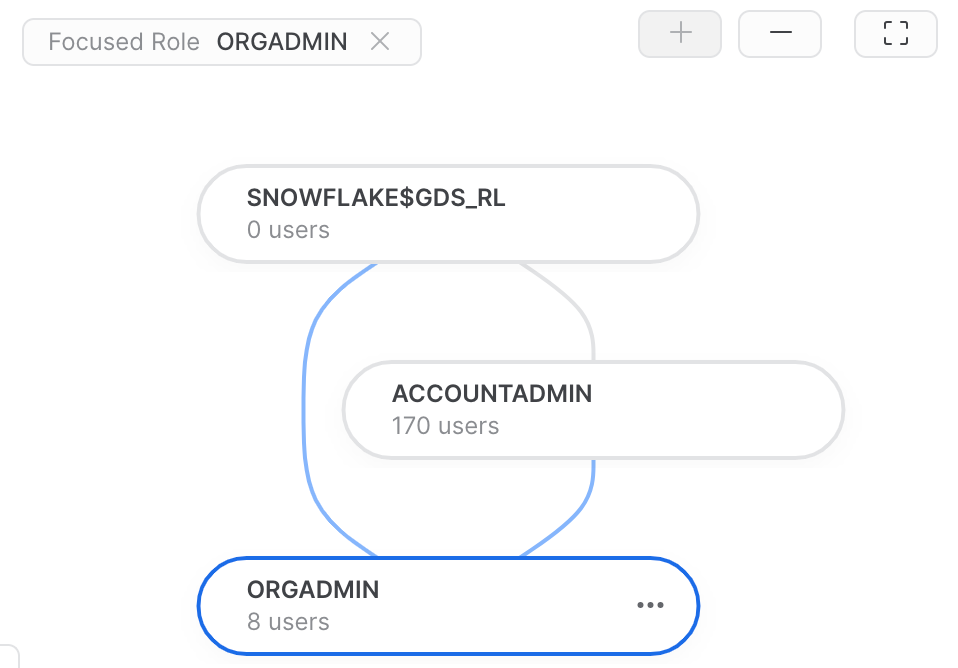
Select a role to view details about the role, such as when the role was created, the owner role, the number of roles granted to the role, the number of roles that the role has been granted to, the number of users to which the role is granted, and the ability to manage grants to the role.
When viewing the details for a role, you can select the to center the graph on the selected role or open the role detail
page.
Granting privileges to a user
A user with MANAGE GRANTS privileges on objects can grant privileges directly to users. For more information, see GRANT <privileges> … TO USER.
For example, to grant the USAGE privilege on a Streamlit application streamlitApp1 to
user1, execute the following commands:
Note
Privileges assigned directly to users are only effective when the user has all secondary roles enabled.
For more specific information about granting privileges to users, see Usage notes for GRANT <privileges> … TO USER.
Disabling UBAC
We understand that this new access control model might affect your governance practices. If you need to disable UBAC in your account after
Bundle 2025_02 becomes enabled by default, use the ALTER ACCOUNT command to set the account parameter
DISABLE_USER_PRIVILEGE_GRANTS = TRUE. For example:
For more information about using the ALTER ACCOUNT command to set account parameters, see ALTER ACCOUNT. For more information about the DISABLE_USER_PRIVILEGE_GRANTS parameter, see DISABLE_USER_PRIVILEGE_GRANTS.
Assigning future grants on objects
To simplify grant management, future grants allow defining an initial set of privileges to grant on new (that is, future) objects of a certain type in a database or a schema. As new objects are created in the database or schema, the defined privileges are automatically granted to a specified role.
Future grants only define the initial set of privileges granted on new objects of a specified type. After an individual object is created, administrators can explicitly grant additional privileges or revoke privileges on the object. This allows fine-grained access control over all objects in the schema or database.
Considerations when using future grants
-
When future grants are defined on the same object type for a database and a schema in the same database, the schema-level grants take precedence over the database level grants, and the database level grants are ignored. This behavior applies to privileges on future objects granted to one role or different roles.
For example, the following statements grant different privileges on objects of the same type at the database and schema levels.
Grant the SELECT privilege on all future tables in database
d1to roler1:Grant the INSERT and DELETE privileges on all future tables in schema
d1.s1to roler2.The future grants assigned to the
r1role on object types in schemad1.s1are ignored completely. When new tables are created in schemad1.s1, only the future privileges defined on tables for ther2role are granted. -
Database level future grants apply to both regular and managed access schemas.
To manage future grants in Snowsight, run SQL statements in a worksheet.
Defining future grants on database or schema objects
Grant privileges on future objects of a specified type using the GRANT <privileges> … TO ROLE command with the ON FUTURE keywords.
Revoking future grants on database or schema objects
Revoke grants on future objects using the REVOKE <privileges> … FROM ROLE command with the ON FUTURE keywords.
Object cloning and future grants
- When a database or schema is cloned, future grants are copied to its clone. This behavior maintains consistency with regular object grants. For example, when you clone a source object such as a database, grants of privileges on the database are not copied to its clones. Privilege grants on all child objects, such as tables created in the database, are copied to the clones.
- When an object in a schema is cloned, any future grants defined for this object type in the schema are applied to the cloned object unless the COPY GRANTS option is specified in the CREATE <object> statement for the clone operation. In that case, the new object retains the access permissions of the original object and does not inherit any future grants for objects of that type.
Creating managed access schemas
Managed access schemas improve security by locking down privilege management on objects.
In regular (that is, non-managed) schemas, object owners (that is, a role with the OWNERSHIP privilege on an object) can grant access on their objects to other roles, with the option to further grant those roles the ability to manage object grants.
With managed access schemas, object owners lose the ability to make grant decisions. Only the schema owner (that is, the role with the OWNERSHIP privilege on the schema) or a role with the MANAGE GRANTS privilege can grant privileges on objects in the schema, including future grants, centralizing privilege management.
You can create a managed access schema in Snowsight using a SQL command. For example, run the
CREATE SCHEMA command with the WITH MANAGED ACCESS keywords.
You can change a managed access schema to a regular one in Snowsight using a SQL command. For example, run the
ALTER SCHEMA command with the DISABLE MANAGED ACCESS keywords.
The following table indicates which roles can manage object privileges in a regular or managed access schema:
| Role | Can grant object privileges in a regular schema | Can grant object privileges in a managed access schema |
|---|---|---|
| SYSADMIN | No | No |
| SECURITYADMIN or higher | Yes | Yes |
| Database owner | No | No |
| Schema owner | No | Yes |
| Object owner | Yes | No |
| Any role with the MANAGE GRANTS privilege | Yes | Yes |
Manage object privileges with Snowsight
You can use Snowsight to manage grants of database object privileges to roles. To manage these grants, use a role with either the OWNERSHIP privilege on the object or with the global MANAGE GRANTS privilege.
When you use Snowsight to manage grants, it is equivalent to running a GRANT PRIVILEGE or REVOKE PRIVILEGE command in SQL. For example, you can use Snowsight to grant the USAGE privilege on a view to the ACCOUNTADMIN role.
Grant privileges on objects
To grant database object privileges to a role, do the following:
- Sign in to Snowsight.
- In the navigation menu, select Catalog » Database Explorer.
- For a specific database and schema, select a database object to which you want to grant privileges.
- In the Object Details, locate the Privileges section.
- Select + Privilege.
- Select the role to which you want to grant privileges.
- Select the privilege you want to grant to the role.
- If you want the role to be able to grant the privilege to other roles, select Grant option.
- Repeat the steps for each object privilege you want to grant to the role.
- Select Grant Privileges.
Revoke privileges on objects
To revoke database object privileges from a role, do the following:
- Sign in to Snowsight.
- In the navigation menu, select Catalog » Database Explorer.
- For a specific database and schema, select a database object from which you want to revoke privileges.
- In the Object Details, locate the Privileges section.
- For a specific role listed, select the Edit Role pencil icon that appears when you hover over the row.
- In the dialog that appears, select the x to revoke a privilege from a specific role.
- Select Update Privileges.
Identify privileges granted to roles
To show the privileges granted on a specific role, you can run the SHOW GRANTS command or do the following in Snowsight:
- Sign in to Snowsight.
- In the navigation menu, select Governance & security » Users & roles » Roles.
- Select Table and locate the role for which you want to view granted privileges.
- Select the role for which you want to view granted privileges to view the details.
- Review the Privileges section for the role.
Enabling non-account administrators to monitor usage and billing history
Snowflake provides extensive account usage and billing information about data storage/transfer and warehouse usage/load:
- Snowsight:
In the navigation menu, select Admin » Cost management.
- SQL:
Query any of the following:
-
Table functions (in the Snowflake Information Schema):
-
Views (in Account Usage):
-
By default, this information can be accessed/viewed only by account administrators.
Note
Currently, Snowsight only displays usage and billing information to account administrators. It is not possible to grant other roles the ability to view this information.
To enable users who are not account administrators to access/view this information, grant the following privileges to a system-defined or custom role. Granting the privileges to a role allows all users who are granted the role to access this historical/usage information:
Privilege Object Description MONITOR USAGE Account (that is, global privilege) Allows users who have been granted the role to view usage and billing information in the web interface and query the corresponding table functions in the Information Schema.
In addition, with this privilege, the SHOW DATABASES and SHOW WAREHOUSES commands return the lists of all databases and warehouses in the account, respectively, regardless of other privilege grants.
IMPORTED PRIVILEGES snowflakedatabaseAllows users who have been granted the role to query all of the ACCOUNT USAGE views, including the views containing usage and billing information.
For more information, see Enabling other roles to use schemas in the SNOWFLAKE database.
For example, to grant these permissions to the custom role: