Configure a catalog integration for Delta Sharing
Use the CREATE CATALOG INTEGRATION (Delta Sharing) command to create a catalog integration that uses the Delta Sharing protocol to read Delta tables from a remote Delta Sharing server. After you create the catalog integration, you can create a catalog-linked database to query the shared Delta tables from Snowflake.
Note
To configure a catalog integration that uses the Apache Iceberg™ REST protocol to connect to Databricks Unity Catalog, see Configure a catalog integration for Unity Catalog instead.
You can configure a Delta Sharing catalog integration that uses any of the following authentication methods:
- Configure a catalog integration with bearer-token authentication: the provider issues a long-lived bearer token to the recipient, and Snowflake uses that token to authenticate.
- Configure a catalog integration with OIDC authentication: Snowflake authenticates to the Delta Sharing server by using OpenID Connect federation, exchanging short-lived JWT tokens. OIDC avoids the need to share or rotate long-lived bearer tokens.
- Configure a catalog integration with OAuth authentication: Snowflake exchanges an OAuth2 client ID and secret with a token endpoint for an access token, then uses that token to authenticate to the Delta Sharing server.
Considerations
Consider the following when you use a Delta Sharing catalog integration:
-
Tables are read-only in Snowflake. A catalog-linked database that uses a Delta Sharing catalog integration supports only read operations. You can’t insert into, update, or create tables in the catalog-linked database from Snowflake.
-
Table format must be Delta. A Delta Sharing catalog integration supports only Delta tables (
TABLE_FORMAT = DELTA). -
Vended credentials are required for table access. Snowflake uses vended credentials returned by the Delta Sharing server to access the underlying table data in cloud storage. The Delta Sharing server must support vended credentials.
Prerequisites
Before you begin, make sure that you have:
-
A Snowflake account where you can create a catalog integration. You must use the ACCOUNTADMIN role, or a role that has the CREATE INTEGRATION privilege on the account.
-
Access to a Delta Sharing server (the provider) that has:
- A share configured for an open recipient.
- The recipient configured for bearer-token, OIDC federation, or OAuth client-credentials authentication.
For Databricks Unity Catalog, see Delta Sharing in the Databricks documentation for instructions on enabling Delta Sharing, creating a share, and creating a recipient.
Configure a catalog integration with bearer-token authentication
With bearer-token authentication, the Delta Sharing provider issues a long-lived bearer token to the recipient. Snowflake uses that token to authenticate to the Delta Sharing server.
About the recipient credential file
At the time of writing, the Delta share credential file is a JSON file from the Delta Sharing provider that contains the endpoint URL and the bearer token Snowflake uses to authenticate. The file contains content like the following:
When you create the catalog integration, you specify the endpoint and bearerToken values from this file.
Important
The bearer token grants access to the share. Treat it like a password and don’t commit it to source control.
Create the catalog integration
Use the CREATE CATALOG INTEGRATION (Delta Sharing) command to create a Delta Sharing catalog integration
in Snowflake. Use the endpoint and bearerToken values from the recipient credential file.
The following example creates a Delta Sharing catalog integration with bearer-token authentication:
Where:
CATALOG_URIis theendpointvalue from the recipient credential file.CATALOG_NAMEisshares/followed by the name of the Delta Sharing share. For example, if your share is namedsales_share, specifyCATALOG_NAME = 'shares/sales_share'.BEARER_TOKENis thebearerTokenvalue from the recipient credential file.
After you create the catalog integration, verify it by following Verify the catalog integration.
Configure a catalog integration with OIDC authentication
With OIDC authentication, Snowflake authenticates to the Delta Sharing server by using OpenID Connect federation. Snowflake acts as the workload identity provider, and the Delta Sharing server validates the short-lived JWT tokens that Snowflake presents.
OIDC authentication avoids sharing or rotating long-lived bearer tokens. Setup requires a handshake: you create the catalog integration in Snowflake, retrieve the workload identity values, and then provide those values to the Delta Sharing provider to configure the OIDC recipient policy.
Note
For Databricks Unity Catalog, see Read shared data using Open ID Connect (OIDC) token federation in an M2M flow in the Databricks documentation for the provider-side steps to enable OIDC federation and configure the recipient policy.
Step 1: Create the catalog integration
Use the CREATE CATALOG INTEGRATION (Delta Sharing) command to create a Delta Sharing catalog integration
that uses OIDC authentication. Specify TYPE = OIDC and provide the OIDC_AUDIENCE value that the Delta Sharing provider’s
recipient policy expects.
The following example creates a Delta Sharing catalog integration with OIDC authentication:
Where:
CATALOG_URIis the endpoint URL for the Delta Sharing recipient that the provider gave you.CATALOG_NAMEisshares/followed by the name of the Delta Sharing share.OIDC_AUDIENCEis the audience value that the Delta Sharing server’s OIDC recipient policy expects.
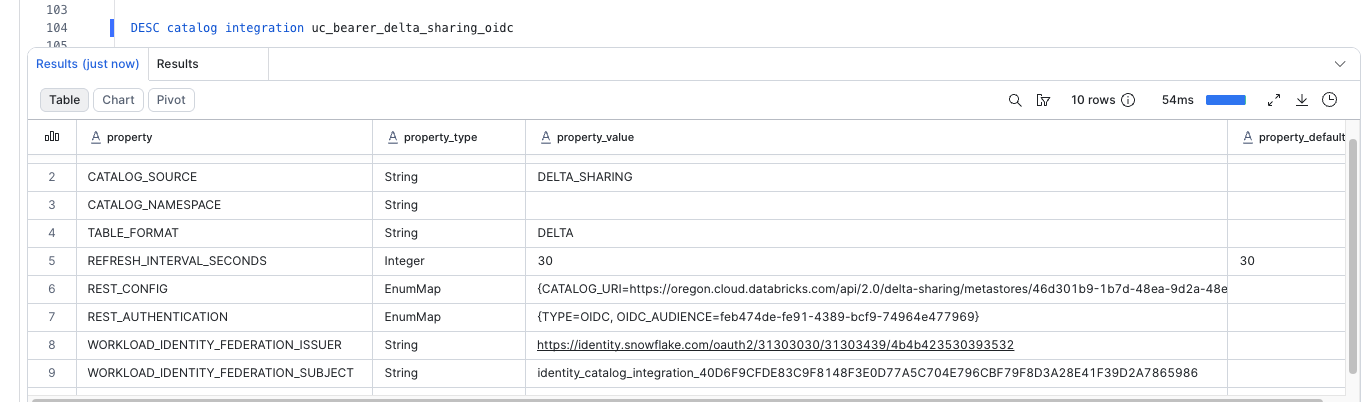
Step 2: Retrieve the workload identity values
After you create the catalog integration, run DESCRIBE CATALOG INTEGRATION to retrieve the workload identity issuer and subject values that Snowflake uses to identify itself to the Delta Sharing provider:
In the output, note the values for the following properties:
WORKLOAD_IDENTITY_FEDERATION_ISSUERWORKLOAD_IDENTITY_FEDERATION_SUBJECT
You provide these values to the Delta Sharing provider in the next step.
Step 3: Configure the OIDC recipient policy on the provider
On the Delta Sharing provider, configure the OIDC recipient policy with the issuer and subject values that you retrieved
in the previous step, plus the audience value that you specified for OIDC_AUDIENCE when you created the catalog
integration. All three values must match exactly.
For Databricks Unity Catalog, see Read shared data using Open ID Connect (OIDC) token federation in an M2M flow in the Databricks documentation for the provider-side configuration steps.
Step 4: Verify the catalog integration
After the provider’s OIDC recipient policy is configured, verify the catalog integration by following Verify the catalog integration.
Configure a catalog integration with OAuth authentication
With OAuth client-credentials authentication, Snowflake exchanges a long-lived OAuth2 client ID and secret with the identity provider’s token endpoint for a short-lived access token, then uses that access token to authenticate to the Delta Sharing server. The Delta Sharing provider configures the recipient policy to trust tokens issued by the identity provider.
Step 1: Gather the OAuth credentials from the provider
From the Delta Sharing provider, obtain:
- The OAuth2 client ID and client secret that the provider issued for your recipient.
- The token endpoint URL of the identity provider that issues access tokens for the Delta Sharing server.
- The Delta Sharing endpoint URL and share name.
Important
Treat the OAuth client secret like a password and don’t commit it to source control.
Step 2: Create the catalog integration
Use the CREATE CATALOG INTEGRATION (Delta Sharing) command to create a Delta Sharing catalog
integration that uses OAuth authentication. Specify TYPE = OAUTH and provide the client ID, client secret, and token
endpoint URL.
The following example creates a Delta Sharing catalog integration with OAuth authentication:
Where:
CATALOG_URIis the endpoint URL for the Delta Sharing recipient that the provider gave you.CATALOG_NAMEisshares/followed by the name of the Delta Sharing share.OAUTH_CLIENT_IDandOAUTH_CLIENT_SECRETare the OAuth2 credentials issued by the provider’s identity provider.OAUTH_TOKEN_URIis the token endpoint URL of the identity provider.
Step 3: Verify the catalog integration
Verify the catalog integration by following Verify the catalog integration.
Verify the catalog integration
Verify that Snowflake can connect to the Delta Sharing server. Substitute the name of your catalog integration in the following examples.
-
Verify the catalog integration configuration by calling the SYSTEM$VERIFY_CATALOG_INTEGRATION function:

-
List the namespaces (schemas) in the share by calling the SYSTEM$LIST_NAMESPACES_FROM_CATALOG function:

-
List the tables in a schema by calling the SYSTEM$LIST_ICEBERG_TABLES_FROM_CATALOG function:

Create a catalog-linked database
After you verify the catalog integration, create a catalog-linked database that surfaces the Delta tables from the share as queryable tables in Snowflake.
The following example creates a read-only catalog-linked database named delta_sharing_cld:
Where:
CATALOGis the name of the catalog integration that you created in Create the catalog integration, Step 1: Create the catalog integration, or Step 2: Create the catalog integration.ALLOWED_WRITE_OPERATIONS = 'NONE'makes the database read-only. Write operations against Delta tables shared through Delta Sharing aren’t supported.SYNC_INTERVAL_SECONDScontrols how often Snowflake syncs the catalog-linked database with the remote share. Adjust this value based on how frequently the tables in the share change.
For more information about catalog-linked databases, including additional parameters, see Use a catalog-linked database for Apache Iceberg™ tables and CREATE DATABASE (catalog-linked).
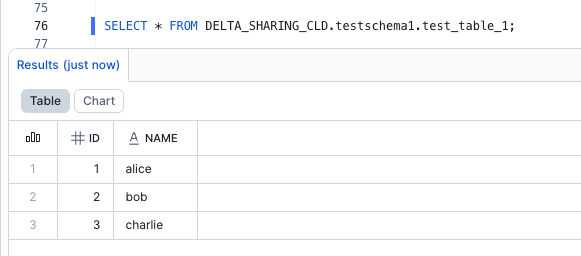
Query Delta tables
After Snowflake syncs the catalog-linked database, you can query the shared Delta tables like any other table in Snowflake.
For example: