Setting Up IntelliJ IDEA CE for Snowpark Scala
This topic explains how to set up IntelliJ IDEA CE for Snowpark.
Setting Up IntelliJ IDEA CE for Scala Development
To use Scala in IntelliJ IDEA CE, you need to install the Scala plugin. See the Installation section of the tutorial Getting Started with Scala in IntelliJ IDEA.
Creating a New Scala Project in IntelliJ IDEA
Next, create a new Scala project for Snowpark.
Choose File » New » Project.
In the list on the left, select Scala.
In the list on the right, select sbt.
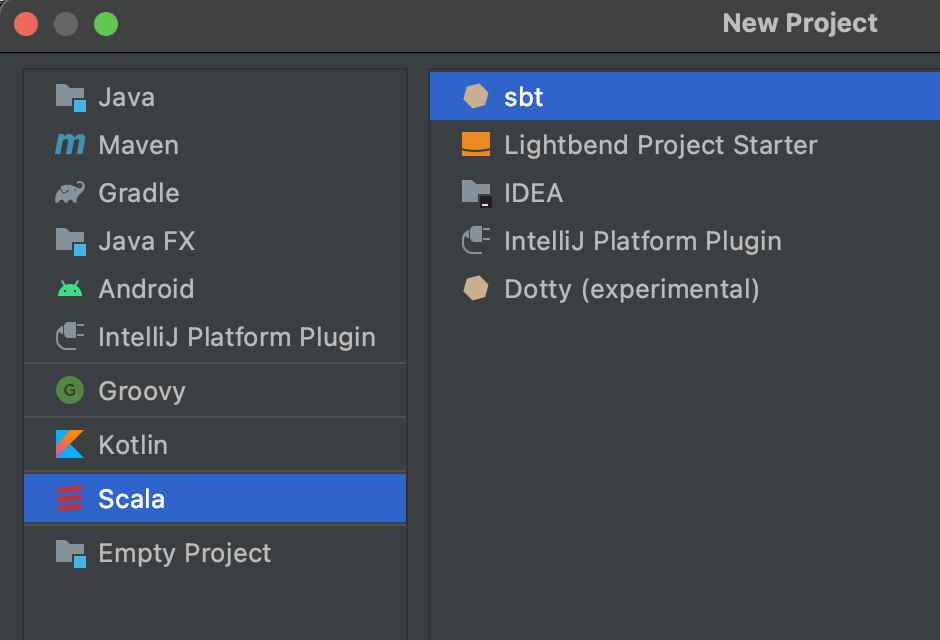
Click Next.
Fill in the details for your new project.
For the JDK and Scala SDK, select the JDK and Scala versions supported for use with Snowpark.
Click Finish to create the new project.
Configuring the IntelliJ IDEA Project for Snowpark
Next, configure the project for Snowpark.
In the Project tool window on the left, double-click on the
build.sbtfile for your project.In the
build.sbtfile for your project, make the following changes:If the
scalaVersionsetting does not match the version that you plan to use, update the setting. For example:scalaVersion := "2.12.20"
Note that you must use a Scala version that is supported for use with the Snowpark library.
Add the Snowpark library to the list of dependencies. For example:
libraryDependencies += "com.snowflake" % "snowpark_2.12" % "1.18.0"
Save the changes to the
build.sbtfile.Update your Maven repositories.
Reload the SBT project:
Choose View » Tool Windows » sbt to display the sbt Tool window.
Right-click on the project name, and choose Reload sbt Project.
This causes IntelliJ IDEA CE to download the Snowpark library and makes the API available for use in your code.
Verifying Your IntelliJ IDEA Project Configuration
To verify that you have configured your project to use Snowpark, run a simple example of Snowpark code.
In the Project tool window on the left, expand your project, expand the
src/mainfolders, and select thescalafolder.Right-click on the folder, and choose New » Scala class.
In the Create New Scala Class dialog box, enter the name “Main”, select Object, and press the Enter key.
In the
Main.scalafile, replace the contents with the code below:import com.snowflake.snowpark._ import com.snowflake.snowpark.functions._ object Main { def main(args: Array[String]): Unit = { // Replace the <placeholders> below. val configs = Map ( "URL" -> "https://<account_identifier>.snowflakecomputing.com:443", "USER" -> "<user name>", "PASSWORD" -> "<password>", "ROLE" -> "<role name>", "WAREHOUSE" -> "<warehouse name>", "DB" -> "<database name>", "SCHEMA" -> "<schema name>" ) val session = Session.builder.configs(configs).create session.sql("show tables").show() } }
Note the following:
Replace the
<placeholders>with values that you use to connect to Snowflake.For
<account_identifier>, specify your account identifier.If you prefer to use key pair authentication:
Replace
PASSWORDwithPRIVATE_KEY_FILE, and set it to the path to your private key file.If the private key is encrypted, you must set
PRIVATE_KEY_FILE_PWDto the passphrase for decrypting the private key.
As an alternative to setting
PRIVATE_KEY_FILEandPRIVATE_KEY_FILE_PWD, you can set thePRIVATEKEYproperty to the string value of the unencrypted private key from the private key file.For example, if your private key file is unencrypted, set this to the value of the key in the file (without the
-----BEGIN PRIVATE KEY-----and-----END PRIVATE KEY-----header and footer and without the line endings).Note that if the private key is encrypted, you must decrypt the key before setting it as the value of the
PRIVATEKEYproperty.
If you plan to create UDFs:
Don’t set up your
objectto extend theApptrait. For details, see Caveat About Creating UDFs in an Object With the App Trait.Don’t set up your
objectto extend a class or trait that is not serializable.
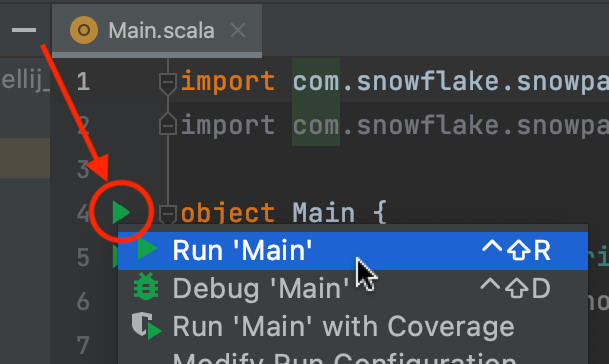
Click the green arrow next to the
Objectline, and choose Run Main to run the example.