Creating an interactive table using streaming ingestion
This topic explains how to stream data into interactive tables. For general information about interactive tables and interactive warehouses, see Snowflake interactive tables and interactive warehouses. For mutable, deduplicated data (inserts, updates, and deletes from a source system), see Using change data capture with interactive tables.
Choosing an ingestion path
You can stream data into an interactive table by using any of the following paths, all of which sit on the Snowpipe Streaming high-performance architecture:
- Snowpipe Streaming SDK — for custom producers that use the Python or Java client directly. Best when you own the producer application and want the lowest-latency, lowest-overhead path into Snowflake.
- Snowflake Connector for Kafka — for teams that already run Apache Kafka or a Kafka-compatible service (Amazon MSK, Confluent Cloud). The connector calls the same Snowpipe Streaming v2 APIs under the hood.
- Snowflake Openflow — for managed, no-code pipelines. Use the PutSnowpipeStreaming2 processor to write records to Snowflake.
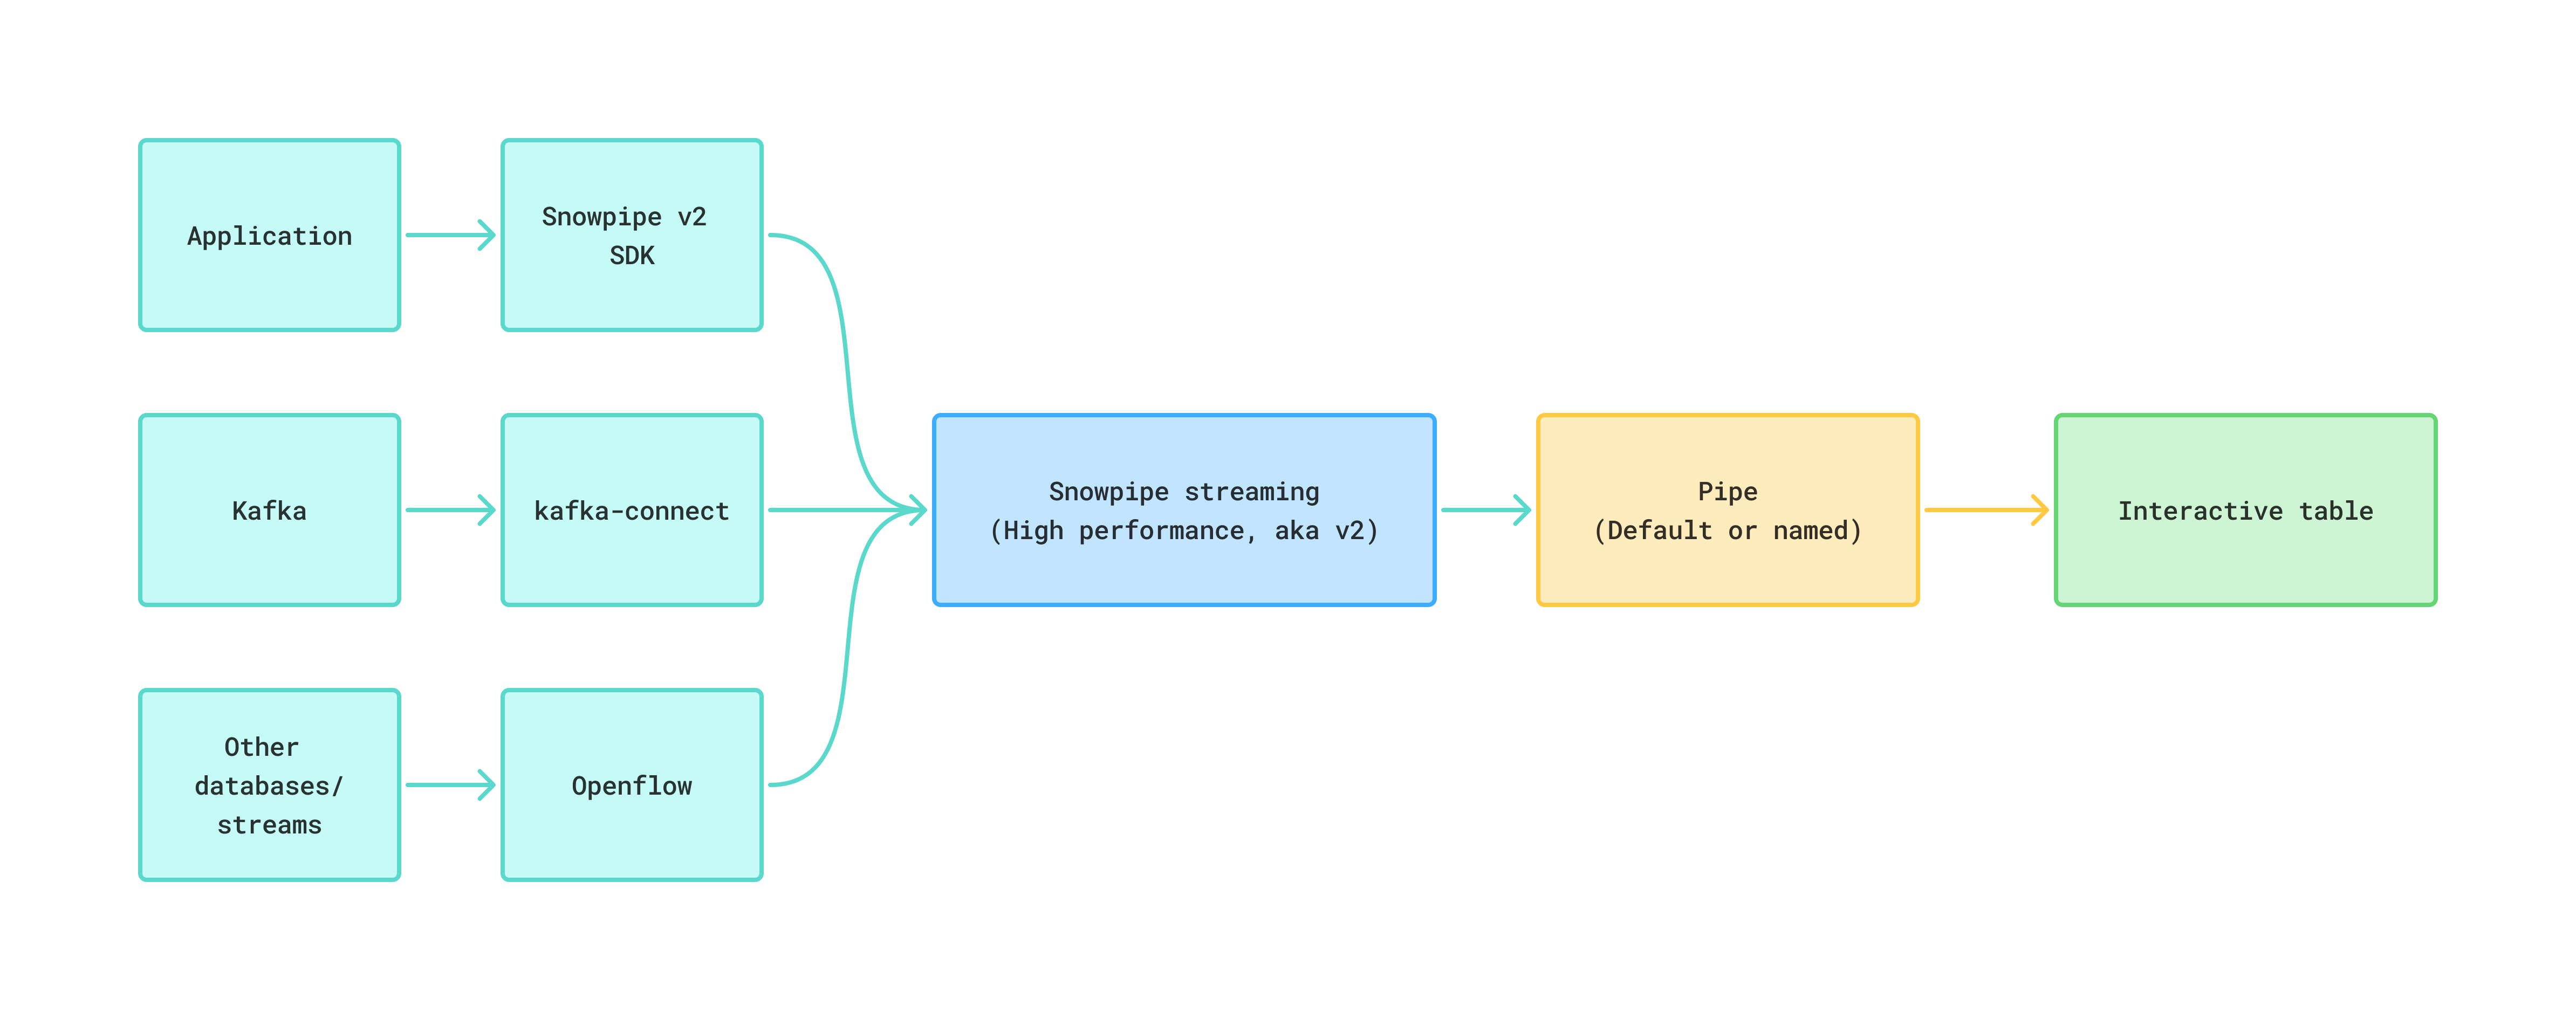
Three ways to stream data into an interactive table.
Note
Interactive tables also support change data capture (CDC) on top of streaming ingestion. If your source emits inserts, updates, and deletes that you want to deduplicate on a primary key, see Using change data capture with interactive tables.
How streaming ingestion works: the default pipe
Every Snowpipe Streaming write goes through a PIPE object, which handles schema validation, in-flight transformations, and pre-clustering. For most interactive-table workloads, Snowflake creates and manages a default pipe for you — no CREATE PIPE needed.
CREATE INTERACTIVE TABLE does not create a pipe. Snowflake creates the default pipe on demand
the first time a client opens a channel or calls get_pipe_info against the table. After
that, it’s visible to SHOW PIPES and
DESCRIBE PIPE.
The default pipe has the following characteristics:
- Name:
<TABLE_NAME>-STREAMING. A table namedORDERSgets a default pipe namedORDERS-STREAMING. - Snowflake-managed: You can’t run CREATE, ALTER, or DROP against the default pipe. Its
OWNERattribute is NULL. - Default ingestion semantics: It uses
MATCH_BY_COLUMN_NAMEto map incoming fields to columns. It doesn’t support in-flight transformations or pre-clustering.
Define your own named pipe when you need any of the following:
- In-flight transformations, such as projecting fields from
$1:RECORD_CONTENTor calling SQL functions during ingest. - Pre-clustering at ingest time (
CLUSTER_AT_INGEST_TIME = TRUE). - An explicit pipe you can grant on, monitor, and replicate independently from the table.
For the complete reference, see The PIPE object.
Required privileges for streaming ingestion
Before you run any of the ingestion options below, set up a role with the privileges needed to stream into the target table. Snowpipe Streaming also requires key-pair authentication; see Key-pair authentication and key-pair rotation for how to generate a key pair and associate it with the user.
The following example sets up a streaming_role for an interactive table named my_table
whose default pipe is MY_TABLE-STREAMING:
Note
If you run CREATE OR REPLACE INTERACTIVE TABLE, grants on the old table don’t carry over to the new one; you must reapply them. For the full list of Snowpipe Streaming privileges, see Required access privileges.
Option A: Using the Snowpipe Streaming SDK
The Snowpipe Streaming high-performance SDK lets your producer open a channel against the table’s pipes (default or custom) and append rows directly. This is the lowest-overhead path and is a good fit for custom producers.
Start by setting up a Python virtual environment and installing the SDK. Do not install packages
system-wide with --break-system-packages.
Create the interactive table in Snowflake:
Create a profile.json file with your account, user, and private-key details. For the format
and an example, see
Step 2: Configure an authentication profile.
Then open a channel against the default pipe (SENSOR_READINGS-STREAMING) and append rows.
The following example shows what a minimal producer looks like:
For the complete SDK reference, see Snowpipe Streaming key concepts and the getting-started tutorial.
Option B: Using the Snowflake Connector for Kafka
Use the Snowflake Connector for Kafka when you already run Kafka (or a Kafka-compatible service such as Amazon MSK or Confluent Cloud). The connector writes records through the Snowpipe Streaming v2 APIs, so the default pipe and custom-pipe rules described above apply.
Download the connector
During the preview period, use the release candidate of the connector that supports interactive tables. Download the JAR from Maven Central:
You must use key-pair authentication instead of basic authentication. Generate a key pair as described in Key-pair authentication and key-pair rotation, and run ALTER USER to associate the public key with the user that creates the interactive table. Then include the private key in the configuration settings of the Kafka Connect worker.
Create the interactive table
Create the interactive table in Snowflake before you register the connector. No pipe is needed
up front — Snowflake creates the default pipe (KAFKA_CONNECTOR_DEMO-STREAMING) on demand
when the connector opens its first channel:
Configure the Kafka Connect sink
The following connector configuration targets the table created above. Replace the
placeholders marked with angle brackets (<...>) with your own values:
The following settings are the most critical for interactive tables:
Register the connector
Save the configuration above to a file named snowflake-sink.json. Create a virtual
environment and install the requests library, then register the connector with the Kafka
Connect REST API:
Run the helper:
After the connector is running, check its status with
GET /connectors/snowflake-interactive-sink/status, then produce a few Kafka records to the
interactive_demo_topic topic and query the interactive table to confirm that rows arrive.
Option C: Using Snowflake Openflow
Snowflake Openflow provides a managed, no-code pipeline for streaming data into Snowflake. Use the PutSnowpipeStreaming2 processor to write newline-delimited JSON records through the Snowpipe Streaming v2 API.
Openflow uses the same default-pipe mechanism described
in How streaming ingestion works: the default pipe to ingest data into Interactive tables. In the PutSnowpipeStreaming2 processor,
point the Pipe Name property at either the table’s default pipe
(<TABLE_NAME>-STREAMING) or a custom pipe that you created with a DATA_SOURCE(TYPE => 'STREAMING') COPY expression.
For the full list of Openflow processors, see All processors (alphabetical).
Monitoring data ingestion
The following Snowpipe Streaming view contains useful information to help you verify that data ingestion is happening to the interactive table and how much data is transferred:
Measuring end-to-end latency with row timestamps
Note
Support for ROW_TIMESTAMP on interactive tables is planned for an upcoming preview
update.
Once the feature is enabled, you’ll be able to set ROW_TIMESTAMP = TRUE on the interactive
table and use the row-level commit timestamp to measure end-to-end latency independently of any
client-provided event time column. Latency then becomes a straightforward SQL expression:
For general guidance on row timestamps, including how they behave across transactions and dynamic tables, see Use row timestamps to measure latency in your pipelines.
Managing data retention with storage lifecycle policies
Use a storage lifecycle policy to cap the amount of historical streaming data you keep. A common pattern for interactive tables is to retain a rolling window of the last two weeks.
The following policy expires rows whose ingest-time column is older than 14 days:
For the full set of options (archive tiers, tagging, monitoring), see Create and manage storage lifecycle policies.
Schema evolution for interactive tables
Interactive tables support schema evolution, which allows Snowflake to automatically add new columns when the incoming data contains fields that don’t yet exist in the table. This is particularly useful when streaming data from external systems like Kafka, where the source schema may change over time.
You enable schema evolution by setting ENABLE_SCHEMA_EVOLUTION = TRUE on the interactive table.
You can set this property at table creation or on an existing table using ALTER TABLE.
In addition to automatic schema evolution, interactive tables support these manual ALTER TABLE operations:
- Adding new columns.
- Modifying NULL constraints on columns (SET NOT NULL or DROP NOT NULL).
Enabling schema evolution at table creation
Include ENABLE_SCHEMA_EVOLUTION = TRUE in the CREATE INTERACTIVE TABLE statement (the
Kafka connector example already does this):
Enabling schema evolution on an existing table
If the table was created without schema evolution, enable it using ALTER TABLE:
Schema evolution with the Kafka connector
When you use the Kafka connector with schema evolution, two settings work together:
- On the Snowflake table:
ENABLE_SCHEMA_EVOLUTION = TRUEallows Snowflake to automatically add new columns. - On the Kafka connector:
snowflake.enable.schematization: trueenables the connector to detect and propagate schema changes from the data source.
Both settings must be enabled for end-to-end schema evolution to work.
Note
The example in Option B: Using the Snowflake Connector for Kafka already sets
ENABLE_SCHEMA_EVOLUTION = TRUE on the table and
"snowflake.enable.schematization": "true" on the connector, so schema evolution is
enabled end-to-end in that example.
Testing schema evolution with Kafka
The following steps show how to verify that schema evolution works end-to-end with a Kafka data source.
-
Start from the
kafka_connector_demotable created in Option B: Using the Snowflake Connector for Kafka. It already hasENABLE_SCHEMA_EVOLUTION = TRUE. -
Send a record with the base fields to the Kafka topic:
-
Send a record that includes a new field (
referrer) that doesn’t exist in the table: -
Verify that Snowflake automatically added the new column:
The
referrercolumn should appear in the table schema, with a NULL value for the first record andgoogle.comfor the second record.
Manual schema changes with ALTER TABLE
You can also add columns and modify NULL constraints manually, regardless of the ENABLE_SCHEMA_EVOLUTION setting:
Verify the table structure after any schema changes:
Usage notes for schema evolution
- The role used to load data must have the EVOLVE SCHEMA or OWNERSHIP privilege on the table.
- Newly added columns contain NULL values for existing rows.
- Setting NOT NULL on a column that contains NULL values results in an error.
- For more information about schema evolution, see Enable automatic table schema evolution.