Working with resource monitors
A resource monitor can help control costs and avoid unexpected credit usage caused by running warehouses. A virtual warehouse consumes Snowflake credits while it runs. You can use a resource monitor to monitor credit usage by virtual warehouses and the cloud services needed to support those warehouses. You can also set up a resource monitor to suspend a standard virtual warehouse or disable an Adaptive Warehouse when it reaches a credit limit.
Important
Resource monitors work for warehouses only. You can’t use a resource monitor to track spending associated with serverless features and AI services. To monitor credit consumption by these features, use a budget instead.
The number of credits consumed depends on the size of the warehouse and how long it runs. For more information on warehouse credit usage, see Virtual warehouse credit usage.
Credit usage limits can be set for a specified interval or date range. When a limit is reached and/or reaches a specified threshold, the resource monitor can trigger various actions, such as sending alert notifications, suspending standard warehouses, or disabling Adaptive Warehouses.
Only users with the ACCOUNTADMIN role can create a resource monitor, but an account administrator can grant privileges to other roles to allow other users to view and modify resource monitors.
Resource monitor properties
A resource monitor is a first-class object in Snowflake, consisting of the following properties:
Credit quota
Credit quota specifies the number of Snowflake credits allocated to the monitor for the specified frequency interval. Any number can be specified.
In addition, Snowflake tracks the used credits/quota within the specified frequency interval by all warehouses assigned to the monitor.
At the specified interval, this number resets to 0.
Credit quota accounts for credits consumed by both user-managed virtual warehouses and virtual warehouses used by cloud services.
For example, your resource monitor limit is set at 1000 credits. If your warehouse consumes 700 credits, and cloud services consume 300 credits within a specified interval or date range, an alert will be triggered.
Note
Resource monitor limits do not take into account the daily 10% adjustment for cloud services. Snowflake uses all credit consumption by the cloud services layer to calculate whether a limit has been reached, even if that consumption is never billed. For more information about how cloud services credits and adjustments are calculated, see Understanding billing for cloud services usage.
For instructions on how to view your cloud services credit usage, see Exploring compute cost.
Monitor type
This property specifies whether the resource monitor is used to monitor your account or a specific set of individual warehouses:
-
An account monitor monitors the credit usage of all the warehouses in the account. An account can only have one account monitor.
-
A warehouse monitor monitors the credit usage of the warehouses assigned to the resource monitor. An account can have multiple warehouse monitors.
A warehouse monitor can have one or more warehouses assigned to it, but each warehouse can only be assigned to one resource monitor.
If this property is not set, the resource monitor doesn’t monitor any credit usage. It simply remains dormant.
For more information, see Assignment of resource monitors.
Schedule
The default schedule for a resource monitor specifies that it starts monitoring credit usage immediately and the used credits reset to
0 at the beginning of each calendar month (i.e. the start of the standard Snowflake billing cycle).
However, you can optionally customize the schedule for a resource monitor using the following properties:
- Frequency:
The interval at which the used credits reset relative to the specified start date.
Supported values:
- Daily
- Weekly
- Monthly
- Yearly
- Never (used credits never reset; assigned warehouses continue using credits until the credit quota is reached)
- Start:
Date and time (i.e. timestamp) when the resource monitor starts monitoring the assigned warehouses.
Supported values:
- Immediately (i.e. current timestamp)
- Later (i.e. any future timestamp)
In addition, Snowflake uses this date to determine when to reset the used credits, based on the specified frequency. Note, however, that regardless of the time specified in the start date and time, resource monitors reset at 12:00 AM UTC. For example, if the start is 15-July-2019 (Monday) at 8:00 AM:
- Frequency = Monthly: Used credits reset at 12:00 AM UTC on the 15th of each following month.
- Frequency = Weekly: Used credits reset at 12:00 AM UTC on each following Monday.
Note that, if you specify the last day of a month as the start date, Snowflake resets the used credits on the last day of all following months, regardless of the number of days in the month. For example, if you set the start date to January 31, Snowflake subsequently resets the used credits for the resource monitor on February 28 (or February 29 in a leap year), March 31, April 30, and so on.
- End:
Date and time (i.e. timestamp) when Snowflake suspends the warehouses associated with the resource monitor, regardless of whether the used credits reached any of the thresholds defined for the resource monitor’s actions (see the next section in this topic).
Supported values: Any future timestamp.
Note that this property is not commonly used.
Important
If you choose to customize the schedule for a resource monitor, the frequency is relative to the specified start date, which is different than the default schedule.
Also, if you specify a frequency, you must also specify a start date and time, and vice versa (i.e. you cannot set one without setting the other).
Actions
Also referred to as triggers, each action specifies a threshold, as a percentage of the credit quota for the resource monitor, and the
action to perform when the threshold is reached within the specified interval. Note that actions support thresholds greater than 100.
Resource monitors support the following actions:
- Notify & Suspend:
Send a notification and suspend all assigned standard warehouses after all statements being executed by the warehouse(s) have completed. For Adaptive Warehouses, this action disables the warehouse after running statements complete.
- Notify & Suspend Immediately:
Send a notification and suspend all assigned standard warehouses immediately, which cancels any statements being executed by the warehouses at the time. For Adaptive Warehouses, this action disables the warehouse immediately.
- Notify:
Perform no action on warehouses, but send a notification.
Notifications are sent to all account administrators with notifications enabled. Email notifications for resource monitors that monitor warehouses are also sent to any non-administrator user that is enabled to receive those notifications.
Note
Non-administrator users can only receive email notifications for warehouse monitors.
Each resource monitor can have the following actions:
- One Suspend action.
- One Suspend Immediate action.
- Up to five Notify actions.
Note
A resource monitor must have at least one action defined; if no actions have been defined, nothing happens when the used credits reach the threshold.
Assignment of resource monitors
A single monitor can be set at the account level to control credit usage for all warehouses in your account.
In addition, a one or more warehouses can be assigned to a resource monitor, thereby controlling the credit usage for each assigned warehouse. Note, however, that a warehouse can be assigned to only a single resource monitor below the account level.
The following diagram illustrates a scenario in which one resource monitor is set at the account level and individual warehouses are assigned to two other resource monitors:
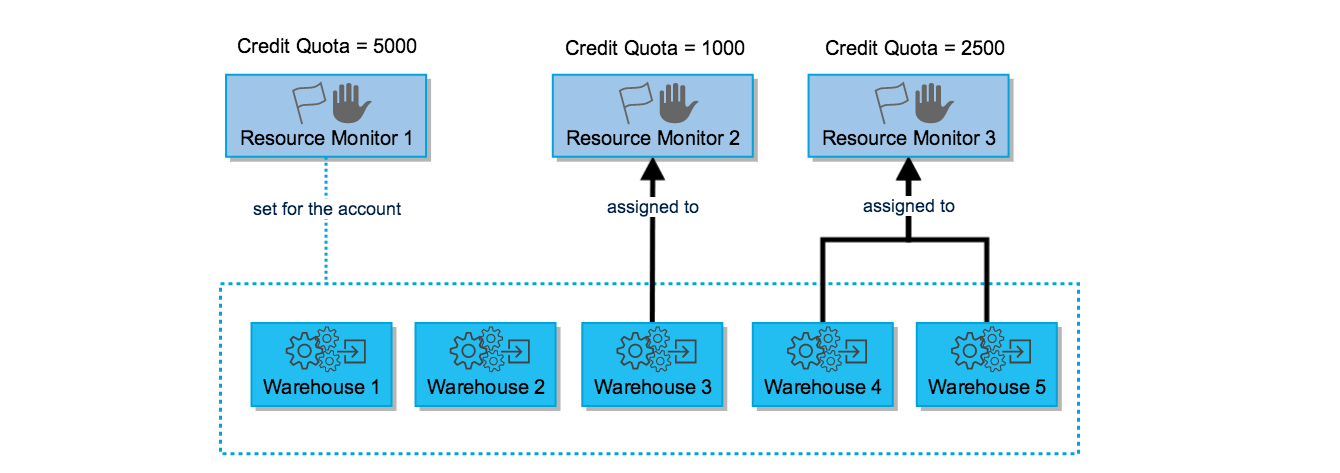
Based on this diagram:
- The credit quota for the entire account is 5000 for the interval (month, week, etc.), as controlled by Resource Monitor 1; if this quota is reached within the interval, the actions defined for the resource monitor (Suspend, Suspend Immediate, etc.) are enforced for all five warehouses.
- Warehouse 3 can consume a maximum of 1000 credits within the interval.
- Warehouse 4 and 5 can consume a maximum combined total of 2500 credits within the interval.
Note that the actual credits consumed by Warehouses 3, 4, and 5 may be less than their quotas if the quota for the account is reached first.
Important
- An account-level resource monitor does not override resource monitor assignment for individual warehouses. If either the account resource monitor or the warehouse resource monitor reaches its defined threshold and a suspend action has been defined, standard warehouses are suspended and Adaptive Warehouses are disabled.
- An account-level resource monitor does not control credit usage by the Snowflake-provided compute resources for serverless features (for example, Snowpipe, automatic reclustering, and materialized views).
Warehouse suspension and resumption
The used credits for a resource monitor reflect the sum of credits consumed by all assigned warehouses within the specified interval, along with the cloud services used to support those warehouses during the same interval. If a monitor has a Suspend or Suspend Immediately action defined and its used credits reach the threshold for the action, assigned standard warehouses are suspended. Assigned Adaptive Warehouses are disabled. Affected warehouses cannot be resumed or enabled until one of the following conditions is met:
- The next interval, if any, starts, as dictated by the start date for the monitor.
- The credit quota for the monitor is increased.
- The credit threshold for the suspend action is increased.
- The warehouses are no longer assigned to the monitor.
- The monitor is dropped.
Adaptive Warehouses
For Adaptive Warehouses, Suspend and Suspend Immediate in resource monitor configuration are synonyms for disable. The
warehouse STATE is DISABLED, and DISABLED_REASONS can list the resource monitor. Adaptive Warehouses don’t use suspend and resume the
same way as standard warehouses.
When a resource monitor’s conditions clear, an Adaptive Warehouse is enabled again (the same outcome as ALTER WAREHOUSE ... ENABLE).
You can also disable or enable an Adaptive Warehouse with ALTER WAREHOUSE. For more information, see
Enable or disable an Adaptive Warehouse.
A warehouse-level resource monitor can monitor, but cannot suspend, credit usage by cloud services. After a standard virtual warehouse is suspended or an Adaptive Warehouse is disabled, subsequent queries run against that warehouse can still result in additional cloud services costs. For more information about credit usage for cloud services, see Cloud service credit usage.
Tip
Resource monitors are not intended for strictly controlling consumption on an hourly basis; they are intended for tracking and controlling credit consumption per interval (day, week, month, etc.). Also, they are not intended for setting precise limits on credit usage (i.e. down to the level of individual credits). For example, when credit quota thresholds are reached for a resource monitor, the assigned warehouses may take some time to suspend or disable, even when the action is Suspend Immediate, thereby consuming additional credits.
If you wish to strictly enforce your quotas, we recommend the following:
-
Utilize buffers in the quota thresholds for actions (e.g. set a threshold to 90% instead of 100%).
This will help ensure that your credit usage doesn’t exceed the quota.
-
To more strictly control credit usage for individual warehouses, assign only a single warehouse to each resource monitor.
When multiple warehouses are assigned to the same resource monitor, they share the same quota thresholds, which may result in credit usage for one warehouse impacting the other assigned warehouses.
Resource monitor notifications
When a resource monitor reaches the threshold for an action, it generates a notification similar to the following notification:
The <action> is one of the following actions:
- NOTIFY
- SUSPEND
- SUSPEND_IMMEDIATE
Notification behavior depends on the type of resource monitor and whether or not notifications are enabled for an individual user. Notifications are sent as follows:
-
For warehouse monitors, a notification is sent to the following users:
- All account administrators who have enabled resource monitor notifications.
- Non-administrator users in the notification list for the resource monitor.
-
For account monitors, a notification is sent to the following users:
- The account administrator with the OWNERSHIP privilege on the resource monitor if they have enabled notifications.
- All account administrators who have enabled notifications using Snowsight.
Note
A non-administrator user can’t be added to the notification list for an account monitor.
Important
Resource monitor notifications can be sent by email or in Snowsight, but are disabled by default. You must set up notifications before they are sent. Users that do not have the ACCOUNTADMIN role can only be sent email notifications.
To enable notifications, see Enabling receipt of notifications.
DDL for resource monitors
Snowflake provides the following DDL commands for creating and using/managing resource monitors:
In addition, the following DDL commands can be used to assign a resource monitor to a warehouse and determine whether a warehouse is assigned to a monitor:
Access control privileges for resource monitors
By default, resource monitors can only be created by account administrators and, therefore, can only be viewed and maintained by them.
However, roles that have been granted the following privileges on specific resource monitors can view and modify the resource monitor as needed using SQL:
- MONITOR
- MODIFY
For more information, see Access control privileges and GRANT <privileges> … TO ROLE.
Note that only account administrators can view and manage resource monitors via the Snowsight.
Enabling receipt of notifications
Before you can receive any notifications from resource monitors, you must enable notifications in the web interface and verify your email.
- Snowsight:
To enable notifications, follow these steps:
-
Verify your email address if you haven’t already done so. For instructions on how to verify your email address, see Verify your email address.
-
Select your username, then select Profile
-
For Notifications, select Enable notifications from resource monitors.
Note
- If you haven’t verified your email address, the Notifications option isn’t available until you verify your email.
- In Notifications, the Enable notifications from resource monitors option is only available to users with
the ACCOUNTADMIN role in the following cases:
- If there is a resource monitor assigned to the account and the account administrator has the OWNERSHIP privilege on the account monitor.
- If there are warehouse monitors in the account. All account administrators can receive notifications for warehouse monitors.
-
Creating resource monitors
Resource monitors can be created through either the web interface or SQL; however, only account administrators (i.e. users with the ACCOUNTADMIN role) can create resource monitors.
A resource monitor can’t be assigned more than 500 warehouses.
Important
You must assign at least one warehouse to a resource monitor or set the monitor at the account level for it to begin monitoring/tracking credit usage:
- In the web interface, you are required to do this at creation time.
- In SQL, you must create the resource monitor first, then assign one or more warehouses to it by executing ALTER WAREHOUSE as a separate, additional step.
Also, to receive notifications when resource monitor actions are triggered, you must enable notifications.
Creating a resource monitor with a default schedule
You can create a resource monitor that uses the default schedule using the web interface or SQL.
Note
Only users with the ACCOUNTADMIN role can create resource monitors.
- Snowsight:
-
Sign in to Snowsight.
-
In the navigation menu, select Admin » Cost management.
-
Select Resource Monitors, then select + Resource Monitor.
-
For Name, enter a name for the resource monitor.
-
For Credit Quota, enter the number of credits for each specified interval.
-
Select the Monitor Type. Choose Account to create an account monitor or choose Warehouse to select the warehouses to monitor.
-
For Actions, choose which notifications to enable by entering a threshold next to the option. You must select at least one option.
Select Add to create additional notifications. You can specify up to five notify actions.
-
- SQL:
In SQL, this task is performed in two steps:
- Execute a CREATE RESOURCE MONITOR command, but do not specify any scheduling properties.
- Execute an ALTER WAREHOUSE statement to assign warehouses to the resource monitor or an ALTER ACCOUNT statement to set the resource monitor for the account.
For example:
-
To create a monitor that starts monitoring immediately, resets at the beginning of each month, and suspends the assigned warehouse when the used credits reach 100% of the credit quota:
The SUSPEND action waits for currently executing queries to finish before suspending the warehouse. A query might start before the threshold is reached and complete after the SUSPEND action is triggered. In this case, the warehouse continues to consume credits even after the quota is reached.
-
To create a similar monitor that suspends at 90% and suspends immediately at 100% after the quota has been reached:
In this example, a notification is sent and the assigned warehouses are suspended when 90% of the credit quota is reached. Currently executing queries complete, but the resource monitor prevents the warehouses from executing any new queries. If the assigned warehouses reach 100% of the credit quota, a notification is sent and the warehouses are suspended immediately, canceling all currently executing queries. This prevents all warehouses in the account from consuming credits.
-
To create a monitor that is similar to the first example, but lets the assigned warehouse exceed the quota by 10% and also includes two notification actions to alert account administrators as the used credits reach the halfway and three-quarters points for the quota:
In this example:
- When 50% and 75% usage is reached, an alert notification is sent to all account administrators who have enabled notifications, but no other actions are performed.
- When 100% usage is reached, the assigned warehouse is suspended.
- If the warehouse is still running when 110% usage is reached, it is suspended immediately.
Creating a resource monitor with a custom schedule
You can create a resource monitor that uses a schedule other than the default using the web interface or SQL.
Note
Only users with the ACCOUNTADMIN role can create resource monitors.
Complete the following steps to create a resource monitor with a custom schedule:
- Snowsight:
-
Sign in to Snowsight.
-
In the navigation menu, select Admin » Cost management.
-
Select Resource Monitors, then select + Resource Monitor.
-
For Name, enter a name for the resource monitor.
-
For Credit Quota, enter the number of credits for each specified interval.
-
Select the Monitor Type. Choose Account to create an account monitor or choose Warehouse to select the warehouses to monitor.
-
Select Schedule » Customize to set a custom schedule for the specified interval. You can skip this step to use the default schedule.
You can set a custom start and end date using Custom Start Date and Custom End Date, or specify a date range by using the Range tab.
Note
If you choose to end monitoring at a specified date and time, all assigned warehouses are suspended on that date and time even if the credit quota has not been reached. A notification is sent when this occurs that states the resource monitor has reached a percentage of its quota and has triggered a suspend immediate action. The percentage of the quota reflects the number of used credits in the current interval up to the end date and might not be a threshold you specified.
You can also customize the specified interval for monitoring. Select Resets and you can select from the following periodic intervals at which to reset the credit quota:
- Monthly
- Daily
- Weekly
- Yearly
- Never
-
For Actions, choose which notifications to enable by entering a threshold next to the option. You must select at least one option.
Select Add to create additional notifications. You can specify up to five notify actions.
-
For Actions and Notifications, enable a given action or notification by entering a threshold next to the option. You must select at least one option.
Select +Add more notification thresholds to create additional notifications. You can specify up to five notify actions.
-
- SQL:
Execute a CREATE RESOURCE MONITOR command, with one or more of the following scheduling properties:
- FREQUENCY
- START_TIMESTAMP
- END_TIMESTAMP
For example:
-
To create an account-level resource monitor that starts immediately (based on the current timestamp), resets monthly on the same day, has no end date or time, and suspends the assigned warehouse when the used credits reach 100% of the quota:
-
To create a resource monitor that starts at a specific date and time in the future, resets weekly on the same day, has no end date or time, and performs two different suspend actions at different thresholds on two assigned warehouses:
Note
You cannot change the customized schedule for a resource monitor back to the default. You must drop the monitor and create a new monitor.
Modifying a resource monitor
You can modify the following properties for an existing resource monitor:
- Increase or decrease the credit quota for the monitor.
- Customize the schedule (frequency, start timestamp, and end timestamp) for the monitor.
- Add or remove actions, or modify the threshold percentages for existing actions.
- If the monitor is monitoring your account, convert it to monitor individual warehouses.
- If the monitor is monitoring individual warehouses:
- Add or remove warehouses from the list.
- Convert it to monitor your account.
Note
Changing any of these properties does not affect the used credits to-date for the monitor. All changes only affect used credits after the changes are saved.
Resource monitors can be modified through the web interface or SQL.
Note
The following privileges are required to modify the properties of a resource monitor:
- To modify the credit quota, schedule, or actions for a resource monitor, a user must use a role with the MODIFY privilege on the resource monitor.
- To modify the monitor type for a resource monitor from warehouse to account or vice versa, a user must use the ACCOUNTADMIN role.
- To modify the list of warehouses for a warehouse-level resource monitor, a user must use the ACCOUNTADMIN role.
- Snowsight:
- Sign in to Snowsight.
- In the navigation menu, select Admin » Cost management.
- Select Resource Monitors, then select a resource monitor.
- Select the More menu (…) in top right corner. Select Edit.
- SQL:
-
To change the quota, customize the schedule, or add/remove/modify actions, execute an ALTER RESOURCE MONITOR statement.
For example, to increase the credit quota for resource monitor
limit1to3000, execute the following statement:For more examples, see Examples.
-
To change the monitor type, execute an ALTER WAREHOUSE or ALTER ACCOUNT statement.
For example, to change resource monitor
my_rmwhich currently monitors warehouses to monitor the accountmy_account, execute the following steps:-
Find all the warehouses the resource monitor
my_rmis monitoring. Check theresource_monitorcolumn formy_rm:Returns the following results:
Resource monitor
my_rmis monitoring two warehousesmy_wh2andmy_wh3. -
Remove the resource monitor for both warehouses by executing the following statements:
-
Change the resource monitor to monitor the account by executing the following statement:
-
-
Note
If a resource monitor has a customized schedule, you cannot change the schedule back to the default. You must drop the monitor and create a new monitor.
Send resource monitor notifications to non-administrator users
Non-administrator users can only receive email notifications for warehouse monitors. Each non-administrator user must have a verified email address. You can add up to five non-administrator users to a warehouse monitor using the CREATE RESOURCE MONITOR or ALTER RESOURCE MONITOR command.
For example, to add users user1 and user2 to the warehouse monitor my_warehouse_rm, execute the following
statement:
Note
If any user in the notification list does not have a verified email, the statement fails.
For more information, see the NOTIFY_USERS parameter and Usage notes in the ALTER RESOURCE MONITOR topic.
To add non-administrator users to the notification list for a resource monitor when you create a resource monitor using SQL, see CREATE RESOURCE MONITOR.
Setting a resource monitor for your account
A resource monitor can be set for your account through the web interface or SQL.
Note
Only users with the ACCOUNTADMIN role can set a resource monitor to monitor the account.
- Snowsight:
You can set the monitor type to account when you create a resource monitor. For more information, see Creating resource monitors.
- SQL:
In SQL, this task is performed in two steps:
-
Use the CREATE RESOURCE MONITOR command to create the resource monitor (if it doesn’t already exist).
If the resource monitor does exist, to change a warehouse level resource monitor to monitor an account, see the example in the Modifying a Resource Monitor section.
-
Use the ALTER ACCOUNT command to set the resource monitor you created as the monitor for your account.
For example, to set the account resource monitor to
my_account_rm, execute the following statements:
To change the monitor type of an existing resource monitor from a warehouse monitor to an account monitor, see the example in the Modifying a Resource Monitor section.
-
To view whether a resource monitor is set for your account, use the web interface or the SHOW RESOURCE MONITORS
command. The LEVEL column for a resource monitor displays whether it is set for your account or individual warehouses.
Important
- An account-level resource monitor only controls the virtual warehouses explicitly created in your account; it does not control credit usage by the Snowflake-provided warehouses for serverless features (for example, Snowpipe, Automatic Clustering, and materialized views).
- A warehouse-level resource monitor can monitor, but cannot suspend, credit usage by cloud services. The monitor can only suspend the user-managed virtual warehouses created in your account. After a user-managed virtual warehouse is suspended, subsequent queries run against that warehouse can still result in additional cloud services costs. For more information about credit usage for cloud services, see Cloud service credit usage.
Assigning warehouses to a resource monitor
Warehouses can be assigned to an existing resource monitor through the web interface or SQL.
Note
Only users with the ACCOUNTADMIN role can assign warehouses to resource monitors.
- Snowsight:
- Sign in to Snowsight.
- In the navigation menu, select Admin » Cost management.
- Select Resource Monitors, then select a resource monitor.
- Select the More menu (…) in top right corner. Select Edit.
- If Monitor Type is Account, select Warehouse.
- Select Warehouse to choose the warehouses to monitor.
- SQL:
Use the ALTER WAREHOUSE command to assign a warehouse to a resource monitor.
For example, to monitor warehouse
my_whwith the resource monitormy_rm, execute the following statement:
Viewing resource monitors
Resource monitors can be viewed through the web interface or SQL.
- Snowsight:
- Sign in to Snowsight.
- In the navigation menu, select Admin » Cost management.
- Select Resource Monitors to see a list of resource monitors for which your role has been granted the MODIFY or MONITOR privilege. Account administrator users can see all resource monitors.
- Select a resource monitor to view detailed information about resource monitor settings, current credit usage, and a list of roles with privileges on the resource monitor.
- Select Account
 » Resource Monitors.
- SQL:
Using the ACCOUNTADMIN role or a role that has been granted the MONITOR or MODIFY privilege on the resource monitor, execute a SHOW RESOURCE MONITORS statement.
In addition, using any role, you can execute a SHOW WAREHOUSES statement to view the warehouses owned by the role (or for which the role has been granted USAGE privilege). The output includes the resource monitor, if any, to which the warehouse is assigned.
Note
For provider accounts that have created reader accounts, Snowflake provides an additional view, RESOURCE_MONITORS. This view can be used for querying resource monitor usage in the provider’s reader accounts. For more information, see Account Usage.
Replicating resource monitors
Resource monitors can be replicated from a source account to target accounts using a replication or failover group. For more information, see Resource monitor replication.