Snowflake ML Model Development
Snowflake ML is a highly flexible platform that lets you use your open-source (OSS) code to train machine learning models directly on your data. This approach removes the need for complex data movement while allowing you to use your preferred ML libraries, tools, and development processes.
Snowflake ML integrates with Snowflake-compatible data sources to accelerate ML workflows using optimized data ingestion pipelines. Advanced distributed APIs enable efficient scaling of model training and tuning. You can access all Snowflake ML features from a notebook environment with an ML runtime image, eliminating the need for you to manage packages and infrastructure.
Train and tune your models
Build with Notebooks on Container Runtime
Snowflake Container Runtime provides a pre-built ML environment with popular packages included. You can securely add libraries from public or private PyPI repositories to customize your environment. Its distributed APIs enable you to transform data and run AI/ML workflows at scale.
In addition to using Snowflake’s distributed APIs to scale your workflows, you can also use Ray. Ray is an open-source framework that provides a simple and flexible way to scale Python applications. It allows you to run your code in parallel across multiple nodes. For more information about using Ray with Snowflake ML, see the Ray Getting Started Guide.
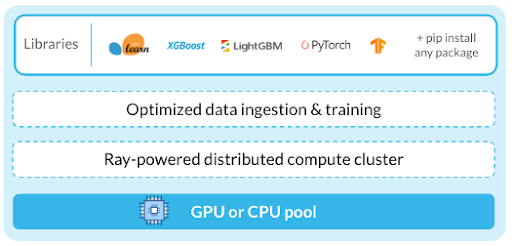
Container Runtime Notebooks are Snowflake Notebooks integrated with the Container Runtime. They provide features such as a pre-built ML runtime image, distributed processing, CPU compute pools, and GPU compute pools. If you’re a data scientist or ML engineer, Container Runtime Notebooks can be particularly useful for your ML development tasks.
Remote execution from any external IDE
You can also use your preferred external IDE, such as Visual Studio Code or a cloud-based Jupyter Notebook, and remotely execute ML workflows in the Container Runtime. To execute your workflows remotely, annotate your Python code, functions, or files and run it in a Container Runtime instance. For more information, see Run a Python function as a Snowflake ML Job.
Develop your code
Ingest data directly into open source objects
Use the Data Connector for optimized data loading from your Snowflake tables and stages into open source objects such as pandas dataframes, PyTorch datasets, and TensorFlow datasets. The Data Connector uses the Container Runtime’s distributed processing to speed up ingestion. After loading, you can use the data with any open-source library.
Using the Data Connector, you can load structured and unstructured data from multiple sources. In addition to its versatility, it provides improved performance over to_pandas for loading large datasets.
Train with OSS frameworks
We recommend using your existing open source code or training models directly in Snowflake with open source libraries.
You can use the following features for your Snowflake ML workflows:
- Import features built and managed in the Snowflake Feature Store.
- Use Snowpark to scale your data preprocessing and transformation.
- Bring your data into memory with the Data Connector APIs.
- Leverage the latest in OSS frameworks to engineer features, train models, and evaluate them.
Scale workloads using distributed APIs
Training ML models on large datasets can exceed the resources of a single node. With Snowflake’s distributed APIs, you can scale feature engineering and training workflows across multiple nodes for improved performance. With the distributed APIs, you can do the following:
- Leverage distributed preprocessing functions in snowflake.ml.modeling.preprocessing.
- Scale your model training out across one or more nodes using optimized training APIs in Snowflake Container Runtime.
Tune hyperparameters with distributed HPO
Accelerate hyperparameter tuning with Snowflake ML’s distributed HPO, optimized for data stored in Snowflake. You can also use open source libraries like hyperopt or optuna.
Operationalize training workflows
Snowflake ML Jobs allow you to run Python-based ML workloads remotely, making it easy to operationalize work developed interactively in environments like Snowflake Notebooks. This ensures secure, reproducible ML training and scoring, and integrates seamlessly with CI/CD pipelines.
Schedule ML jobs and pipelines to run periodically
Use Introduction to tasks to build complex DAGs to represent ML training pipelines, where each task corresponds to a phase in your workflow. These pipelines can run on a schedule or be triggered by events. You can allocate resources to each step as needed, optimizing your pipeline. Snowsight provides built-in tools to view, manage, and modify these pipelines.
With Snowflake’s built-in git integration, you can also configure git hooks to construct and trigger the ML pipelines that best fit your CI/CD configuration.