Notebooks on Container Runtime
Overview
You can run Snowflake Notebooks on Container Runtime. Container Runtime is powered by Snowpark Container Services, giving you a flexible container infrastructure that supports building and operationalizing a wide variety of workflows entirely within Snowflake. Container Runtime provides software and hardware options to support advanced data science and machine learning workloads. Compared to virtual warehouses, Container Runtime provides a more flexible compute environment where you can install packages from multiple sources and select compute resources, including GPU machine types, while still running SQL queries on warehouses for optimal performance.
This document describes some considerations for using notebooks on Snowflake Container Runtime. You can also try the Getting Started with Snowflake Notebook Container Runtime quickstart to learn more about using the Container Runtime in your development.
Prerequisites
Before you start using Snowflake Notebooks on Container Runtime, the ACCOUNTADMIN role must complete the notebook setup steps for creating the necessary resources and granting privileges to those resources. For detailed steps, see Administrator setup.
Create a notebook on Container Runtime
When you create a notebook on Container Runtime, you choose a warehouse, runtime, and compute pool to provide the resources to run your notebook. The runtime you choose gives you access to different Python packages based on your use case. Different warehouse sizes or compute pools have different cost and performance implications. All of these settings can be changed later if needed.
Note
A user with the ACCOUNTADMIN, ORGADMIN, or SECURITYADMIN roles cannot directly create or own a notebook on Container Runtime. Notebooks created or directly owned by these roles will fail to run. However, if a notebook is owned by a role that the ACCOUNTADMIN, ORGADMIN, or SECURITYADMIN roles inherit privileges from, such as the PUBLIC role, then you can use those roles to run that notebook.
To create a Snowflake Notebook to run on Container Runtime, follow these steps:
-
Sign in to Snowsight.
-
In the navigation menu, select Projects » Notebooks.
-
Select + Notebook.
-
Enter a name for your notebook.
-
Select a database and schema in which to store your notebook. These cannot be changed after you create the notebook.
Note
The database and schema are only required for storing your notebooks. You can query any database and schema your role has access to from within your notebook.
-
Select Run on container for the Runtime.
-
Select the Runtime version from the CPU or GPU options.
-
- Select a Compute pool.
Snowflake automatically provisions two compute pools in each account for running notebooks: SYSTEM_COMPUTE_POOL_CPU and SYSTEM_COMPUTE_POOL_GPU.
-
Change the selected warehouse to use to run SQL and Snowpark queries.
-
To create and open your notebook, select Create.
Runtime version:
Two runtime version types are available: CPU and GPU. Each runtime image contains a base set of Python packages and versions verified and integrated by Snowflake. All runtime images support data analysis, modeling, and training with Snowpark Python, Snowflake ML, and Streamlit.
To install additional packages from a public repo, you can use pip. An external access integration (EAI) is required for Snowflake Notebooks to install packages from external endpoints. To configure EAIs, see Set up external access for Snowflake Notebooks. However, if a package is already part of the base image, then you can’t change the version on the package by installing a different version with pip install. For a list of the pre-installed packages, run the following command from a cell in the notebook:
Compute pool:
A compute pool provides the compute resources for your notebook kernel and Python code. Use smaller, CPU-based compute pools to get started, and select higher-memory, GPU-based compute pools to optimize for intensive GPU usage scenarios like computer vision or LLMs/VLMs.
Note that each compute node is limited to running one notebook per user at a time. You should set the MAX_NODES parameter to a value greater than one when creating compute pools for notebooks. For an example, see Compute resources. For more details on Snowpark Container Services compute pools, see Snowpark Container Services: Working with compute pools.
When a notebook is not being used, consider shutting it down to free up node resources. You can shut down a notebook by selecting End session from the connection dropdown.
If a notebook runs on Container Runtime, the role needs the USAGE privilege on a compute pool instead of on the Notebook warehouse. Compute pools are CPU-based or GPU-based virtual machines managed by Snowflake. When creating a compute pool, set the MAX_NODES parameter to greater than one because each notebook will require one full node to run. For information, see Snowpark Container Services: Working with compute pools.
You can view your resource utilization. For more information, see About Legacy Snowflake Notebooks.
Note
On AWS, notebooks running on GPU compute pools use high performance NVMe storage as the default boot device.
Run a notebook on Container Runtime
After you create your notebook, you can start running code immediately by adding and running cells. For information about adding cells, see Develop and run code in Snowflake Notebooks.
Importing more packages
In addition to pre-installed packages to get your notebook up and running, you can install packages from public sources that you have external access set up for. You can also use packages stored in a stage or a private repository. You need to use the ACCOUNTADMIN role or a role that can create external access integrations (EAIs) to set up and grant you access for visiting specific external endpoints. Use the ALTER NOTEBOOK command to enable external access on your notebook. Once granted, you will see the EAIs in Notebook settings. Toggle the EAIs before you start installing from external channels. For instructions, see Configure a notebook with external access and secrets.
The following example installs an external package using pip install in a code cell:
Updating notebook settings
You can update settings, such as which compute pools or warehouse to use, any time in Notebook settings, which can be accessed
through the  Notebook actions menu at the top right.
One of the settings you can update in Notebook settings is the idle timeout setting. The default for idle timeout is 1 hour, and you can set it for up to 72 hours. To set this in SQL, use the CREATE NOTEBOOK or ALTER NOTEBOOK command to set the IDLE_AUTO_SHUTDOWN_TIME_SECONDS property of the notebook.
Installing private packages
Pip supports the installation of packages from private sources with basic authentication, such as JFrog Artifactory. Configure the notebook for external access integration (EAI) so it can access the repository.
-
Create a network rule to specify the repository you want to access. For example, this network rule specifies a JFrog repository:
-
Create a secret that represents credentials required to authenticate with the external network location.
-
Create an external access integration that allows repository access:
-
Associate the external access integration and secret with the notebook.
-
To access the external access configuration, select the
(Notebook actions menu) on the top right of your notebook. -
Select Notebook settings, and then select the External access tab.
-
Select the EAI to connect to the repository.
The notebook restarts.
-
Once the notebook has restarted, you can install from the repository:
Installing private packages with private connectivity
If your private package repository requires private connectivity, follow these steps to configure your account. If you need assistance, you can coordinate with your account administrator to set up the network rule.
-
Follow the steps in Network egress using private connectivity to set up network egress using private connectivity.
-
Create a secret that represents credentials required to authenticate with the external network location.
-
Create an EAI with the network rule from step 1. For example:
-
Associate the external access integration and secret with the notebook.
-
To access the external access configuration, select the
(Notebook actions menu) on the top right of your notebook. -
Select Notebook settings, and then select the External access tab.
-
Select the EAI to connect to your private repository.
The notebook restarts.
-
After the notebook has restarted, you can provide the –index-url of your repository:
Running ML workloads
Notebooks on Container Runtime are well suited for running ML workloads such as model training and parameter tuning. Runtimes come
pre-installed with popular ML packages. With external integration access set up, you can install any other packages you need using !pip install.
For an optimal experience, use OSS libraries to develop model or to import notebooks that use OSS components. The Container Runtime has optimized APIs such as the following:
DataConnectorfor faster data ingestion- Distributed training APIs for scalable model fitting
- Distributed hyperparameter tuning APIs to efficiently utilize all available resources.
For more information, see Snowflake Container Runtime.
Note
Because the runtime comes pre-installed with many packages, a change to any version requires a kernel restart. For more information, see Explore Legacy Notebooks.
Use OSS ML libraries
The following example uses an OSS ML library, xgboost, with an active Snowpark session to fetch data directly into memory for training:
Limitations
After a Container Runtime notebook session starts, it can run up to seven days without disruption. After seven days, it may be disrupted and shut down if there is a scheduled SPCS service maintenance event. The notebook idle time settings still apply. For details on SPCS service maintenance, see Compute pool maintenance.
Cost and billing considerations
When running notebooks on Container Runtime, you may incur both warehouse compute and SPCS compute costs. Warehouses are required not only for executing queries but also for supporting certain frontend functionality in Snowflake Notebooks. For example, when using a compute pool for Python execution, a warehouse may still be needed for rendering outputs or handling interactive components.
Snowflake Notebooks rely on virtual warehouses to efficiently run SQL and Snowpark queries. As a result, you may incur warehouse compute costs when executing SQL cells or Snowpark push-down queries in Python cells.
The following diagram shows where compute happens for SQL, Snowpark, and Python cells within a notebook:
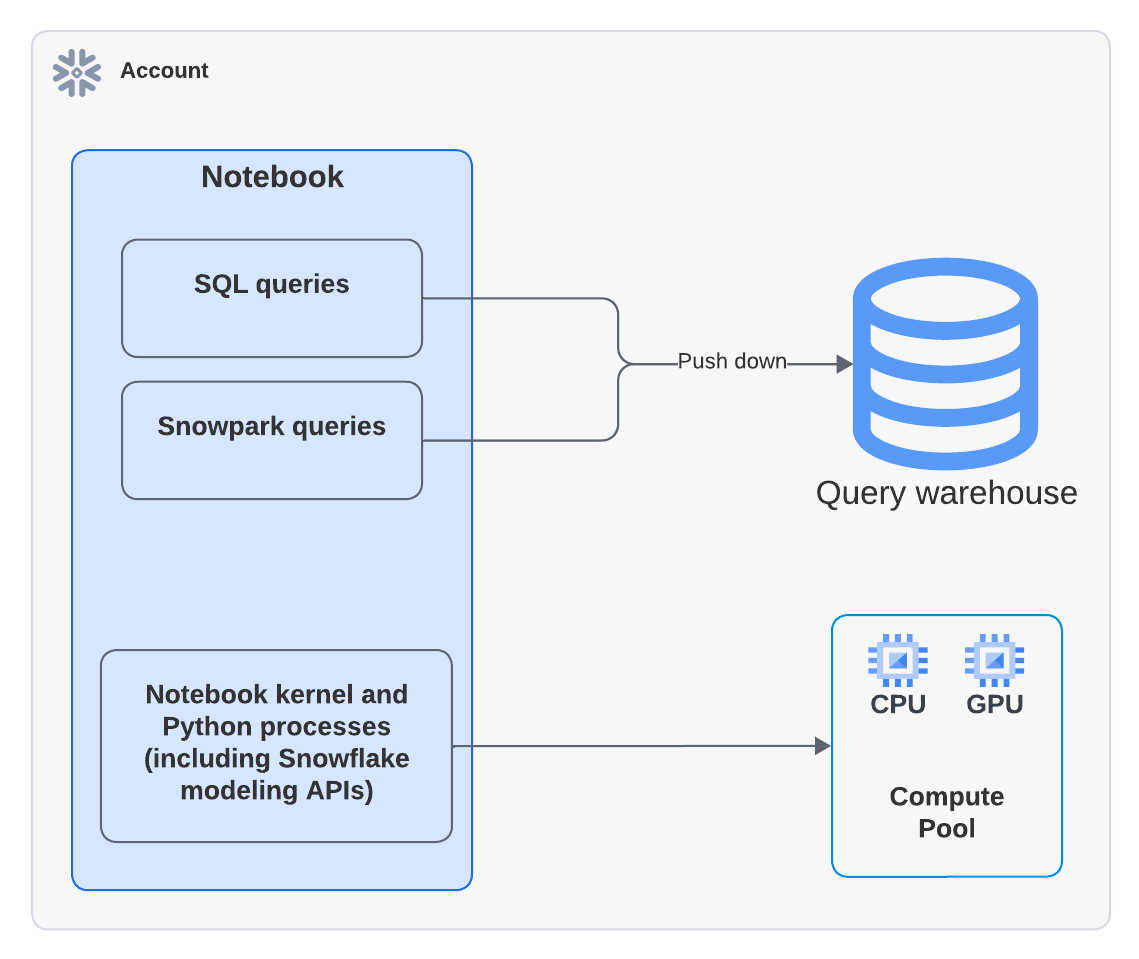
Note
When you execute a notebook that uses a compute pool, the Python code runs on the compute pool. However, you might see activity in Query History showing that a warehouse was used to run the EXECUTE NOTEBOOK command. This is expected behavior. The warehouse is used briefly to initialize the execution environment but does not consume any warehouse credits. All code execution is handled by the compute pool.
For example, the following Python example uses the xgboost library. The data is pulled into the container and compute is handled entirely by Snowpark Container Services:
To learn more about warehouse costs, see Overview of warehouses.