Deploy and manage DCM Projects
This topic describes how to create and deploy DCM Projects to manage Snowflake environments, including as accounts.
Managing a DCM project involves the following steps:
- Prepare your Snowflake account for a DCM project.
- Define project configuration and objects in project files.
- Create a DCM Projects object.
- Plan to preview proposed changes before deployment.
- Deploy the project.
- Maintain the project by monitoring, updating, and repeating the process as needed.
You can continuously deploy incremental changes to your project as well as large-scale account infrastructure changes.
Snowflake recommends that you continuously deploy incremental changes and additions to your project, rather than going from 0 to 100 large-scale account infrastructure changes in a single deployment.
Prepare for a DCM project
To get started with DCM Projects, your Snowflake account must satisfy the following prerequisites:
- A database and schema where you can create your DCM Projects object
- A role with privileges to create a DCM Projects object and access to run queries on a warehouse
- For Snowflake CLI, a role with privileges to create a temporary stage
This section describes the tasks that you need to complete to prepare for DCM Projects:
- Install interfaces to use with DCM Projects if you want to use Snowflake CLI or Cortex CLI.
- Configure Git integration (recommended but not mandatory)
Note
The snowflake-labs DCM repository is continuously updated with resources to help you get started.
- Quickstarts and demo projects: Clone the repository into a Snowflake Workspace or local folder to try out DCM Projects commands and explore DCM Projects capabilities.
- Reusable GitHub Actions: Composite actions for parsing manifests, testing connections, planning, and deploying DCM Projects in CI/CD pipelines. For more information, see GitHub Actions.
- Sample workflows: Ready-to-use workflow files that compose the reusable actions into complete CI/CD pipelines.
Interface tools
You have the following interface options available for DCM Projects.
| Interface tool | Best for |
|---|---|
Snowsight A workspace in Snowsight is a Snowflake native cloud IDE in your account. |
|
Local IDE with Snowflake CLI The most familiar and personalized interface for software engineers. |
|
Cortex Code An agentic AI tool for Snowflake. See Cortex Code for DCM Projects for more information. |
|
| SQL commands |
|
Cortex Code for DCM Projects
Cortex Code is an agentic AI tool for Snowflake. With the DCM skill enabled, Cortex Code can autonomously create, migrate, debug, and deploy DCM Projects. It can also work alongside you step by step. The DCM skill is available in both the Cortex Code CLI and Cortex Code in Snowsight.
The Cortex Code DCM skill enables the following:
- Scaffold a new DCM project from scratch, including the manifest file, the folder structure, and definition files.
- Author and edit DEFINE statements, Jinja templates, and macros.
- Run PLAN, DEPLOY, REFRESH, TEST, and PREVIEW commands.
- Interpret plan output, diagnose failures, and suggest fixes.
- Download and inspect deployment artifacts.
- Navigate and explain an existing DCM project.
To get started with the Cortex Code DCM skill, use one of the following options:
- Cortex Code CLI: Install Cortex Code CLI as described in Installing Cortex Code, then start Cortex Code in your terminal.
- Cortex Code in Snowsight: Open Cortex Code in a Snowsight workspace as described in Cortex Code in Snowsight.
In either interface, use the $dcm skill reference or the term DCM in your natural language prompt.
For example:
- “Create a new DCM project for our analytics pipeline”
- “Plan my project against the PROD target”
- “Why did my last plan fail?”
- “Add a new dynamic table definition for customer spending”
Snowflake CLI for DCM Projects
Snowflake CLI is a command-line interface for Snowflake. It is a tool that you can use to interact with your Snowflake account from your local IDE.
-
DCM Projects require Snowflake CLI version 3.16 or higher. Install or upgrade Snowflake CLI as described in Installing Snowflake CLI.
-
Configure your connection to your Snowflake account, as described in Configuring Snowflake CLI and connecting to Snowflake. Confirm you have a working connection:
-
Navigate to the local directory of your Git repository clone. For example:
-
See the Snowflake CLI DCM commands available to you:
Git integration
Connect to the Git repository where your DCM project definition files are stored.
-
Create or select a Git branch for your planned changes.
Snowflake clones files from that branch into your workspace editor.
-
Navigate to the folder where you have your DCM project definition files or want to create them.
-
The Snowflake extension for VSCode is not needed here, but can be helpful.
-
Connect to your Git repository.
- Connect your local IDE to your remote Git repository.
- Create or select a branch for your planned changes.
- Clone that branch to your local disk.
- Navigate to the folder where you have your DCM Projects definition files or want to create them.
Create a DCM project
Required roles and privileges
The role of the user who creates a DCM project object must have the following roles and privileges:
- The CREATE DCM PROJECT ON SCHEMA privilege:
Create a DCM project
Create a DCM project object by using one of the following options.
To create a project for a non-default target, use one of the following commands:
-
In the navigation menu, select Projects » Workspaces.
-
On the Workspaces page, select “+Add new” -> “DCM Project” to create a new DCM project folder
-
Select “Define default target environment” to select or create a new DCM project object for the default target in the manifest
When running DCM PLAN against a target which has a DCM project object defined in the manifest, but does not yet exist, the UI will prompt you to confirm creation of that DCM project object based on the defined name and owner role before executing the plan.
-
The Target indicates whether the specified DCM project object already exists and can be used or not.
- Green: The DCM project object exists and can be used to run PLAN or DEPLOY.
- Red: The DCM project object does not exist and first needs to be created.
Access control and role privileges
You can set role-based access control (RBAC) of the schema-level DCM project object to READ, MONITOR, or OWNERSHIP privileges.
These privileges are independent of the access control for definition files stored in a workspace, stage, or repository.
| Privilege | Description | Allowed operations |
|---|---|---|
| READ |
This means you need both READ on the DCM project and READ on the objects themselves. |
|
| MONITOR |
|
|
| OWNERSHIP |
|
|
Note
Like other Snowflake commands, EXECUTE DCM PROJECT respects when privileges from secondary roles are enabled for the user who
runs the command. Run USE SECONDARY ROLES NONE; so that you are not leveraging privileges from other roles than the project owner
role. This ensures that deployment behavior is consistent across different environments when executed by different service-users with the
same primary role.
Ownership on DCM-managed objects
The role that deploys a DCM project, by default, has the OWNERSHIP privilege of all deployed objects.
The project definitions can include GRANT OWNERSHIP statements to other roles. Snowflake recommends that the DCM project owner role only grant ownership of DCM-managed objects to another lower-level role that it also holds. Then the project can continue to manage this object, as the project owner role “inherits” the privileges of the new object owner role.
If the DCM project owner role grants ownership of DCM-managed objects to another role that it does not hold itself, the project can no longer manage this deployed object because the project owner role no longer has ownership of it. Subsequent deployments will fail. The object definition needs to be removed from the project or ownership needs to be granted back to the project owner role.
If you want to migrate existing objects to be managed by a DCM project, the role that owns the DCM project object also has to have ownership privileges (direct or inherited through other roles) on the object to be managed by DCM project.
Note
If a migrated object, we recommend adding the corresponding GRANT OWNERSHIP statement to the project definitions as well to ensure that the current state and DCM project definitions are in sync.
Define a DCM project
A DCM project is based on a manifest file and one or more SQL object definition files. These files are typically stored and managed in a Git repository or your local workspace.
-
The manifest file
- Specifies one or more target environments with corresponding account identifiers, DCM project objects, owner roles for these object and optional templating configurations
- Optionally, specifies templating defaults and one or more configurations with values for template variables.
-
The object definition files
- Define a group of Snowflake objects, grants, and expectations that you want to manage together in this DCM project.
See Create a DCM project folder to store your definition files for how to set up a DCM project folder and the definition files and how to use templates to define your DCM project.
Plan a DCM project
Planning a DCM project performs a dry run to preview changes before deployment. Snowflake compares your project definition files to existing objects and shows which objects will be created, altered, or dropped. No changes are made to your account.
Use planning to review and validate changes before deploying a DCM project. You can specify options such as a configuration or an output path for plan results.
The PLAN mimics the DEPLOY command as much as possible, except it doesn’t actually execute any DDL statements. Because PLAN closely mirrors DEPLOY, it requires the same OWNERSHIP privilege on the DCM project as DEPLOY, even though no changes are applied. This way, a dry run surfaces privilege errors before deployment.
Important
Always run the PLAN command on your projects before deployment to help ensure there are no errors from syntax, templating, object dependency, access privileges, and so on. Review the plan output to debug any errors, preview the rendered Jinja with the provided variables, and preview the changes that will be made once you deploy.
The plan performs the following steps:
- Renders all Jinja templating with the selected configuration profile or values provided at runtime.
- Compares all definitions against the current state of entities that were defined as part of the last deployment.
- Converts all defined statements into CREATE, ALTER, DROP, GRANT, and REVOKE statements.
- Sorts all statements based on their interdependencies.
- Compiles all statements.
Note
Although PLAN catches almost all possible errors that can occur during deployment, it does not guarantee a successful deployment.
Run the PLAN command
The PLAN command takes the following information as input:
-
The path to the manifest file
The CLI reads the target from the manifest (
default_targetor--targetflag). For SQL commands, the path to the manifest file and the project name must be provided. -
Defined values for Jinja variables (optional).
-
The target’s
templating_configautomatically selects the configuration profile. For SQL commands, use the USING CONFIGURATION clause to specify the profile. -
One or more values of the configuration profile to overwrite (optional).
The following are examples of how to run the PLAN command.
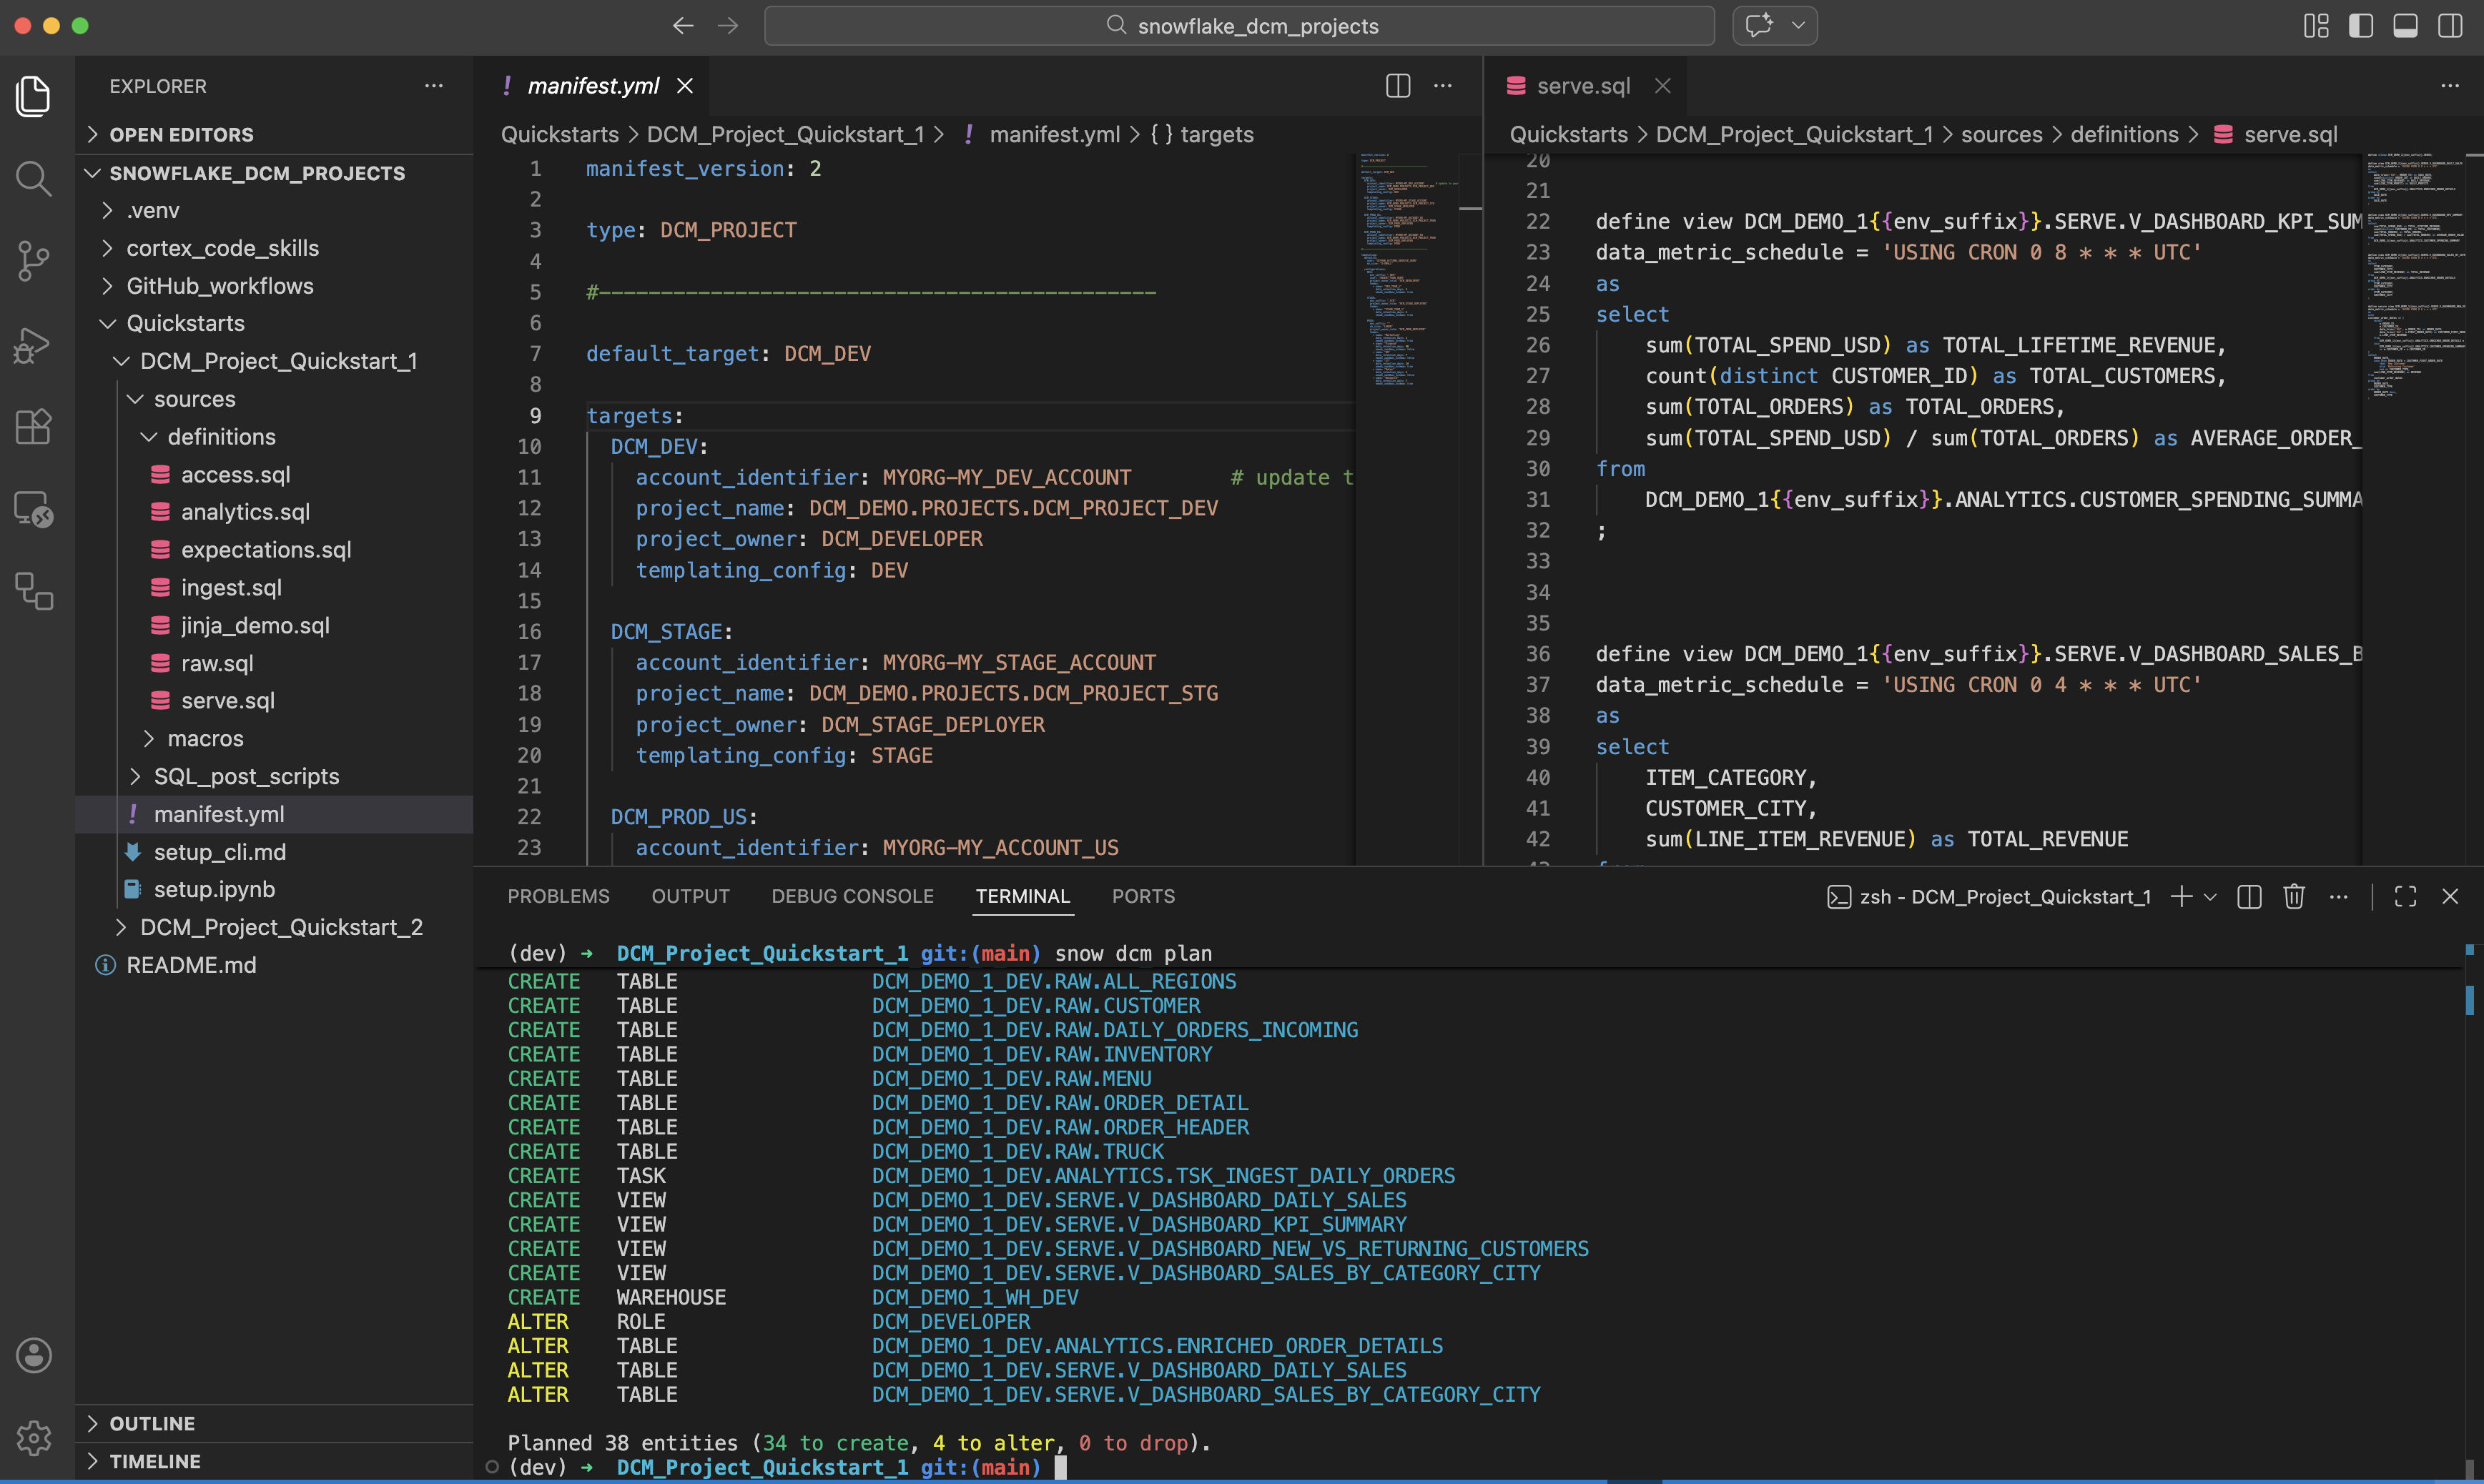
Run the snow dcm plan command in your local IDE terminal or as part of a Git workflow.
An example of a CLI command to plan a DCM project from a local directory is:
An example of a CLI command to plan a DCM project from a Snowflake stage or Git repository clone is:
An example of a CLI command to plan a DCM project with optional arguments is:
Variables are required in double-quotes with additional single quotes for string-values. Lists of values require square-brackets.
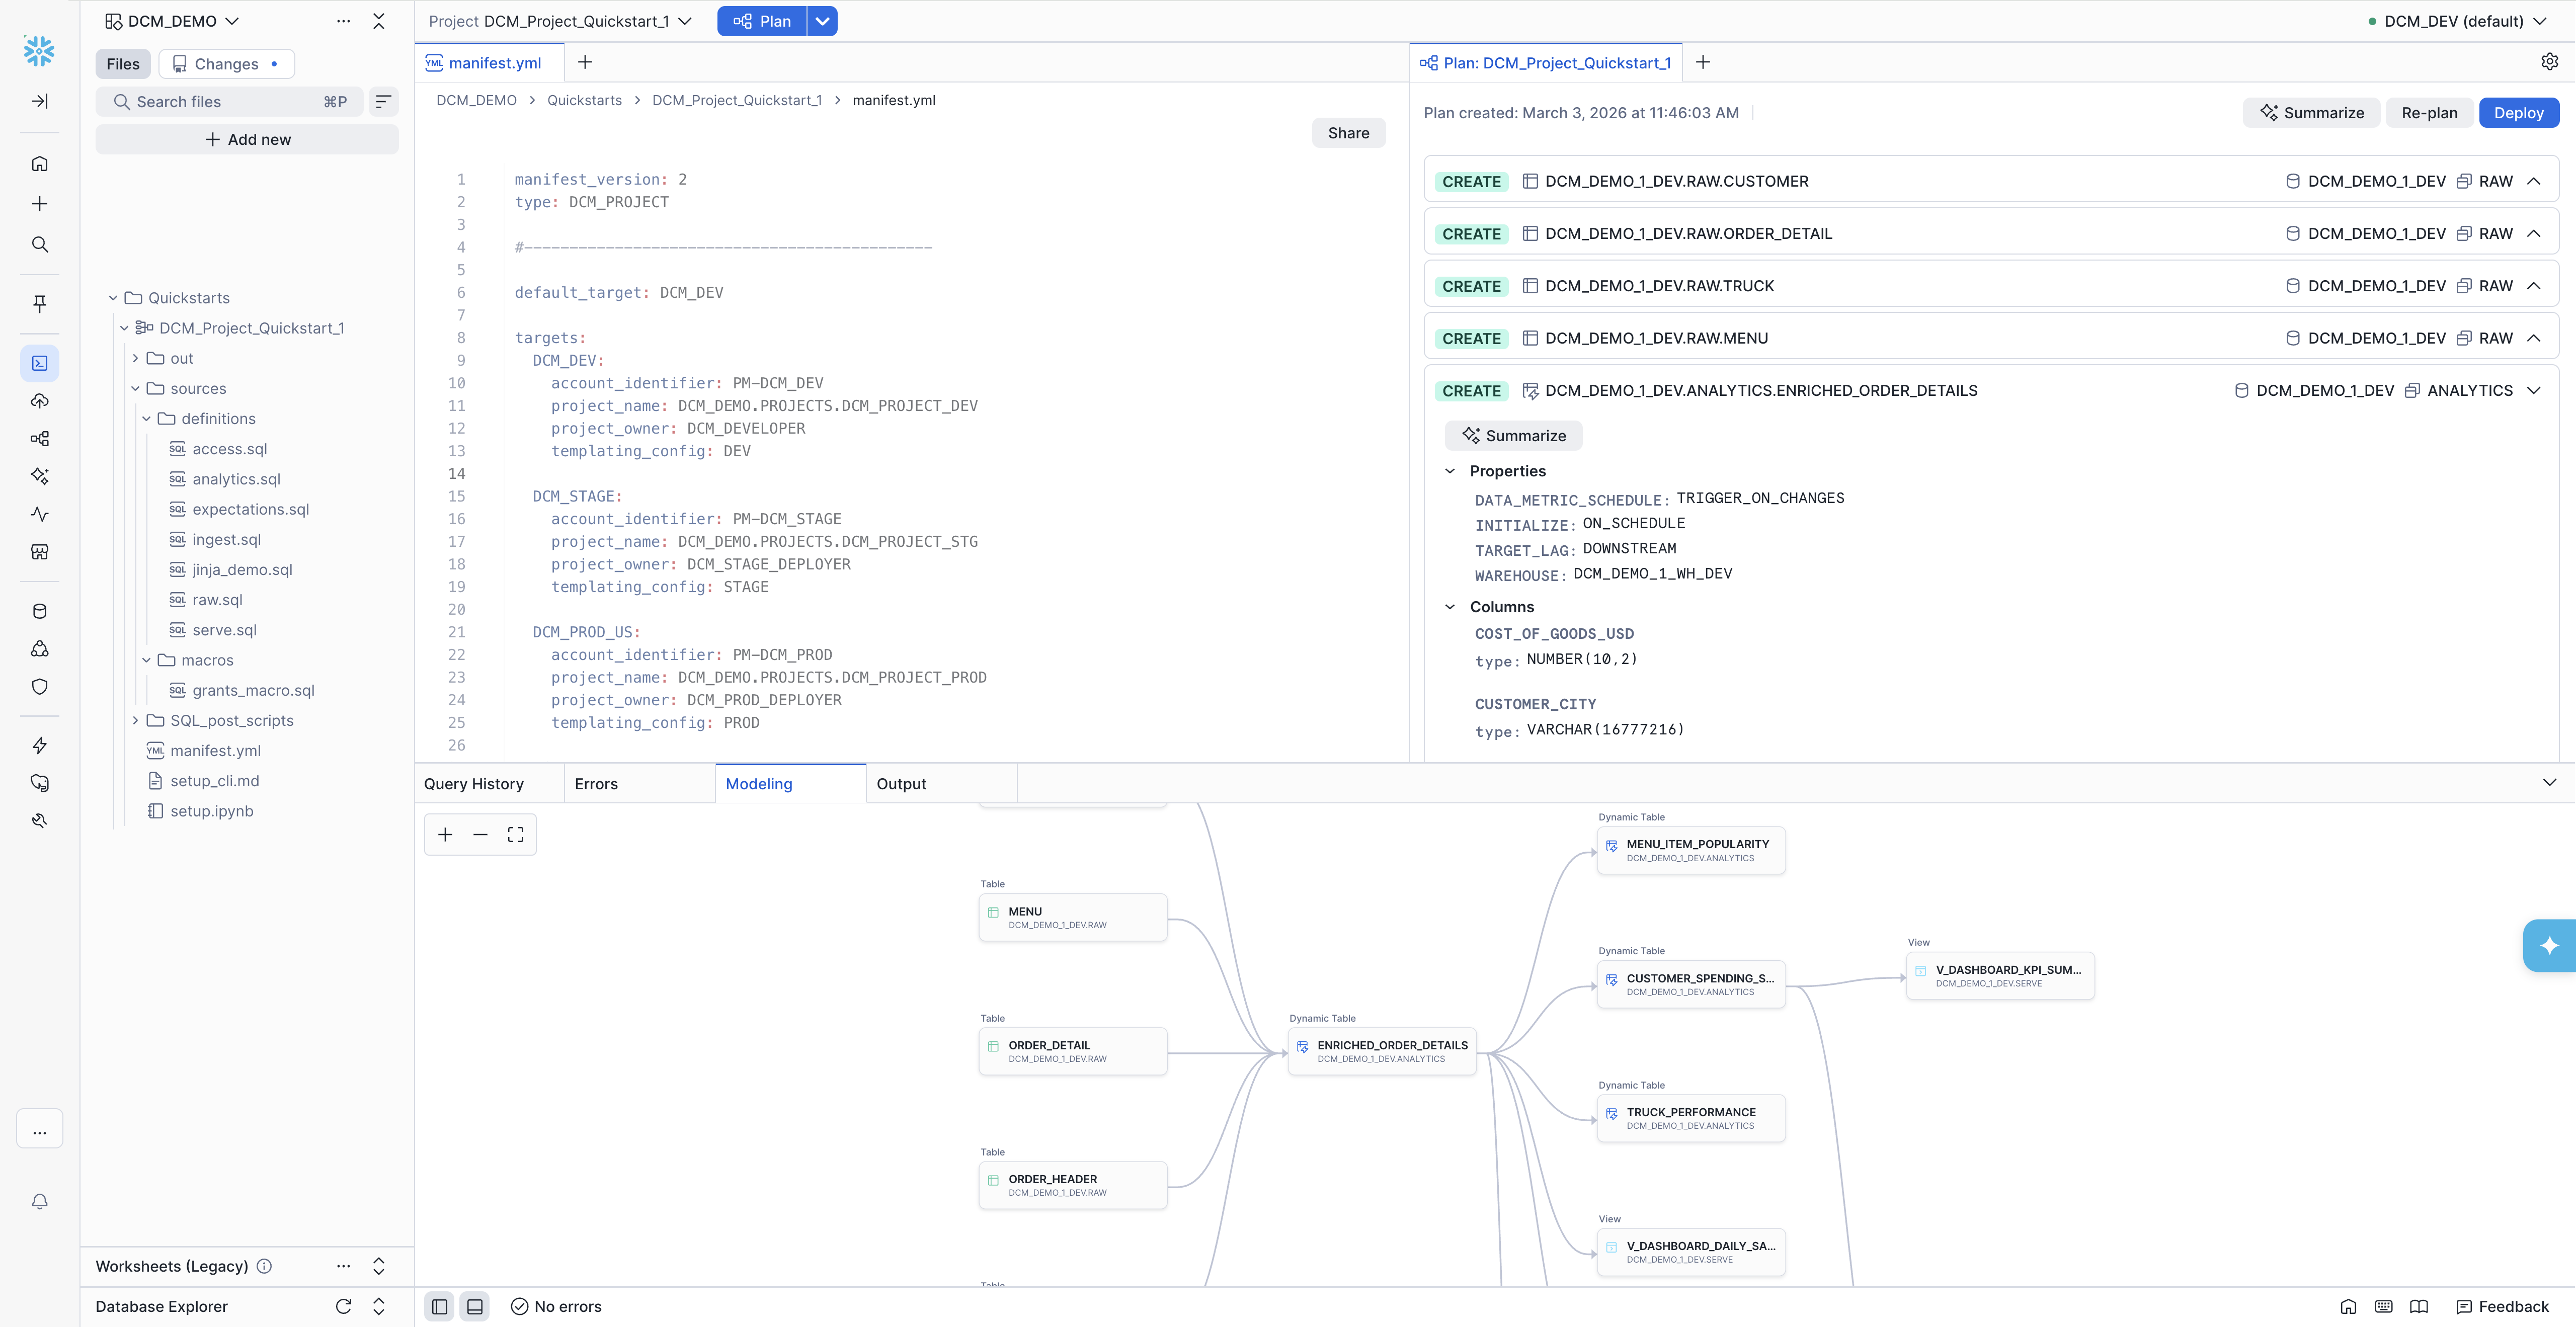
In the DCM control panel, at the top:
- Select your project folder in your current workspace.
- Select your target (if you have multiple targets).
- (optional) Overwrite specific parameters.
- Click Plan.
- The Snowsight UI automatically uses the DCM project object defined in the manifest target. If the project object does not yet exist, you can create it from the UI.
When the PLAN is completed, the output opens in a new tab. If you don’t see it, click Plan again to open the tab.
If a Plan already exists, you can choose to re-plan if you have changed your definitions.
The plan output is always generated automatically under the project sub-folder out/.
You can execute a DCM PLAN in SQL from anywhere you can run SQL commands, inside Snowflake or connected to Snowflake. Use the
EXECUTE DCM PROJECT command with the PLAN mode.
An example of a SQL command to plan a DCM project from a Workspace path is:
An example of a SQL command to plan a DCM project when using Jinja with configuration profiles but overwriting wh_size and teams is:
An example of a SQL command to plan a DCM project when using Jinja templating without configuration profiles is:
Definition file path
You have the following options to reference the location of the manifest and definition files.
-
From a Workspace path
The Snowsight user interface automatically lists all DCM project definitions inside the current workspace. You can select one of these paths and workspaces will use it to run DCM commands.
If you want to manually run SQL commands in workspaces you can also refer to that same path inside any of your workspaces.
Tip: The 3-dot menu behind every file in your workspace lets you copy the full path to that file into your SQL code.
An example of a SQL command to plan a DCM project from a workspace path is:
-
From a local Git repository clone on your disk
Select the directory that contains your
manifest.ymlfile before running the CLI command in your local IDE. Alternatively you can specify a different local directory that contains the manifest and definitions you want to use.An example of a CLI command to plan a DCM project from the current directory of a local Git repo:
An example of a CLI command to plan a DCM project from a different directory in a local Git repo clone:
-
From your remote repository in a workflow
The same CLI syntax can be used when the DCM commands are executed in a CI/CD workflow. You can call the CLI directly or use the reusable GitHub Actions from the snowflake-labs DCM repository, which handle CLI setup, authentication, and DCM commands internally.
An example using the reusable
dcm-planaction: -
From a Stage or Git repository clone in Snowflake
In case you want to run a PROCEDURE or TASK inside Snowflake that runs DCM commands, this SQL command can reference an absolute path to a Snowflake stage or Git repository clone inside the account.
For Git Repository clones consider first running ALTER GIT REPOSITORY FETCH to have the latest version.
'@...'paths can only be used when executing DCM SQL commands.An example of a SQL command to plan a DCM project from a Stage or Git repository clone in Snowflake is:
Plan output
For the PLAN and DEPLOY output format, including the JSON schema and examples, see the PLAN and DEPLOY output section of the EXECUTE DCM PROJECT command reference.
Deploy a DCM project
When you deploy a DCM project, the following actions are performed:
- Objects that are defined but don’t exist yet are created.
- Objects that already exist but differ from the current definition are altered.
- Objects that already exist as defined are skipped.
- Objects that already exist but are no longer defined are dropped.
The same behavior applies to grants and attached data quality expectations defined in the project.
Important
To avoid any unintended data loss, always run and review your PLAN output before running DEPLOY.
Each DCM project can only have one instance deployed at any time. Multiple configuration profiles can’t coexist. Deploying configuration B with the same DCM project will drop any objects from other previous configurations that are not defined in B.
Create one DCM project for each target environment. The DCM project for each environment can then point to the same definition files, but
deploy independently with different values for each variable, like suffix => 'DEV_JS', so that they can exist
independently side-by-side on the same Snowflake account.
You can overwrite values for selected variables at runtime if you want to use a pre-defined profile with a slight variation.
For example:
Each deployment attempt (executing, successful, failed, or canceled) has a deployment number, for example DEPLOYMENT$1. Optionally you can
specify a unique string as a deployment alias to name individual deployments for better observability in the deployment history.
Think of the deployment alias like a commit message for your code change.
Each DEPLOY command first runs an internal PRE-PLAN as part of the deployment. If the PRE-PLAN succeeds the DEPLOY is executed directly afterwards. There is no option to intercept or review this internal plan step. The PRE-PLAN is executed to further reduce the risk of failure during the deployment. If a DEPLOY fails, you can see in the error message if it failed during the PRE-PLAN or DEPLOY step. Failure during the PRE-PLAN step is similar to PLAN - no DDL changes are executed.
Important
Failure during the DEPLOY step can result in partial execution of the defined changes. This can potentially cause some of the managed objects to be in an undefined state. In most cases fixing the root cause and executing DEPLOY again restores the defined target state.
The target path for the DEPLOY output file can’t be customized. Deployment artifacts are always stored inside the DCM project.
Run the DEPLOY command
To execute the DEPLOY command, provide the following inputs:
- The path to the manifest file.
- A configuration profile must be named if configuration profiles are defined in the manifest.
- Optionally, values for the configuration profile overriding the default values.
- Optionally, a deployment alias.
The following are examples of how to run the DEPLOY command.
An example of a SQL command to deploy a DCM project when using Jinja with configuration profiles but overwriting wh_size and teams is:
You can run snow dcm deploy either in your local IDE terminal or as part of a Git workflow.
An example of a CLI command to deploy a DCM project from a local directory is:
An example of a CLI command to deploy a DCM project targeting a non-default environment is:
An example of a CLI command to deploy a DCM project with optional arguments is:
-
In the navigation menu, select Projects » Workspaces.
-
Select your project folder in the current workspace.
-
Select your target (if you have multiple targets).
-
Click Plan.
The UI will automatically use the DCM project object defined in the manifest target. If the project object does not yet exist, you can create it from the UI.
-
Once the PLAN is completed, the output opens in a new tab. If you don’t see it, click Plan again to open the tab.
If a Plan already exists you can choose to re-plan if you have changed your definitions.
-
Review your PLAN output to ensure it does not contain unintended changes.
-
Click Deploy to execute the deployment with the same target and values from PLAN.
See PLAN and DEPLOY output for the standard plan output structure.
Manage a DCM project
Show objects and grants managed by a DCM project
The SHOW ENTITIES IN DCM PROJECT command allows you to see a list of all Snowflake objects that are currently managed by a specific DCM project. It provides a list of fully qualified names for all objects. To see the results, you need both READ privilege on the DCM project and privileges to see the managed object itself.
Note
The result does not necessarily match the objects of the most recent deployment. Objects that were manually dropped or detached from the project are not listed in the result.
You can use LIKE to search by name or use a flow operator to further process or filter the result set.
Similarly, the SHOW GRANTS IN DCM PROJECT command lets you list the grants that are defined and deployed with the DCM project.
Use SHOW GRANTS IN DCM PROJECT to list grants that are currently deployed and managed by the project, or SHOW FUTURE GRANTS IN DCM PROJECT to list grants that will be deployed and managed by the project the next time it’s executed.
Examples to see the objects and grants that are currently managed by a DCM project:
- In the navigation menu, select Catalog » Database Explorer.
- Navigate to the schema that contains the DCM project object.
- Select the DCM project object to see its details.
- Select the Objects tab to see a list of all Snowflake objects currently managed by this project object, or select the Grants tab to see a list of all grants currently managed by this project object.
- Click the name of an object to open that object’s details page in a new tab.
Detach objects from a DCM project
Using the ALTER <object> command with the UNSET DCM PROJECT clause, you can detach an object that was deployed and is now managed by a DCM project. The command removes the association between the object and the DCM project without dropping the object. You can use this command when you want to start managing an object by a different DCM project.
Make sure to remove the corresponding DEFINE statement from your project definition files before you deploy it again. Otherwise, the object will be reintegrated into the DCM project.
An example of a SQL command to detach an object from a DCM project:
You can not detach deployed grants or exectations from a DCM Project.
Purge a DCM project
When you create temporary DCM project objects as development sandboxes or for demos, the EXECUTE DCM PROJECT command with the PURGE option lets you clean up the entire project in a single statement. PURGE runs a deployment without any definitions, which drops all entities, revokes all grants, and removes all attachments the project currently manages.
Warning
PURGE is destructive by design. Use it only for non-production projects, such as development sandboxes or demos.
To fully tear down a temporary DCM project, run two commands:
EXECUTE DCM PROJECT <name> PURGEdrops all entities, grants, and attachments the project manages.DROP DCM PROJECT <name>removes the project object itself.
For example:
The purge execution appears in the deployment history of the DCM project, so you can confirm that it ran successfully. For more information about dropping the project object, see Drop a DCM project.
Drop a DCM project
When a DCM project object is dropped, all managed entities, grants, and expectations remain in place as “unmanaged”.
Important
Dropping or replacing a DCM project object causes you to lose all deployment history artifacts that the object contains.
- In the navigation menu, select Catalog » Database Explorer.
- Navigate to the schema that contains the DCM project.
- Select the DCM project to see its details page.
- Click the 3-dot menu in the top right and select Drop.
Automate a DCM project deployment
CI/CD best practices
Follow these practices when automating deployments with CI/CD pipelines:
- A DCM project targeting a non-production environment should be owned by a different role than its production counterpart to avoid accidental deployments to production.
- A DCM project targeting a production environment should be owned by a dedicated role for production deployments with specifically tailored access
privileges that are just enough to deploy all objects in the project.
-
Avoid using general administrator roles for DCM project ownership. Grant such roles only to service users, not to individual developers.
-
Grant the dedicated production deployment role only to service users, not to individual developers.
-
Restrict the ownership to the production deployment role to ensure immutability of critical infrastructure or data products.
If the dedicated production deployment role grants ownership of production objects to other roles, users who are granted those roles can still modify or drop the production objects.
-
GitHub Actions
The snowflake-labs DCM repository provides a set of reusable composite GitHub Actions that automate DCM Projects pipelines. Each action handles one step of the lifecycle, and you can reference them from your own workflows to build end-to-end CI/CD pipelines. Only the workflow syntax differs across platforms; the same CI/CD concepts apply to Azure DevOps, GitLab CI/CD, Bitbucket Pipelines, and others.
Note
The GitHub Actions in the snowflake-labs DCM repository are provided as-is for evaluation purposes. They aren’t officially supported by Snowflake. Use at your own risk.
The following reusable actions are available:
| Action | Description |
|---|---|
dcm-parse-manifest | Parses manifest.yml and outputs target names as a JSON array for matrix strategies. |
dcm-connection-test | Tests Snowflake connectivity, validates that the connection role matches the manifest project_owner, and checks whether the DCM project object already exists. |
dcm-plan | Runs snow dcm plan, summarizes the changeset (CREATE, ALTER, DROP counts by object domain), and uploads plan artifacts. Optionally posts the plan summary as a comment on the associated pull request. |
dcm-deploy | Deploys the DCM project with optional data drop detection, Dynamic Table refresh, expectation testing, and post-deployment SQL scripts. Optionally posts a deploy summary to the pull request. |
To use an action in your workflow, reference it with:
For full documentation of each action’s inputs and outputs, see the actions README.
Prerequisites
Before using the reusable GitHub Actions, complete the following setup steps:
- Store the DCM project files in a Git repository.
- Create a GitHub Environment for each manifest target (for example,
DCM_STAGE,DCM_PROD_US). The environment name must match the target name in yourmanifest.yml. - Set the
SNOWFLAKE_USERandDCM_PROJECT_PATHvariables in the workflowenvblock or as GitHub repository variables. - Grant the workflow the required permissions:
Authentication
All actions authenticate using the Snowflake CLI GitHub Action. OIDC (OpenID Connect) is the recommended approach because it uses GitHub’s built-in identity tokens so that no passwords or private keys need to be stored as secrets.
To configure OIDC authentication, create a Snowflake service user with a workload identity that trusts GitHub’s OIDC provider:
Replace <owner>/<repo> with your GitHub repository and <env_name> with the GitHub Environment name (for example,
DCM_STAGE). If you have multiple environments, create a separate service user per environment or use
subject claim customization.
Then grant the service user the role specified as project_owner in your manifest.
If you can’t use OIDC, the actions also support password, PAT, and key-pair authentication. See the actions README authentication section for setup instructions.
Sample workflows
The GitHub_workflows directory in the
snowflake-labs DCM repository contains ready-to-use workflow files that compose the reusable actions into complete CI/CD pipelines.
You can copy them into your repository’s .github/workflows/ directory and customize them for your project. For full setup
instructions, see the
sample workflows README.
All sample workflows read the Snowflake account_identifier and project_owner role directly from the manifest targets,
so that environment-specific configuration lives in the version-controlled manifest.yml rather than in duplicated
GitHub secrets. Only the service user credentials are stored as secrets.
The sample workflows demonstrate the following patterns applicable to any DCM Projects CI/CD setup:
- Manifest-driven configuration: Each workflow reads
account_identifier,project_owner, andproject_namefrom the manifest targets, keeping environment configuration in one place. - Data drop protection: The deploy workflow detects destructive DROP operations on data-bearing objects (databases, schemas, tables, and stages) and blocks the deployment if any are found.
- Sequential stage-to-production promotion: Production deployment starts only after staging deployment succeeds, Dynamic Tables are refreshed, and data quality tests pass.
- Pull request comments: Plan and deploy summaries are posted as comments on the originating pull request.
Sample workflow: Test connections
- Workflow configuration file: DCM_1_Test_Connections.yml
- Trigger: Manual with the
workflow_dispatchevent
This workflow validates that the GitHub Actions service user can connect to every target environment defined in the manifest. Use it when setting up a new repository, onboarding a new account, or debugging authentication issues. The workflow performs the following steps:
- Parses all target names from
manifest.ymldynamically. - Uses a GitHub Actions matrix strategy to test each target in parallel.
- For each target, verifies the Snowflake connection, reports the connected account, user, and role, and checks whether the connected role matches the DCM project owner.
- Reports whether the DCM project object already exists and whether the service user has deployment privileges.
Sample workflow: Test PR to main
- Workflow configuration file: DCM_2_Test_PR_to_main.yml
- Trigger: Pull request opened, synchronized, or reopened against the
mainbranch
This workflow runs a PLAN against the production target as an integration test for every pull request. It provides reviewers with a summary of the planned changes directly on the pull request. The workflow performs the following steps:
- Runs
snow dcm planagainst the PROD target. - Parses
plan_result.jsonto summarize CREATE, ALTER, and DROP operations grouped by object domain. - Uploads plan artifacts for later inspection.
- Posts the plan summary as a comment on the pull request.
- Fails the check if the PLAN fails, blocking the merge.
Sample workflow: Deploy to Prod
- Workflow configuration file: DCM_3_Deploy_to_Prod.yml
- Trigger: Push to the
mainbranch (typically a merged pull request)
This workflow plans and deploys to a single production target. Use it when you don’t need a staging environment or when staging is handled separately. The workflow performs the following steps:
- Plan: Runs
snow dcm planand summarizes the changeset. - Data drop detection: Blocks the pipeline if the plan contains DROP operations for databases, schemas, tables, or stages.
- Deploy: Runs
snow dcm deploy. - Post scripts (optional): Runs SQL post-hook scripts with Jinja variable injection.
- Refresh Dynamic Tables (optional): Runs
snow dcm refreshto apply any new transformation logic. - Test expectations (optional): Runs
snow dcm testto validate data quality expectations.
After deployment, the workflow optionally posts a status summary to the originating pull request.
Sample workflow: Deploy to Stage then Prod
- Workflow configuration file: DCM_4_Deploy_to_Stage_then_Prod.yml
- Trigger: Push to the
mainbranch (typically a merged pull request)
This workflow implements a sequential promotion pipeline. Changes are first deployed to staging, validated end-to-end, and only then promoted to production. If any step fails, the pipeline stops and production is not affected.
The deployment sequence for each target (STAGE, then PROD) includes:
- Plan: Runs
snow dcm planand summarizes the changeset. - Data drop detection: Blocks the pipeline if the plan contains DROP operations for databases, schemas, tables, or stages.
- Deploy: Runs
snow dcm deploy. - Post scripts (optional): Runs SQL post-hook scripts with Jinja variable injection.
- Refresh Dynamic Tables (optional): Runs
snow dcm refreshto apply any new transformation logic. - Test expectations (optional): Runs
snow dcm testto validate data quality expectations.
Production deployment starts only after all staging steps pass. After all jobs complete, the workflow optionally posts a final status summary to the originating pull request.
Frequently asked questions (FAQ)
- How do I rename an existing object?
- Run an ALTER command outside of the DCM project.
- Change the definition.
- Run PLAN to verify that the new definition matches the new state (no change in PLAN).
- Run DEPLOY to save the new state.
- How do I deploy objects that are not yet supported by DEFINE statements?
You can run CREATE IF NOT EXISTS or CREATE OR REPLACE statements in a separate SQL script after executing your DCM project plan or deployment.
Both options support Jinja2 templating and dry-run (dry-run renders the Jinja templating but does not verify successful SQL compilation).
For example: