Redirecting client connections
Client Redirect enables redirecting your client connections to Snowflake accounts in different regions without changing the connection settings for your application. You can use Client Redirect in combination with the account replication feature for business continuity and disaster recovery. You can also use Client Redirect to minimize changes needed in your application settings when migrating your account to another region or cloud platform.
Introduction to Client Redirect
Client Redirect is implemented through a Snowflake connection object. The connection object stores a secure connection URL that you use with a Snowflake client to connect to Snowflake.
The hostname in the connection URL is composed of your organization name and the connection object name in addition to a common domain name:
organization_name-connection_name.snowflakecomputing.com
Note that this hostname does not specify the account to which you are connecting. An account administrator determines the account to use by designating the connection in that account to serve as the primary connection. When you use the connection URL to connect to Snowflake, you are connecting to the account that contains the primary connection.
If an outage occurs in a region or cloud platform and the outage affects the account with the primary connection, the administrator can promote a connection in a different account in a different region or cloud platform to serve as the primary connection.
Through this outage, you can continue to use the same connection URL to connect to Snowflake. Snowflake resolves the connection URL to the account with the newly promoted connection (the account outside of the region or cloud platform affected by the outage).
Note
The Snowflake accounts that store the primary and secondary connections must be hosted in different regions.
Client Redirect flow
Complete the steps in Configuring Client Redirect (in this topic) to create a connection URL for client connections. This includes creating a primary connection and linked secondary connection(s).
Update Snowflake clients to connect using the connection URL. Using a connection URL (in this topic) contains a list of supported clients and connection details.
In the event of a service outage in the region where the primary connection is located, complete the steps in Redirecting client connections (in this topic) to update the connection URL to redirect to a secondary connection.
When the outage is resolved, complete the steps in Redirecting client connections to redirect client connections back to the original primary connection.
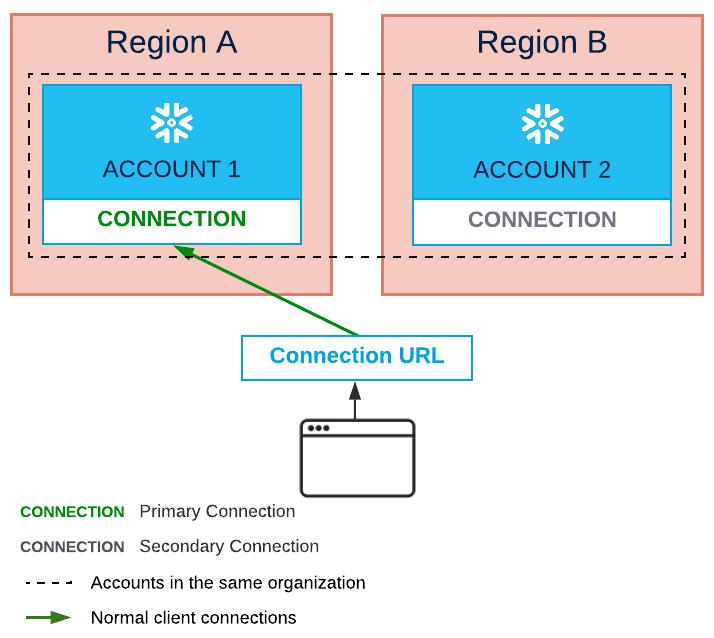
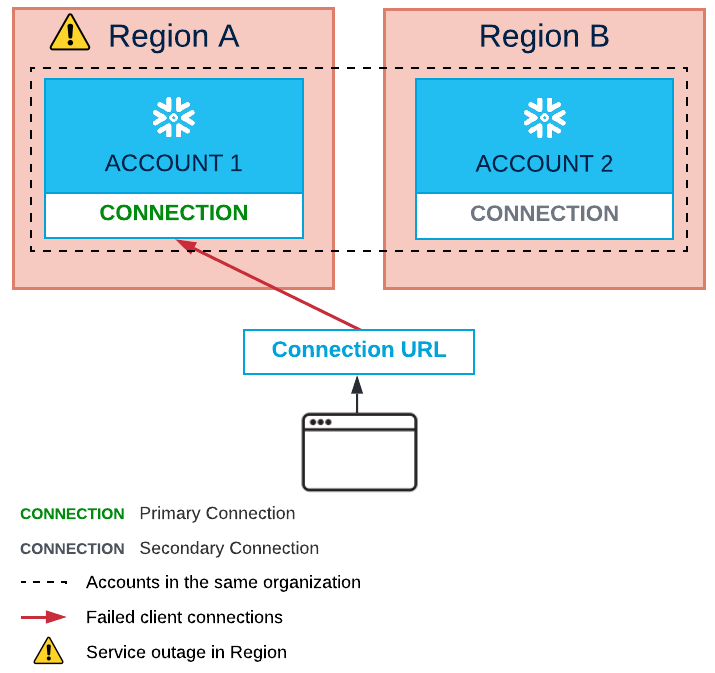
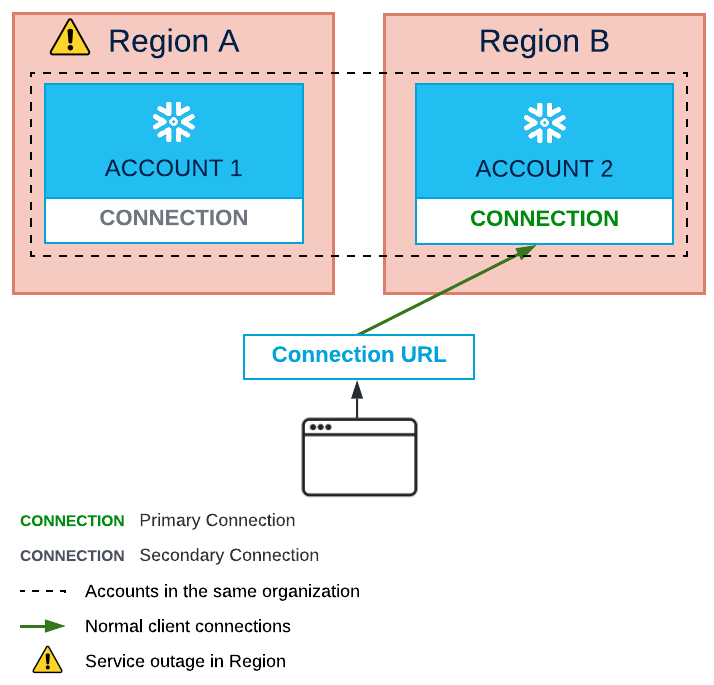
The following diagrams illustrate the Client Redirect flow for two accounts in the same organization but different regions (Region A and
Region B) on either the same or different cloud platforms.
The primary connection is in Account 1 in Region A. Snowflake clients using the connection URL connect to Account 1.
A service outage in Region A results in failed client connections:
The connection in Account 2 in Region B is promoted to act as the primary connection. Snowflake clients using the connection URL
now connect to Account 2.
Example
The following SQL statements go through the client redirect workflow. Each step is explained in detail in the sections that follow in this topic.
Normal client connections: Configure Client Redirect
Create a primary connection in the source account
Create a new primary connection and enable failover to other accounts in your organization. Each account that is enabled for failover must be in a different region than the account with the primary connection.
Note the account_name column in the output of SHOW REPLICATION ACCOUNTS for each account to be
enabled for failover.
Execute the following statements in the source account:
If private connectivity to the Snowflake service is enabled for your Snowflake account, you must create and manage a DNS CNAME record for your connection URL. For more details, see Configuring the DNS settings for private connectivity to the Snowflake service.
Executed on target account
Create a secondary connection linked to the primary connection. The name of the secondary connection must be the same name as the primary connection.
If private connectivity to the Snowflake service is enabled for your Snowflake account, you must create or update a DNS CNAME record for your connection URL. For more details, see Modifying the DNS settings for private connectivity to the Snowflake service.
Outage occurs in source region: Failover
If an outage occurs in the region where the primary connection is located, promote a secondary connection in a different region to serve as the primary connection.
Executed on target account
Sign in to the target account that you want to promote to serve as the new source account.
Promote the secondary connection to serve as the primary connection:
If private connectivity to the Snowflake service is enabled for your Snowflake account, you must create or update a DNS CNAME record for your connection URL. For more details, see Modifying the DNS settings for private connectivity to the Snowflake service.
Outage resolved: Failback
Once the outage is resolved, promote the original primary connection to serve as the primary connection again.
Executed on the target account that previously served as the source account
Sign in to the target account that served as the source account prior to the outage.
Promote the secondary connection back to primary connection:
If private connectivity to the Snowflake service is enabled for your Snowflake account, you must create or update a DNS CNAME record for your connection URL. For more details, see Modifying the DNS settings for private connectivity to the Snowflake service.
Configuring Client Redirect
This section describes how to create a primary connection and one or more secondary connections in a connection group.
Prerequisite
To enable the Client Redirect feature for your accounts, an organization administrator must enable replication for two or more accounts. To enable replication, see Prerequisite: Enable replication for accounts in the organization for detailed instructions.
Create a primary connection
Important
Snowflake assigned your organization a unique, generated name when it was created in the system. The organization name is a part of the connection URL defined in a connection object and submitted by Snowflake clients to access an account. Before you create any connection objects, verify that your organization name in Snowflake is satisfactory. To change your organization name in the system, contact Snowflake Support.
You can create a primary connection in the source account using Snowsight or SQL.
Create a primary and secondary connection using Snowsight
To create a connection using Snowsight, complete the following steps:
Note
Only a user with the ACCOUNTADMIN role can create a connection using Snowsight.
You must be signed in to the target account as a user with the ACCOUNTADMIN role. If not, you will be prompted to sign in.
Currently, if your account uses private connectivity, you can’t use Snowsight to create a primary and secondary connection.
Sign in to Snowsight.
In the navigation menu, select Admin » Accounts.
Select Client Redirect.
Select + Connection.
Select Target Account.
In the Connection Name box, enter a connection name that meets the following requirements:
Must start with an alphabetic character and may only contain letters, decimal digits (0-9), and underscores (_).
Must be unique across connection names and account names in the organization.
Select Create Connection.
Create a primary connection using SQL
Note
Only a user with the ACCOUNTADMIN role can execute the SQL commands in this section.
Create a new primary connection using the CREATE CONNECTION command. The name of each primary connection must be unique across all connection and account names in the organization.
The connection name is included as part of the connection URL used to connect to Snowflake accounts.
For example, to create a connection named
myconnection:Modify this primary connection using an ALTER CONNECTION … ENABLE FAILOVER TO ACCOUNTS statement. Provide a comma-separated list of accounts in your organization that can store a failover option for this connection (i.e. a secondary connection).
Any account that stores a secondary connection must be hosted in a region different from the account that stores the primary connection. Client Redirect only operates successfully across regions. For example, if you try to redirect client connections from
account1toaccount2in the same region, client redirect does not work.To see the complete list of accounts in your organization that are enabled for replication, execute SHOW REPLICATION ACCOUNTS.
For example, allow accounts
myaccount2andmyaccount3in themyorgorganization to each store a secondary connection for themyconnectionconnection:Execute the SHOW CONNECTIONS command to view the details for the connection.
Create a secondary connection in each target account
Create a secondary connection in one or more accounts, linked to a primary connection using CREATE CONNECTION … AS REPLICA OF. Note that you can only create a secondary connection in an account specified in the ALTER CONNECTION … ENABLE FAILOVER TO ACCOUNTS statement in Create a Primary Connection.
Execute a CREATE CONNECTION … AS REPLICA OF statement in each target account to create a replica of the specified primary connection.
Important
Each secondary connection must have the same name as its primary connection. The connection name is included in the connection URL.
Execute the SQL statements in this section in the target account where you want to create a secondary connection.
Note
Only a user with the ACCOUNTADMIN role can execute the SQL commands in this section.
Execute the SHOW CONNECTIONS command to view all connections. Copy the value of the
primarycolumn for the primary connection. You will use this value when creating the secondary connection in the next step.Execute the CREATE CONNECTION … AS REPLICA OF command to create a secondary connection.
For example, create a secondary connection named
myconnectionthat is linked to themyorg.myaccount1.myconnectionprimary connection. AfterAS REPLICA OF, paste in the fully qualified name of the primary connection (the name that you copied from the SHOW CONNECTIONS output in the previous step).Execute the SHOW CONNECTIONS command to verify the secondary connection was created.
Grant the FAILOVER Privilege to a Role — Optional
An account administrator can grant the FAILOVER privilege on a connection object to an account role. This enables a user other than the account administrator to promote a secondary connection to serve as the primary connection.
For example, to grant the role my_failover_role the ability to fail over the connection myconnection, execute
the following statement on the target account:
A user with the role my_failover_role can now promote the secondary connection myconnection to serve as
primary connection in the case of failover:
For more information on redirecting client connections, see Redirecting client connections.
Configuring the DNS settings for private connectivity to the Snowflake service
If private connectivity to the Snowflake service is enabled for your Snowflake account, then your network administrator must create and manage a DNS record for your connection URL. Your network administrator can use a CNAME record, alias record, or an alias based on the configuration of the network architecture. For consistency, the following example uses a CNAME record.
These steps use AWS PrivateLink as an example, and the steps are the same if your Snowflake account uses Azure Private Link or Google Cloud Private Service Connect:
Execute SHOW CONNECTIONS in one of your accounts in which client redirect is enabled. For example, suppose AWS PrivateLink is enabled for
myaccount1andmyaccount2.Note that the output of this command in the CONNECTION_URL column should match the
privatelink-connection-urlslist when calling the SYSTEM$GET_PRIVATELINK_CONFIG function in eithermyaccount1ormyaccount2. This list already contains the connection URL formatted with theprivatelinksegment (as shown in the next step). You can optionally run the command in this step or call the function. If calling the function, use the URLs as is without any further modification.Record the CONNECTION_URL column value, and create two URLs to support private connectivity and OCSP.
Add a
privatelinksegment to the URL just beforesnowflakecomputing.com(myorg-myconnection.privatelink.snowflakecomputing.com, in this example).Add an
ocspsegment to the beginning of the URL (ocsp.myorg-myconnection.privatelink.snowflakecomputing.com, in this example).
Using a tool provided by your DNS provider, create a CNAME record for the connection URL and the OCSP URL:
Set the domain (or alias) using the modified CONNECTION_URL column value.
Configure the record to have the connection URL resolve to the primary Snowflake account URL. Be sure to include all URL segments for the cloud region and AWS PrivateLink based on the URL format that you choose. This is the primary account URL and it is where client connections to the connection URL will redirect.
Configure the record to have the OCSP URL resolve to either the private endpoint IP address for an account on Azure or the private endpoint ID value for an account on AWS.
In the case of failover, you must manually update the DNS setting to have the connection URL point to the secondary account URL as shown in Modifying the DNS settings for private connectivity to the Snowflake service. Similarly, you must update your OCSP settings to point to the private endpoint IP address or private endpoint ID value.
For example:
Alternatively, use the organization and account name URL.
For example:
Note the trailing period, which must be included.
Users connect to Snowflake using the following connection URL format:
organization_name-connection_name.privatelink.snowflakecomputing.com
Where:
organization_nameName of your Snowflake organization. The Snowflake accounts that your users connect to are contained in this organization.
connection_nameName of the connection object.
For more information, see:
Using a connection URL (in this topic).
Modifying the DNS settings for private connectivity to the Snowflake service (in this topic).
Configuring Client Redirect and reader accounts
If you are a data provider with reader accounts, you can use Client Redirect to provide continued access to shared data in the event of a service outage. The configuration steps for creating connections are the same as those described in the Configuring Client Redirect section for source and target reader accounts:
Create two reader accounts. Each reader account must be in a different region.
Create a primary connection in the source reader account. Enable failover to the other reader account.
Create a secondary connection in each target account in the reader account that you enabled for failover from the source account.
Share the connection URL with your data consumers.
If a service outage occurs, redirect client connections. Data consumers using the connection URL to connect to your reader account now connect to the newly promoted source reader account.
Using a connection URL
This section provides instructions for referencing a connection URL in the configuration for various Snowflake clients.
Supported Snowflake clients
Client Redirect is supported by Snowsight and Classic Console. In addition, the following Snowflake client versions (and higher) support Client Redirect:
Snowflake Client |
Minimum Supported Version |
|---|---|
Snowflake CLI |
3.0.0 |
SnowSQL |
1.1.82 |
Snowflake Connector for Python |
1.8.3 |
Snowflake Connector for Spark |
All versions |
Node.js Driver |
1.2.0 |
Go Snowflake Driver |
1.2.0 |
.NET Driver |
1.0.0 |
JDBC Driver |
3.8.4 |
ODBC Driver |
2.19.4 |
Snowpark |
All versions |
Configure Snowflake clients
Use the following host name for the connection URL when connecting to Snowflake:
Host name:
organization_name-connection_name.snowflakecomputing.com
Where:
organization_nameName of your Snowflake organization. The Snowflake accounts that your users connect to are contained in this organization.
connection_nameName of the connection object.
Important
Private Connectivity to the Snowflake Service
Customers using private connectivity to the Snowflake service need to add a privatelink segment to the URL just before
snowflakecomputing.com:
organization_name-connection_name.privatelink.snowflakecomputing.com
Snowsight
Enter the following in the account name field on app.snowflake.com:
For example:
When using organization-connection to log in, Snowsight navigates to the specific region and locator of the current
primary connection. During an outage, once the connection has been redirected, users must log in again via
organization-connection to connect to the new primary.
Classic Console
Enter the following URL in a web browser:
For example:
Snowflake CLI
Specify the host name for the connection URL in the account connection parameter in the Snowflake CLI config.toml file. For information
about the config.toml file, see Configuring Snowflake CLI.
For example:
SnowSQL
Specify the host name for the connection URL in the accountname connection parameter in the SnowSQL config file. For information
about the config file, see Configuring SnowSQL.
For example:
Snowflake Connector for Python
Specify the host name for the connection URL in the account connection parameter when calling the connect function. For more
information, see Python Connector API and Using the Python Connector.
For example:
Snowflake Connector for Spark
Specify the connection URL in the URL property in the properties file or Map that you use
to establish the session.
For example:
For more information about using the Snowflake Connector for Spark, see Snowflake Connector for Spark. For configuration options, see Setting Configuration Options for the Connector. Depending upon which language you use with the connector, also see Using the Connector in Scala or Using the Connector with Python.
JDBC Driver
Specify the host name for the connection URL in the connection string. For more information, see Configuring the JDBC Driver.
For example:
ODBC Driver
Specify the host name for the connection URL in the Server connection parameter. For more information about the connection parameters, see ODBC configuration and connection parameters.
For example:
Node.js Driver
Specify the host name for the connection URL in the account connection option. For more information about the connection parameters,
see Node.js options reference.
For example:
Go Snowflake Driver
Specify the host name for the connection URL in the Account parameter. For more information, see Go Snowflake Driver.
For example:
Snowpark
Snowpark Python
Specify the host name for the connection URL in the account connection parameter in the Python dictionary (dict) used to
establish a session. For more information about creating a session, see Creating a Session for Snowpark Python.
For example:
Snowpark Java
Specify the connection URL in the URL property in the properties file or Map that you use to establish the session. For more
information about creating a session, see Creating a Session for Snowpark Java.
For example:
Snowpark Scala
Specify the connection URL in the URL property in the properties file or Map that you use to establish the session. For more
information about creating a session, see Creating a Session for Snowpark Scala.
For example:
Authentication and Client Redirect
Users must be provisioned in the source account and on each target account if security integrations are not replicated.
Federated authentication & SSO
Configure federated authentication separately in each target account. Provide the identity provider (IdP) details using the setup options in Configuring Snowflake to use federated authentication:
Note
Snowflake recommends configuring your SAML 2.0-compliant identity provider (IdP) with the connection URL rather than an account URL so users are redirected to the correct account in case of failover.
OAuth
Configure a security integration object for OAuth in each target account. The security integration object must be identical to the same object in the source account. For instructions, see the appropriate topic:
To retrieve security integration properties, query the DESCRIBE INTEGRATION command for each security integration in the source account. Then recreate each security integration in a target account by executing the CREATE INTEGRATION command.
OAuth redirect behavior
If you are using Snowflake OAuth for authenticating a client connection and are connecting to Snowflake using a connection URL, you are prompted to re-authenticate if the connection URL is redirected to another account (e.g. in case of failover). Snowflake OAuth tokens are valid for use in a specific account. When a connection URL is updated to point to an account in a different region, the existing OAuth token becomes invalid.
In the case of a failover, when the connection URL is updated to the new account, the client will disconnect with an
invalid OAuth access token error. You must re-authenticate and consent to permissions to re-establish the connection.
Note
You will not be prompted for re-authentication when the connection URL is updated to a new account if the OAuth security integration is replicated to that account. For more information, refer to Replicating OAuth security integrations.
Redirecting client connections
In the event of a service outage in the region where the primary connection is located, redirect the client connection to an account that stores a secondary connection.
Promoting a secondary connection to serve as the primary connection
Initiating the redirect involves promoting a secondary connection in an available region to serve as the primary connection using ALTER CONNECTION. Concurrently, the former primary connection becomes a secondary connection.
Sign in to the target account in an available region that contains the secondary connection to be promoted to serve as the primary connection.
Execute the SQL statements in this section:
View all connections in the account:
The statement returns the following output:
Promote a secondary connection to serve as the primary connection:
Verify that the former secondary connection was promoted successfully:
The statement returns the following output:
Modifying the DNS settings for private connectivity to the Snowflake service
To redirect client connections to a secondary account, your network administrator must modify the DNS setting created in Configuring the DNS settings for private connectivity to the Snowflake service.
Using a tool provided by your DNS provider, modify the DNS setting for the connection URL.
Set the destination hostname as the complete Snowflake account URL for the account that stores your new primary connection, including the additional segments that identify the region and cloud platform where your account is hosted and the support for AWS PrivateLink, Azure Private Link, or Google Cloud Private Service Connect. This is the account name where client connections to the connection URL will now redirect. Be sure to include the private connectivity OCSP URL when updating the DNS settings.
For example:
(Note the trailing period, which must be included.)
Note
You can configure private connectivity and client redirect to work with Snowsight. Ensure your DNS updates include the Snowsight values from the output of the SYSTEM$GET_PRIVATELINK_CONFIG function. For details, refer to private connectivity and Snowsight.
Verifying the connection URL is updated
To verify the connection URL has been updated, you can confirm the region of your current connection. Use the connection URL to connect to Snowflake and execute the CURRENT_REGION function.
Modifying a connection
You can edit the target accounts for a connection after creating it using Snowsight or SQL.
Modify target accounts for a connection using Snowsight
You can modify the target account for a connection after creating it, but you cannot change the connection name.
Note
To edit a connection, you must be signed in as a user with the ACCOUNTADMIN role to the following accounts:
The source account with the primary connection.
The current target account with the secondary connection.
The new target account you want to add for the primary connection.
You can only add one target account for a primary connection using Snowsight. To add additional target accounts, use the ALTER CONNECTION command.
Currently, if your account uses private connectivity, you can’t use Snowsight to modify target accounts for a connection.
Sign in to Snowsight.
In the navigation menu, select Admin » Accounts.
Select Client Redirect.
Locate the connection you want to edit. Select the More menu (…) in the last column of the row.
Modify target accounts for a connection using SQL
You can add more than one target account for a primary connection using the ALTER CONNECTION command. For an example, see Examples.
Dropping a connection
You can drop a connection using Snowsight or SQL.
Drop a connection using Snowsight
Note
Currently, if your account uses private connectivity, you can’t use Snowsight to drop a connection.
To delete a connection, you must sign in as a user with the ACCOUNTADMIN role to the source account with the primary connection.
Sign in to Snowsight.
In the navigation menu, select Admin » Accounts.
Select Client Redirect.
Locate the connection you want to delete. Select the More menu (…) in the last column of the row.
Select Drop, then select Drop Connection
Drop a connection using SQL
You can use the DROP CONNECTION command to delete a connection.
Delete all secondary connections in target accounts.
Delete the primary connection in the source account.
For an example, see Examples.
Monitoring Client Redirect
You can monitor Client Redirect connections and usage for accounts in an organization using Snowsight or SQL.
Monitor Client Redirect using Snowsight
Note
Only a user with the ACCOUNTADMIN role can view connection details using Snowsight.
You must be signed in to the target account as a user with the ACCOUNTADMIN role. If you are not, you will be prompted to sign in.
Currently, if your account uses private connectivity, you can’t use Snowsight to monitor Client Redirect.
To view the Client Redirect connection details, complete the following steps:
Sign in to Snowsight.
In the navigation menu, select Admin » Accounts.
Select Replication and then select Client Redirect.
If there is no active warehouse for the session, you will be prompted to select a warehouse.
Monitor a specific connection using search and filters.
You can search by connection name. In the
 (search) box, enter the connection name to filter results.
Choose Redirecting to filter the results by primary (To) or secondary (From) connection.
Choose the
 (accounts) menu to filter the results by account name.
You can review the following information about each connection:
Column |
Description |
|---|---|
Name |
Connection name. |
Redirecting |
Indicates if the connection is To a target account or From a source account and the account name. If this column contains destinations available, there are no secondary connections. The number of destinations available indicates the number of target accounts the primary connection can be replicated to. If there is more than one secondary connection, each connection is detailed in a separate row. |
Usage |
Displays the number of times the connection has been used in the last 7 days. You must sign in to the target account to view usage data for that account. |
Connection URL |
The connection URL to use with Snowflake clients. Select the connection URL in the column to copy the URL. |
Monitor Client Redirect using SQL
You can view connection details and monitor usage using the SHOW CONNECTIONS command and LOGIN_HISTORY function.
View connection details
You can retrieve connection names and details using the SHOW CONNECTIONS command:
Returns:
Verify the connection URL used by your users
Query the LOGIN_HISTORY , LOGIN_HISTORY_BY_USER family of table functions to view the login activity for your users within the last 7 days. The output indicates which users and Snowflake clients have been using a connection URL. The REPORTED_CLIENT_TYPE and REPORTED_CLIENT_VERSION columns display the client and version used for each connection to Snowflake, and the CONNECTION column displays the connection URL used, if any.
Note
If a client authenticates through an identity provider (IdP) that is configured with the account URL rather than the connection URL, the IdP directs the client to the account URL after authentication is complete. The CONNECTION column for this login event is NULL. See Authentication and Client Redirect (in this topic).
For example, retrieve up to 100 login events of every user your current role is allowed to monitor in the last 72 hours:
Current limitations of Client Redirect
Client connections using a connection URL and OAuth integration require re-authentication when the connection URL is updated to point to a different account if the OAuth security integration is not replicated to that account. For more information, refer to OAuth redirect behavior.
Web browsers may take several minutes to redirect due to browser cache.
If you need to verify that the redirect works, you can connect to Snowflake with a different client.
Alternatively, open a new private browser window (e.g. incognito mode in Google Chrome) to avoid browser caching issues. Note that some web browsers in private or incognito mode might still cache data. To avoid using the browser cache, close any open private browsers windows and tabs before you open a new private browser window.
You can only add one target account using Snowsight. To add more than one target account to the list of allowed failover accounts, use the ALTER CONNECTION … ENABLE FAILOVER TO ACCOUNTS command.