Option 1: Configure a Snowflake storage integration to access Amazon S3
This topic describes how to use storage integrations to allow Snowflake to read data from and write data to an Amazon S3 bucket referenced in an external (i.e. S3) stage. Integrations are named, first-class Snowflake objects that avoid the need for passing explicit cloud provider credentials such as secret keys or access tokens. Integration objects store an AWS identity and access management (IAM) user ID. An administrator in your organization grants the integration IAM user permissions in the AWS account.
An integration can also list buckets (and optional paths) that limit the locations users can specify when creating external stages that use the integration.
Note
- Completing the instructions in this section requires permissions in AWS to create and manage IAM policies and roles. If you are not an AWS administrator, ask your AWS administrator to perform these tasks.
- Access to S3 storage in government regions using a storage integration is limited to Snowflake accounts hosted on AWS in the same government region.
- Confirm that Snowflake supports the AWS region that your storage is hosted in. For more information, see Supported cloud regions.
The following diagram shows the integration flow for a S3 stage:
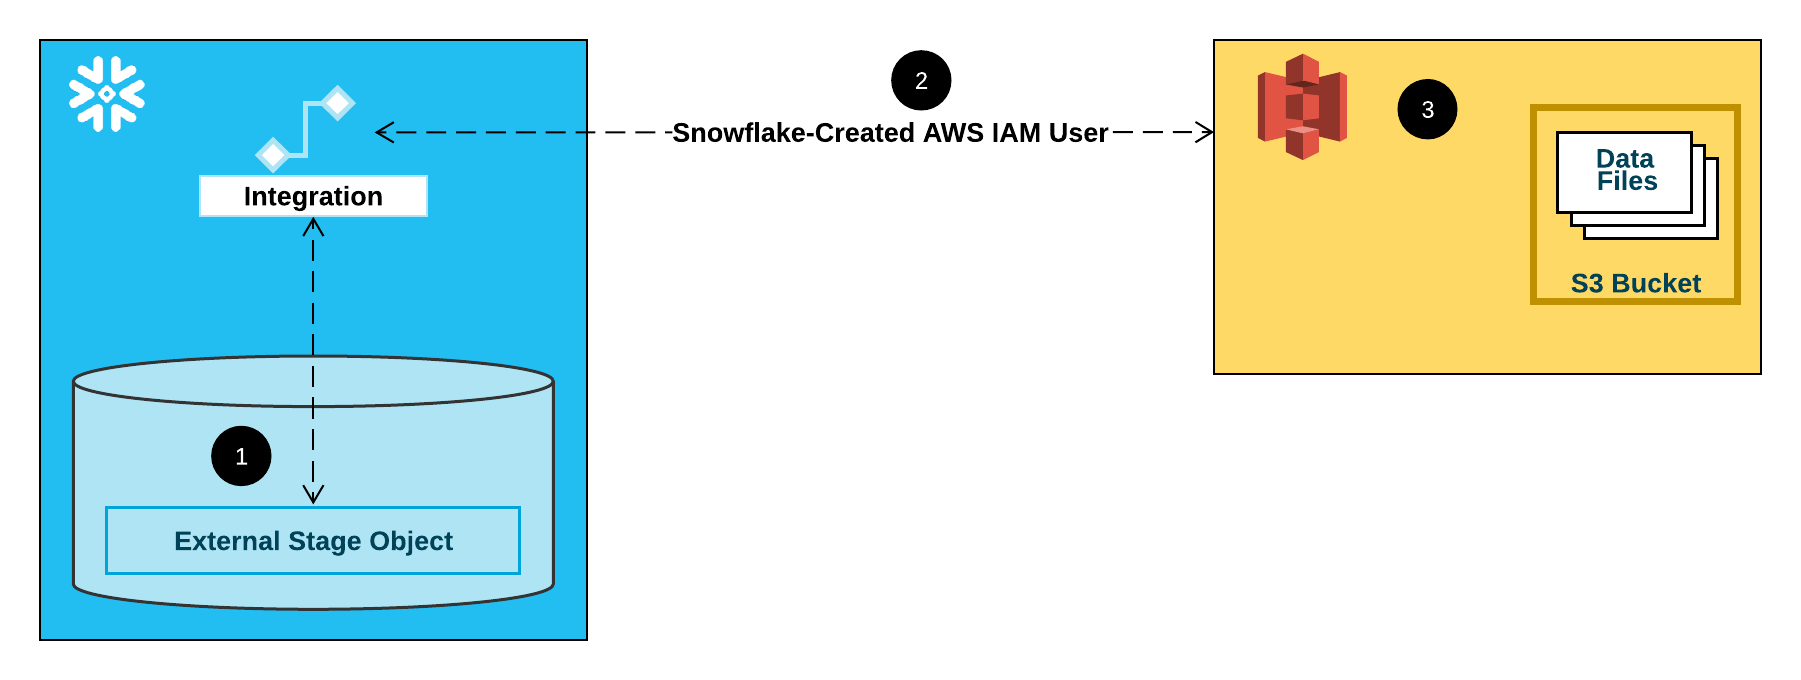
- An external (i.e. S3) stage references a storage integration object in its definition.
- Snowflake automatically associates the storage integration with a S3 IAM user created for your account. Snowflake creates a single IAM user that is referenced by all S3 storage integrations in your Snowflake account.
- An AWS administrator in your organization grants permissions to the IAM user to access the bucket referenced in the stage definition. Note that many external stage objects can reference different buckets and paths and use the same storage integration for authentication.
When a user loads or unloads data from or to a stage, Snowflake verifies the permissions granted to the IAM user on the bucket before allowing or denying access.
Configure secure access to cloud storage
This section describes how to configure a Snowflake storage integration object to delegate authentication responsibility for cloud storage to a Snowflake identity and access management (IAM) entity.
Step 1: Configure access permissions for the S3 bucket
AWS access control requirements
Snowflake requires the following permissions on an S3 bucket and folder to be able to access files in the folder (and sub-folders):
s3:GetBucketLocations3:GetObjects3:GetObjectVersions3:ListBucket
Note
The following additional permissions are required to perform additional SQL actions:
| Permission | SQL Action |
|---|---|
s3:PutObject | Unload files to the bucket. |
s3:DeleteObject | Either automatically purge files from the stage after a successful load or execute REMOVE statements to manually remove files. |
As a best practice, Snowflake recommends creating an IAM policy for Snowflake access to the S3 bucket. You can then attach the policy to the role and use the security credentials generated by AWS for the role to access files in the bucket.
Create an IAM policy
The following step-by-step instructions describe how to configure access permissions for Snowflake in your AWS Management Console so that you can use an S3 bucket to load and unload data:
-
Log into the AWS Management Console.
-
From the home dashboard, search for and select IAM.
-
From the left-hand navigation pane, select Account settings.
-
Under Security Token Service (STS) in the Endpoints list, find the Snowflake region where your account is located. If the STS status is inactive, move the toggle to Active.
-
From the left-hand navigation pane, select Policies.
-
Select Create Policy.
-
For Policy editor, select JSON.
-
Add a policy document that will allow Snowflake to access the S3 bucket and folder.
The following policy (in JSON format) provides Snowflake with the required permissions to load or unload data using a single bucket and folder path. You can also purge data files using the PURGE copy option.
Copy and paste the text into the policy editor:
Note
- Make sure to replace
bucketandprefixwith your actual bucket name and folder path prefix. - The Amazon Resource Names (ARN) for buckets in
government regions have a
arn:aws-us-gov:s3:::prefix. - The ARN for buckets in public AWS regions in China have a
arn:aws-cn:s3:::prefix. -
If you’re using an S3 access point, specify the access point ARN instead of a bucket ARN. For more information, see Configuring IAM policies for using access points.
Note
Setting the
"s3:prefix":condition to either["*"]or["<path>/*"]grants access to all prefixes in the specified bucket or path in the bucket, respectively.Note that AWS policies support a variety of different security use cases.
The following policy provides Snowflake with the required permissions to load data from a single read-only bucket and folder path. The policy includes the
s3:GetBucketLocation,s3:GetObject,s3:GetObjectVersion, ands3:ListBucketpermissions:Alternative policy: Load from a read-only S3 bucket
- Make sure to replace
-
Select Next.
-
Enter a Policy name (for example,
snowflake_access) and an optional Description. -
Select Create policy.
Step 2: Create the IAM role in AWS
To configure access permissions for Snowflake in the AWS Management Console, do the following:
- From the left-hand navigation pane in the Identity and Access Management (IAM) Dashboard, select Roles.
- Select Create role.
- Select AWS account as the trusted entity type.
- Select Another AWS account
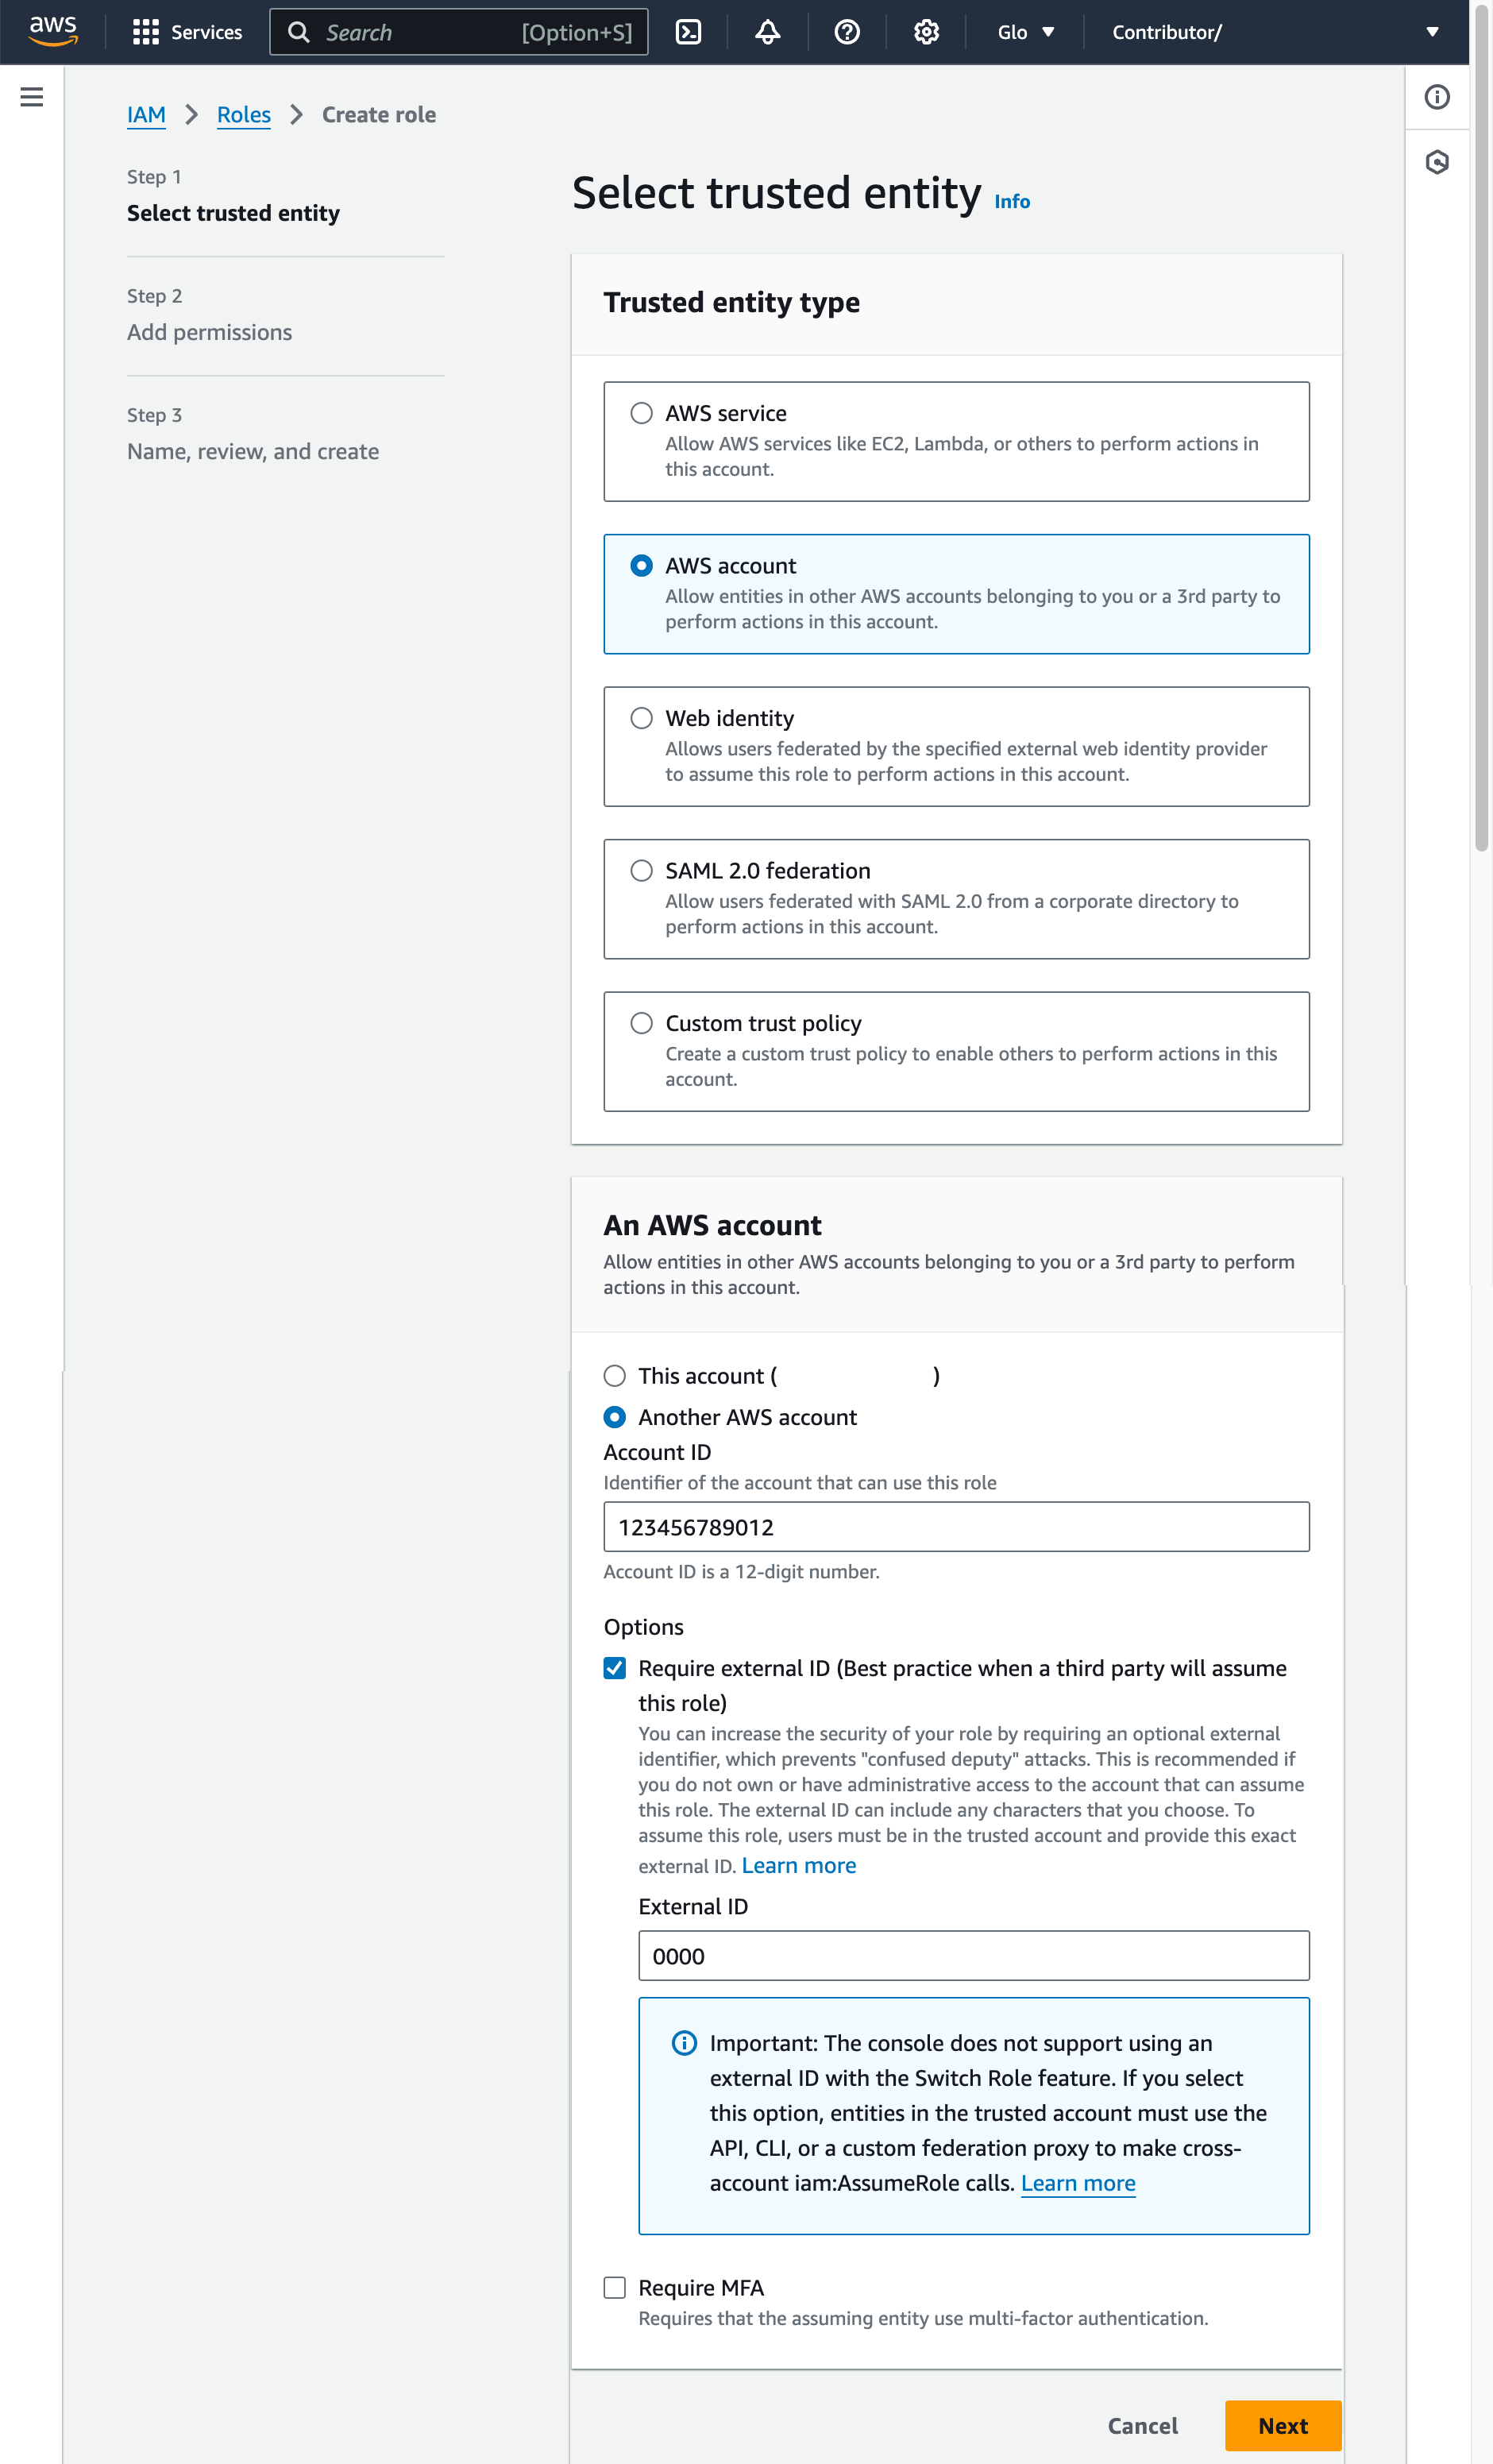
-
In the Account ID field, enter your own AWS account ID temporarily. Later, you modify the trust relationship and grant access to Snowflake.
-
Select the Require external ID option. An external ID is used to grant access to your AWS resources (such as S3 buckets) to a third party like Snowflake.
Enter a placeholder ID such as
0000. In a later step, you will modify the trust relationship for your IAM role and specify the external ID for your storage integration. -
Select Next.
-
Select the policy you created in
Step 1: Configure access permissions for the S3 bucket_ (in this topic). -
Select Next.
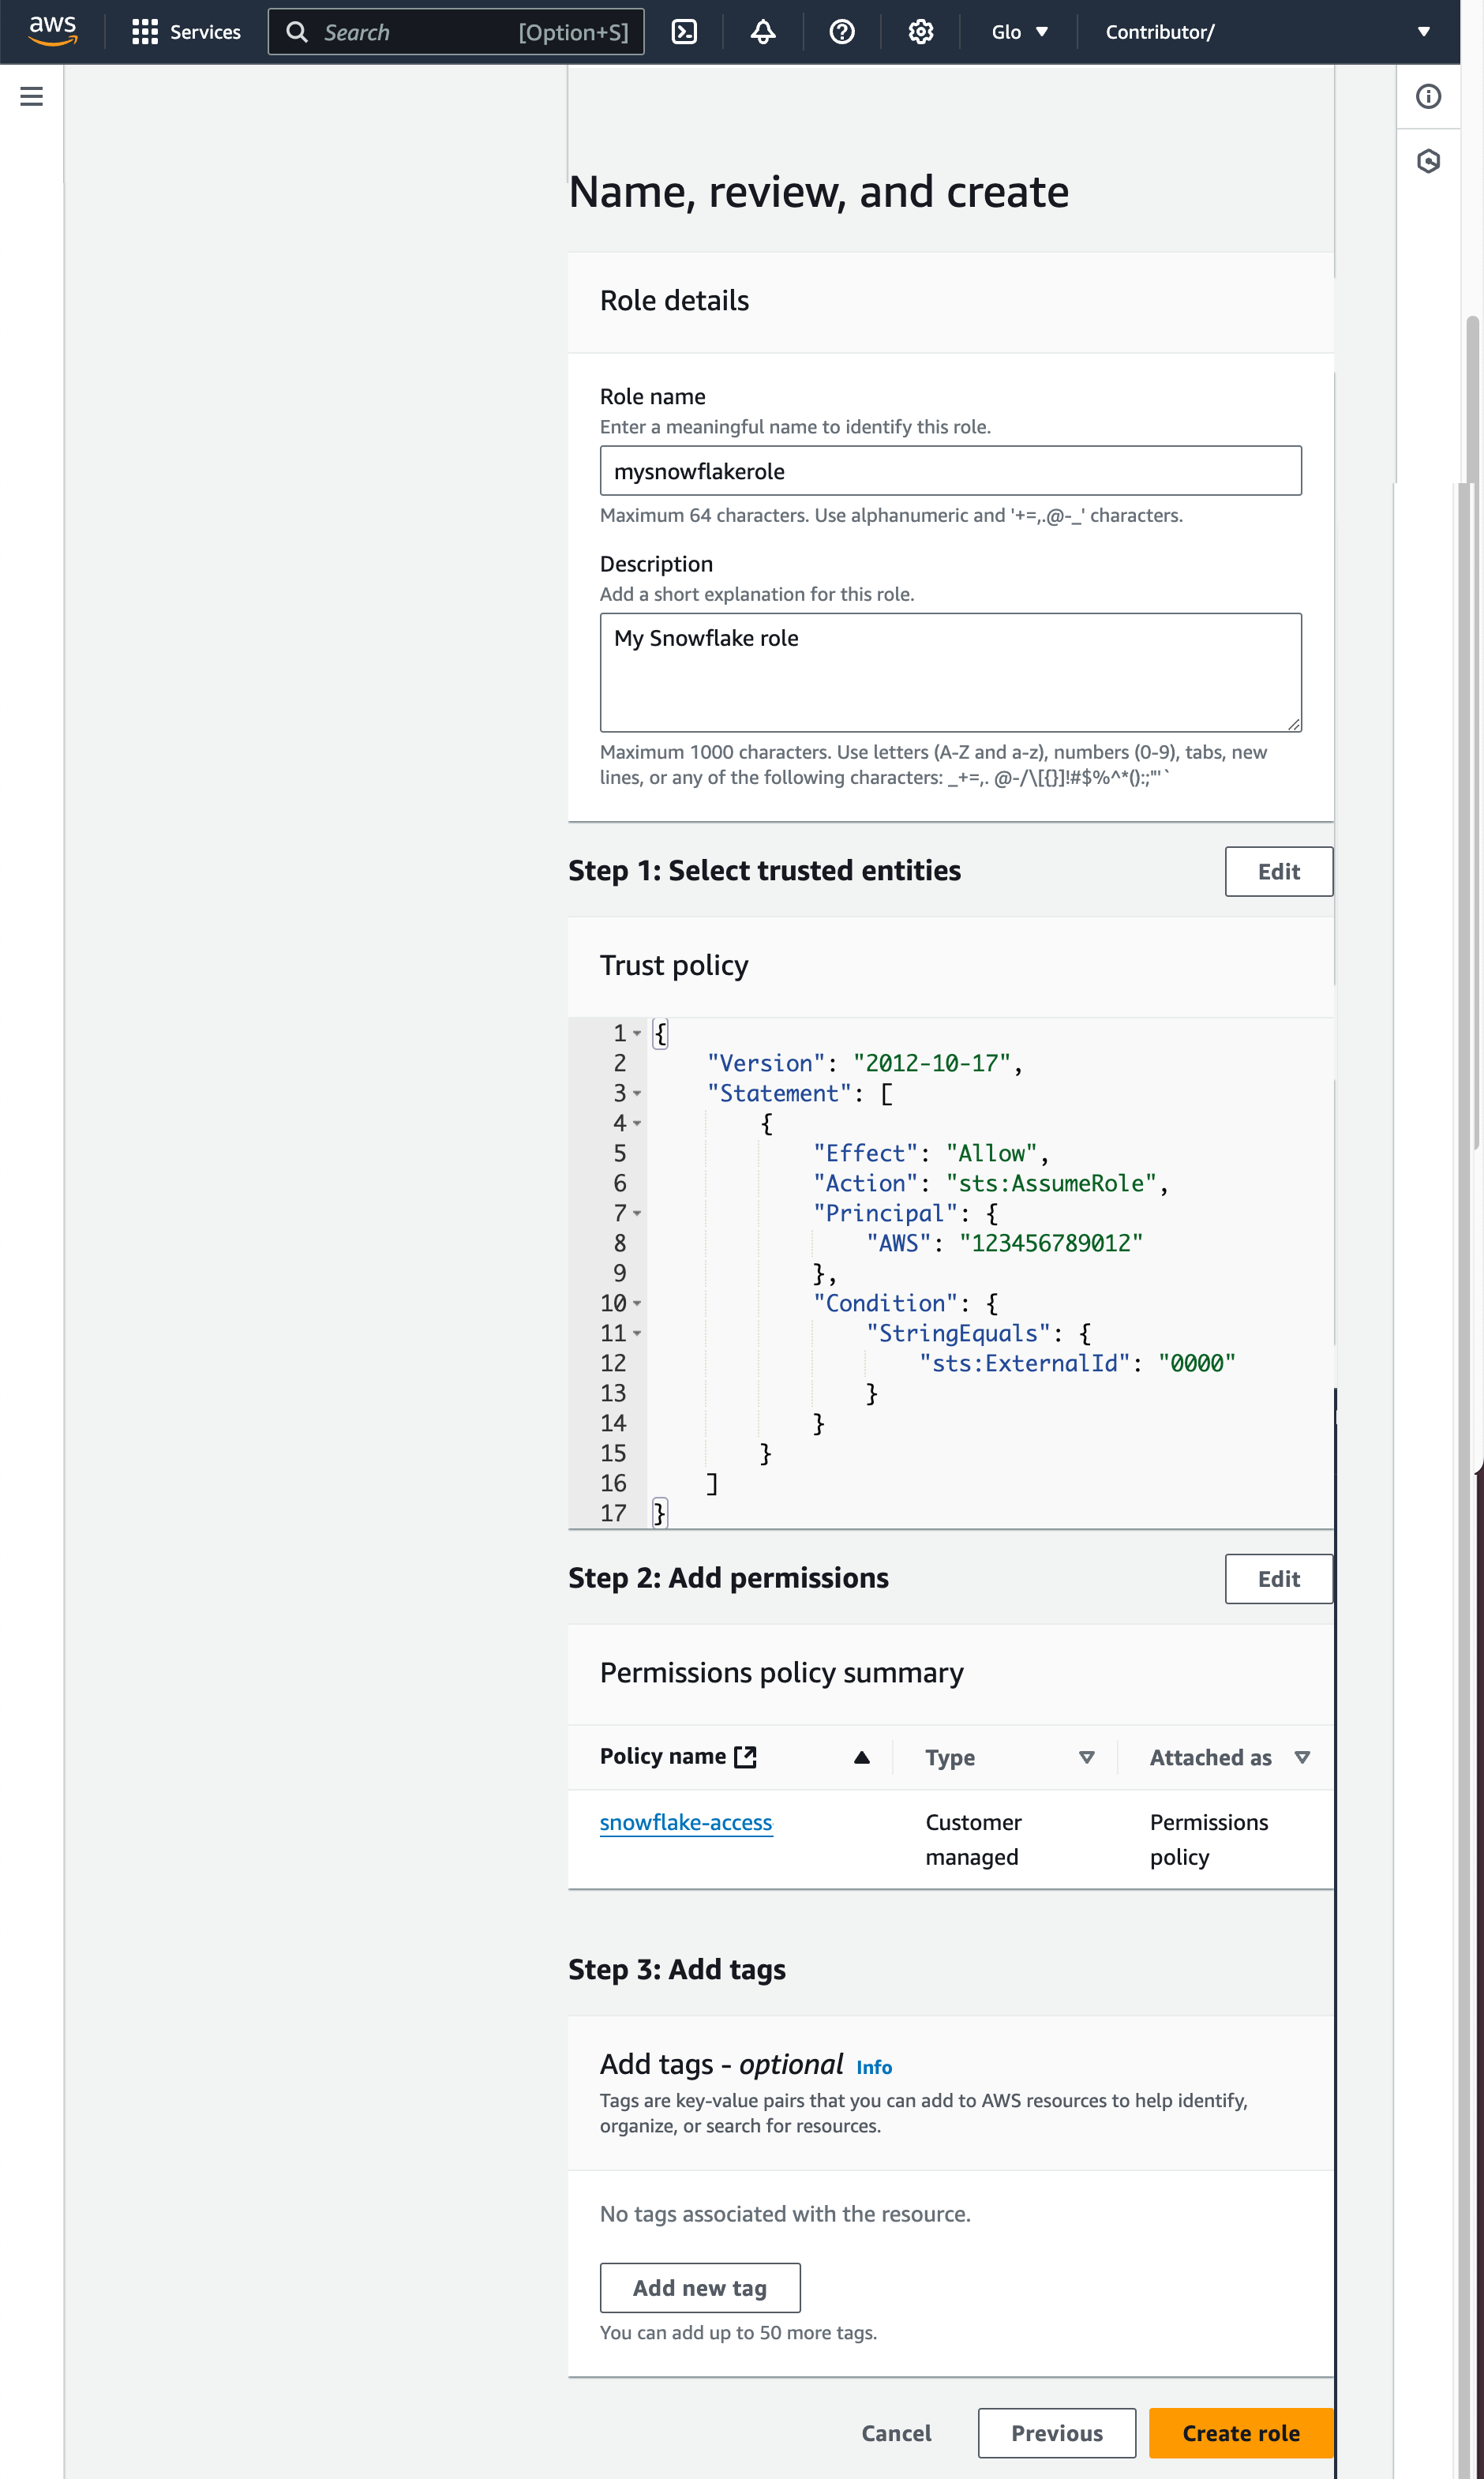
- Enter a name and description for the role, then select Create role.
You have now created an IAM policy for a bucket, created an IAM role, and attached the policy to the role.
- On the role summary page, locate and record the Role ARN value. In the next step, you will create a Snowflake integration that references this role.
Note
Snowflake caches the temporary credentials for a period that cannot exceed the 60-minute expiration time. If you revoke access from Snowflake, users might be able to list files and access data from the cloud storage location until the cache expires.
Step 3: Create a cloud storage integration in Snowflake
Create a storage integration using the CREATE STORAGE INTEGRATION command. A storage integration is a Snowflake object that stores a generated identity and access management (IAM) user for your S3 cloud storage, along with an optional set of allowed or blocked storage locations (that is, buckets). Cloud provider administrators in your organization grant permissions on the storage locations to the generated user. This option allows users to avoid supplying credentials when creating stages or loading data.
A single storage integration can support multiple external (that is, S3) stages. The URL in the stage definition must align with the S3 buckets (and optional paths) specified for the STORAGE_ALLOWED_LOCATIONS parameter.
Note
Only account administrators (users with the ACCOUNTADMIN role) or a role with the global CREATE INTEGRATION privilege can execute this SQL command.
Where:
-
integration_nameis the name of the new integration. -
iam_roleis the Amazon Resource Name (ARN) of the role you created in Step 2: Create the IAM role in AWS (in this topic). -
protocolis one of the following:s3refers to S3 storage in public AWS regions outside of China.s3chinarefers to S3 storage in public AWS regions in China.s3govrefers to S3 storage in government regions.
-
bucketis the name of a S3 bucket that stores your data files (for example,mybucket). The required STORAGE_ALLOWED_LOCATIONS parameter and optional STORAGE_BLOCKED_LOCATIONS parameter restrict or block access to these buckets, respectively, when stages that reference this integration are created or modified. -
pathis an optional path that can be used to provide granular control over objects in the bucket.
The following example creates an integration that allows access to all buckets in the account but blocks access to the defined sensitivedata folders.
Additional external stages that also use this integration can reference the allowed buckets and paths:
Note
Optionally, use the STORAGE_AWS_EXTERNAL_ID parameter to specify your own external ID. You might choose this option to use the same external ID across multiple external volumes and/or storage integrations.
Step 4: Retrieve the AWS IAM user for your Snowflake account
-
To retrieve the ARN for the IAM user that was created automatically for your Snowflake account, use the DESCRIBE INTEGRATION.
Where:
integration_nameis the name of the integration you created in Step 3: Create a Cloud Storage Integration in Snowflake (in this topic).
For example:
-
Record the values for the following properties:
| Property | Description |
|---|---|
STORAGE_AWS_IAM_USER_ARN | The AWS IAM user created for your Snowflake account; for example, arn:aws:iam::123456789001:user/abc1-b-self1234. Snowflake provisions a single IAM user for your entire Snowflake account. All S3 storage integrations in your account use that IAM user. |
STORAGE_AWS_EXTERNAL_ID | The external ID that Snowflake uses to establish a trust relationship with AWS. If you didn’t specify an external ID (STORAGE_AWS_EXTERNAL_ID) when you created the storage integration, Snowflake generates an ID for you to use. |
You provide these values in the next section.
Step 5: Grant the IAM user permissions to access bucket objects
The following step-by-step instructions describe how to configure IAM access permissions for Snowflake in your AWS Management Console so that you can use a S3 bucket to load and unload data:
-
Sign in to the AWS Management Console.
-
Select IAM.
-
From the left-hand navigation pane, select Roles.
-
Select the role you created in Step 2: Create the IAM role in AWS (in this topic).
-
Select the Trust relationships tab.
-
Select Edit trust policy.
-
Modify the policy document with the DESC STORAGE INTEGRATION output values you recorded in Step 4: Retrieve the AWS IAM user for your Snowflake account (in this topic):
Policy document for IAM role
Where:
snowflake_user_arnis the STORAGE_AWS_IAM_USER_ARN value you recorded.snowflake_external_idis the STORAGE_AWS_EXTERNAL_ID value you recorded.In this example, the
snowflake_external_idvalue isMYACCOUNT_SFCRole=2_a123456/s0aBCDEfGHIJklmNoPq=.Note
For security reasons, if you create a new storage integration (or recreate an existing storage integration using the CREATE OR REPLACE STORAGE INTEGRATION syntax) without specifying an external ID, the new integration has a different external ID and can’t resolve the trust relationship unless you update the trust policy.
- Select Update policy to save your changes.
Note
Snowflake caches the temporary credentials for a period that cannot exceed the 60-minute expiration time. If you revoke access from Snowflake, users might be able to list files and load data from the cloud storage location until the cache expires.
Note
You can use the SYSTEM$VALIDATE_STORAGE_INTEGRATION function to validate the configuration for your storage integration.
Step 6: Create an external stage
Create an external (i.e. S3) stage that references the storage integration you created in Step 3: Create a Cloud Storage Integration in Snowflake (in this topic).
Note
Creating a stage that uses a storage integration requires a role that has the CREATE STAGE privilege for the schema as well as the USAGE privilege on the storage integration. For example:
Create the stage using the CREATE STAGE command.
For example, set mydb.public as the current database and schema for the user session, and then create a stage named my_s3_stage. In this example, the stage references the S3 bucket and path mybucket1/path1, which are supported by the integration. The stage also references a named file format object called my_csv_format:
Note
-
The stage owner (i.e. the role with the OWNERSHIP privilege on the stage) must have the USAGE privilege on the storage integration.
-
Append a forward slash (
/) to the URL value to filter to the specified folder path. If the forward slash is omitted, all files and folders starting with the prefix for the specified path are included.Note that the forward slash is required to access and retrieve unstructured data files in the stage.
-
To load or unload data from or to a stage that uses an integration, a role must have the USAGE privilege on the stage. It is not necessary to also have the USAGE privilege on the storage integration.
-
The STORAGE_INTEGRATION parameter is handled separately from other stage parameters, such as FILE_FORMAT. Support for these other parameters is the same regardless of the integration used to access your S3 bucket.
Next: AWS data file encryption