Manage Snowpipe in Snowsight
In Snowsight, you can check the health of a pipe and manage it without writing SQL. You can do the following:
- See whether a pipe is running, paused, or stopped, and how many files are waiting to load.
- Review which files the pipe loaded, partially loaded, or failed to load.
- Track success rates, row counts, and gaps between loads over time.
- See how the pipe connects stages and tables in a lineage graph.
- Pause, resume, refresh, or drop a pipe, transfer its ownership, or edit its comment.
Before you begin
The privileges that you need depend on the task:
| Task | Required privileges |
|---|---|
| View pipe details | MONITOR or OWNERSHIP on the pipe, or MONITOR EXECUTION on the account |
| View copy history | Any privilege on the target table, or MONITOR on the account |
| Pause or resume a pipe | OPERATE or OWNERSHIP on the pipe |
| Refresh a pipe | OPERATE or OWNERSHIP on the pipe, USAGE on an external stage or READ on an internal stage, USAGE on a named file format, and SELECT and INSERT on the target table |
| Edit the comment or drop the pipe | OWNERSHIP on the pipe |
| Transfer ownership | OWNERSHIP on the pipe and INSERT on the target table |
Every task also requires the USAGE privilege on the database and schema that contain each object that the task uses, such as the pipe, the stage, or the target table. For the privileges to create and own pipes, see Snowpipe access control. For all pipe privileges, see Pipe privileges.
View pipe details
To open the details page for a pipe, complete the following steps:
-
Sign in to Snowsight.
-
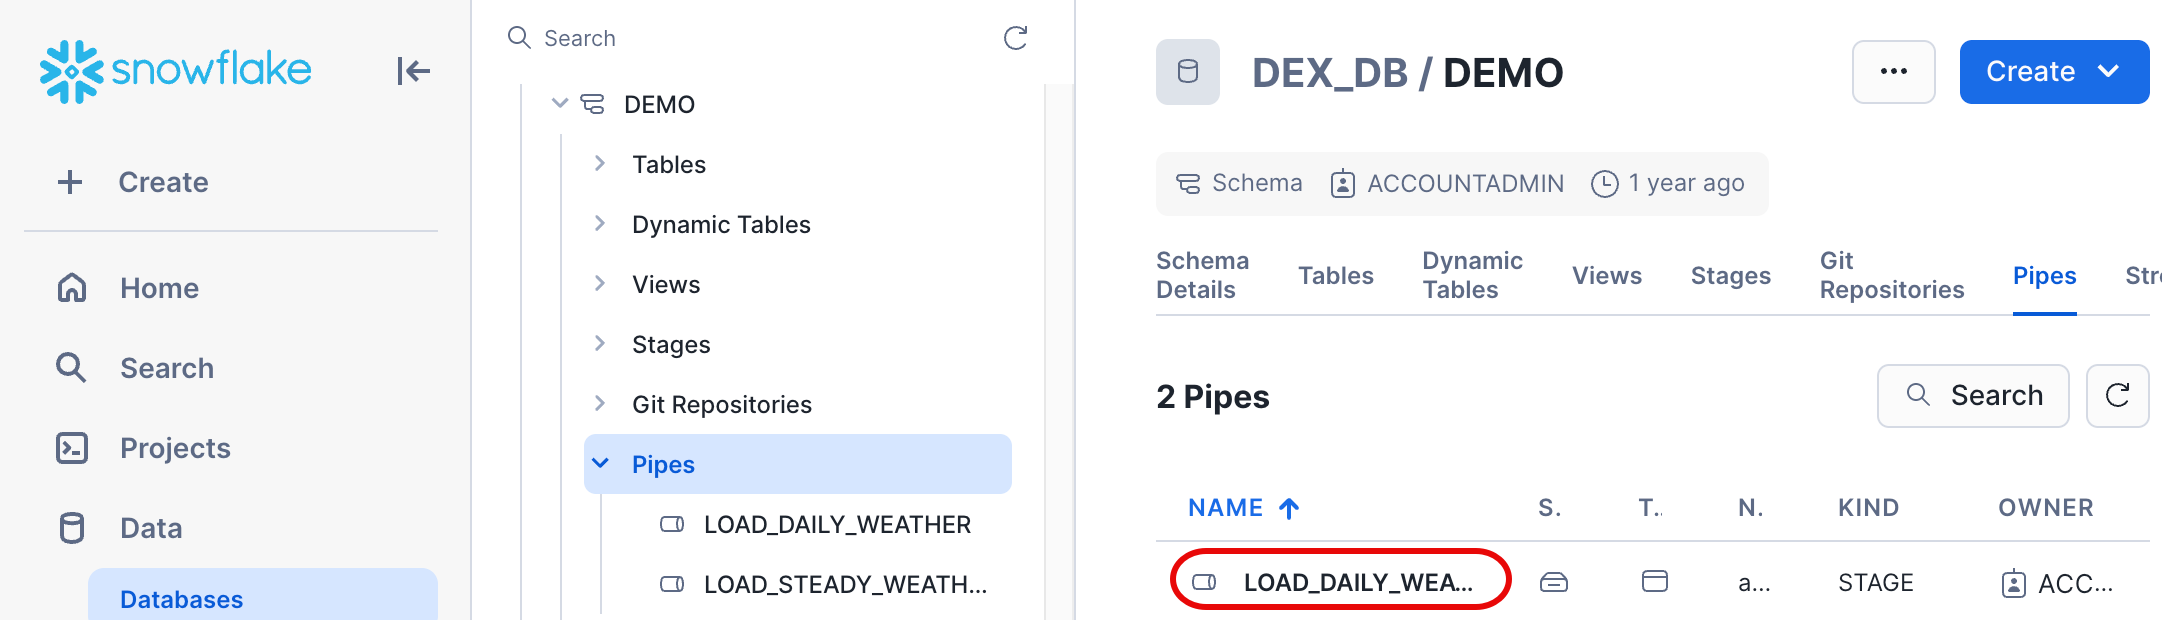
In the navigation menu, select Catalog » Explorer.
-
Expand the database and schema that contain the pipe.
-
Select the pipe.
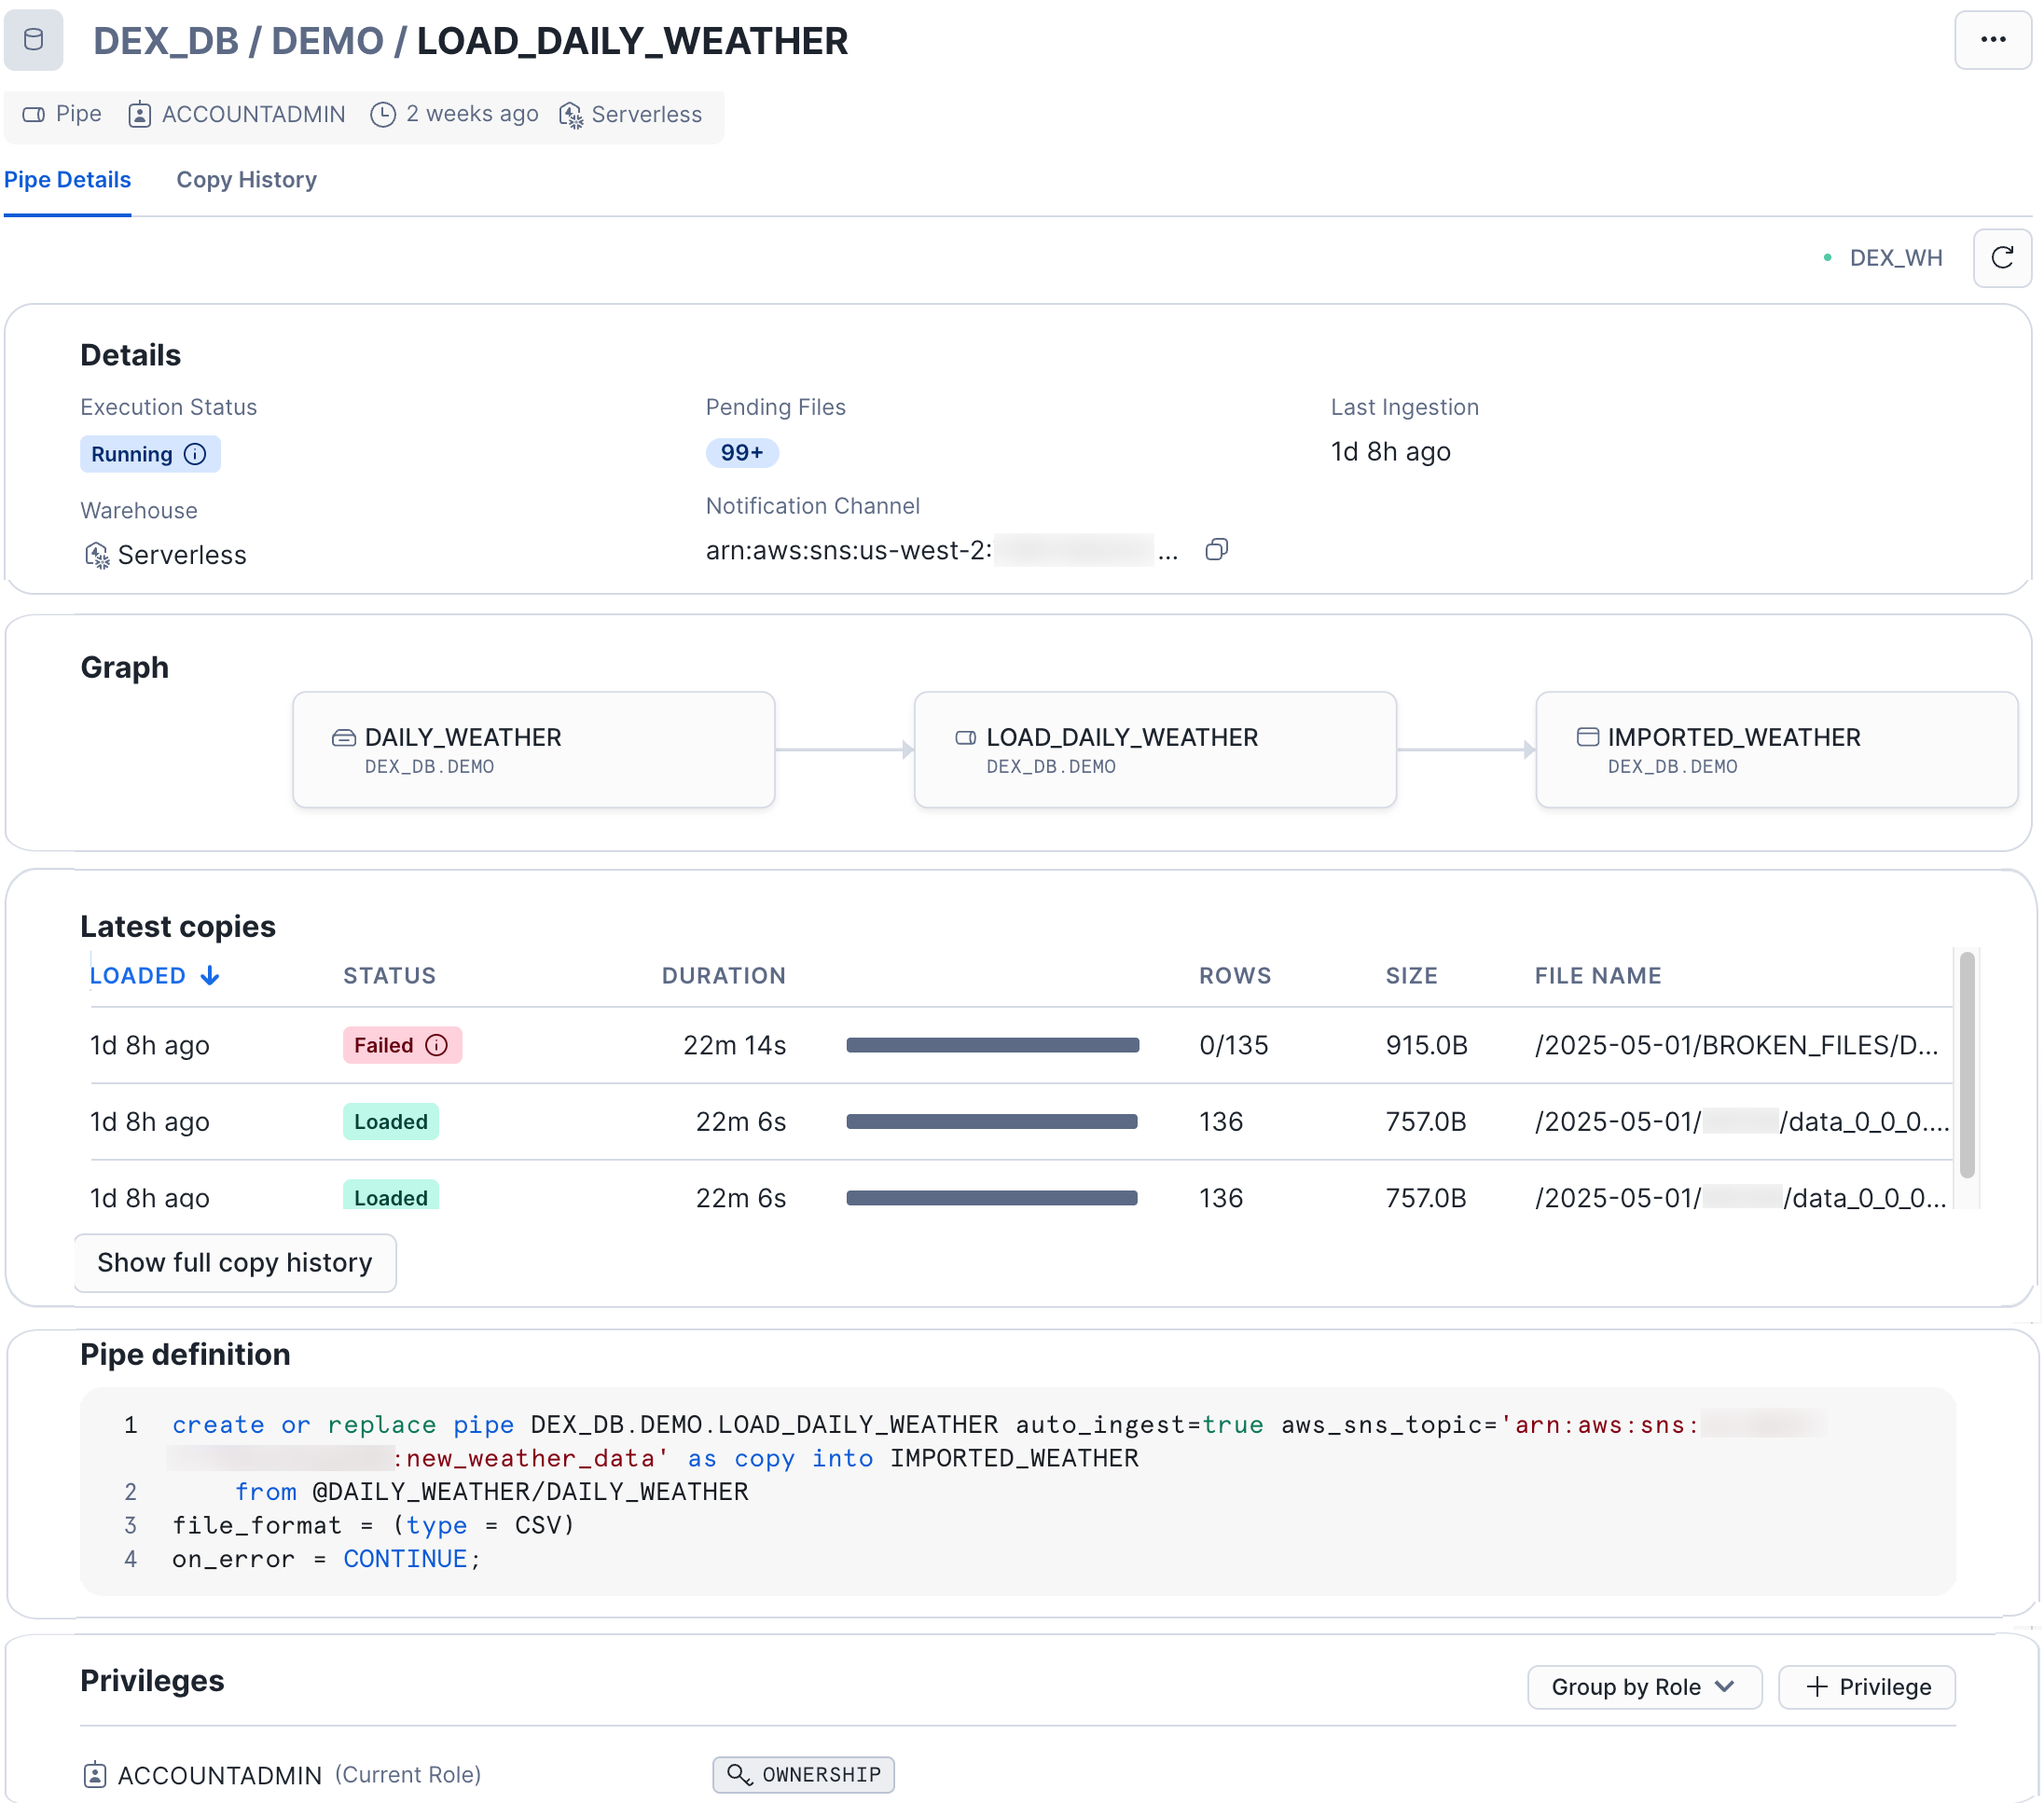
The Pipe Details page shows the following information:
- The status of the pipe, such as Running or Paused. If the pipe stopped loading files, see Pipe execution states.
- The number of files that are waiting to load, and when the pipe last loaded a file.
- The compute that the pipe uses, which is always Serverless.
- The notification channel that tells the pipe when new files arrive.
- A lineage graph of the stages and tables that the pipe connects.
- The most recent loads.
- The pipe definition, which is the SQL statement that created the pipe.
- The privileges granted on the pipe.
Review copy history and pipe metrics
To review the files that a pipe processed, open the Pipe Details page, and then select the Copy History tab.
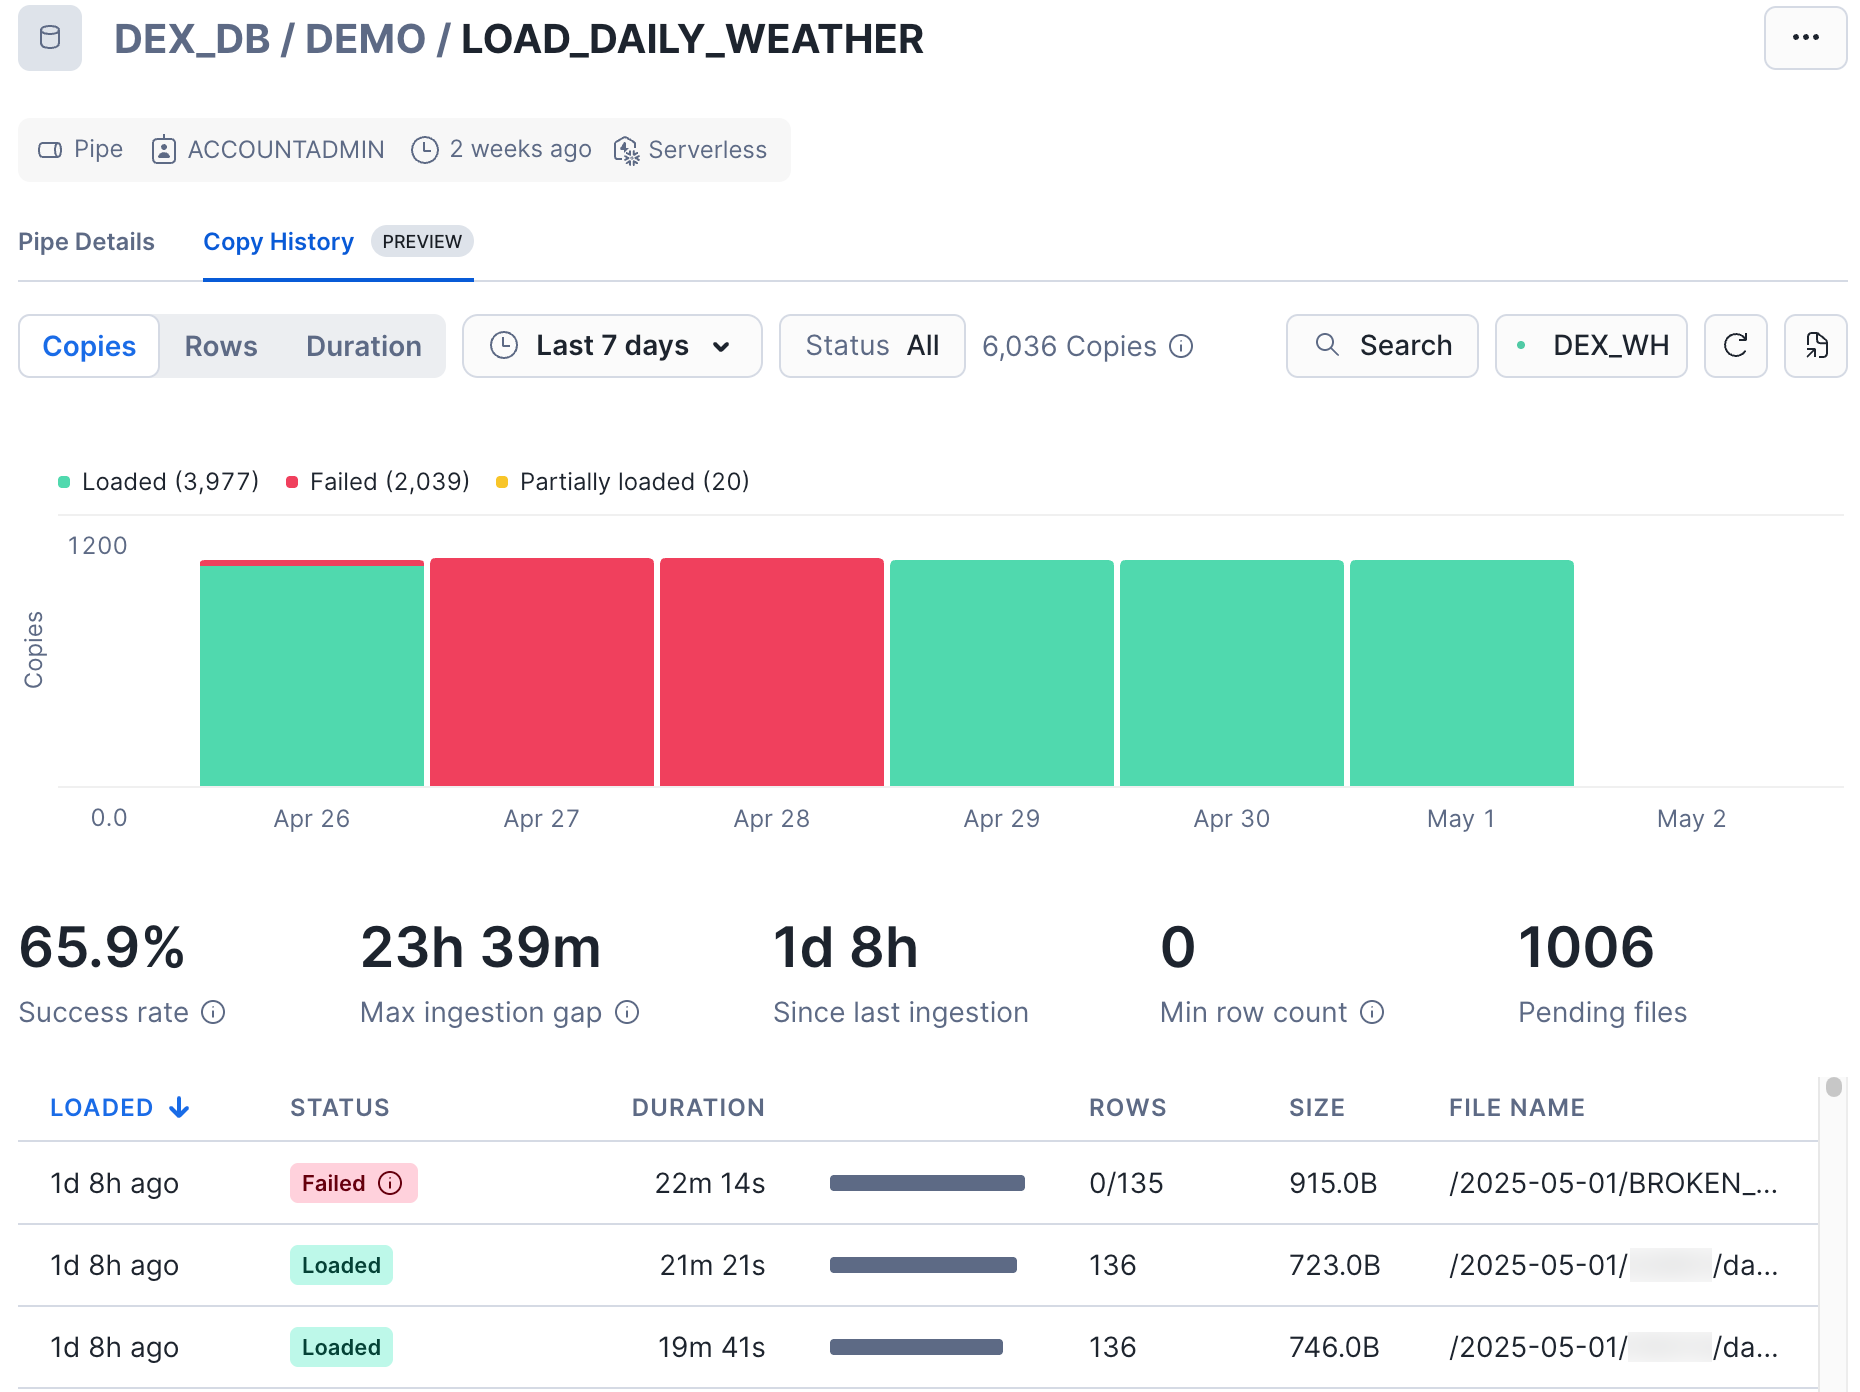
The tab lists each file with its STATUS, DURATION, ROWS, SIZE, and FILE NAME. To find a specific file, search by file name, status, or date.
To find out why a file failed to load, see Step 3: Get details about load errors. To load a file again after you fix it, see Reload a file that Snowpipe already processed.
A histogram shows up to 14 days of copy history. You can display one of the following measures, by day or by hour:
- Copies (default): The number of files processed, grouped by status. Use this measure to find failed loads and to follow ingestion trends.
- Rows: The number of rows inserted. Use this measure to follow throughput.
- Duration: The time that the pipe took to load files. Snowpipe is billed by data volume rather than by load time. For more information, see Snowpipe costs.
The pipe metrics show the health of the pipe for the selected time range:
- Success rate: The percentage of files that loaded successfully.
- Max ingestion gap: The longest gap between loads, which can reveal interruptions in continuous loading.
- Time since last ingestion: How long ago the pipe last loaded a file.
- Min row count: The smallest number of rows in a loaded file, which can reveal empty files or files with fewer rows than expected.
- Pending files: The number of files that the pipe detected but hasn’t loaded yet.
To get notified about failed loads instead of checking this page, set up error notifications or an alert on Snowpipe events.
Manage a pipe
From the Pipe Details page, select the  menu in the top-right corner, and then select one of the following options:
- Pause or Resume: Stop or restart loading. While a pipe is paused, Snowflake keeps adding new files to the pipe’s queue, and each queued file stays in the queue for up to 14 days. To resume a pipe that was paused for longer, see Resume a stale pipe.
- Manual Refresh: Queue files that the pipe missed. For more information, see Load files that the pipe missed.
- Edit: Change the pipe’s comment. To change other properties, use SQL. You can set properties such as
ERROR_INTEGRATIONandLOG_EVENT_LEVELwith ALTER PIPE, but you must recreate the pipe to change itsCOPY INTOstatement. For more information, see Change or recreate a pipe. - Transfer Ownership: Give ownership of the pipe to another role. For the steps, see Transfer ownership of a pipe.
- Drop: Delete the pipe. Dropping a pipe also deletes its load metadata, which is the record of the files that the pipe already processed.
Load files that the pipe missed
To queue staged files that the pipe hasn’t processed yet, open the Pipe Details page, select the menu in the top-right corner, and then select Manual Refresh.
Use this option to recover files that the pipe missed, such as files that were staged before you set up event notifications. Files that failed to load aren’t queued again; to reload them, see Reload a file that Snowpipe already processed. For files that were staged more than 7 days ago, see Files staged more than 7 days ago.
After you refresh, check Pending files on the Pipe Details page to confirm that the files are queued, and then follow their progress on the Copy History tab.
Important
Don’t use Manual Refresh within 7 days after you recreate a pipe. The new pipe has no load metadata, so a refresh can load files that the old pipe already loaded. Instead, use ALTER PIPE ... REFRESH with MODIFIED_AFTER, as described in Recreate a pipe safely.
Transfer ownership of a pipe
To transfer ownership of a pipe to another role, complete the following steps:
-
Make sure that the new owner role has the privileges in the Own a pipe column of Snowpipe access control. Without them, the pipe stops loading after you resume it.
-
On the Pipe Details page, select the
menu, and then select Pause. The transfer fails while the pipe is running. -
Select the
menu again, select Transfer Ownership, and then select the new owner role. -
Switch to the new owner role, and then check Pending files on the Pipe Details page to confirm that only the files that you expect are waiting to load.
-
In a worksheet, use the new owner role to call
SYSTEM$PIPE_FORCE_RESUME. After an ownership transfer, settingPIPE_EXECUTION_PAUSED = FALSEdoesn’t resume the pipe:
For more information, see Transfer ownership of a pipe.