Load data using Snowsight
You can add data to tables through Snowsight.
From these interfaces, you can upload files that include structured data, including CSV or TSV formats, or semi-structured data, including JSON, Avro, ORC, Parquet, or XML formats.
You can upload data from the following locations:
- Your local computer.
- An existing stage.
You can upload up to 250 files at a time. Each file can be up to 250 MB. To load larger files, or a large number of files, use the Snowflake CLI or SnowSQL client. For more information, see Bulk loading from a local file system.
Load data using Snowsight
When loading your data, you can either create a new table, or load data into an existing table.
For data loading sessions in Snowsight, Snowflake runs all SQL commands in an explicit transaction. These commands will be committed regardless of values you set for AUTOCOMMIT at ACCOUNT or USER levels.
Create a new table using Snowsight
When loading data, you can often create and automatically configure a new table for the data at the same time.
Note
Creating a new table from an XML file when loading data isn’t supported.
Creating a new Apache Iceberg™ table when loading data isn’t supported.
In these situations, create a new empty table, and then use the instructions to load data into an existing table.
-
Sign in to Snowsight.
-
In the lower-left corner, select your name » Switch role, and select a role that includes the following privileges:
Object Privilege Notes Database USAGE Schema CREATE TABLE Stage USAGE Table OWNERSHIP -
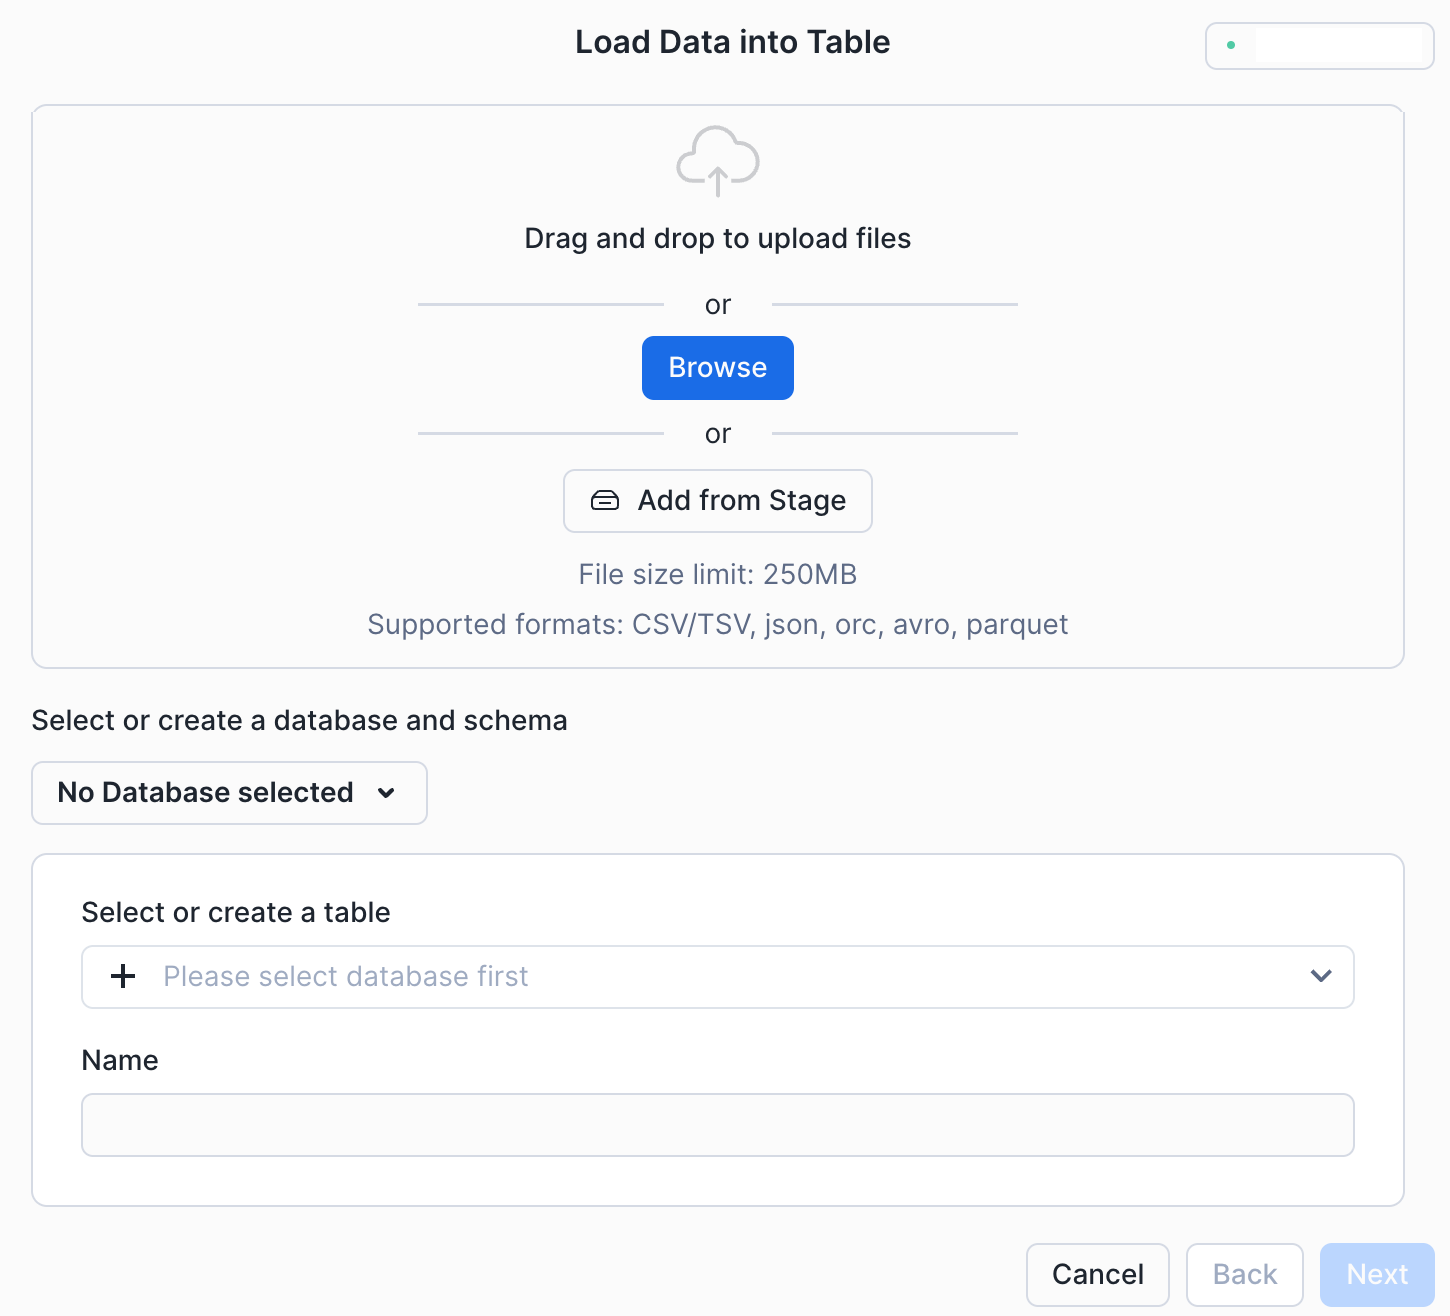
At the top of the navigation menu, select
 (Create) » Table » From File.
The Load Data into Table dialog appears.
-
Select or create a database and schema where you want the table to be created.
-
Select the files that contain the data using one of these methods:
-
Drag and drop to upload files directly from your local system.
-
Browse to files on your local system.
-
Add from stage.
If you select Add from stage, the stage explorer appears.
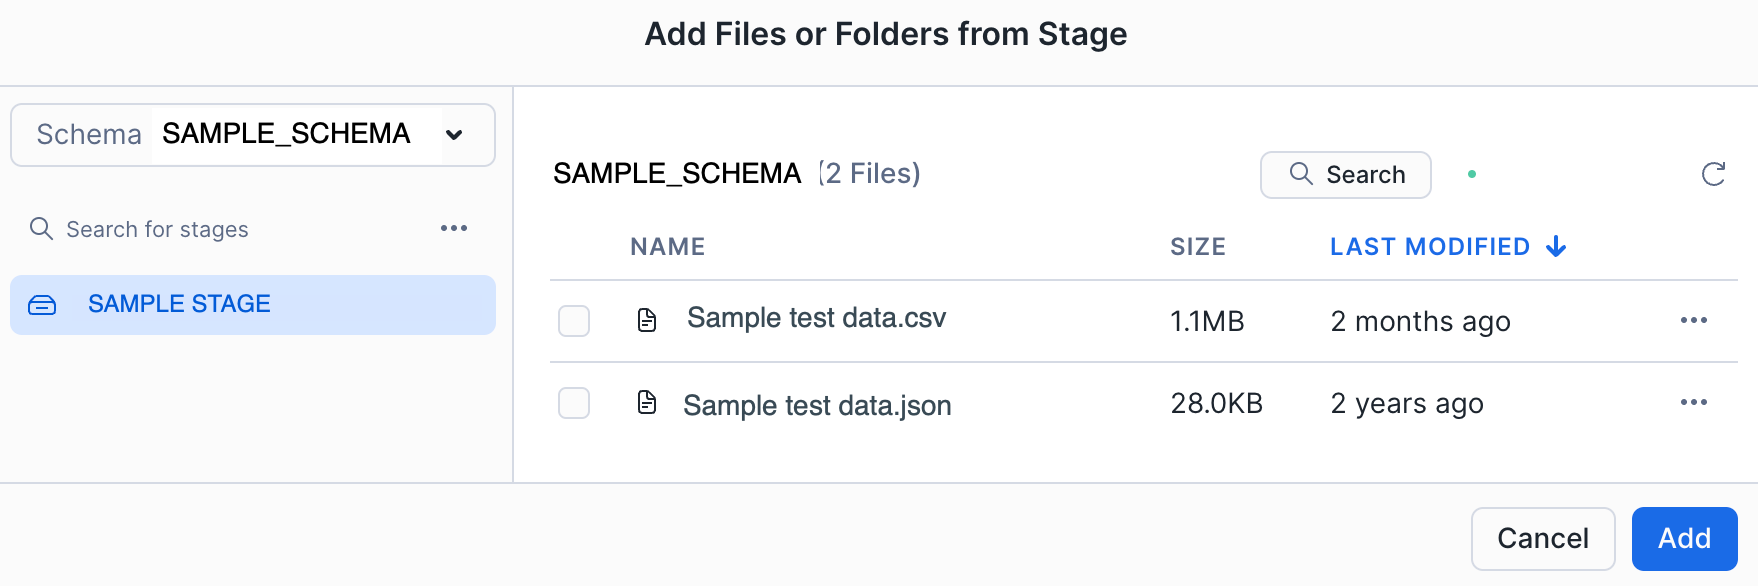
From the stage explorer, you can navigate into stages and subfolders and select specific folders and files from the stage.
If you select Add without selecting any specific files on the stage, the root stage, which includes all the files and folders on the stage, will be added.
The maximum number of files that can be shown in a stage folder is 250.
-
-
Enter a name for the new table and then select Next. The table schema dialog appears.
Snowsight detects the metadata schema for the file and returns the file format and column definitions identified by the INFER_SCHEMA function.
-
Review the inferred file format, data type, column name, and a sample of column data. Ensure that all information is accurate and make updates if needed.
-
Select Load.
Snowsight loads the file and creates a new table for the file.
Load data into an existing table using Snowsight
-
Sign in to Snowsight.
-
Open the user menu, and select an account role that includes at least the following privileges:
Object Privilege Notes Database USAGE Schema USAGE Stage USAGE Required for loading a file from a stage. File format USAGE Required for using a named file format. Table INSERT -
In the navigation menu, select Ingestion » Add Data.
-
Select Load data into a Table. The Load Data into Table dialog appears.
-
Select the files that contain the data using one of these methods:
-
Drag and drop to upload files directly from your local system.
-
Browse to files on your local system.
-
Add from stage.
If you select Add from stage, the stage explorer appears.
From the stage explorer, you can navigate into stages and subfolders and select specific folders and files from the stage.
If you select Add without selecting any specific files on the stage, the root stage, which includes all the files and folders on the stage, will be added.
The maximum number of files that can be shown in a stage folder is 250.
-
-
Select the database, schema, and table where you want to load data.
-
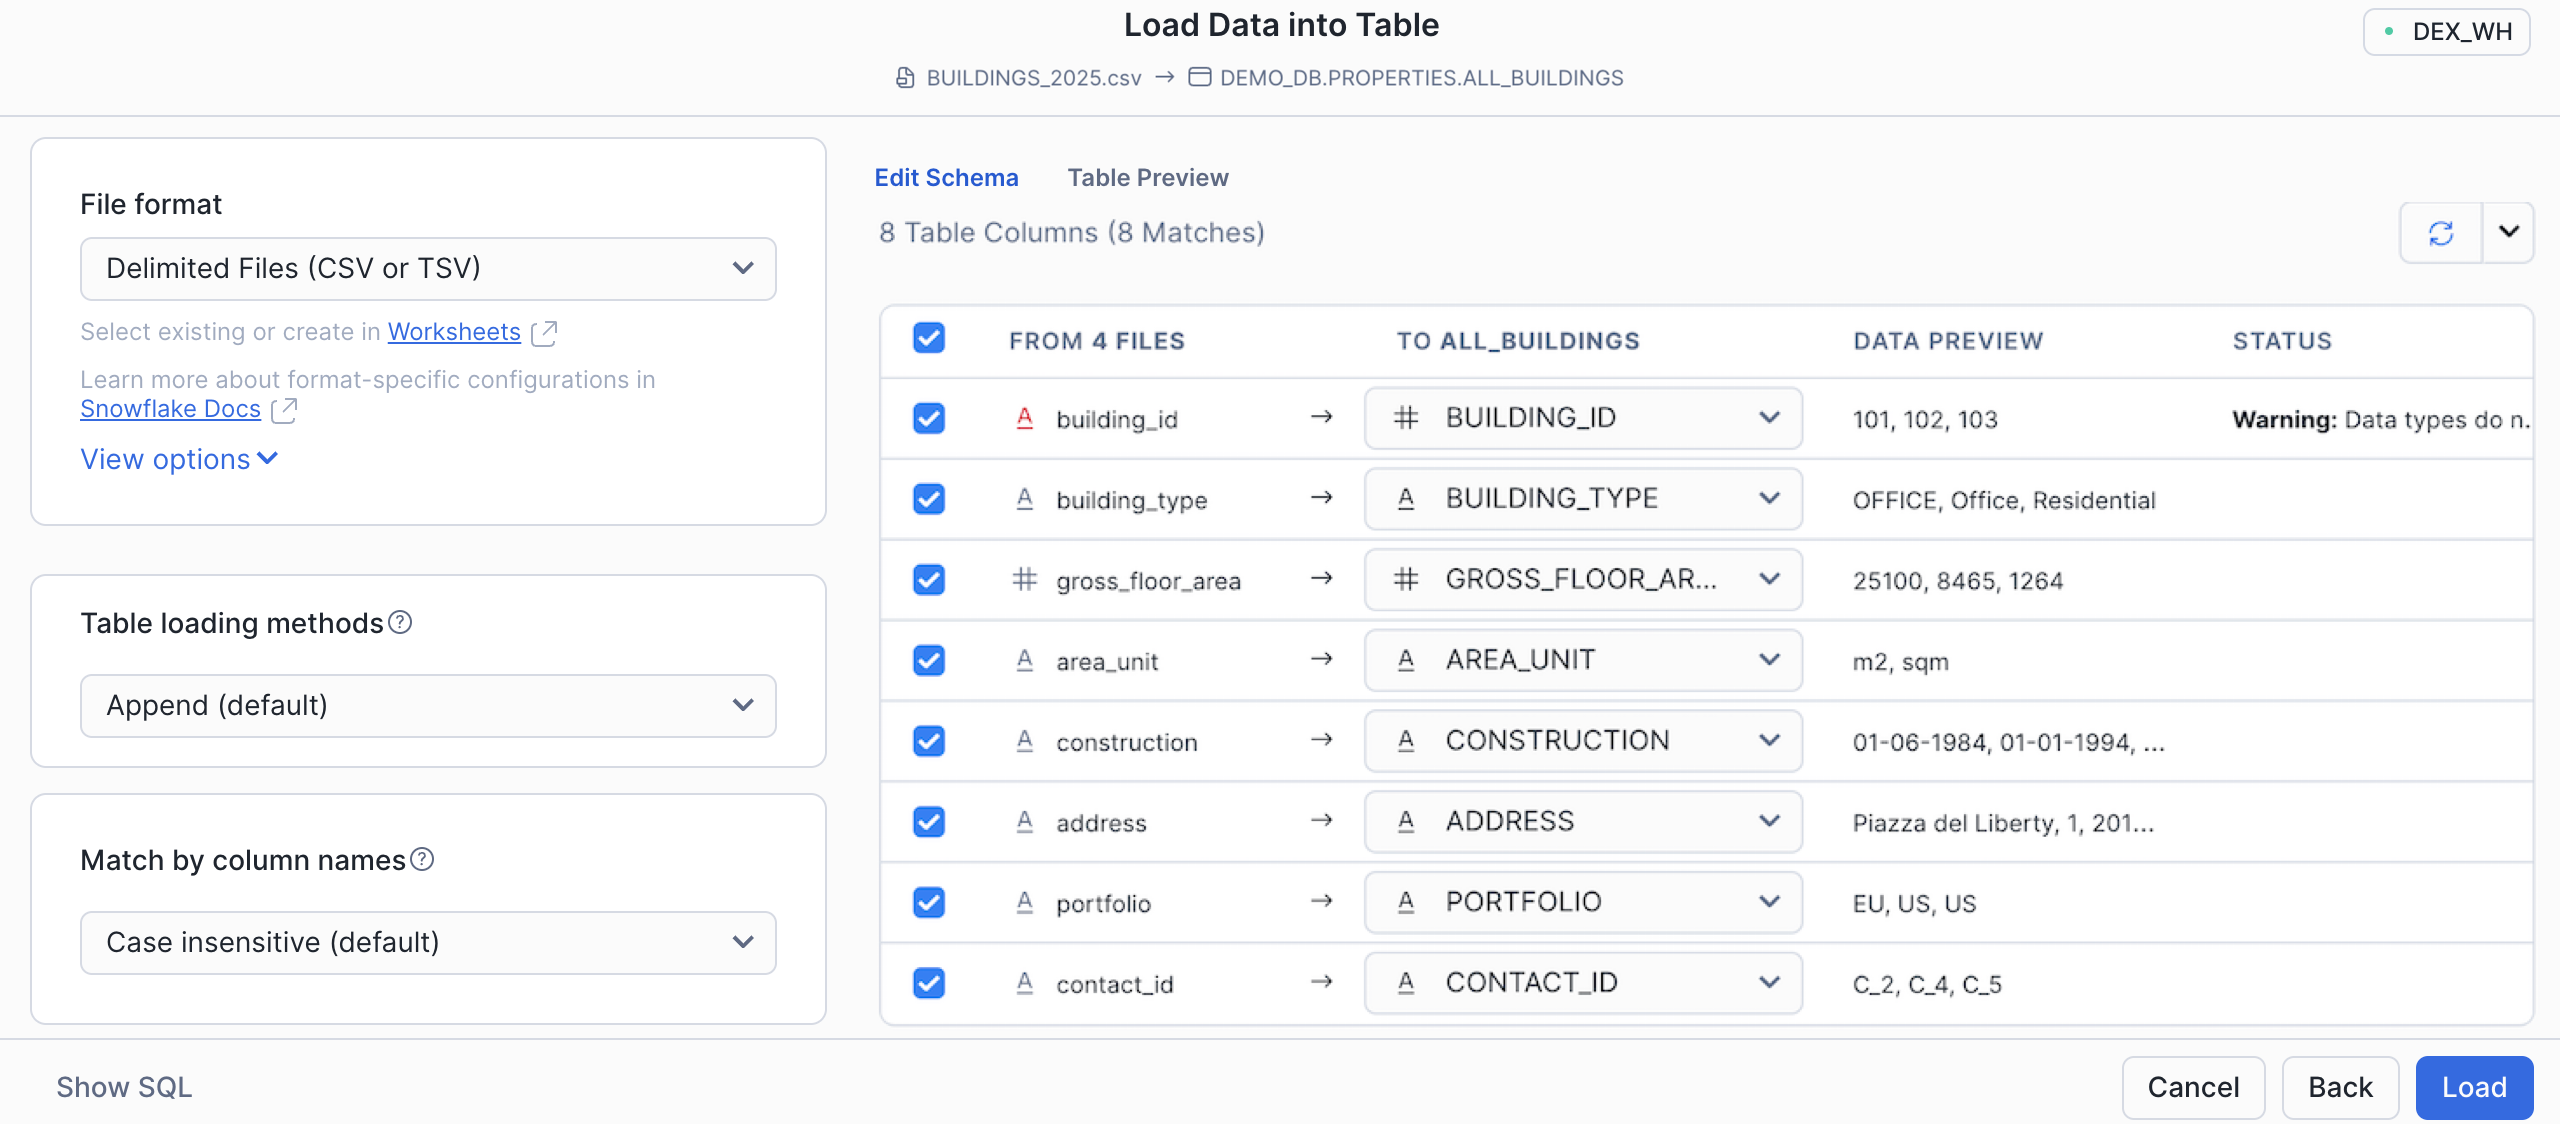
Select Next. The Edit Schema page appears in the Load Data into Table dialog.
-
Make final customizations as needed:
-
Select a file format from the current database.
-
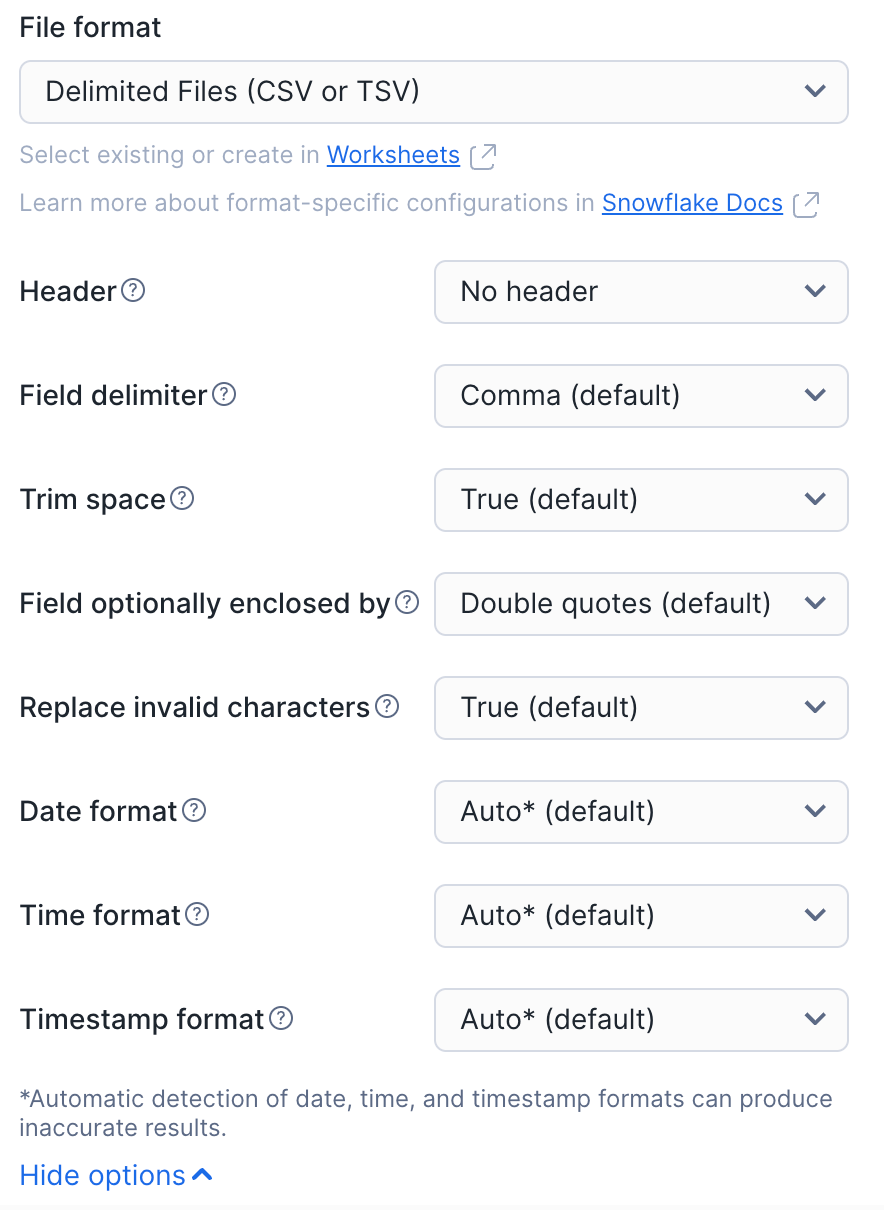
Select a file type to customize, and then select the relevant settings for your data file.
Note
To load Parquet data into a Snowflake-managed Iceberg table, deselect Load as a single variant column?. Snowflake loads Parquet data directly into Iceberg table columns. Only the default LOAD_MODE = FULL_INGEST is supported when you use Snowsight to load Parquet files. For more information, see COPY INTO <table>.
-
(Optional) Select View options for format type options (examples: specify date and time formats or replace invalid characters).
-
(Optional) Select what should happen if an error occurs during loading. By default, no data is loaded from the file.
-
Select one of the following options for Table loading methods. The default option is Append.
- Append: New data will be appended to the existing table during data loading.
- Replace: New data will replace the existing data in the table.
-
Select one of the Match by column names options to automatically match the source file and the target table. The default option is case insensitive.
-
-
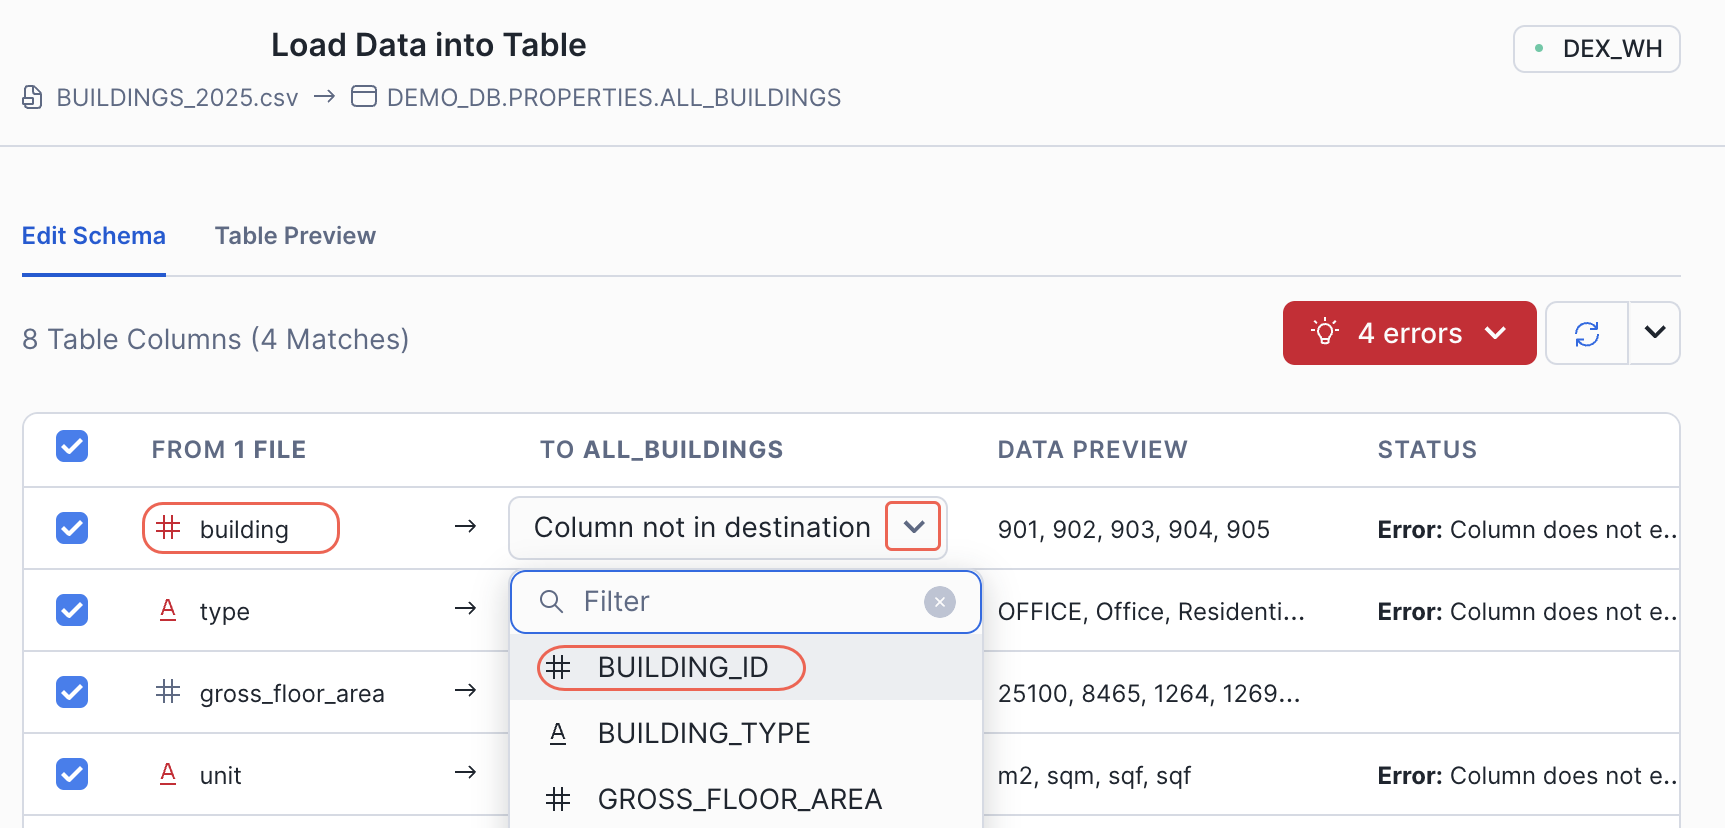
Select the Edit Schema tab on the right side of the table schema dialog. If there are any discrepancies between the source file and the target table, make adjustments as needed.
Select the correct column name from the dropdown list to match the source file with the target table. For example, in the following screenshot, the source file has a column named building and the target table has a column named BUILDING_ID.
-
Optional: Select the Table Preview tab to preview how the data of the incoming source file will look in the target table.
-
Select Load.
Snowsight loads your file and displays the number of rows successfully inserted into the table.
Select a role
Select a role that has the appropriate privileges. (In the lower-left corner, select your name » Switch role » ACCOUNTADMIN.)
- To load data, your role must have the USAGE privilege on the database and the schema that contain the table that you load data into.
- To create a stage when you load data, your role must have the CREATE STAGE privilege on the database schema.
- To create a file format when you load data, your role must have the CREATE FILE FORMAT privilege on the database schema.
Select the table where you will load the data
-
Select Databases
 .
. -
Select a specific database and schema.
-
Select the Tables tab.
-
Locate the table into which you want to load data.
-
Start loading data into a specific table by doing one of the following:
- Select a table row, then select Load Data.
- Select a table name to open the table details page, then select Load Table.
The Load Data wizard opens.
-
Select a warehouse to use to load data into the table. The drop-down includes any warehouse on which you have the USAGE privilege.
-
Select Next.
Select the data to load
Depending on where you choose to load data from, follow the relevant steps. If you want to load data from multiple locations, use the Load Data wizard multiple times.
To load data from your computer:
- Select the Load files from your computer option, and select Select Files to browse to the files that you want to load.
- Select one or more local data files and select Open.
- Select Next.
To load data from an existing stage:
- Select the Load files from external stage option.
- Select an existing stage from the Stage dropdown list.
- (Optional) Specify a path to the files in the stage.
- Select Next.
To create a stage, for example to load data from external cloud storage:
-
Select the Load files from external stage option.
-
Select the + next to the Stage dropdown list.
-
Select the supported cloud storage service where your files are located.
-
Select Next.
-
Complete the fields to describe your stage. For more information, refer to CREATE STAGE.
-
Select Finish.
Your new stage is automatically selected from the Stage dropdown list.
-
(Optional) Specify a path to the files in the stage.
-
Select Next.
Finish loading data
After you select the files to load, finish loading data into your table.
Note
If your warehouse is not running when you finish loading data, you must wait for the warehouse to resume (up to 5 minutes) before data is loaded.
To finish loading data, do the following:
-
Select an existing named file format from the dropdown list, or create one.
To create a file format:
- Select the + next to the dropdown list.
- Fill in the fields to match the format of your data files. For descriptions of the options, refer to CREATE FILE FORMAT.
- Select Finish.
Your new named file format is automatically selected from the dropdown list.
-
Determine how you want to handle errors that occur when the data is loaded:
- If you want data loading to stop if an error occurs, select Load.
- If you want errors to be handled in a different way:
- Select Next.
- Select the option that describes how you want to handle errors. For details about the options,
refer to the
ON_ERRORsection of COPY INTO <table>. - Select Load.
Snowflake loads the data into your selected table using the warehouse you selected.
-
Select OK to close the Load Data wizard.