Using the Python Connector
This topic provides a series of examples that illustrate how to use the Snowflake Connector to perform standard Snowflake operations such as user login, database and table creation, warehouse creation, data insertion/loading, and querying.
The sample code at the end of this topic combines the examples into a single, working Python program.
Note
Snowflake now provides first-class Python APIs for managing core Snowflake resources including databases, schemas, tables, tasks, and warehouses, without using SQL. For more information, see Snowflake Python APIs: Managing Snowflake objects with Python.
Creating a database, schema, and warehouse
After you log in, create a database, schema, and warehouse if they don’t yet exist, using the CREATE DATABASE, CREATE SCHEMA, and CREATE WAREHOUSE commands.
The example below shows how to create a warehouse named tiny_warehouse, database named testdb, and a
schema named testschema. Note that when you create the schema, you must either specify the name of the
database in which to create the schema, or you must already be connected to the database in which to create the
schema. The example below executes a USE DATABASE command before the CREATE SCHEMA command to ensure
that the schema is created in the correct database.
Using the database, schema, and warehouse
Specify the database and schema in which you want to create tables. Also specify the warehouse that will provide resources for executing DML statements and queries.
For example, to use the database testdb, schema testschema and warehouse tiny_warehouse (created earlier):
Creating tables and inserting data
Use the CREATE TABLE command to create tables and the INSERT command to populate the tables with data.
For example, create a table named testtable and insert two rows into the table:
Loading data
Instead of inserting data into tables using individual INSERT commands, you can bulk load data from files staged in either an internal or external location.
Copying data from an internal location
To load data from files on your host machine into a table, first use the PUT command to stage the file in an internal location, then use the COPY INTO <table> command to copy the data in the files into the table.
For example:
Where your CSV data is stored in a local directory named
/tmp/datain a Linux or macOS environment, and the directory contains files namedfile0,file1, …file100.
Copying data from an external location
To load data from files already staged in an external location (i.e. your S3 bucket) into a table, use the COPY INTO <table> command.
For example:
Where:
s3://<s3_bucket>/data/specifies the name of your S3 bucket- The files in the bucket are prefixed with
data.- The bucket is accessed using a storage integration created using CREATE STORAGE INTEGRATION by an account administrator (i.e. a user with the ACCOUNTADMIN role) or a role with the global CREATE INTEGRATION privilege. A storage integration allows users to avoid supplying credentials to access a private storage location.
Note
This example uses the format() function to compose the statement. If your environment has a risk of SQL injection attacks, you might prefer to bind values rather than use format().
Querying data
With the Snowflake Connector for Python, you can submit:
- a synchronous query, which returns control to your application after the query completes.
- an asynchronous query, which returns control to your application before the query completes.
After the query has completed, you use the Cursor object to
fetch the values in the results. By default, the Snowflake Connector for
Python converts the values from Snowflake data types to native Python data types. (Note that
you can choose to return the values as strings and perform the type conversions in your application.
See Improving query performance by bypassing data conversion.)
Note
By default, values from NUMBER columns are returned as double-precision floating-point values (float64). To return these
as decimal values (decimal.Decimal) in the fetch_pandas_all() and fetch_pandas_batches() methods, set
the arrow_number_to_decimal parameter in the connect() method to True.
Performing a synchronous query
To perform a synchronous query, call the execute() method in the Cursor object. For example:
Use the Cursor object to fetch the values in the results, as explained in
Using to fetch values.
Performing an asynchronous query
The Snowflake Connector for Python supports asynchronous queries (i.e. queries that return control to the user before the query completes). You can submit an asynchronous query and use polling to determine when the query has completed. After the query completes, you can get the results.
Note
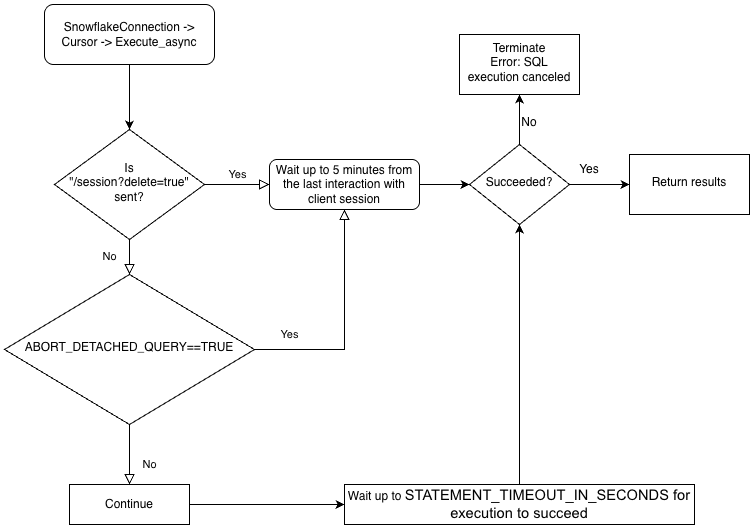
To perform asynchronous queries, you must ensure the ABORT_DETACHED_QUERY configuration parameter is FALSE (default value).
If the connection to client is lost:
- For synchronous queries, all in-progress synchronous queries are aborted immediately regardless of the parameter value.
- For asynchronous queries:
-
If ABORT_DETACHED_QUERY is set to
FALSE, in-progress asynchronous queries continue to run until they end normally. -
If ABORT_DETACHED_QUERY is set to
TRUE, Snowflake automatically aborts all in-progress asynchronous queries when a client connection is not re-established after five minutes.You can prevent the asynchronous query from being aborted at the five minute mark by calling
cursor.query_result(queryId). While this call does not retrieve the actual query result as the query is still running, it does prevent the query from being canceled. Invokingquery_resultis a synchronous operation, which might or might not be appropriate for your particular use case.
-
With this feature, you can submit multiple queries in parallel without waiting for each query to complete. You can also run a combination of synchronous and asynchronous queries during the same session.
Note
Executing multiple statements in a single query requires that a valid warehouse is available in a session.
Finally, you can submit an asynchronous query from one connection and check the results from a different connection. For example, a user can initiate a long-running query from your application, exit the application, and restart the application at a later time to check the results.
To better understand the hierarchy of the drivers’ business logic and the ABORT_DETACHED_QUERY parameter’s interaction, see the following flowchart:
Submitting an asynchronous query
Note
Asynchronous queries don’t support PUT/GET statements.
When cursor.execute_async(query) is used, the Snowflake Python driver automatically keeps track of the queries submitted asynchronously. When the connection is explicitly closed with connection.close() or the context manager is used with connect()..., the list of async queries is examined and, if any of them are still running, the Snowflake-side session is not deleted.
If no async queries are running within the same connection, the Snowflake session belonging to the connection is logged out when connection.close() is called, which implicitly cancels all other queries running in the same session.
This behavior also depends on the SQL ABORT_DETACHED_QUERY parameter.
As a best practice, isolate all long-running async tasks (especially those intended to continue after the connection is closed) into a separate connection.
You can use the server_session_keep_alive (default: False) connection parameter to override this automatic behavior. By default, the Snowflake session is logged out when connection.close() is called only when no async queries are running in it. The default behavior doesn’t consider or track sync queries.
When server_session_keep_alive=True, connection.close() won’t log out the Snowflake session, regardless of the status of any queries. For connections designed to issue long-running asynchronous queries, enabling this setting can reduce CPU overhead and accelerate the connection-closing process.
Important
Enabling this parameter might have unexpected, billable effects (for example, it might leave queries running up to the configured value of STATEMENT_TIMEOUT_IN_SECONDS). Snowflake strongly recommends that you carefully decide whether changing the value of server_session_keep_alive from the default is needed and, if possible, thoroughly test the change in non-production environments before implementing it in production.
To submit an asynchronous query, call the execute_async() method in the Cursor object. For example:
After submitting the query:
- To determine if the query is still running, see Checking the status of a query.
- To retrieve the results of the query, see Using the query ID to retrieve the results of a query.
For examples of performing asynchronous queries, see Examples of asynchronous queries.
Best practices for asynchronous queries
When submitting an asynchronous query, follow these best practices:
- Ensure that you know which queries are dependent upon other queries before you run any queries in parallel. Some queries are interdependent and order sensitive, and therefore not suitable for parallelizing. For example, obviously an INSERT statement should not start until after the corresponding CREATE TABLE statement has finished.
- Ensure that you do not run too many queries for the memory that you have available. Running multiple queries in parallel typically consumes more memory, especially if more than one set of results is stored in memory at the same time.
- When polling, handle the rare cases where a query does not succeed.
- Ensure that transaction control statements (BEGIN, COMMIT, and ROLLBACK) do not execute in parallel with other statements.
- Be aware that asynchronous queries are not guaranteed to return ordered results, even if the SQL itself has an ORDER BY clause. Consequently, the
result_scanfunction does not guarantee ordered results.
Retrieving the Snowflake query ID
A query ID identifies each query executed by Snowflake. When you use the Snowflake Connector for Python to execute a query, you
can access the query ID through the sfqid attribute in the Cursor object:
You can use the query ID to:
-
Check the status of the query in the web interface.
In the Snowsight, query IDs are displayed in the Query History page. See Monitor query activity with Query History.
-
Programmatically check the status of the query (e.g. to determine if an asynchronous query has completed).
-
Retrieve the results of an asynchronous query or a previously submitted synchronous query.
-
Cancel a running query.
Checking the status of a query
To check the status of a query:
-
Get the query ID from the
sfqidfield in theCursorobject. -
Pass the query ID to the
get_query_status()method of theConnectionobject to return theQueryStatusenum constant that represents the status of the query.By default,
get_query_status()does not raise an error if the query resulted in an error. If you want an error raised, callget_query_status_throw_if_error()instead. -
Use the
QueryStatusenum constant to check the status of the query.- To determine if the query is still running (for example, if this is an asynchronous query), pass the constant to the
is_still_running()method of theConnectionobject. - To determine if an error occurred, pass the constant to the
is_an_error()method.
For the full list of enum constants, see
QueryStatus. - To determine if the query is still running (for example, if this is an asynchronous query), pass the constant to the
The following example executes an asynchronous query and checks the status of the query:
The following example raises an error if the query has resulted in an error:
Using the query ID to retrieve the results of a query
Note
If you performed a synchronous query by calling the execute()
method on a Cursor object, you don’t need to use the query ID to retrieve the results. You can just fetch the values
from the results, as explained in Using to fetch values.
If you want to retrieve the results of an asynchronous query or a previously submitted synchronous query, follow these steps:
- Get the query ID of the query. See Retrieving the Snowflake query ID.
- Call the
get_results_from_sfqid()method in theCursorobject to retrieve the results. - Use the
Cursorobject to fetch the values in the results, as explained in Using to fetch values.
Note that if the query is still running, the fetch methods (fetchone(), fetchmany(), fetchall(), etc.)
will wait for the query to complete.
For example:
Using cursor to fetch values
Fetch values from a table using the cursor object iterator method.
For example, to fetch columns named “col1” and “col2” from the table
named testtable, which was created earlier
(in Creating tables and inserting data),
use code similar to the following:
Alternatively, the Snowflake Connector for Python provides a convenient shortcut:
If you need to get a single result (i.e. a single row), use the fetchone method:
If you need to get the specified number of rows at a time, use the fetchmany method with the number of rows:
Note
Use
fetchoneorfetchmanyif the result set is too large to fit into memory.
If you need to get all results at once:
To set a timeout for a query, execute a “begin” command and include a timeout parameter on the query. If the query exceeds the length of the parameter value, an error is produced and a rollback occurs.
In the following code, error 604 means the query was canceled. The timeout parameter starts Timer() and cancels if the query does not finish within the specified time.
Using DictCursor to fetch values by column name
If you want to fetch a value by column name, create a cursor object of type DictCursor.
For example:
Examples of asynchronous queries
The following is a simple example of an asynchronous query:
The next example submits an asynchronous query from one connection and retrieves the results from a different connection:
Canceling a query by query ID
Cancel a query by query ID:
Replace the string “queryID” with the actual query ID. To get the ID for a query, see Retrieving the Snowflake query ID.
Improving query performance by bypassing data conversion
To improve query performance, use the SnowflakeNoConverterToPython class in the snowflake.connector.converter_null module to bypass
data conversions from the Snowflake internal data type to the native Python data type, e.g.:
As a result, all data is represented in string form such that the application is responsible for
converting it to the native Python data types. For example, TIMESTAMP_NTZ and TIMESTAMP_LTZ
data are the epoch time represented in string form, and TIMESTAMP_TZ data is the epoch time followed by a space
followed by the offset to UTC in minutes represented in string form.
No impact is made to binding data; Python native data can still be bound for updates.
Downloading data
Snowflake Connector for Python version 3.14.0 introduced the unsafe_file_write connection parameter that specifies how the connector should set file permissions when downloading files for a Snowflake stage with the GET command. These files are always owned by the same user who runs the Python process.
By default, the unsafe_file_write parameter is False to provide a more secure and strict 600 file permission, which means that only the owner has read and write permissions of the downloaded files.
Other groups and users have no permissions for the files downloaded with the GET command.
If your organization requires less restrictive file permissions for the files, you can set the unsafe_file_write parameter to True.
Enabling this parameter sets the file permissions for the files downloaded from a stage to 644, which allows the owner to read and write the files, but allows others only to read them.
This setting might be necessary, for example, for some ETL tools that run under a different system user who needs to be able to read and process the downloaded files.
If you are unsure of which value to use, consult with the team responsible for your organization’s applicable security policy.
Binding data
To specify values to be used in a SQL statement, you can include literals in the statement, or you can bind variables. When you bind variables, you put one or more placeholders in the text of the SQL statement, and then specify the variable (the value to be used) for each placeholder.
The following example contrasts the use of literals and binding:
Literals:
Binding:
Note
There is an upper limit to the size of data that you can bind, or that you can combine in a batch. For details, see Limits on Query Text Size.
Snowflake supports the following types of binding:
pyformatandformat, which bind data on the client.qmarkandnumeric, which bind data on the server.
Each of these is explained below.
pyformat or format binding
Both pyformat binding and format binding bind data on the client side rather than on the server side.
By default, the Snowflake Connector for Python supports both pyformat and format, so you can use %(name)s or %s as the
placeholder. For example:
-
Using
%(name)sas the placeholder: -
Using
%sas the placeholder:
With pyformat and format, you can also use a list object to bind data for the IN operator:
The percent character (“%”) is both a wildcard character for SQL LIKE and a format binding character for Python. If you use format binding, and if your SQL command contains the percent character, you might need to escape the percent character. For example, if your SQL statement is:
then your Python code should look like the following (note the extra percent sign to escape the original percent sign):
qmark or numeric binding
Both qmark binding and numeric binding bind data on the server side rather than on the client side:
-
For
qmarkbinding, use a question mark character (?) to indicate where in the string you want a variable’s value inserted. -
For
numericbinding, use a colon (:) followed by a number to indicate the position of the variable that you want substituted at that position. For example,:2specifies the second variable.Use numeric binding to bind the same value more than once in the same query. For example, if you have a long VARCHAR or BINARY or semi-structured value that you want to use more than once, then
numericbinding allows you to send the value to the server once and use it multiple times.
The next sections explain how to use qmark and numeric binding:
Using qmark or numeric binding
To use qmark or numeric style binding, you can either execute one of the following or set paramstyle as part of the connection parameters when calling connect().
snowflake.connector.paramstyle='qmark'snowflake.connector.paramstyle='numeric'
If you set paramstyle to qmark or numeric, you must use ? or :N (where N is replaced
with a number) as the placeholders, respectively.
For example:
-
Using
?as the placeholder: -
Using
:Nas the placeholder:The following query shows how to use
numericbinding to reuse a variable:
Using qmark or numeric binding with datetime objects
When using qmark or numeric binding to bind data to a Snowflake TIMESTAMP data type, set the bind variable to a tuple that
specifies the Snowflake timestamp data type (TIMESTAMP_LTZ or TIMESTAMP_TZ) and the value. For example:
Unlike client side binding, the server side binding requires the Snowflake data type for the column. Most common Python data types
already have implicit mappings to Snowflake data types (e.g. int is mapped to FIXED). However, because the Python
datetime data can be bound to one of multiple Snowflake data types (TIMESTAMP_NTZ, TIMESTAMP_LTZ,
or TIMESTAMP_TZ), and the default mapping is TIMESTAMP_NTZ, you must specify the Snowflake data type to use.
Using bind variables with the IN operator
qmark and numeric (server side binding) do not support the use of bind variables with the IN operator.
If you need to use bind variables with the IN operator, use
client side binding (pyformat or format).
Binding parameters to variables for batch inserts
In your application code, you can insert multiple rows in a single batch. To do this, use parameters for values in an INSERT
statement. For example, the following statement uses placeholders for qmark binding in an INSERT statement:
Then, to specify the data that should be inserted, define a variable that is a sequence of sequences (for example, a list of tuples):
As shown in the example above, each item in the list is a tuple that contains the column values for a row to be inserted.
To perform the binding, call the executemany() method, passing the variable as the second argument. For example:
If you are binding data on the server (i.e. by using qmark or
numeric binding), the connector can optimize the performance of batch inserts through binding.
When you use this technique to insert a large number of values, the driver can improve performance by streaming the data (without creating files on the local machine) to a temporary stage for ingestion. The driver automatically does this when the number of values exceeds a threshold.
In addition, the current database and schema for the session must be set. If these are not set, the CREATE TEMPORARY STAGE command executed by the driver can fail with the following error:
Note
For alternative ways to load data into the Snowflake database (including bulk loading using the COPY command), see Load data into Snowflake.
Avoid SQL injection attacks
Avoid binding data using Python’s formatting function because you risk SQL injection. For example:
Instead, store the values in variables and then bind those variables using qmark or numeric binding style.
Retrieving column metadata
To retrieve metadata about each column in the result set (e.g. the name, type, precision, scale, etc. of each column), use one of the following approaches:
-
To access the metadata after calling the
execute()method to execute the query, use thedescriptionattribute of theCursorobject. -
To access the metadata without having to execute the query, call the
describe()method.The
describemethod is available in the Snowflake Connector for Python 2.4.6 and more recent versions.
The description attribute is set to one of the following values:
- Version 2.4.5 and earlier: A list of tuples.
- Version 2.4.6 and later: A list of ResultMetadata objects. (The
describemethod also returns this list.)
Each tuple and ResultMetadata object contains the metadata for a column (the column name, data type, etc.). You can
access the metadata by index or, in 2.4.6 and later versions, by
ResultMetadata attribute.
The following examples demonstrate how to access the metadata from the returned tuples and ResultMetadata objects.
Example: Getting the column name metadata by index (versions 2.4.5 and earlier):
The following example uses the description attribute to retrieve the list of column names after executing a query. The
attribute is a list of tuples, and the
example accesses the column name from the first value in each tuple.
Example: Getting the column name metadata by attribute (versions 2.4.6 and later):
The following example uses the description attribute to retrieve the list of column names after executing a query. The
attribute is a list of ResultMetaData objects, and the
example accesses the column name from the name attribute of each ResultMetadata object.
Example: Getting the column name metadata without executing the query (versions 2.4.6 and later):
The following example uses the describe method to retrieve the list of column names without executing a query.
The describe() method returns a list of ResultMetaData objects, and the
example accesses the column name from the name attribute of each ResultMetadata object.
Handling errors
The application must handle exceptions raised from Snowflake Connector properly and decide to continue or stop running the code.
Using execute_stream to execute SQL scripts
The execute_stream function enables you to run one or more SQL scripts in a stream:
Note
Additional configuration might be required if sql_stream contains comments. See Using execute_stream to execute SQL scripts.
Closing the connection
As a best practice, close the connection by calling the close method:
This ensures the collected client metrics are submitted to the server and the session is deleted. Also, try-finally blocks help ensure the connection is closed even if an exception is raised in the middle:
Caution
Multiple non-closed connections can exhaust your system resources and eventually cause an application crash.
Using context manager to connect and control transactions
The Snowflake Connector for Python supports a context manager that allocates and releases resources as required. The context manager is useful for committing or rolling back transactions based on the statement status when autocommit is disabled.
In the above example, when the third statement fails, the context manager rolls back the changes in the transaction and closes the connection. If all statements were successful, the context manager would commit the changes and close the connection.
An equivalent code with try and except blocks is as follows:
Using the VECTOR data type
Support for the VECTOR data type was introduced in version 3.6.0 of the Snowflake Python Connector. You can use the VECTOR data type with the vector similarity functions to implement applications based on vector search or retrieval-augmented-generation (RAG).
The following code example shows how to use the Python Connector to create tables with VECTOR columns and call the VECTOR_INNER_PRODUCT function:
The following code example shows how to use the Python Connector to call the VECTOR_COSINE_SIMILARITY in order to find the closest vectors to [1,2,3]:
Note
Variable binds are not supported for VECTOR data types.
Logging
The Snowflake Connector for Python leverages the standard Python logging module to log status at regular intervals so that the application can trace its activity working behind the scenes. The
simplest way to enable logging is call logging.basicConfig() in the beginning of the application.
For example, to set the logging level to INFO and store the logs in a file named /tmp/snowflake_python_connector.log:
More comprehensive logging can be enabled by setting the logging level to DEBUG as follows:
The optional but recommended SecretDetector formatter class ensures that a certain set of known sensitive information is masked before being written to Snowflake Python Connector log files. To use SecretDetector, use code similar to the following:
Note
botocoreandboto3are available through the AWS (Amazon Web Services) SDK for Python.
Logging configuration file
Alternatively, you can easily specify the log level and the directory in which to save log files in the config.toml configuration file. For more information about the this file, see Connecting using the `connections.toml` file.
Note
This logging configuration feature supports log levels as defined in the Python logging document.
For more information about logging levels, see the Python Basic Logging Tutorial.
This logging configuration file uses toml to define the save_logs, level, and path logging parameters, as follows:
where:
save_logsdetermines whether to save logs.levelspecifies the logging level. If not defined, the driver defaults toINFO.pathidentifies the directory in which to save the log files. If not defined, the driver saves the logs in the default$SNOWFLAKE_HOME/logs/directory.
Note
If your config.toml file does not contain a [log] section, log messages are not saved.
Log message from a single day are appended to the python-connector.log file, which is later renamed to python-connector.log.YYYY-MM-DD.
Sample program
The following sample code combines many of the examples described in the previous sections into a working python program. This example contains two parts:
- A parent class (“python_veritas_base”) contains the code for many common operations, such as connecting to the server.
- A child class (“python_connector_example”) represents the custom portions of a particular client, for example, querying a table.
This sample code is imported directly from one of our tests to help ensure that it is has been executed on a recent build of the product.
Because this is taken from a test, it includes a small amount of code to set an alternative port and protocol used in some tests. Users should not set the protocol or port number; instead, omit these and use the defaults.
This also contains some section markers (sometimes called “snippet tags”) to identify code that can be imported independently into the documentation. Section markers typically look similar to:
These section markers are not required in user code.
The first part of the code sample contains the common subroutines to:
- Read command-line arguments (for example, “–warehouse MyWarehouse”) that contain connection information.
- Connect to the server.
- Create and use a warehouse, database, and schema.
- Drop the schema, database, and warehouse when you are done with them.
The second part of the code sample creates a table, inserts rows into it, etc.:
To run this sample, do the following:
Copy the first piece of code to a file named “python_veritas_base.py”.
Copy the second piece of code to a file named “python_connector_example.py”
Set the SNOWSQL_PWD environment variable to your password, for example:
Execute the program using a command line similar to the following (replace the user and account information with your own user and account information, of course).
Warning
This deletes the warehouse, database, and schema at the end of the program! Do not use the name of an existing database because you will lose it!
Here is the output:
Here is a longer example:
Note
In the section where you set your account and login information, make sure to replace the variables as needed to match your Snowflake login information (name, password, etc.).
This example uses the format() function to compose the statement. If your environment has a risk of SQL injection attacks, you might prefer to bind values rather than use format().