Databricks to Snowflake Migration Guide
Snowflake Migration Framework
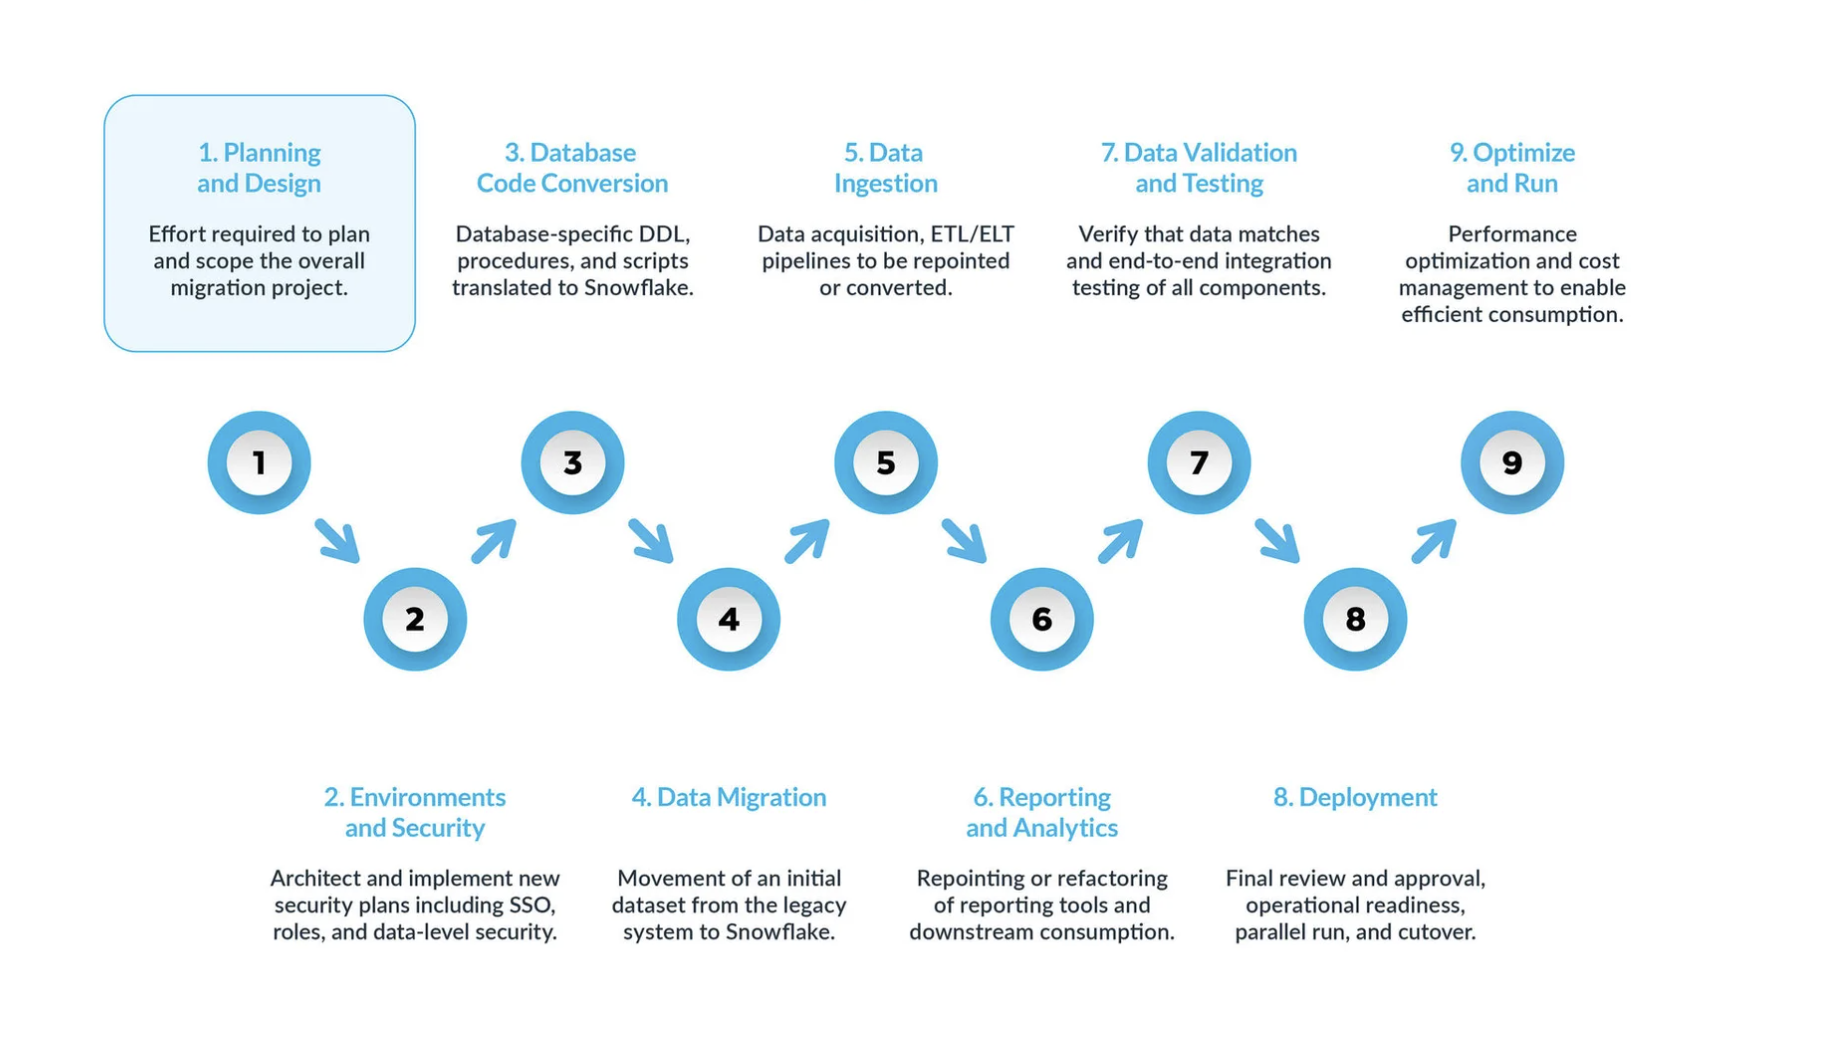
A typical Databricks-to-Snowflake migration can be broken into five key steps:
-
Planning and design are often overlooked steps in the migration process. The main reason is that companies typically want to show progress quickly, even if they haven’t fully understood the scope of the project. That is why, this phase is critical to understand and prioritize the migration project.
-
Environment and security with a plan, a clear timeline, a RACI matrix, and buy-in from all stakeholders, it’s time to move into execution mode.
Setting up the necessary environments and security measures to begin the migration is very important before starting the migration phase given that there are many moving parts, and will be more impactful for the migration project if all your setup is ready before moving forward. -
Database code conversion process involves extracting code directly from the source systems’ database catalog, such as table definitions, views, stored procedures and functions. Once extracted, you migrate all this code to equivalent data definition languages (DDLs) in Snowflake. This step also includes migrating data manipulation language (DML) scripts, which may be used by business analysts to build reports or dashboards.
All this code needs to be migrated and adjusted to work in Snowflake. The adjustments can range from simple changes, such as naming conventions and data type mappings, to more complex differences in syntax, platform semantics and other factors. To assist with this, Snowflake offers a powerful solution called SnowConvert AI, which automates much of the database code conversion process. -
Data migration Data migration involves transferring data between different storage systems, formats, or computer systems. In the context of a Databricks to Snowflake migration, it specifically refers to moving data from your Databricks environment to your new Snowflake environment.
There are two main types discussed in this guide:
- Historical data migration: Taking a snapshot of your Databricks data at a specific point in time and transferring it to Snowflake. This is often done as an initial, bulk transfer.
- Incremental data migration: Moving new or changed data from Databricks to Snowflake on an ongoing basis after the initial historical migration. This ensures that your Snowflake environment stays up-to-date with your source systems.
- Data ingestion: After migrating the historical data, the next step is migrating the data ingestion process, bringing in live data from various sources. Typically, this process follows an extract, transform, load (ETL) or extract, load, transform (ELT) model, depending on when and where the data transformation occurs before it becomes available to business users.
- Reporting and analytics, now that the database has both historical data and live pipelines continuously importing new data, the next step is to extract value from this data through BI. Reporting can be done using standard BI tools or custom queries. In both cases, the SQL sent to the database may need to be adjusted to meet Snowflake’s requirements. These adjustments can range from simple name changes (common during migration) to syntax and more complex semantic differences. All these need to be identified and addressed.
- Data validation and testing: The goal is to have the data as clean as possible before entering this phase.
Every organization has its own testing methodologies and requirements for moving data into production. These must be fully understood from the start of the project. - Deployment. At this stage, the data is validated, an equivalent system is set up, all the ETLs have been migrated, and reports have been verified. Are you ready to go live?
Not so fast — there are still a few critical considerations before final promotion to production. First, your legacy application may consist of multiple components or services. Ideally, you should migrate these applications one by one (although parallel migration is possible) and promote them to production in the same order. During this process, ensure your bridging strategy is in place so business users don’t have to query both Snowflake and the legacy system. Data synchronization for applications that haven’t been migrated yet should happen behind the scenes through the bridging mechanism. If this isn’t done, business users will have to work in a hybrid environment, and they must understand the implications of this setup. - Optimize and run once a system has been migrated to Snowflake, it enters normal maintenance mode. All software systems are living organisms requiring ongoing maintenance. This phase, after migration, is referred to as optimize and run, and it is not part of the migration itself.
Key Phases
A typical Databricks-to-Snowflake migration can be broken down into several key phases, each with distinct objectives and considerations. Following these phases will help ensure a structured and successful transition.
Phase 1: Planning and Design
This initial phase is crucial for a successful migration. It lays the groundwork by defining your project’s scope, objectives, and requirements. It involves a deep understanding of your current Databricks environment and a clear vision for the future state in Snowflake.
Your Actionable Steps:
- Conduct a Thorough Assessment of your Databricks Environment: This involves more than just a technical inventory; it is a strategic exercise to identify “technical debt” and uncover opportunities for modernizing and simplifying the data estate.
- Inventory Existing Data Assets: Meticulously identify and document all Databricks assets, including databases, tables (especially Delta Lake tables), views, notebooks (categorized by language: Python, Scala, SQL), jobs, workflows, User-Defined Functions (UDFs), and external integrations.
- Analyze Query Workloads: Utilize Databricks’ monitoring tools and logs to pinpoint frequently executed and resource-intensive queries. These queries will be critical for performance validation post-migration.
- Categorize Data Assets: Distinguish between production and non-production data, identify active versus deprecated objects, and pinpoint any redundant assets that can be excluded from migration. This significantly reduces the volume of data and code to be migrated, saving effort, time, and costs.
- Assess Security and Compliance Requirements: Identify sensitive data, regulatory obligations (e.g. GDPR, HIPAA), and potential vulnerabilities within the existing Databricks environment. This information is critical for designing a robust security setup in Snowflake.
- Define Clear Migration Objectives and Success Metrics: Overlooking the precise definition of these objectives can lead to “moving goalposts” and project failure.
- Articulate Strategic Drivers: Clearly state the business drivers (e.g. cost reduction, improved BI performance, simplified operations, enhanced governance) and technical objectives for migrating to Snowflake.
- Establish Measurable Success Metrics: Define quantifiable metrics to track progress and demonstrate ROI, such as improvements in query performance (e.g. average query latency reduced by X%), demonstrable cost savings (e.g. Y% reduction in monthly cloud spend), a measurable decrease in operational incidents, increased user satisfaction scores, and verified data accuracy.
- Choose Your Migration Approach: Phased vs. Big Bang Cutover: The selection of a migration strategy is fundamentally a risk management decision.
- Phased Migration: This approach involves moving data and workloads in smaller, manageable segments (by subject area, data mart, business unit, or application). It is highly recommended for maintaining zero or minimal downtime, allowing for continuous testing, iterative learning, and gradual workload shifting. This approach facilitates parallel runs for thorough validation.
- Big Bang Cutover: This approach involves migrating all data and workloads at once, followed by an immediate switch. While potentially faster for very simple systems, it carries a high risk of unforeseen issues and is generally less safe for maintaining zero downtime.
- Establish a Robust Migration Readiness Framework: Early and continuous involvement of all stakeholders is paramount.
- Conduct a Formal Migration Readiness Assessment (MRA): Involve a cross-functional team of experts (code conversion, data migration, data ingestion, data validation, reporting & analytics) and representatives from both business and technical sides.
- Develop a Detailed Project Timeline and RACI Matrix: Ensure clarity of roles and responsibilities for all migration tasks.
- Secure Explicit Buy-in: Obtain buy-in from all key stakeholders, including executive leadership and business users, from the outset. A technically flawless migration can still fail if business users are not adequately prepared, trained, or involved.
Phase 2: Environment and Security
Setting up the necessary environments and security measures is a critical early step before you begin the migration. Snowflake operates under a shared security model between the platform and administrators.
Your Actionable Steps:
- Set Up Environments: Decide on the number of Snowflake accounts needed. At minimum, set up a production and development environment. Based on your strategy, consider additional environments for different testing stages.
- Implement Security Measures:
- Start with network policies to ensure only authorized users within your VPN can access the Snowflake system.
- Define roles based on business needs, as Snowflake’s user access control is role-based.
- Create user accounts and enforce Multi-Factor Authentication (MFA) and/or Single Sign-On (SSO) for all users.
- Set up service accounts without relying on traditional username/password authentication.
- Define Roles During Migration: Define specific roles for your migration team. Even in non-production environments, where the team may have more freedom, remember that you will be dealing with real data, so maintain robust security.
- Rethink Your Access Model: Use this migration to clean up and optimize your access hierarchy, ensuring only necessary users have access to specific resources.
- Coordinate with Finance: Align with your finance team to track Snowflake usage by department, utilizing Snowflake’s consumption-based pricing model and object tagging for cost allocation.
Phase 3: Database Code Conversion
This phase focuses on converting your Databricks database code (DDL, SQL, Spark code) to Snowflake-compatible SQL and Snowpark.
Your Actionable Steps:
- Map Databricks Spark Data Types to Snowflake Data Types:
- Meticulously identify and map Databricks (Spark) data types to their most appropriate Snowflake equivalents. Pay close attention to precision, scale, and time zone handling for complex types (e.g. TimestampType to TIMESTAMP_NTZ, TIMESTAMP_LTZ, or TIMESTAMP_TZ).
- Be aware that ByteType maps to Snowflake’s INTEGER, and LongType (64-bit) to INTEGER (32-bit) may require range checks to prevent truncation.
- ArrayType and MapType commonly map to Snowflake’s VARIANT data type.
- Translate Data Definition Language (DDL) for Tables and Views:
- Extract existing DDL scripts from your Databricks environment, typically from Delta Lake tables.
- Adjust the extracted DDL for full compatibility with Snowflake’s SQL dialect, removing or re-engineering Databricks-specific features (e.g., Delta Lake table properties, specific partitioning schemes beyond clustering keys).
- Consider opportunities for schema reorganization, such as breaking down large schemas into multiple Snowflake databases or schemas for better logical separation and access control.
- Convert Databricks SQL and Spark Code to Snowflake SQL and Snowpark:
- Databricks SQL to Snowflake SQL: Snowconvert AI now supports Spark SQL and Databricks SQL assessment and translation for TABLES and VIEWS.
- Spark Code (PySpark/Scala) to Snowpark: Convert PySpark or Scala code from Databricks notebooks and jobs to Snowflake’s Snowpark API (Python, Java, Scala). Snowpark DataFrames offer similar functionalities to Spark DataFrames (filter, select, join, groupBy, agg), aiming to bring processing logic directly to data within Snowflake.
- User-Defined Functions (UDFs): Re-implement Databricks UDFs (Python, Scala) as Snowflake UDFs (SQL, JavaScript, Python, Java, Scala). Complex Spark UDFs may require significant re-engineering to leverage Snowpark effectively.
- Orchestration Logic: Re-design and re-implement Databricks Jobs, Workflows, and Delta Live Tables (DLT) orchestration logic in Snowflake using native features like Streams and Tasks for incremental transformations and scheduling. Alternatively, repoint external orchestrators (e.g., Airflow) to Snowflake, rewriting any embedded Databricks-specific code.
Phase 4: Data Migration
Data migration is the process of transferring existing datasets from the Databricks environment to Snowflake. This phase typically involves both historical bulk data transfer and ongoing incremental data ingestion.
Your Actionable Steps:
- Extract Data from Databricks:
- For Delta Lake tables, generate manifest files using Apache Spark, which point to the underlying Parquet data files that Snowflake can directly read.
- For large tables, partition data exports for efficient parallel processing.
- Leverage Databricks’ native Snowflake connector to directly read data from Databricks and write it to cloud storage (e.g. AWS S3, Azure Blob Storage) as a staging area for Snowflake.
- Add a timestamp column for ingestion time and a source system name column to maintain lineage and control in Snowflake.
- Load Data into Snowflake:
- Use Snowflake’s COPY INTO command for bulk loading data from external stages (cloud storage locations) into Snowflake tables.
- For optimal performance with Parquet files, use Snowflake’s vectorized scanner (set USE_VECTORIZED_SCANNER in COPY command, or expect it to be default in future).
- Best Practices for Loading:
- File Size Optimization: Create files in the range of 100-250MB with compression (e.g., Snappy for Parquet) for optimal throughput.
- Purging Staged Files: Use PURGE=TRUE in the COPY command to remove files from the stage after successful loading, optimizing performance and managing storage costs.
- Error Handling: Use ON_ERROR=’CONTINUE’ in the COPY command for large files with potential bad data, allowing good data to load while ignoring problematic rows.
- Internal Stages: Consider using Snowflake’s internal stages for faster loading compared to external stages, but compare storage costs.
- For incremental data loading, implement Change Data Capture (CDC) pipelines to replicate new or changed data from Databricks to Snowflake. Tools like Fivetran or Matillion can automate these syncs.
Phase 5: Data Ingestion
This phase focuses on migrating the ongoing data ingestion processes and ETL/ELT pipelines from Databricks to Snowflake, ensuring a continuous flow of live data.
Your Actionable Steps:
- Re-engineer Databricks ETL/ELT Workflows:
- Re-engineer Databricks ETL/ELT workflows (often built using PySpark, Scala, or SQL with Delta Live Tables (DLT) or Databricks Jobs) for Snowflake.
- For complex ETL/ELT, convert Spark code to Snowpark DataFrames and UDFs (as discussed in Phase 1). For SQL-based transformations, consider dbt (data build tool) for transformations within Snowflake.
- Leverage Snowflake Native Features:
- Streams and Tasks: Use Streams to record DML changes for incremental processing and Tasks to schedule SQL statements or stored procedures for incremental transformations and orchestration directly within Snowflake.
- Snowpipe: For real-time, continuous loading of new data, use Snowpipe for trickle feeds. For batch loading, the COPY command remains a powerful option.
- Snowpipe Streaming: Ideal for low-latency streaming use cases.
- Realign Data Sources and Sinks:
- Redirect multiple inbound data sources currently landing in Databricks to Snowflake ingestion patterns by configuring connectors or custom ingestion processes to point directly to Snowflake stages or tables.
- Develop a plan to repoint downstream systems (e.g., BI tools, other applications) that currently read from Databricks to Snowflake once data pipelines have stabilized and data validation is complete.
Phase 6: Reporting and Analytics Transition
This phase focuses on ensuring that Business Intelligence (BI) and analytical tools continue to function correctly and optimally with Snowflake as the new data source.
Your Actionable Steps:
- Adjust BI Tools and Custom Queries:
- Repoint or refactor existing reporting tools (e.g., Tableau, Power BI, Looker) and adjust custom queries that previously ran against Databricks.
- Adjust SQL queries sent to the database for Snowflake’s requirements, which can range from simple name changes to more complex syntax and semantic differences.
- Engage Business Users and Provide Training:
- Include business users as key stakeholders in the migration process (e.g., in the RACI matrix during planning). Their acceptance is crucial for a full transition away from the legacy platform.
- Train business users on how Snowflake operates and ensure they clearly understand the platform differences. This will enable them to modify their custom queries and reports as needed.
- Consider a parallel training track for business users, followed by office hours with migration experts, to help address platform differences and guide users through necessary adjustments.
Phase 7: Data Validation and Testing
Data validation and testing are often underestimated steps in the migration planning process, yet they are critical to ensuring data integrity and accuracy in the new Snowflake environment. The goal is to have the data as clean as possible before entering this phase.
Your Actionable Steps:
- Conduct Comprehensive Testing Strategies: Every organization has its own testing methodologies and requirements for moving data into production, which must be fully understood from the start of the project.
- Functional Testing: Verify that all migrated applications and functionalities work as expected within the new environment, ensuring data integrity and accuracy. This includes verifying that migrated ETLs and reports produce correct results.
- Performance Testing: Evaluate query performance, data loading speed, and overall system responsiveness. This helps identify and address any performance bottlenecks in Snowflake, ensuring the new platform meets or exceeds performance expectations.
- User Acceptance Testing (UAT): Involve end-users in the testing process to ensure the migrated system meets their business requirements and gather feedback for potential improvements. This is crucial for gaining user confidence and adoption.
- Data Validation Techniques: Compare row counts, calculate sums, maximums, minimums, and averages of columns, and hash row values for one-on-one association between source (Databricks) and target (Snowflake) systems. Running parallel systems for a period allows for real-time comparison.
- Provide Training and Documentation:
- Offer comprehensive training to end-users on Snowflake’s features, functionalities, and best practices, covering topics like data access, query optimization, and security.
- Create comprehensive documentation, including system architecture diagrams, data flow diagrams, operational procedures, user guides, troubleshooting guides, and FAQs for easy reference and ongoing support.
Phase 8: Deployment - Going Live
This stage involves critical considerations before final promotion to production, ensuring a smooth and coordinated cutover.
Your Actionable Steps:
- Plan Phased Rollout and Bridging Strategy:
- Ideally, migrate legacy applications one by one and promote them to production in the same order.
- Ensure a bridging strategy is in place so business users do not have to query both Snowflake and the legacy Databricks system. Data synchronization for applications not yet migrated should happen behind the scenes through this mechanism.
- Ensure Stakeholder Alignment and Formal Sign-offs:
- When ready for cutover, ensure all stakeholders are aligned and understand that Snowflake will be the system of record, not the legacy Databricks platform.
- Obtain final and formal sign-offs from all stakeholders before proceeding.
- Emphasize that any reports not migrated are now the responsibility of business users, highlighting the importance of early user involvement.
- Verify that all permissions have been properly granted in Snowflake, including any Active Directory-based roles.
- Address Critical Considerations for Cutover:
- Surrogate Keys: If using surrogate keys, be aware that their lifecycle may differ between legacy and Snowflake systems; these keys need to be synchronized during cutover.
- Cutover Timing: Consider the optimal timing for cutover based on your industry to minimize business impact.
- Legacy Platform Decommissioning: Plan for the decommissioning of the legacy Databricks environment, including considerations for legacy platform licensing and data retention policies.
Phase 9: Optimize and Run - Continuous Improvement
Once a system has been migrated to Snowflake, it enters normal maintenance mode. This phase, referred to as “Optimize and Run,” is not part of the migration itself but focuses on ongoing optimization and continuous improvement.
Your Actionable Steps:
- Focus on Ongoing Optimization and Cost Management:
- The team takes full ownership of the system in Snowflake, with optimization driven by usage patterns.
- While jobs in Snowflake generally run faster, if performance doesn’t meet expectations, optimizations may be needed to fully leverage Snowflake’s unique architecture.
- Utilize Snowflake’s query analysis tools to identify bottlenecks and optimize specific parts of the workflow.
- Address only critical performance issues during migration, treating broader optimization as a post-migration effort.
- Implement Continuous Cost Management:
- Set auto-suspend timeouts for virtual warehouses to 60 seconds to significantly reduce costs, as Snowflake charges for every second a warehouse is running with a minimum of 60 seconds per resume.
- Reduce virtual warehouse sizes based on workload requirements, as compute resources and costs scale exponentially with warehouse size.
- Continuously monitor usage patterns and coordinate with finance to track departmental usage for cost allocation.
- Enhance Governance and Security:
- Refine role-based access control, implement dynamic data masking and row access policies for sensitive data, and regularly audit access patterns.
- Rethink the access model to clean up the hierarchy of users and ensure only necessary users have access to specific resources.