Teradata to Snowflake Migration Guide
Snowflake Migration Framework
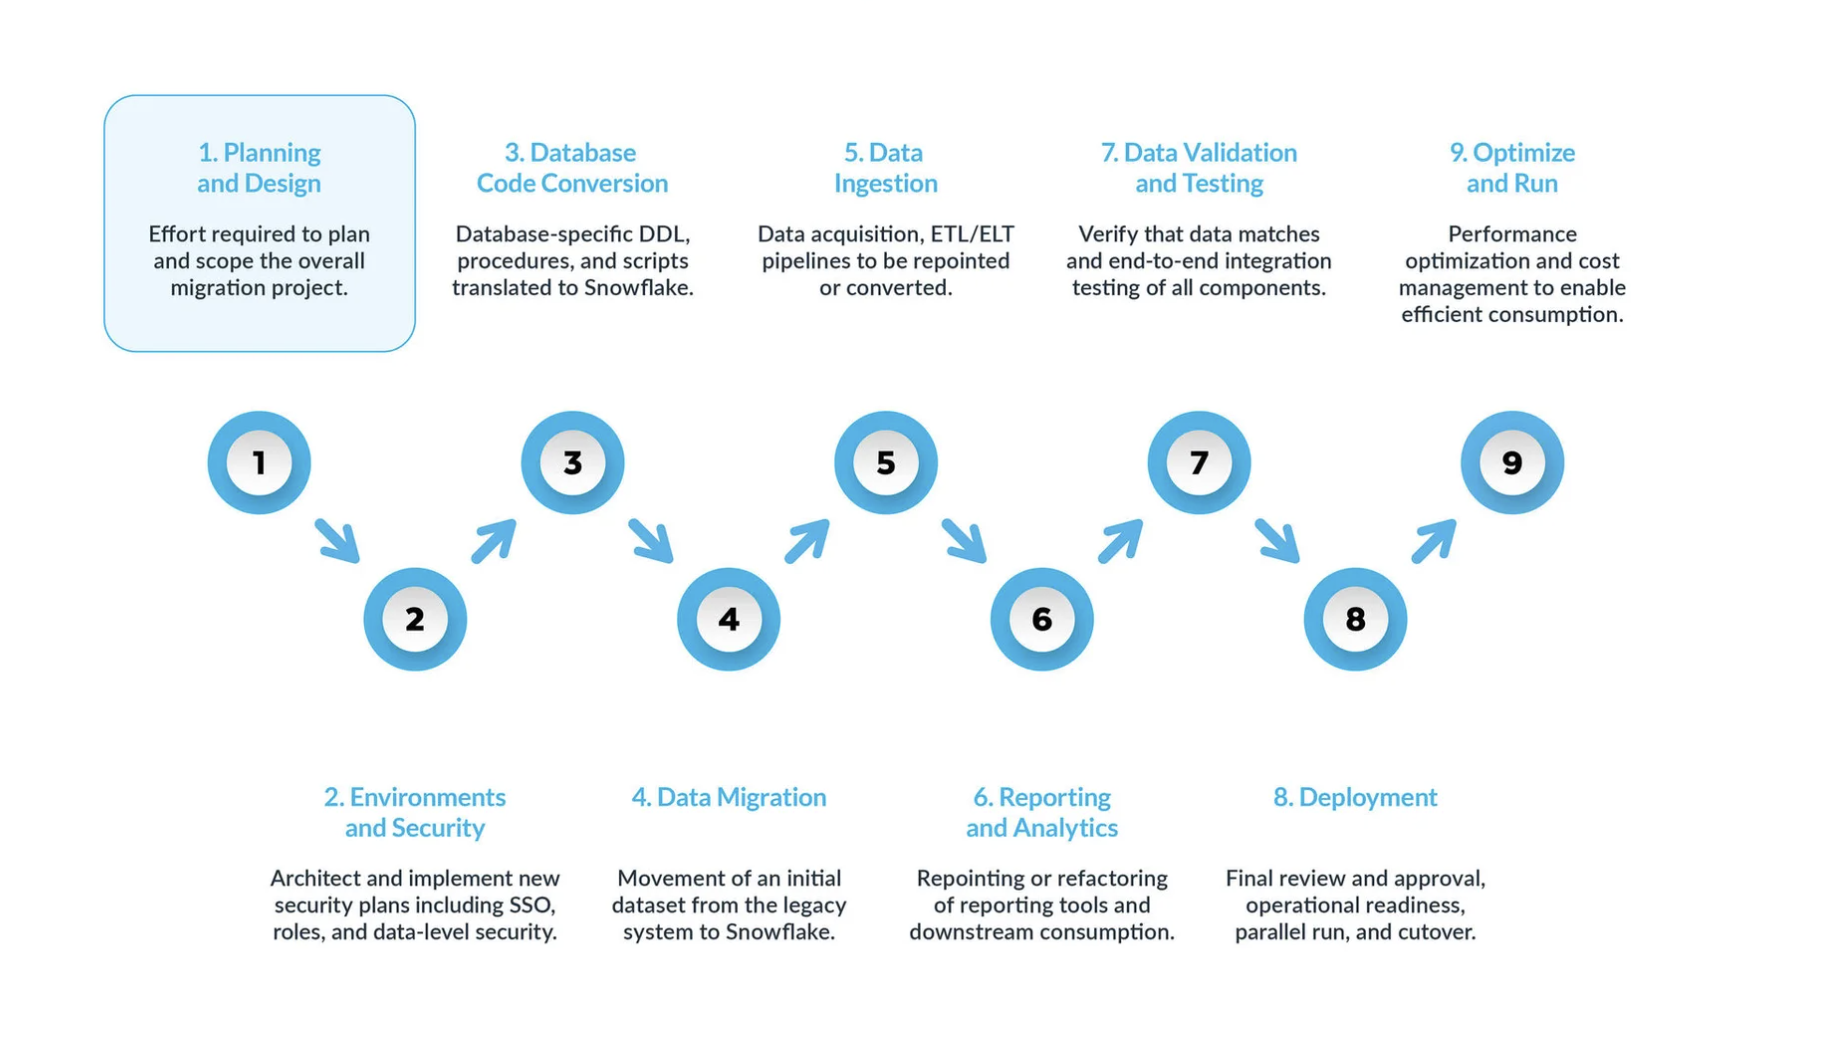
A typical Teradata-to-Snowflake migration can be broken into five key steps:
- Planning and design are often overlooked steps in the migration process. The main reason is that companies typically want to show progress quickly, even if they haven’t fully understood the scope of the project. That is why, this phase is critical to understand and prioritize the migration project.
- Environment and security with a plan, a clear timeline, a RACI matrix, and buy-in from all stakeholders, it’s time to move into execution mode.
Setting up the necessary environments and security measures to begin the migration is very important before starting the migration phase given that there are many moving parts, and will be more impactful for the migration project if all your setup is ready before moving forward. - Database code conversion process involves extracting code directly from the source systems’ database catalog, such as table definitions, views, stored procedures and functions. Once extracted, you migrate all this code to equivalent data definition languages (DDLs) in Snowflake. This step also includes migrating data manipulation language (DML) scripts, which may be used by business analysts to build reports or dashboards.
All this code needs to be migrated and adjusted to work in Snowflake. The adjustments can range from simple changes, such as naming conventions and data type mappings, to more complex differences in syntax, platform semantics and other factors. To assist with this, Snowflake offers a powerful solution called SnowConvert AI, which automates much of the database code conversion process. - Data migration Data migration involves transferring data between different storage systems, formats, or computer systems. In the context of a Teradata to Snowflake migration, it specifically refers to moving data from your Teradata environment to your new Snowflake environment.
There are two main types discussed in this guide:
- Historical data migration: Taking a snapshot of your Teradata data at a specific point in time and transferring it to Snowflake. This is often done as an initial, bulk transfer.
- Incremental data migration: Moving new or changed data from Teradata to Snowflake on an ongoing basis after the initial historical migration. This ensures that your Snowflake environment stays up-to-date with your source systems.
- Data ingestion: After migrating the historical data, the next step is migrating the data ingestion process, bringing in live data from various sources. Typically, this process follows an extract, transform, load (ETL) or extract, load, transform (ELT) model, depending on when and where the data transformation occurs before it becomes available to business users.
- Reporting and analytics, now that the database has both historical data and live pipelines continuously importing new data, the next step is to extract value from this data through BI. Reporting can be done using standard BI tools or custom queries. In both cases, the SQL sent to the database may need to be adjusted to meet Snowflake’s requirements. These adjustments can range from simple name changes (common during migration) to syntax and more complex semantic differences. All these need to be identified and addressed.
- Data validation and testing: The goal is to have the data as clean as possible before entering this phase.
Every organization has its own testing methodologies and requirements for moving data into production. These must be fully understood from the start of the project. - Deployment. At this stage, the data is validated, an equivalent system is set up, all the ETLs have been migrated, and reports have been verified. Are you ready to go live?
Not so fast — there are still a few critical considerations before final promotion to production. First, your legacy application may consist of multiple components or services. Ideally, you should migrate these applications one by one (although parallel migration is possible) and promote them to production in the same order. During this process, ensure your bridging strategy is in place so business users don’t have to query both Snowflake and the legacy system. Data synchronization for applications that haven’t been migrated yet should happen behind the scenes through the bridging mechanism. If this isn’t done, business users will have to work in a hybrid environment, and they must understand the implications of this setup. - Optimize and run once a system has been migrated to Snowflake, it enters normal maintenance mode. All software systems are living organisms requiring ongoing maintenance. This phase, after migration, is referred to as optimize and run, and it is not part of the migration itself.
Migration Phases
Phase 1: Planning and design
This phase is the crucial first step in a successful Snowflake migration. It lays the groundwork for the entire migration process by defining the scope, objectives, and requirements. This phase involves a deep understanding of the current environment and a clear vision for the future state in Snowflake.
During this phase, organizations identify the key business drivers and technical objectives for migrating to Snowflake by executing the following tasks:
Conduct a Thorough Assessment of your Teradata Environment
To conduct a thorough assessment of the current environment, it is crucial to start by inventorying existing data assets. This involves documenting not only databases and files but also any external systems, while carefully noting data types, schemas, and any prevalent data quality issues. Simultaneously, analyzing query workloads is essential to pinpoint frequently executed and resource-intensive queries, which will shed light on data access patterns and user behavior. Lastly, assessing security and compliance requirements is non-negotiable, requiring the identification of sensitive data, regulatory obligations, and potential vulnerabilities within the existing system.
Phase 2: Environment and security
One of the first steps we recommend is setting up the necessary environments and security measures to begin the migration. There are many moving parts, so let’s start with security. As with any cloud platform, Snowflake operates under a shared security model between the platform and administrators.
Setting Up Environments
First, you need to decide how many accounts you will need. In legacy platforms, you typically had database instances, but in Snowflake, the setup revolves around accounts. At a minimum, you should set up a production environment and a development environment. Depending on your testing strategy, you may also need additional environments for different stages of testing.
Security Measures
Once the environments are set up, it’s crucial to implement the right security measures. Start with the network policy to ensure that only authorized users within your VPN can access the Snowflake system.
Snowflake’s user access control is role-based, so administrators must define roles according to the business needs. Once the roles are defined, create the user accounts and enforce Multi-Factor Authentication (MFA) and/or Single Sign-On (SSO) for all users. Additionally, you’ll need to set up service accounts and ensure that you’re not relying on traditional username/password authentication for these accounts.
Roles During Migration
During the migration, you’ll also need to define specific roles for the users executing the migration itself. Although the roles for non-production environments may differ, remember that during migration, you will be dealing with real data. Don’t skimp on security, even for non-production environments.
In development, the migration team will generally have more freedom when deploying changes to the structure or code. These are active development environments, and you don’t want to block the migration team with excessive security restrictions. However, it’s still important to maintain a robust security model, even in non-production environments.
Rethinking the Access Model
Since the security model in Snowflake differs from that of many legacy platforms, this migration is a good opportunity to rethink your access model. Clean up the hierarchy of users who need access to your system and ensure that only the necessary users have access to specific resources.
Coordinating with Finance
Snowflake uses a consumption-based pricing model, meaning costs are tied to usage. As you define roles, it’s a good idea to coordinate with your finance team to track which departments are using Snowflake and how. Snowflake also allows you to tag database objects, which can be used to track ownership at the business level, helping you align usage with departmental cost allocation.
Security and environment setup are complex tasks, and they need to be planned upfront. You may even need to consider a redesign of your access model to ensure the new platform is manageable in the long run. Taking the time to set this up correctly will lay a strong foundation for a secure and efficient migration to Snowflake.
Phase 3: Database code conversion
SnowConvert AI understands the Teradata source code and converts the Data Definition Language (DDL), Data Manipulation Language (DML), and functions in the source code to the corresponding SQL in the target: Snowflake. SnowConvert AI can migrate the source code in any of these three extensions .sql, .dml, ddl
This phase involves extracting code directly from the source systems’ database catalog, such as table definitions, views, stored procedures, and functions. Once extracted, you migrate all of this code to equivalent DDLs (Data Definition Language) in Snowflake. This step also includes migrating DML (Data Manipulation Language) scripts, which may be used by business analysts to build reports or dashboards.
Please review our recommended extraction scripts here
Teradata DDL typically includes references to primary indexes, fallback, or partitioning. In Snowflake, these structures do not exist in the same way:
- Use SnowConvert AI for Teradata that significantly streamlines the Data Definition Language (DDL) conversion process, especially when dealing with numerous tables. It automates the translation of Teradata’s specific DDL constructs, such as primary index definitions and fallback options, into Snowflake’s equivalent structures. This automation reduces manual effort and minimizes the risk of errors, allowing teams to focus on higher-level migration strategy and validation.
Beyond basic DDL conversion, SnowConvert AI also addresses nuances like data type mapping and schema reorganization. It can automatically adjust data types to align with Snowflake’s offerings and facilitate decisions on whether to consolidate or break down schemas for optimal performance and manageability. This comprehensive approach ensures that the migrated database structure is not only functional but also optimized for Snowflake’s architecture. - Adjust data types where needed or use the Migrations AI assistant to fix any Error or Warning (EWI).
- Decide whether to reorganize schemas (e.g., breaking large monolithic schemas into multiple Snowflake databases).
Teradata Migration Considerations
When migrating data from Teradata to Snowflake, it is crucial to consider the functional differences between the databases.
Session Modes in Teradata
The Teradata database has different modes for running queries: ANSI Mode (rules based on the ANSI SQL: 2011 specifications) and TERA mode (rules defined by Teradata). Please review the following Teradata documentation for more information.
Teradata mode for strings informative table
For strings, the Teradata Mode works differently. As it is explained in the following table based on the Teradata documentation:
| Feature | ANSI mode | Teradata mode |
|---|---|---|
| Default attribute for character comparisons | CASESPECIFIC | NOT CASESPECIFIC |
| Default TRIM behavior | TRIM(BOTH FROM) | TRIM(BOTH FROM) |
Translation specification summary
| Mode | Column constraint values | Teradata behavior | SC expected behavior |
|---|---|---|---|
| ANSI Mode | CASESPECIFIC | CASESPECIFIC | No constraint added. |
| NOT CASESPECIFIC | CASESPECIFIC | Add COLLATE ‘en-cs’ in column definition. | |
| Teradata Mode | CASESPECIFIC | CASESPECIFIC | In most cases, do not add COLLATE, and convert its usages of string comparison to RTRIM( expression ) |
| NOT CASESPECIFIC | NOT CASESPECIFIC | In most cases, do not add COLLATE, and convert its usages of string comparison to RTRIM(UPPER( expression )) |
Available translation specification options
- TERA Mode For Strings Comparison - NO COLLATE
- TERA Mode For Strings Comparison - COLLATE
- ANSI Mode For Strings Comparison - NO COLLATE
- ANSI Mode For Strings Comparison - COLLATE
SQL Translation Reference
Use this as a guide to understand how the transformed code might look when migrating from Teradata to Snowflake. SQL has a similar syntax between dialects, but each dialect can extend or add new functionalities.
For this reason, when running SQL in one environment (such as Teradata) vs. another (such as Snowflake),
there are many statements that require transformation or even removal. These transformations are done
by SnowConvert AI.
Browse through the following pages to find more information about specific topics.
- Data Types, compare Teradata data types and their equivalents in Snowflake.
- DDL, explore the translation of the Data Definition Language.
- DML, explore the translation of the Data Manipulation Language.
- Built-in Functions, compare functions included in the runtime of both languages.
SQL to JavaScript (Procedures)
Scripts to Snowflake SQL Translation Reference
Translation reference to convert Teradata scripts files to Snowflake SQL
Scripts To Python Translation Reference
This section details how SnowConvert AI translates the Teradata Scripts (BTEQ, FastLoad, MultiLoad, TPUMP, etc.) into a scripting language compatible with Snowflake.
Browse through the following pages to find more information about specific topics.
- BTEQ, explore the translation reference for Basic Teradata Query syntax.
- FastLoad, explore the translation reference for FastLoad syntax.
- MultiLoad, explore the translation reference for MultiLoad syntax.
- TPT, explore the translation reference for TPT syntax.
Phase 4: Data Migration
First, it’s important to differentiate between historical data migration and new data addition. Historical data migration refers to taking a snapshot of the data at a specific point in time and transferring it to Snowflake. Our recommendation is to first perform an exact copy of the data without any transformation into Snowflake. This initial copy will put some load on the legacy platform, so you’ll want to do it only once and store it in Snowflake.
Your Actionable Steps:
- Perform Historical Data Migration: Take a snapshot of your Teradata data at a specific point in time and transfer it to Snowflake, often as an initial bulk transfer. The recommendation is to perform an exact copy without transformation initially.
- Plan Incremental Data Migration: After the initial historical migration, set up processes to move new or changed data from Teradata to Snowflake on an ongoing basis to keep your Snowflake environment up-to-date.
Phase 5: Data Ingestion
Pipeline migration to Snowflake involves moving or rewriting Teradata-based logic, such as BTEQ scripts, stored procedures, macros, or specialized ETL flows. This includes an Orchestration Transition, which replaces BTEQ or scheduled Teradata jobs with Streams and Tasks inside Snowflake for incremental transformations. It also requires Source/Sink Realignment, which redirects multiple inbound data sources landing in Teradata to Snowflake ingestion patterns (COPY, Snowpipe).
During the Query Conversion and Optimization stage, Teradata SQL is converted to Snowflake SQL, which may include replacing macros with stored procedures or views, rewriting QUALIFY logic, and adjusting stored procedures and join indexes. SnowConvert AI for Teradata can automate much of this translation.
With the data itself in Snowflake, you now shift to migrating or rewriting Teradata-based logic—BTEQ scripts, stored procedures, macros, or specialized ETL flows.
Orchestration Transition
- Native Snowflake: Replace BTEQ or scheduled Teradata jobs with Streams and Tasks inside Snowflake for incremental transformations.
- External Orchestrators: If you used third-party schedulers (Airflow, Control-M, etc.), point them to Snowflake and rewrite any embedded Teradata SQL.
Source/Sink Realignment
- If you had multiple inbound data sources landing in Teradata, redirect them to Snowflake ingestion patterns (COPY, Snowpipe).
- If downstream systems read from Teradata, plan to repoint them to Snowflake once the pipeline has stabilized.
SnowConvert AI for Teradata is recommended for automated translation. It can handle macros, stored procedures, and BTEQ scripts, outputting Snowflake-compatible code.
Phase 6: Reporting and analytics
Now that we have a database with both historical data and live pipelines continuously importing new data, the next step is to extract value from this data through Business Intelligence (BI). Reporting can be done using standard BI tools or custom queries. In both cases, the SQL sent to the database may need to be adjusted to meet Snowflake’s requirements. These adjustments can range from simple name changes (which are common during migration) to syntax differences and more complex semantic differences. All of these need to be identified and addressed.
As with the ingestion process, it’s crucial to review all legacy platform usage and incorporate those findings into the migration plan. There are generally two types of reports to consider: IT-owned reports and business-owned reports. It’s usually easier to track down IT-owned reports, but business-owned reports and complex queries created by business users require a different approach.
Business users are a key stakeholder in the migration process and should be included in the RACI matrix during the planning phase. They need to be trained on how Snowflake operates and should clearly understand the platform differences. This will enable them to modify their custom queries and reports as needed. We typically recommend a parallel training track for business users, followed by office hours with migration experts who can help address platform differences and guide users through the adjustments they need to make.
Business users are ultimately the ones who “accept” the migration. You might have completed the technical migration from an IT perspective, but if business users aren’t involved, they may still rely on thousands of reports that are crucial for running the business. If these reports are not updated to work with Snowflake, the business cannot fully transition away from the legacy platform.
Teradata SQL has some constructs not in Snowflake, and vice versa. Key differences include:
- Macros: Not supported in Snowflake; typically replaced by stored procedures or views.
- QUALIFY: Snowflake does not support
QUALIFYdirectly; rewrite logic using a subquery or an outer SELECT. - Stored Procedures: Teradata SP vs. Snowflake SP (SQL or JavaScript-based). The procedural language differs.
- Join Indexes: Have no direct equivalent; rely on micro-partition pruning and clustering keys.
- COLLECT STATISTICS: Teradata uses explicit stats, while Snowflake does this automatically.
SnowConvert AI for Teradata is recommended for automated translation. It can handle macros, stored procedures, and BTEQ scripts, outputting Snowflake-compatible code.
Phase 7: Data validation and testing
This brings us to data validation and testing, two often underestimated steps in the migration planning process. Of course, the goal is to have the data as clean as possible before entering this phase.
Every organization has its own testing methodologies and requirements for moving data into production. These must be fully understood from the start of the project. So, what are some useful strategies for data validation?
- Conduct Comprehensive Testing in Snowflake Migration: During the Snowflake migration process, comprehensive testing must be conducted, including:
- Functional testing: To verify that all migrated applications and functionalities work as expected within the new environment, ensuring data integrity and accuracy.
- Performance testing: To evaluate query performance, data loading speed, and overall system responsiveness, which helps identify and address any performance bottlenecks.
- User acceptance testing (UAT): To involve end-users in the testing process to ensure that the migrated system meets their requirements and gather feedback for potential improvements.
- Provide Training and Documentation for Snowflake Migration:
- Provide comprehensive training to end-users on Snowflake’s features, functionalities, and best practices, covering topics like data access, query optimization, and security.
- Create comprehensive documentation, including system architecture diagrams, data flow diagrams, operational procedures, user guides, troubleshooting guides, and FAQs for easy reference.
Phase 8: Deployment
When you’re finally ready for the cutover, ensure that all stakeholders are aligned and understand that from this point forward, Snowflake will be the system of record, not the legacy platform. You’ll need final and formal sign-offs from all stakeholders before proceeding. Any reports that were not migrated are now the responsibility of the business users. This is why it’s crucial not to involve users at the last minute—they should be part of the process from the start and should be aware of the migration timeline.
Additionally, verify that all permissions have been properly granted. For example, if you are using Active Directory-based roles, ensure these are created and configured in Snowflake.
A few additional scenarios are typically left to the end, but they shouldn’t be overlooked:
- Surrogate keys: If you are using surrogate keys, be aware that their lifecycle may differ between the legacy and Snowflake systems. These keys need to be synchronized during the cutover.
- Cutover timing: Depending on your industry, there may be more or less favorable times during the year for performing a cutover. Consider the timing carefully.
- Legacy platform licensing: Don’t forget that you may face hard deadlines related to the licensing of the legacy platform. Be sure to plan your cutover around any such deadlines.
Phase 9: Optimize and run
Once a system has been migrated to Snowflake, it enters normal maintenance mode. All software systems are living organisms that require ongoing maintenance. We refer to this phase after migration as Optimize and Run, and we emphasize that it is not part of the migration itself.
Optimization and continuous improvement are ongoing processes that happen after migration. At this point, your team takes full ownership of the system in Snowflake. The system will continue to evolve, and optimization will be driven by usage patterns.
In general, we find that jobs in Snowflake tend to run faster than on the original platforms. If performance doesn’t meet expectations, you may need to run some optimizations to fully leverage Snowflake’s unique architecture. Snowflake provides various query analysis tools that can help identify bottlenecks, enabling you to optimize specific parts of the workflow.
During the optimization phase, you may need to revisit different aspects of the system. The advantage is that you are already benefiting from Snowflake’s capabilities, and optimization tasks will become part of your regular maintenance routine.
As a recommendation, you should focus on addressing only critical performance issues during the migration phase. Optimization is best treated as a post-migration effort.
Need Migration Assistance?
For complex migration scenarios, addressing specific functional differences, or general assistance, Snowflake provides dedicated support channels, such as snowconvert-support@snowflake.com. Furthermore, leveraging Snowflake’s extensive migration resources, including master classes, webinars, and detailed reference guides specifically for Teradata migrations, can substantially enhance the likelihood of migration success.
A successful data platform migration from Teradata is not solely dependent on the conversion tool itself. Instead, it relies on a holistic strategy that integrates the efficiency of automation (provided by SnowConvert AI), the critical judgment and problem-solving capabilities of human experts (such as data architects), and the comprehensive support and resources offered by the target platform’s ecosystem (including Snowflake’s documentation, support services, and best practices). This implies that organizations should strategically invest not only in the migration tool but also in upskilling their teams in Snowflake-native capabilities and establishing robust validation processes. The ultimate goal is not merely to move the data, but to modernize the entire data operation, leading to a more resilient, performant, and future-ready cloud data platform.
Appendix
Appendix 1: Teradata databases to exclude when migrating to Snowflake
The following list of databases are needed for Teradata only and shouldn’t be migrated to Snowflake:
| DBC Crashdumps Dbcmngr External_AP EXTUSER LockLogShredder QCD SQLJ Sys_Calendar | SysAdmin SYSBAR SYSJDBC SYSLIB SYSSPATIAL SystemFE SYSUDTLIB SYSUIF TD_SERVER_DB | TD_SYSFNLIB TD_SYSGPL TD_SYSXML TDPUSER TDQCD TDStats tdwm |
|---|
Appendix 2: Teradata types to Snowflake data types
| Teradata Column Type | Teradata Data Type | Snowflake Data Type |
|---|---|---|
| ++ | TD_ANYTYPE | TD_ANYTYPE data type isn’t supported in Snowflake. |
| A1 | ARRAY | ARRAY |
| AN | ARRAY | ARRAY |
| AT | TIME | TIME |
| BF | BYTE | BINARY |
| BO | BLOB | BLOB data type isn’t directly supported but can be replaced with BINARY (limited to 8MB). |
| BV | VARBYTE | BINARY |
| CF | CHAR | VARCHAR |
| CO | CLOB | CLOB data type isn’t directly supported but can be replaced with VARCHAR (limited to 16MB). |
| CV | VARCHAR | VARCHAR |
| D | DECIMAL | NUMBER |
| DA | DATE | DATE |
| DH | INTERVAL DAY TO HOUR | INTERVAL data types aren’t supported in Snowflake but date calculations can be done with the date comparison functions (e.g. DATEDIFF and DATEADD) |
| DM | INTERVAL DAY TO MINUTE | INTERVAL data types aren’t supported in Snowflake but date calculations can be done with the date comparison functions (e.g. DATEDIFF and DATEADD) |
| DS | INTERVAL DAY TO SECOND | INTERVAL data types aren’t supported in Snowflake but date calculations can be done with the date comparison functions (e.g. DATEDIFF and DATEADD). |
| DT | DATASET | DATASET data type isn’t supported in Snowflake. |
| DY | INTERVAL DAY | INTERVAL data types aren’t supported in Snowflake but date calculations can be done with the date comparison functions (e.g. DATEDIFF and DATEADD). |
| F | FLOAT | FLOAT |
| HM | INTERVAL HOUR TO MINUTE | INTERVAL data types aren’t supported in Snowflake but date calculations can be done with the date comparison functions (e.g. DATEDIFF and DATEADD). |
| HR | INTERVAL HOUR | INTERVAL data types aren’t supported in Snowflake but date calculations can be done with the date comparison functions (e.g. DATEDIFF and DATEADD). |
| HS | INTERVAL HOUR TO SECOND | INTERVAL data types aren’t supported in Snowflake but date calculations can be done with the date comparison functions (e.g. DATEDIFF and DATEADD). |
| I1 | BYTEINT | NUMBER |
| I2 | SMALLINT | NUMBER |
| I8 | BIGINT | NUMBER |
| I | INTEGER | NUMBER |
| JN | JSON | VARIANT |
| LF | CHAR | This data type is in DBC only and can’t be converted to Snowflake. |
| LV | VARCHAR | This data type is in DBC only and can’t be converted to Snowflake. |
| MI | INTERVAL MINUTE | INTERVAL data types aren’t supported in Snowflake but date calculations can be done with the date comparison functions (e.g. DATEDIFF and DATEADD). |
| MO | INTERVAL MONTH | INTERVAL data types aren’t supported in Snowflake but date calculations can be done with the date comparison functions (e.g. DATEDIFF and DATEADD) |
| MS | INTERVAL MINUTE TO SECOND | INTERVAL data types aren’t supported in Snowflake but date calculations can be done with the date comparison functions (e.g. DATEDIFF and DATEADD). |
| N | NUMBER | NUMBER |
| PD | PERIOD(DATE) | Can be converted to VARCHAR or split into 2 separate dates. |
| PM | PERIOD(TIMESTAMP WITH TIME ZONE) | Can be converted to VARCHAR or split into 2 separate timestamps (TIMESTAMP_TZ). |
| PS | PERIOD(TIMESTAMP) | Can be converted to VARCHAR or split into 2 separate timestamps (TIMESTAMP_NTZ). |
| PT | PERIOD(TIME) | Can be converted to VARCHAR or split into 2 separate times. |
| PZ | PERIOD(TIME WITH TIME ZONE) | Can be converted to VARCHAR or split into 2 separate times but WITH TIME ZONE isn’t supported for TIME. |
| SC | INTERVAL SECOND I | INTERVAL data types aren’t supported in Snowflake but date calculations can be done with the date comparison functions (e.g. DATEDIFF and DATEADD). |
| SZ | TIMESTAMP WITH TIME ZONE | TIMESTAMP_TZ |
| TS | TIMESTAMP | TIMESTAMP_NTZ |
| TZ | TIME WITH TIME ZONE | TIME WITH TIME ZONE isn’t supported because TIME is stored using “wall clock” time only without a time zone offset. |
| UF | CHAR | This data type is in DBC only and can’t be converted to Snowflake. |
| UT | UDT | UDT data type isn’t supported in Snowflake |
| UV | VARCHAR | This data type is in DBC only and can’t be converted to Snowflake |
| XM | XML | VARIANT |
| YM | INTERVAL YEAR TO MONTH | INTERVAL data types aren’t supported in Snowflake but date calculations can be done with the date comparison functions (e.g. DATEDIFF and DATEADD) |
| YR | INTERVAL YEAR | YR INTERVAL YEAR INTERVAL data types aren’t supported in Snowflake but date calculations can be done with the date comparison functions (e.g. DATEDIFF and DATEADD). |