SQL Server to Snowflake Migration Guide
Snowflake Migration Framework
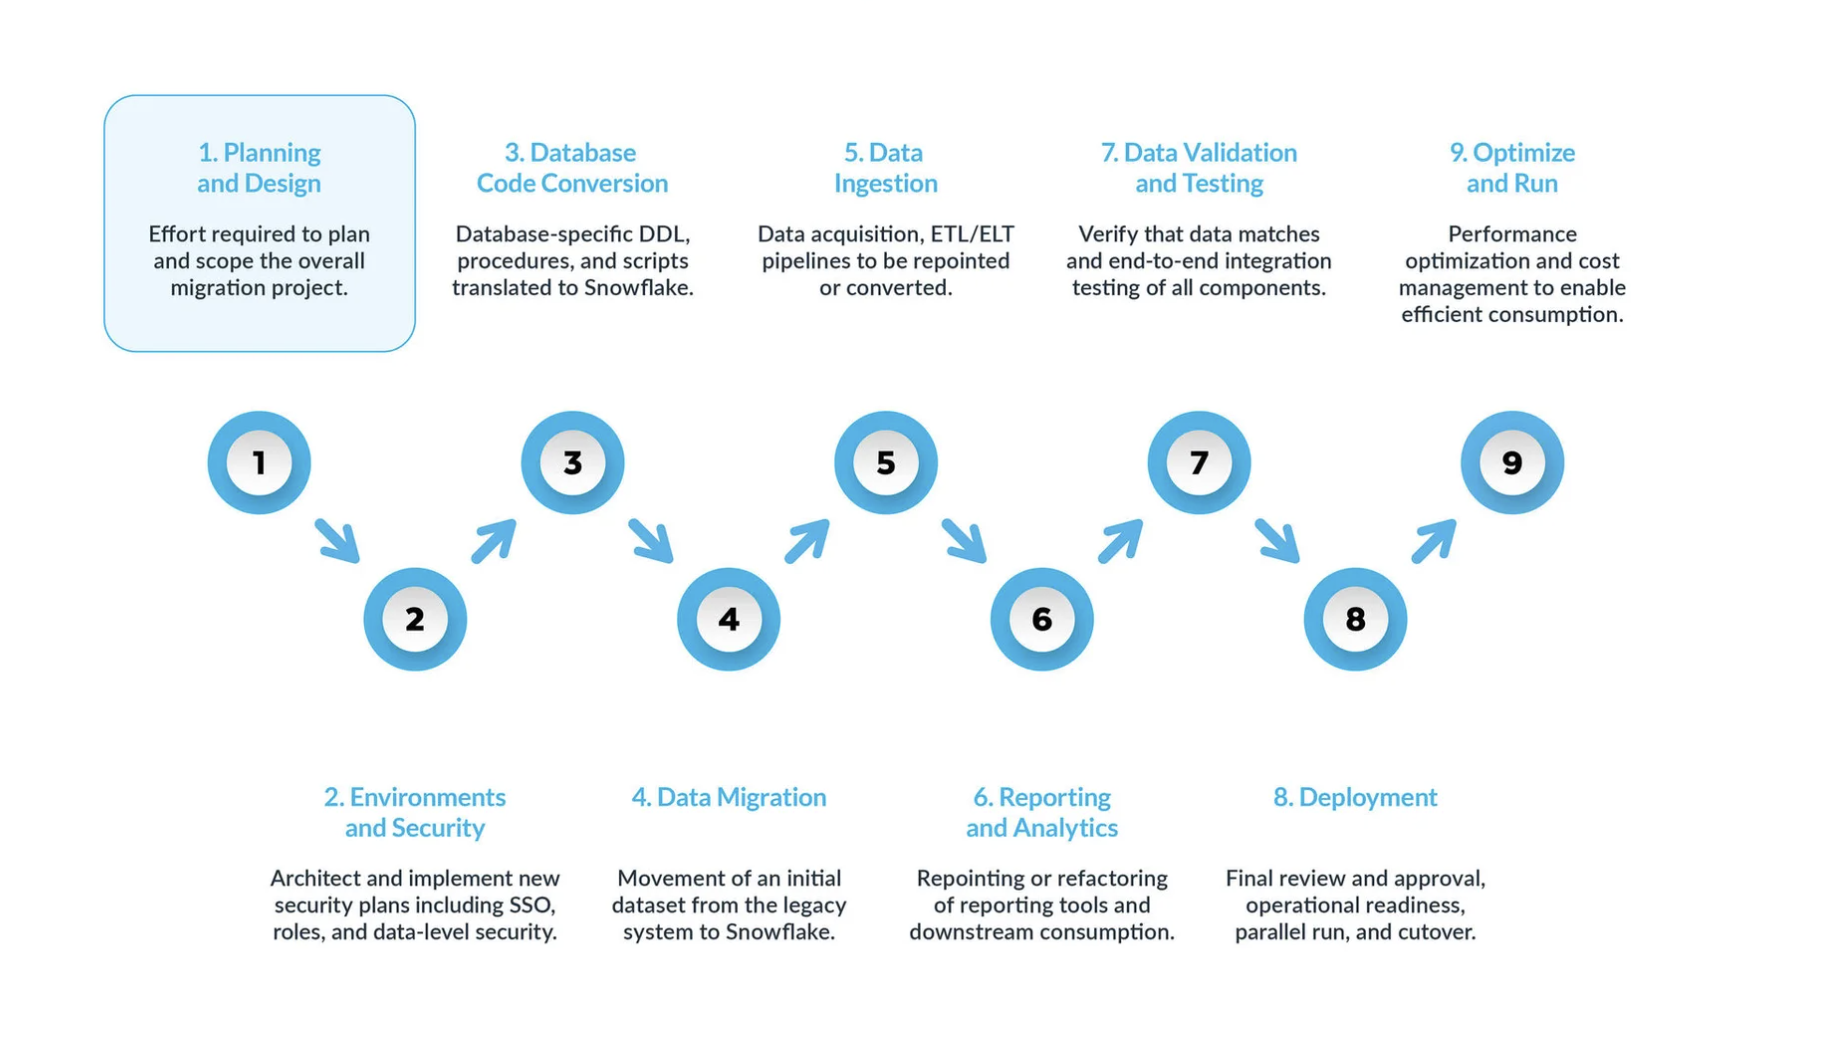
A typical SQL Server-to-Snowflake migration can be broken into nine key steps:
-
Planning and design are often overlooked steps in the migration process. The main reason is that companies typically want to show progress quickly, even if they haven’t fully understood the scope of the project. That is why, this phase is critical to understand and prioritize the migration project.
-
Environment and security with a plan, a clear timeline, a RACI matrix, and buy-in from all stakeholders, it’s time to move into execution mode.
Setting up the necessary environments and security measures to begin the migration is very important before starting the migration phase given that there are many moving parts, and will be more impactful for the migration project if all your setup is ready before moving forward. -
Database code conversion process involves extracting code directly from the source systems’ database catalog, such as table definitions, views, stored procedures and functions. Once extracted, you migrate all this code to equivalent data definition languages (DDLs) in Snowflake. This step also includes migrating data manipulation language (DML) scripts, which may be used by business analysts to build reports or dashboards.
All this code needs to be migrated and adjusted to work in Snowflake. The adjustments can range from simple changes, such as naming conventions and data type mappings, to more complex differences in syntax, platform semantics and other factors. To assist with this, Snowflake offers a powerful solution called SnowConvert AI, which automates much of the database code conversion process. -
Data migration Data migration involves transferring data between different storage systems, formats, or computer systems. In the context of a SQL Server to Snowflake migration, it specifically refers to moving data from your SQL Server environment to your new Snowflake environment.
There are two main types discussed in this guide:
- Historical data migration: Taking a snapshot of your SQL Server data at a specific point in time and transferring it to Snowflake. This is often done as an initial, bulk transfer.
- Incremental data migration: Moving new or changed data from SQL Server to Snowflake on an ongoing basis after the initial historical migration. This ensures that your Snowflake environment stays up-to-date with your source systems.
- Data ingestion: After migrating the historical data, the next step is migrating the data ingestion process, bringing in live data from various sources. Typically, this process follows an extract, transform, load (ETL) or extract, load, transform (ELT) model, depending on when and where the data transformation occurs before it becomes available to business users.
- Reporting and analytics, now that the database has both historical data and live pipelines continuously importing new data, the next step is to extract value from this data through BI. Reporting can be done using standard BI tools or custom queries. In both cases, the SQL sent to the database may need to be adjusted to meet Snowflake’s requirements. These adjustments can range from simple name changes (common during migration) to syntax and more complex semantic differences. All these need to be identified and addressed.
- Data validation and testing: The goal is to have the data as clean as possible before entering this phase.
Every organization has its own testing methodologies and requirements for moving data into production. These must be fully understood from the start of the project. - Deployment. At this stage, the data is validated, an equivalent system is set up, all the ETLs have been migrated, and reports have been verified. Are you ready to go live?
Not so fast — there are still a few critical considerations before final promotion to production. First, your legacy application may consist of multiple components or services. Ideally, you should migrate these applications one by one (although parallel migration is possible) and promote them to production in the same order. During this process, ensure your bridging strategy is in place so business users don’t have to query both Snowflake and the legacy system. Data synchronization for applications that haven’t been migrated yet should happen behind the scenes through the bridging mechanism. If this isn’t done, business users will have to work in a hybrid environment, and they must understand the implications of this setup. - Optimize and run once a system has been migrated to Snowflake, it enters normal maintenance mode. All software systems are living organisms requiring ongoing maintenance. This phase, after migration, is referred to as optimize and run, and it is not part of the migration itself.
Key Phases
A successful migration from SQL Server to Snowflake is a modernization project that unfolds over a sequence of well-defined phases. Following this structured nine-phase approach ensures a comprehensive and methodical transition, addressing everything from initial strategy to long-term operational excellence.
Phase 1: Planning and Design
This initial phase is the most critical for the success of the entire migration project, as it lays the groundwork for accurate scoping, realistic timelines, and stakeholder alignment. A rushed or incomplete planning phase is the leading cause of budget overruns, missed deadlines, and project failure. The objective is not just to catalog the existing system but to strategically decide what assets are valuable enough to move to the new platform. A “lift and shift everything” approach is a recipe for migrating years of accumulated technical debt and inflating cloud costs from day one.
Key Activities:
- Conducting a Comprehensive Inventory: The first step is to create a detailed and exhaustive manifest of every asset within the scope of the migration. This inventory should be created using a combination of automated discovery tools, system catalog queries, and interviews with application owners. The inventory must include:
- Database Objects: All databases, schemas, tables, and views. For tables, document row counts and raw data size.
- Procedural Code: All stored procedures, user-defined functions (UDFs), triggers, and any logic using cursors.
- Automation and ETL: All SQL Server Agent jobs, their schedules, and their dependencies. A complete catalog of SQL Server Integration Services (SSIS) packages is especially critical.
- Downstream Consumers: All applications and BI tools that connect to the database, such as SSRS reports, Power BI dashboards, and Tableau workbooks.
- Security Principals: All users, roles, and granular permissions.
- Excluding System Databases: It is a critical mistake to attempt to migrate SQL Server’s internal system databases (
master,msdb,tempdb,model). These are integral to a SQL Server instance but have no function or equivalent in Snowflake and must be explicitly excluded from all migration plans.
- Defining Migration Objectives, Scope, and Success Metrics: With a complete inventory, the team can define clear and measurable goals tied to business outcomes. Examples include:
- Objective: Improve performance of month-end financial reporting.
- Metric: Reduce the runtime of the “MonthEnd_Consolidation” report suite by 50%.
- Objective: Reduce data warehousing total cost of ownership (TCO).
- Metric: Decrease annual TCO by 30% compared to the previous year’s costs.
- Stakeholder Alignment and Assembling the Migration Team (RACI): A data platform migration is a business transformation. Early and continuous engagement with all stakeholders is critical. The migration team should include representatives from business users, data engineering, finance, security, and legal. A RACI (Responsible, Accountable, Consulted, Informed) matrix should be established to formalize roles and responsibilities.
- Introducing FinOps: The shift to Snowflake’s consumption-based cost model must be planned from the beginning. The migration team must coordinate with the finance department to understand the pricing model, establish budgets, and define how costs will be tracked and attributed, often using Snowflake’s object tagging features.
- Initial Assessment and Triage: The inventory provides the data needed for a critical triage process. The team should analyze usage logs to identify redundant or obsolete data, unused objects, and temporary staging data that can be decommissioned or archived instead of migrated.
Phase 2: Environment and Security
With a strategic plan in place, this phase involves building the foundational Snowflake environment. This is a “greenfield” opportunity to design a clean, secure, and governable data platform from first principles, rather than simply mapping the legacy security model 1:1. Most mature SQL Server environments suffer from “security debt” like overly broad access and inconsistent roles, which this phase aims to resolve.
Key Activities:
- Architecting Your Snowflake Account Structure: For most enterprises, a multi-account strategy is recommended to ensure complete data and metadata isolation. This typically includes separate accounts for:
- Production Account: Houses all production data and workloads with the strictest security controls.
- Development/QA Account: A separate account for all development and testing activities.
- Sandbox Account (Optional): An account for experimental work by data scientists or analysts.
- Implementing a Robust Security Model: Security should be implemented in layers:
- Network Policies: As the first line of defense, create network policies to restrict access to the Snowflake account to a whitelist of trusted IP addresses.
- Authentication: Enforce Multi-Factor Authentication (MFA) for all users. For a seamless and secure user experience, integrate Snowflake with a corporate Single Sign-On (SSO) provider like Azure Active Directory (Azure AD) or Okta.
- Designing a Role-Based Access Control (RBAC) Hierarchy: This is the cornerstone of Snowflake security. All privileges on objects are granted exclusively to roles, which are then granted to users. A best-practice hierarchy involves creating distinct types of roles:
- System-Defined Roles:
ACCOUNTADMIN,SYSADMIN, etc., used for administrative tasks only. - Functional Roles: Custom roles that map to business functions (e.g.,
FINANCE_ADMIN,MARKETING_ANALYST). - Access Roles: Granular roles that define specific permissions (e.g.,
READ_ONLY,WRITE_ACCESS). These roles are then granted in a hierarchy to simplify administration.
- System-Defined Roles:
- Configuring Resource Monitors and Cost Controls: Resource monitors are the primary tool within Snowflake for implementing cost controls. They should be configured as part of the initial environment setup to track credit consumption at both the account and warehouse levels. For each monitor, set notification and suspension triggers (e.g., send an email at 75% of quota, suspend the warehouse at 100%) to prevent budget overruns.
Phase 3: Database Code Conversion
This phase focuses on the technical translation of the database’s physical structure and procedural logic from SQL Server’s T-SQL to Snowflake’s ANSI-compliant SQL. This is often the most complex and time-consuming part of the migration. The process is a catalyst for modernizing data processing logic, forcing a fundamental shift away from imperative, stateful logic toward declarative, set-based processing.
Key Activities:
- Translating Data Definition Language (DDL): This involves extracting and converting
CREATE TABLEandCREATE VIEWstatements. Automated code conversion tools like Snowflake’s SnowConvert AI are highly recommended to parse T-SQL DDL and generate the equivalent Snowflake SQL, handling syntax differences and data type mapping. - Data Type Mapping: Accurate data type mapping is foundational. While many types map directly (e.g.,
INTtoNUMBER), several key differences require careful attention, especially with date/time types. SQL Server’sDATETIMEandDATETIME2are time zone-unaware and must be mapped to Snowflake’sTIMESTAMP_NTZ. Conversely,DATETIMEOFFSETcontains a time zone offset and must be mapped toTIMESTAMP_TZto preserve this information. - Handling Constraints (Enforced vs. Unenforced): This represents a significant conceptual shift. In SQL Server, constraints like Primary Keys and Foreign Keys are enforced by the database engine. In Snowflake, these constraints can be defined but are not enforced. They exist purely as metadata. The responsibility for maintaining data integrity shifts entirely from the database to the data pipeline (ETL/ELT process).
- Stored Procedure and T-SQL Conversion: Migrating T-SQL stored procedures is a significant undertaking.
- SQL Dialect Discrepancies: Numerous T-SQL functions and syntax constructs require conversion (e.g.,
GETDATE()becomesCURRENT_TIMESTAMP(),ISNULL()becomesCOALESCE()). - Refactoring Logic: The preferred path is to rewrite T-SQL procedures using Snowflake Scripting, a SQL-based procedural language. The overarching goal is to eliminate row-by-row processing (like cursors) in favor of set-based SQL statements wherever possible.
- Replacing Cursors and Triggers: Cursors are a severe performance anti-pattern in Snowflake and must be eliminated. Snowflake does not support triggers; their functionality must be re-implemented using a cloud-native pattern of Streams and Tasks, where a stream captures table changes and a scheduled task consumes those changes to apply business logic.
- SQL Dialect Discrepancies: Numerous T-SQL functions and syntax constructs require conversion (e.g.,
Phase 4: Data Migration
This phase focuses on the initial, one-time bulk transfer of historical data from the source SQL Server system to the target Snowflake environment. The fundamental architecture for loading data into Snowflake is a “three-box” model: Source -> Stage -> Target. Data is not moved directly from source to target but is first landed in an intermediate cloud object storage location (the stage).
Key Activities:
- Data Extraction from SQL Server: For the initial migration of historical data, SQL Server’s native Bulk Copy Program (BCP) command-line utility is a highly efficient option. It can export large tables to flat files (e.g., CSV) at high speed. These files can then be uploaded to the cloud stage (e.g., Amazon S3, Azure Blob Storage).
- Loading Data into Snowflake from the Stage: Once data files are present in the cloud stage, the primary mechanism for ingestion is the
COPY INTO <table>command. This is the workhorse SQL command for high-performance, bulk data loading. It is designed to work in a massively parallel fashion. For optimal performance, it is a best practice to split large data sets into multiple files of a moderate size (100-250MB is a common recommendation) to maximize this parallelism.
Phase 5: Data Ingestion
After migrating the historical data, this phase focuses on migrating the ongoing data ingestion processes to bring live, incremental data from various sources into Snowflake. This typically involves migrating logic from legacy ETL tools like SSIS and scheduling from SQL Server Agent.
Key Activities:
- Incremental Data Replication: For replicating ongoing changes after the initial load, SQL Server’s native Change Data Capture (CDC) feature is the preferred method. CDC works by reading the database’s transaction log to capture all
INSERT,UPDATE, andDELETEoperations as they occur, providing a low-impact, near real-time stream of changes. - Continuous Ingestion with Snowpipe: Snowpipe is Snowflake’s continuous data ingestion service, designed for streaming and micro-batch use cases. You create a
PIPEobject that “subscribes” to a stage. When new change files generated by a CDC process arrive in the stage, Snowpipe is automatically triggered to load the data. - Applying Changes with MERGE: After change data has been loaded into a temporary staging table in Snowflake (via Snowpipe), the
MERGEcommand is used to apply those changes to the final production table. It can handle inserts, updates, and deletes in a single, atomic statement. - Modernizing SSIS and SQL Server Agent Jobs:
- SSIS Migration: Simply pointing an existing SSIS package at Snowflake is not a viable strategy. The recommended approach is to re-architect SSIS logic with cloud-native tools, embracing the ELT (Extract, Load, Transform) pattern. This involves decommissioning SSIS and rebuilding the business logic using tools like dbt (data build tool) for in-warehouse transformations, with orchestration managed by a tool like Apache Airflow.
- SQL Server Agent Migration: The scheduling functionality of SQL Server Agent must be migrated. Simple, non-dependent jobs can be scheduled using native Snowflake Tasks. Complex workflows with dependencies require a more powerful external orchestrator like Apache Airflow or Azure Data Factory.
Phase 6: Reporting and Analytics
A data warehouse migration is not truly complete until the end-users are successfully using the new platform through their preferred analytics tools. This “last mile” of the project is often underestimated and requires meticulous planning to manage user acceptance, performance, and cost.
Key Activities:
- Connecting BI Tools (Tableau, Power BI): Both Tableau and Power BI are first-class citizens in the Snowflake ecosystem and provide native, high-performance connectors. For both tools, a critical decision must be made on a per-dashboard basis between a live connection (e.g., Tableau Live, Power BI DirectQuery) and an imported/extracted model.
- Live/DirectQuery: Provides real-time data but sends queries directly to Snowflake for every user interaction, which can lead to significant compute costs.
- Extract/Import: Provides excellent performance by serving queries from an in-memory copy of the data, but the data is only as fresh as the last refresh.
- The SSRS Challenge and Replacement: Connecting SQL Server Reporting Services (SSRS) to Snowflake is notoriously challenging and not a recommended long-term strategy. The migration to Snowflake should serve as the catalyst for a strategic plan to decommission SSRS. Critical SSRS reports should be assessed and rebuilt in a modern, cloud-native BI platform like Power BI or Tableau.
- Workload Isolation: To govern the performance and cost impact of these BI tools, it is a best practice to create dedicated, appropriately-sized virtual warehouses in Snowflake specifically for BI workloads. This isolates BI queries from other workloads like ETL.
Phase 7: Data Validation and Testing
This phase is where the newly built Snowflake platform is rigorously tested and validated against the legacy system to build business trust and ensure a successful deployment. Data validation cannot be an afterthought and must go far beyond simple row counts.
Key Activities:
- A Multi-Layered Data Validation Strategy:
- Level 1: File and Object Validation: Use checksums or hash functions to verify that data files transferred from the source system to the cloud stage have not been corrupted in transit.
- Level 2: Reconciliation and Aggregate Validation: Run queries on both the source SQL Server database and the target Snowflake tables to compare key metrics like row counts and aggregate functions (
SUM,AVG,MIN,MAX) for all key numeric columns. - Level 3: Cell-Level Validation (Data Diff): For the most business-critical tables, a more granular, cell-by-cell comparison of a statistically significant sample of rows is required to catch subtle data type conversion errors or transformation logic bugs.
- Performance Testing and User Acceptance Testing (UAT):
- Performance Testing: The migrated ETL/ELT pipelines and BI reports must be tested against the performance SLAs defined in the planning phase.
- User Acceptance Testing (UAT): This is where business users get hands-on with the new system. They must be given the time and resources to run their reports, execute their queries, and validate that the migrated system meets their functional requirements and produces the same results as the legacy system. UAT is the final gate before production deployment.
Phase 8: Deployment
This phase is the culmination of all preceding efforts, where the validated system is promoted to production and the formal switch, or “cutover,” from the legacy SQL Server system to Snowflake occurs. The strategy should be chosen to minimize risk and business disruption.
Key Activities:
- Developing a Cutover Plan: Instead of a single “big bang” cutover, a phased approach is recommended to limit the “blast radius” of any potential issues.
- Phased Rollout (Recommended): Migrate applications, reports, or business units one by one over a period of time.
- Parallel Run: For a period, run both the legacy SQL Server and the new Snowflake systems in parallel, feeding data to both and comparing outputs to ensure 100% consistency before decommissioning the legacy system.
- Bridging Strategy: During a phased rollout or parallel run, it is critical to implement a bridging strategy so that users do not have to query two different systems. The goal is to present a single, unified view to the business.
- Final Deployment Checklist and Stakeholder Sign-off: Before the final cutover, the team should conduct a final readiness review. This includes verifying all permissions and roles, ensuring all service accounts are in place, and confirming that monitoring and alerting are active. Obtain formal, written sign-off from all key business and technical stakeholders before going live.
Phase 9: Optimize and Run
The completion of the cutover marks the end of the migration project but the beginning of the platform’s operational life. A data platform is a living system that requires ongoing maintenance, governance, and optimization. In the Snowflake paradigm, performance tuning and cost optimization are two sides of the same coin: applying the right amount of compute, for the right amount of time, to meet a business SLA at the lowest possible cost.
Key Activities:
- Performance Tuning:
- Virtual Warehouse Sizing and Management: This is the primary lever for both performance and cost. Continuously monitor and right-size warehouses, create separate warehouses for different workloads (workload isolation), and ensure all warehouses have an aggressive auto-suspend policy.
- Query Optimization: Use Snowflake’s Query Profile tool to visually analyze and debug slow-running queries.
- Clustering Keys: For very large tables (typically over 1 terabyte), defining a clustering key can significantly improve query performance by physically co-locating related data.
- Implementing Long-Term FinOps:
- Continuous Monitoring: Regularly review cost and usage data from the
ACCOUNT_USAGEschema. - Showback and Chargeback: Implement a model to attribute costs back to the business units or projects that incur them to drive accountability.
- Object Tagging: Use Snowflake’s tagging feature to apply metadata tags to objects to simplify cost allocation and governance.
- Continuous Monitoring: Regularly review cost and usage data from the
- Establishing Data Governance and Security:
- RBAC Refinement: Continuously update the RBAC hierarchy and perform regular audits to remove unused roles or excessive permissions.
- Advanced Security Features: For highly sensitive data, implement Snowflake’s advanced data governance features like Dynamic Data Masking and Row-Access Policies.