Refreshing external tables automatically for Google Cloud Storage
This topic provides instructions for triggering external table metadata refreshes using Google Cloud Pub/Sub messages for Google Cloud Storage (GCS) events.
Note
To complete the steps described in this topic, you must use a role that has the CREATE STAGE and CREATE EXTERNAL TABLE privileges on a schema.
In addition, you must have administrative access to Google Cloud (GC). If you are not a GC administrator, ask your GC administrator to complete the Prerequisites steps.
Only
OBJECT_DELETEandOBJECT_FINALIZEevents trigger refreshes for external table metadata. To reduce costs, event noise, and latency, send only supported events for external tables.External tables don’t support storage versioning (S3 versioning, Object Versioning in Google Cloud Storage, or versioning for Azure Storage).
Cloud platform support
Triggering automated external metadata refreshes using GCS Pub/Sub event messages is supported by Snowflake accounts hosted on Google Cloud (GC).
Configuring secure access to Cloud Storage
Note
If you have already configured secure access to the GCS bucket that stores your data files, you can skip this section.
This section describes how to configure a Snowflake storage integration object to delegate authentication responsibility for cloud storage to a Snowflake identity and access management (IAM) entity.
This section describes how to use storage integrations to allow Snowflake to read data from and write to a Google Cloud Storage bucket referenced in an external (i.e. Cloud Storage) stage. Integrations are named, first-class Snowflake objects that avoid the need for passing explicit cloud provider credentials such as secret keys or access tokens; instead, integration objects reference a Cloud Storage service account. An administrator in your organization grants the service account permissions in the Cloud Storage account.
Administrators can also restrict users to a specific set of Cloud Storage buckets (and optional paths) accessed by external stages that use the integration.
Note
Completing the instructions in this section requires access to your Cloud Storage project as a project editor. If you are not a project editor, ask your Cloud Storage administrator to perform these tasks.
Confirm that Snowflake supports the Google Cloud Storage region that your storage is hosted in. For more information, see Supported Cloud Regions.
The following diagram shows the integration flow for a Cloud Storage stage:
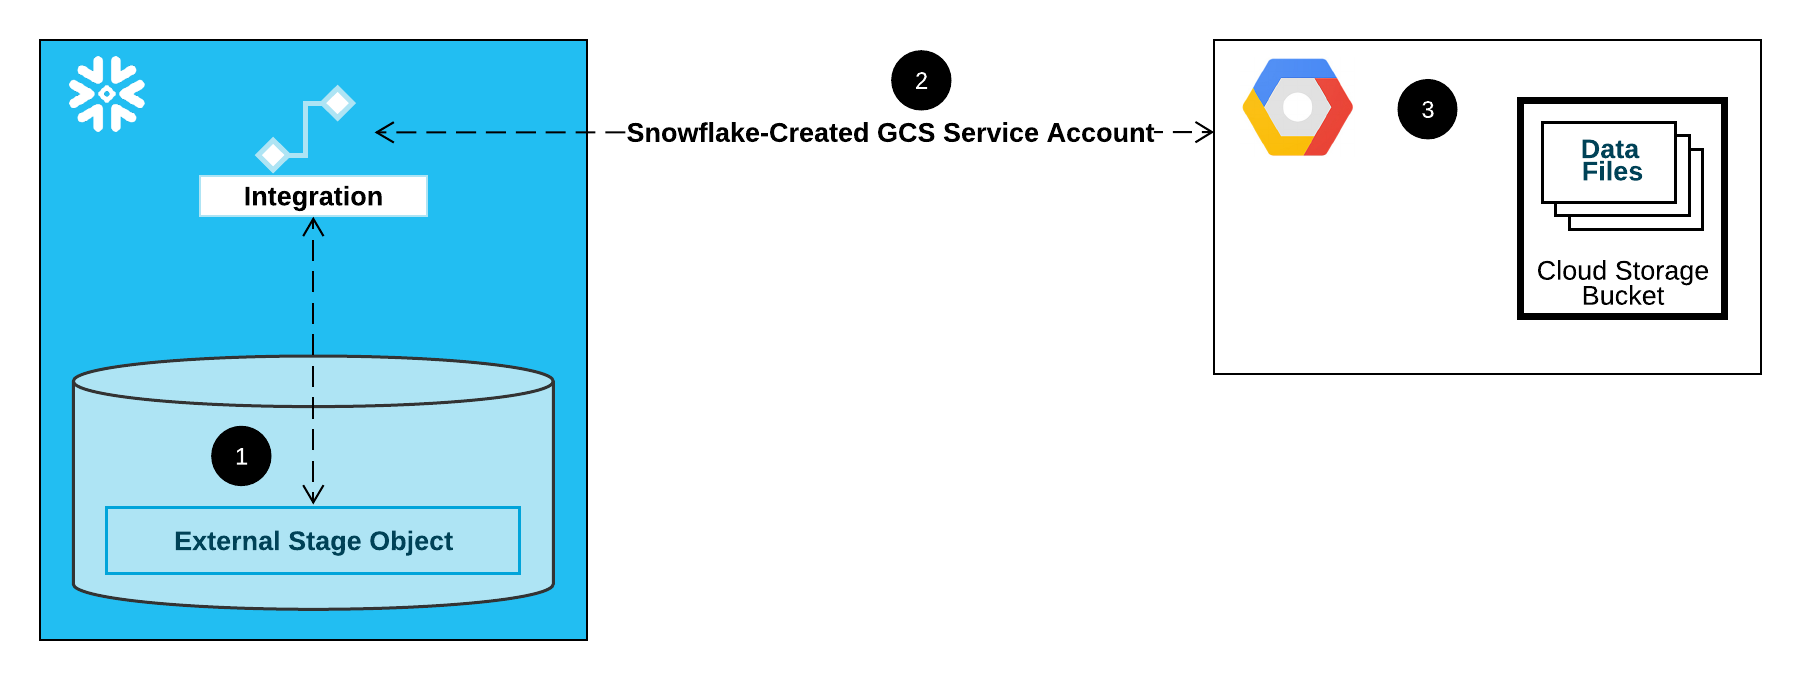
An external (i.e. Cloud Storage) stage references a storage integration object in its definition.
Snowflake automatically associates the storage integration with a Cloud Storage service account created for your account. Snowflake creates a single service account that is referenced by all GCS storage integrations in your Snowflake account.
A project editor for your Cloud Storage project grants permissions to the service account to access the bucket referenced in the stage definition. Note that many external stage objects can reference different buckets and paths and use the same integration for authentication.
When a user loads or unloads data from or to a stage, Snowflake verifies the permissions granted to the service account on the bucket before allowing or denying access.
In this Section:
Step 1: Create a Cloud Storage Integration in Snowflake
Create an integration using the CREATE STORAGE INTEGRATION command. An integration is a Snowflake object that delegates authentication responsibility for external cloud storage to a Snowflake-generated entity (i.e. a Cloud Storage service account). For accessing Cloud Storage buckets, Snowflake creates a service account that can be granted permissions to access the bucket(s) that store your data files.
A single storage integration can support multiple external (i.e. GCS) stages. The URL in the stage definition must align with the GCS buckets (and optional paths) specified for the STORAGE_ALLOWED_LOCATIONS parameter.
Note
Only account administrators (users with the ACCOUNTADMIN role) or a role with the global CREATE INTEGRATION privilege can execute this SQL command.
CREATE STORAGE INTEGRATION <integration_name>
  TYPE = EXTERNAL_STAGE
  STORAGE_PROVIDER = 'GCS'
  ENABLED = TRUE
  STORAGE_ALLOWED_LOCATIONS = ('gcs://<bucket>/<path>/', 'gcs://<bucket>/<path>/')
  [ STORAGE_BLOCKED_LOCATIONS = ('gcs://<bucket>/<path>/', 'gcs://<bucket>/<path>/') ]
Where:
integration_nameis the name of the new integration.bucketis the name of a Cloud Storage bucket that stores your data files (e.g.mybucket). The required STORAGE_ALLOWED_LOCATIONS parameter and optional STORAGE_BLOCKED_LOCATIONS parameter restrict or block access to these buckets, respectively, when stages that reference this integration are created or modified.pathis an optional path that can be used to provide granular control over objects in the bucket.
The following example creates an integration that explicitly limits external stages that use the integration to reference either of two buckets and paths. In a later step, we will create an external stage that references one of these buckets and paths.
Additional external stages that also use this integration can reference the allowed buckets and paths:
CREATE STORAGE INTEGRATION gcs_int
  TYPE = EXTERNAL_STAGE
  STORAGE_PROVIDER = 'GCS'
  ENABLED = TRUE
  STORAGE_ALLOWED_LOCATIONS = ('gcs://mybucket1/path1/', 'gcs://mybucket2/path2/')
  STORAGE_BLOCKED_LOCATIONS = ('gcs://mybucket1/path1/sensitivedata/', 'gcs://mybucket2/path2/sensitivedata/');
Step 2: Retrieve the Cloud Storage Service Account for your Snowflake Account
Execute the DESCRIBE INTEGRATION command to retrieve the ID for the Cloud Storage service account that was created automatically for your Snowflake account:
DESC STORAGE INTEGRATION <integration_name>;
Where:
integration_nameis the name of the integration you created in Step 1: Create a Cloud Storage Integration in Snowflake (in this topic).
For example:
DESC STORAGE INTEGRATION gcs_int;

+-----------------------------+---------------+-----------------------------------------------------------------------------+------------------+
| property                    | property_type | property_value                                                              | property_default |
+-----------------------------+---------------+-----------------------------------------------------------------------------+------------------|
| ENABLED                     | Boolean       | true                                                                        | false            |
| STORAGE_ALLOWED_LOCATIONS   | List          | gcs://mybucket1/path1/,gcs://mybucket2/path2/                               | []               |
| STORAGE_BLOCKED_LOCATIONS   | List          | gcs://mybucket1/path1/sensitivedata/,gcs://mybucket2/path2/sensitivedata/   | []               |
| STORAGE_GCP_SERVICE_ACCOUNT | String        | service-account-id@project1-123456.iam.gserviceaccount.com                  |                  |
+-----------------------------+---------------+-----------------------------------------------------------------------------+------------------+
The STORAGE_GCP_SERVICE_ACCOUNT property in the output shows the Cloud Storage service account created for your Snowflake account (e.g. service-account-id@project1-123456.iam.gserviceaccount.com). We provision a single Cloud Storage service account for your entire Snowflake account. All Cloud Storage integrations use that service account.
Step 3: Grant the Service Account Permissions to Access Bucket Objects
The following step-by-step instructions describe how to configure IAM access permissions for Snowflake in your Google Cloud console so that you can use a Cloud Storage bucket to load and unload data:
Creating a Custom IAM Role
Create a custom role that has the permissions required to access the bucket and get objects.
Log into the Google Cloud console as a project editor.
From the home dashboard, select IAM & Admin » Roles.
Select Create Role.
Enter a Title and optional Description for the custom role.
Select Add Permissions.
Filter the list of permissions, and add the following from the list:
Action(s)
Required permissions
Data loading only
storage.buckets.getstorage.objects.getstorage.objects.list
Data loading with purge option, executing the REMOVE command on the stage
storage.buckets.getstorage.objects.deletestorage.objects.getstorage.objects.list
Data loading and unloading
storage.buckets.get(for calculating data transfer costs)storage.objects.createstorage.objects.deletestorage.objects.getstorage.objects.list
Data unloading only
storage.buckets.getstorage.objects.createstorage.objects.deletestorage.objects.list
Select Add.
Select Create.
Assigning the Custom Role to the Cloud Storage Service Account
Log in to the Google Cloud console as a project editor.
From the home dashboard, select Cloud Storage » Buckets.
Filter the list of buckets, and select the bucket that you specified when you created your storage integration.
Select Permissions » View by principals, then select Grant access.
Under Add principals, paste the name of the service account name that you retrieved from the DESC STORAGE INTEGRATION command output.
Under Assign roles, select the custom IAM role that you created previously, then select Save.
Important
If your Google Cloud organization was created on or after May 3, 2024, Google Cloud enforces a domain restriction constraint in project organization policies. The default constraint lists your domain as the only allowed value.
To allow the Snowflake service account access to your storage, you must update the domain restriction.
Granting the Cloud Storage Service Account Permissions on the Cloud Key Management Service Cryptographic Keys
Note
This step is required only if your GCS bucket is encrypted using a key stored in the Google Cloud Key Management Service (Cloud KMS).
Log into the Google Cloud console as a project editor.
From the home dashboard, search for and select Security » Key Management.
Select the key ring that is assigned to your GCS bucket.
Click SHOW INFO PANEL in the upper-right corner. The information panel for the key ring slides out.
Click the ADD PRINCIPAL button.
In the New principals field, search for the service account name from the DESCRIBE INTEGRATION output in Step 2: Retrieve the Cloud Storage Service Account for your Snowflake Account (in this topic).
From the Select a role dropdown, select the
Cloud KMS CrytoKey Encryptor/Decryptorrole.Click the Save button. The service account name is added to the Cloud KMS CrytoKey Encryptor/Decryptor role dropdown in the information panel.
Note
You can use the SYSTEM$VALIDATE_STORAGE_INTEGRATION function to validate the configuration for your storage integration .
Configuring Automation Using GCS Pub/Sub
Prerequisites
The instructions in this topic assume the following items have been created and configured:
- GCP account:
Pub/Sub topic that receives event messages from the GCS bucket. For more information, see Creating the Pub/Sub Topic (in this topic).
Subscription that receives event messages from the Pub/Sub topic. For more information, see Creating the Pub/Sub Subscription (in this topic).
For instructions, see the Pub/Sub documentation.
- Snowflake:
Target table in the Snowflake database where your data will be loaded.
Creating the Pub/Sub Topic
Create a Pub/Sub topic using Cloud Shell or Cloud SDK.
Execute the following command to create the topic and enable it to listen for activity in the specified GCS bucket:
$ gsutil notification create -t <topic> -f json -e OBJECT_FINALIZE -e OBJECT_DELETE gs://<bucket-name>
Where:
<topic>is the name for the topic.<bucket-name>is the name of your GCS bucket.
If the topic already exists, the command uses it; otherwise, a new topic is created.
For more information, see Using Pub/Sub notifications for Cloud Storage in the Pub/Sub documentation.
Creating the Pub/Sub Subscription
Create a subscription with pull delivery to the Pub/Sub topic using the Cloud Console, gcloud command-line tool, or the Cloud Pub/Sub API. For instructions, see Managing topics and subscriptions in the Pub/Sub documentation.
Note
Only Pub/Sub subscriptions that use the default pull delivery are supported with Snowflake. Push delivery is not supported.
Retrieving the Pub/Sub Subscription ID
The Pub/Sub topic subscription ID is used in these instructions to allow Snowflake access to event messages.
Log into the Google Cloud Platform Console as a project editor.
From the home dashboard, choose Big Data » Pub/Sub » Subscriptions.
Copy the ID in the Subscription ID column for the topic subscription
Step 1: Create a Notification Integration in Snowflake
Create a notification integration using the CREATE NOTIFICATION INTEGRATION command.
The notification integration references your Pub/Sub subscription. Snowflake associates the notification integration with a GCS service account created for your account. Snowflake creates a single service account that is referenced by all GCS notification integrations in your Snowflake account.
Note
Only account administrators (users with the ACCOUNTADMIN role) or a role with the global CREATE INTEGRATION privilege can execute this SQL command.
The GCS service account for notification integrations is different from the service account created for storage integrations.
A single notification integration supports a single Google Cloud Pub/Sub subscription. Referencing the same Pub/Sub subscription in multiple notification integrations can result in missing data in target tables because event notifications are split between notification integrations.
CREATE NOTIFICATION INTEGRATION <integration_name>
  TYPE = QUEUE
  NOTIFICATION_PROVIDER = GCP_PUBSUB
  ENABLED = true
  GCP_PUBSUB_SUBSCRIPTION_NAME = '<subscription_id>';
Where:
integration_nameis the name of the new integration.subscription_idis the subscription name you recorded in Retrieving the Pub/Sub Subscription ID.
For example:
CREATE NOTIFICATION INTEGRATION my_notification_int
  TYPE = QUEUE
  NOTIFICATION_PROVIDER = GCP_PUBSUB
  ENABLED = true
  GCP_PUBSUB_SUBSCRIPTION_NAME = 'projects/project-1234/subscriptions/sub2';
Step 2: Grant Snowflake Access to the Pub/Sub Subscription
Execute the DESCRIBE INTEGRATION command to retrieve the Snowflake service account ID:
DESC NOTIFICATION INTEGRATION <integration_name>;
Where:
integration_nameis the name of the integration you created in Step 1: Create a Notification Integration in Snowflake.
For example:
DESC NOTIFICATION INTEGRATION my_notification_int;
Record the service account name in the GCP_PUBSUB_SERVICE_ACCOUNT column, which has the following format:
<service_account>@<project_id>.iam.gserviceaccount.com
Log into the Google Cloud Platform Console as a project editor.
From the home dashboard, choose Big Data » Pub/Sub » Subscriptions.
Select the subscription to configure for access.
Click SHOW INFO PANEL in the upper-right corner. The information panel for the subscription slides out.
Click the ADD PRINCIPAL button.
In the New principals field, search for the service account name you recorded.
From the Select a role dropdown, select Pub/Sub Subscriber.
Click the Save button. The service account name is added to the Pub/Sub Subscriber role dropdown in the information panel.
Navigate to the Dashboard page in the Cloud Console, and select your project from the dropdown list.
Click the ADD PEOPLE TO THIS PROJECT button.
Add the service account name you recorded.
From the Select a role dropdown, select Monitoring Viewer.
Click the Save button. The service account name is added to the Monitoring Viewer role.
Step 3: Create a stage (if needed)
Create an external stage that references your GCS bucket using the CREATE STAGE command. Snowflake reads your staged data files into the external table metadata. Alternatively, you can use an existing external stage.
Note
To configure secure access to the cloud storage location, see Configuring Secure Access to Cloud Storage (in this topic).
To reference a storage integration in the CREATE STAGE statement, the role must have the USAGE privilege on the storage integration object.
The following example creates a stage named mystage in the active schema for the user session. The cloud storage URL includes the
path files. The stage references a storage integration named my_storage_int.
USE SCHEMA mydb.public;

CREATE STAGE mystage
  URL='gcs://load/files/'
  STORAGE_INTEGRATION = my_storage_int;
Step 4: Create an external table
Create an external table using the CREATE EXTERNAL TABLE command.
For example, create an external table in the mydb.public schema that reads JSON data from files staged in the mystage stage with
the path1/ path.
The INTEGRATION parameter references the my_notification_int notification integration you created in
Step 1: Create a Notification Integration in Snowflake. The integration name must be provided in all uppercase.
Note that the AUTO_REFRESH parameter is TRUE by default:
CREATE OR REPLACE EXTERNAL TABLE ext_table
 INTEGRATION = 'MY_NOTIFICATION_INT'
 WITH LOCATION = @mystage/path1/
 FILE_FORMAT = (TYPE = JSON);
The external stage with auto-refresh is now configured!
When new or updated data files are added to the GCS bucket, the event notification informs Snowflake to scan them into the external table metadata.
Step 5: Manually refresh the external table metadata
Manually refresh the external table metadata once using ALTER EXTERNAL TABLE with the REFRESH parameter, e.g.:
ALTER EXTERNAL TABLE ext_table REFRESH;

+---------------------------------------------+----------------+-------------------------------+
| file                                        | status         | description                   |
|---------------------------------------------+----------------+-------------------------------|
| files/path1/file1.json                      | REGISTERED_NEW | File registered successfully. |
| files/path1/file2.json                      | REGISTERED_NEW | File registered successfully. |
| files/path1/file3.json                      | REGISTERED_NEW | File registered successfully. |
+---------------------------------------------+----------------+-------------------------------+
This step synchronizes the metadata with the list of files in the stage and path in the external table definition. Also, this step ensures the external table can read the data files in the specified stage and path, and that no files were missed in the external table definition.
If the list of files in the file column does not match your expectations, verify the paths in the external table definition and
external stage definition. Any path in the external table definition is appended to any path specified in the stage definition. For more
information, see CREATE EXTERNAL TABLE.
Important
If this step is not completed successfully at least once after the external table is created, querying the external table returns no results until a Pub/Sub notification refreshes the external table metadata automatically for the first time.
This step ensures the metadata is synchronized with any changes to the file list that occurred since Step 4. Thereafter, Pub/Sub notifications trigger the metadata refresh automatically.
Step 6: Configuring security
For each additional role that will be used to query the external table, grant sufficient access control privileges on the various objects (i.e. the database(s), schema(s), stage, and table) using GRANT <privileges>:
Object |
Privilege |
Notes |
|---|---|---|
Database |
USAGE |
|
Schema |
USAGE |
|
Named stage |
USAGE , READ |
|
Named file format |
USAGE |
Optional; only needed if the stage you created in Step 3: Create a Stage (If Needed) references a named file format. |
External table |
SELECT |