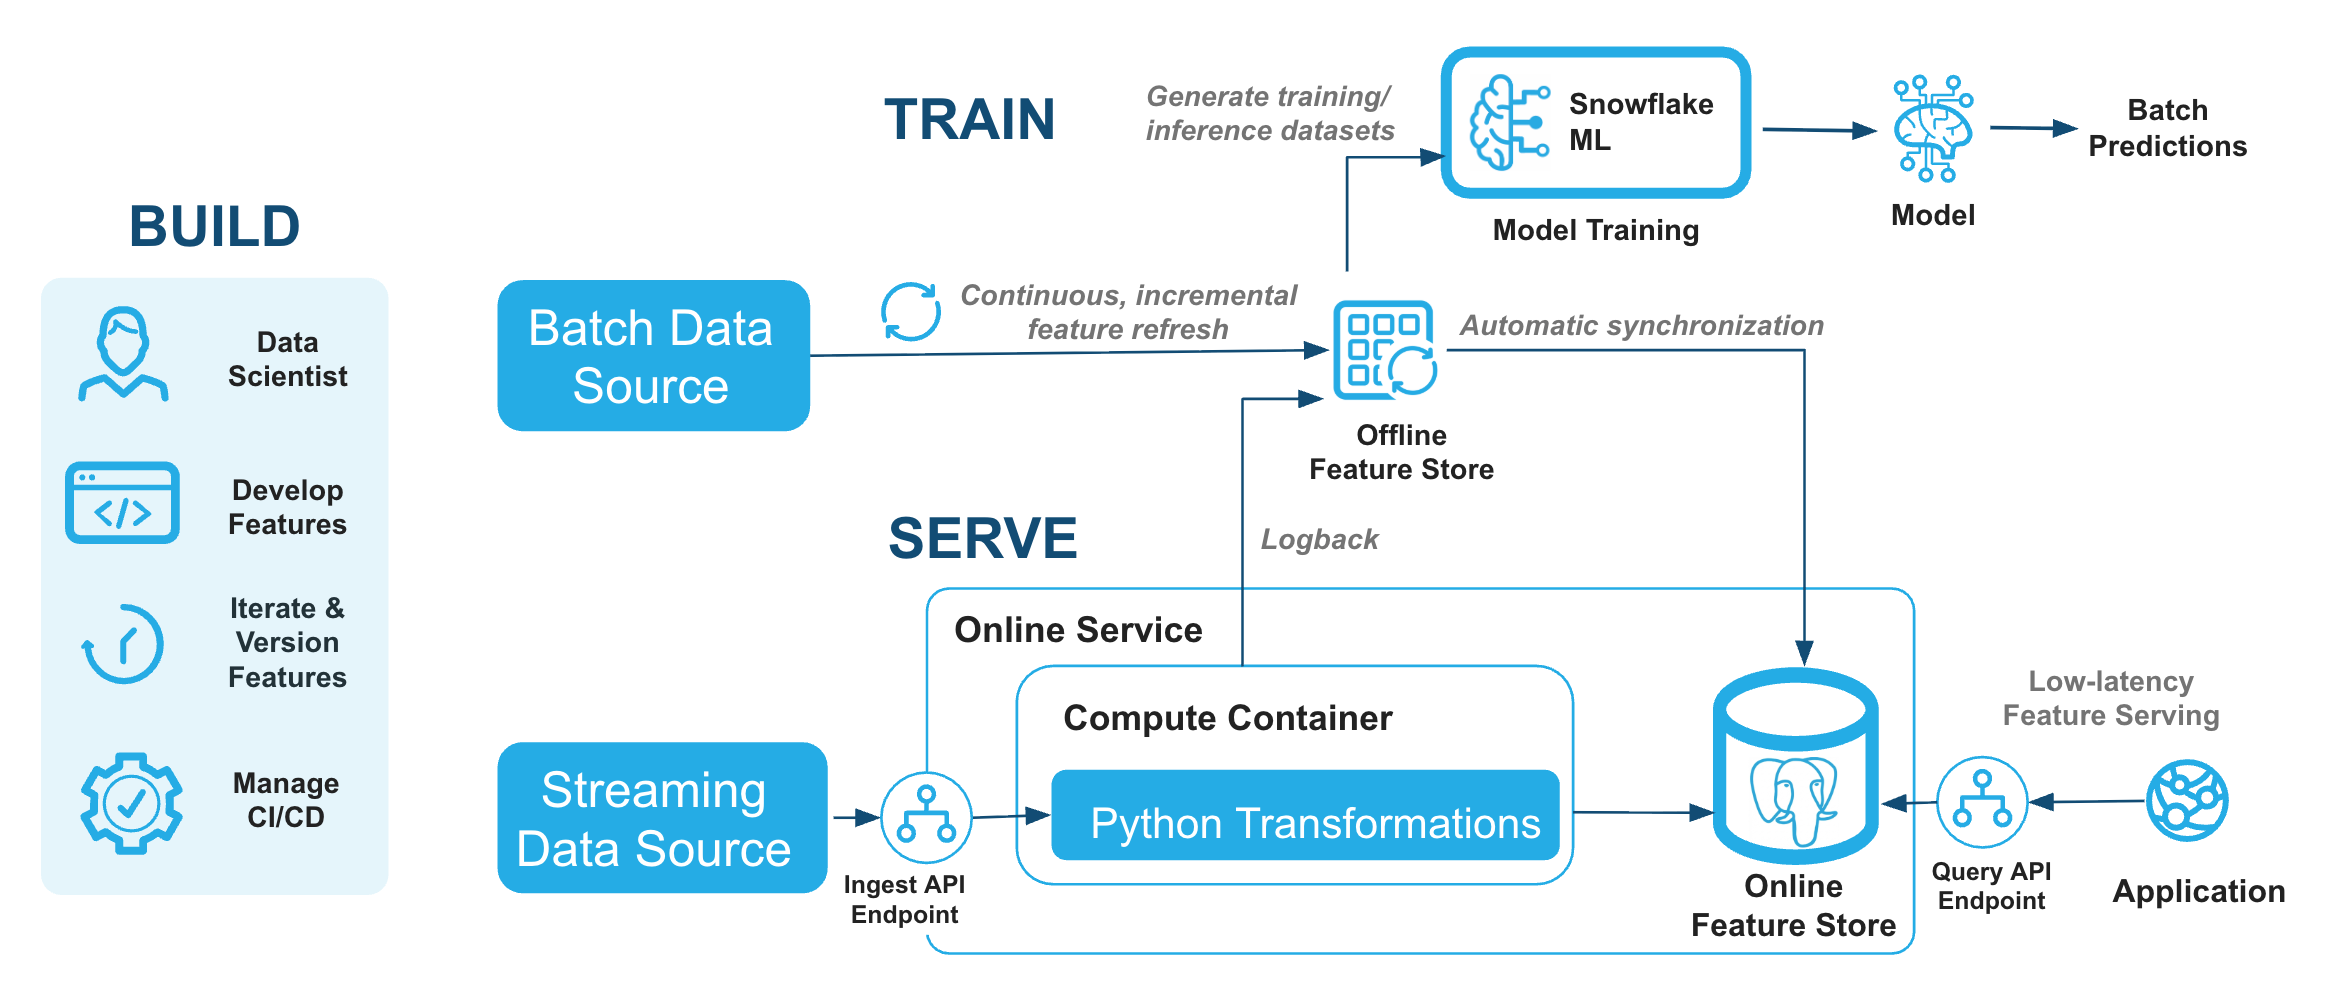
Serving online features
Online feature serving stores the latest feature values keyed by entity so applications can fetch features in milliseconds rather than running warehouse queries. The Online Feature Store uses a managed Postgres serving layer for ultra-low-latency reads, stream ingestion, time-windowed aggregations, and REST APIs. Enable online serving on a feature view when you create it, or update an existing feature view later.
The Online Feature Store is well suited for real-time ML applications such as fraud detection, recommendations, and personalization. It stays integrated with your batch feature pipeline for training while serving the same feature values at inference time.
The following table summarizes ways you can use the Online Feature Store:
| Use | Description |
|---|---|
| Batch online feature views | Serve the latest row per entity key from batch feature views. |
| Stream feature views | Ingest events in real time and serve updated features with end-to-end freshness of less than two seconds. Includes stream sources, transformations, and backfill. |
| Real-time feature views | Compute features at query time from request inputs and upstream feature views. |
| REST ingest and query API | HTTP endpoints for streaming data ingestion and online feature retrieval. |
| Feature groups | Bundle multiple feature views into one versioned set for online reads and training. See Feature groups. |
If you are interested in online serving using hybrid tables, see Online serving with hybrid tables.
Resources
For a hands-on walkthrough, see the Online Feature Store quickstart notebook.
How the Online Feature Store works
The online store stays in sync with your offline feature pipeline automatically, so you don’t need separate sync jobs or extra infrastructure.
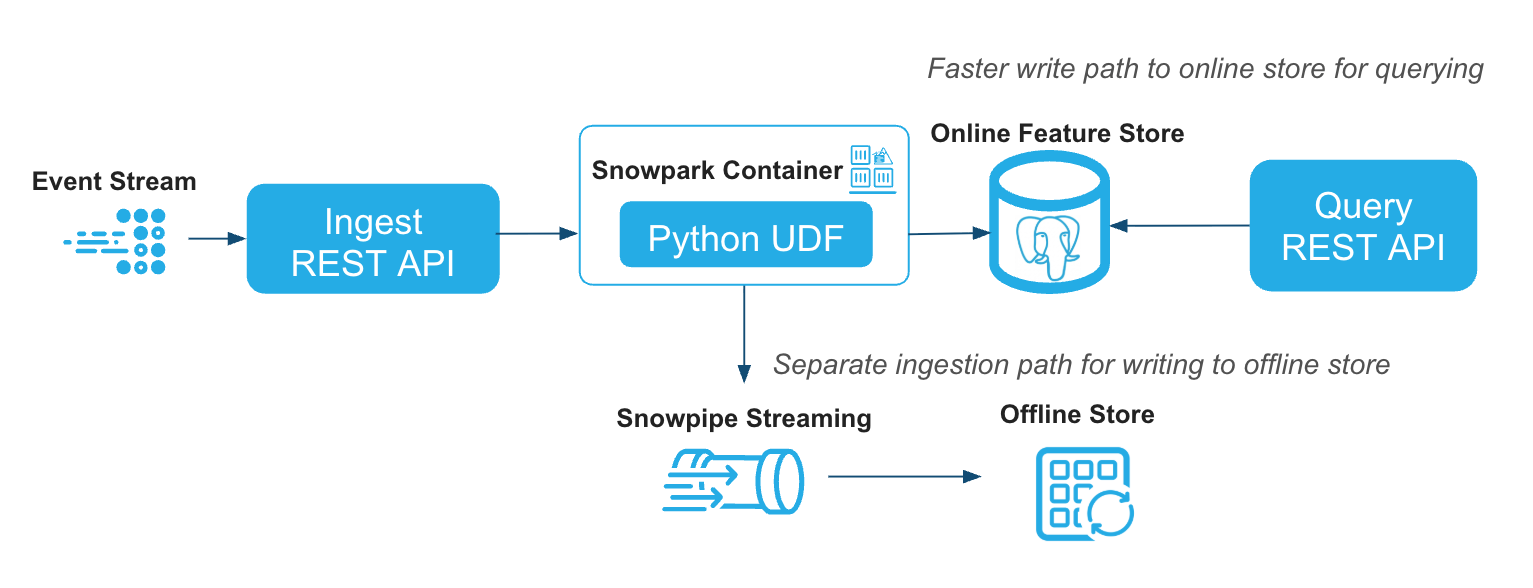
The Online Feature Store receives feature data in two ways:
- From the offline store: Feature values computed in the offline pipeline are
synchronized to the online store on a schedule you configure with
target_lag. - From a stream or request source: For sub-minute freshness, features are computed as events arrive or at query time. See Stream feature views and Real-time feature views.
For real-time ML workloads, serving latency and data freshness matter most.
Serving latency is how long the store takes to return feature values at inference time. The Online Feature Store achieves 10 ms p50 serving latency through the REST query API.
Data freshness is the end-to-end lag from a source event to an updated served feature value. For example, when a user generates clickstream events, freshness includes the time to ingest events, compute features, update the online store, and make values available for retrieval. With stream ingestion, end-to-end freshness is under 2 seconds.
Freshness depends on how you populate the online store:
- Offline to online sync: Set
target_lagfrom 10 seconds to 8 days. Use this path when minute-scale freshness is acceptable. - Stream ingest: Features update as events land in the ingest endpoint. Use stream feature views when you need sub-minute freshness.
Snowflake refreshes the online store in the background. If refresh fails five times in a row, the online table is suspended. To troubleshoot, check your refresh history.
Enabling online serving for feature views
Before you create an online feature store, complete the following:
-
Install the Snowflake ML Python package:
-
Configure Feature Store access control for producer and consumer roles.
-
Set up authentication using a Programmatic Access Token (PAT) or key pair authentication. For details, see Base URL and authentication. If using a PAT:
-
If your account has Tri-Secret Secure enabled, configure Postgres CMK before creating the online service. Without this, you’ll receive:
SnowparkSQLException: (1304): Postgres CMK setup required for Tri-Secret Secure accounts. See Snowflake Postgres Tri-Secret Secure.
You can create the feature store the same way you create an offline feature store. For details, see Creating or connecting to a feature store. There is no special parameter you need to set at the feature store level to enable online serving.
Configure the online store details in the Feature View definition, pass an OnlineConfig with store_type=OnlineStoreType.POSTGRES when defining the feature view.
The following example creates a batch feature view that passes columns from the source
table to the online store. The online store serves the latest row per entity key.
The following are the OnlineConfig parameters:
| Parameter | Type | Description | Default |
|---|---|---|---|
enable | Boolean, optional | Specifies whether online feature serving should be enabled for the feature view. | False |
target_lag | Str, optional | Target data freshness lag in a "<num> (seconds|minutes|hours|days|s|m|h|d)" format. Used for offline-to-online sync only; not used for stream feature views. | 10 seconds |
store_type | Enum, optional | Online store implementation. Set to OnlineStoreType.POSTGRES for the Online Feature Store. | OnlineStoreType.HYBRID_TABLE |
Note
refresh_freq controls how often the offline dynamic table refreshes when source data
changes. OnlineConfig.target_lag controls how often those offline values sync to the
online store. These settings act independently. In the example above, the effective lag from
source data to the online store is approximately refresh_freq + online_config.target_lag.
Warning
When store_type=OnlineStoreType.POSTGRES, keep the combined length of the feature view
name and version at 46 characters or fewer. The Postgres-backed online store maps feature
views to internal Postgres object names subject to Postgres identifier limits. Names that
are too long can be truncated and cause collisions or ingest errors. See
Feature view name length with Postgres online serving.
For existing feature views, update the online serving configuration with update_feature_view:
Create the online service
The online service is a managed serving layer for low-latency online reads. Create it once per feature store before registering feature views with online serving enabled. The online service enables you to ingest data into the online store and read features from the online store using a REST API.
The create_online_service method takes the Snowflake database role names for the
producer (creates and operates on feature views) and consumer (reads feature views and
entities). These are the same roles you configure in
Feature Store access control. Note that the role calling create_online_service must have the CREATE SCHEMA privilege on the
feature store database.
Note
The online service runs continuously after you create it. Keep it running to serve online
traffic in production. For testing or development, call drop_online_service() when you’re
done to minimize cost of unused resources.
The online service can take several minutes to provision on first creation. Poll the status
until it reaches RUNNING:
Read from the online store
Use the online store to retrieve feature values for specific entity keys at inference time.
You can read from a single feature view or from a feature group
that bundles multiple feature views into one versioned set. Feature groups let your model call
read_feature_group once instead of querying each feature view separately, and the same group
can be passed to generate_training_set for training. You can also query features through the
REST query API, including requests with object_type=feature_group.
Read a single feature view
Use read_feature_view with store_type="online" to look up features from the Postgres online store.
First get a reference to the feature view object:
Then read features from the online store:
Read a feature group
When a model consumes features from multiple feature views, register a Feature group and use
read_feature_group to fetch all member features in one round-trip.
Retrieval latency performance and benchmarking
The Postgres-backed online store is optimized for low-latency feature retrieval. In general, you can expect 10ms p50, sub-15ms p95, and sub-20ms p99 latency through the REST query API.
Actual latency depends on factors such as the number of features per entity, the number of entity keys per request, network distance between the caller and the online service, and the payload size.
To measure latency in your own environment, we have released a Online Feature Store Benchmark Kit, which provides scripts and instructions for running reproducible latency benchmarks against your online service.
Integrate with real-time model inference
In addition to fetching features with the Python SDK or the Query REST API, you can deploy a model from the Snowflake Model Registry as a managed real-time inference service that automatically looks up feature values from the online store at inference time.
When your online feature store uses OnlineStoreType.POSTGRES, pass feature_sources_per_function to
create_service() to map a registered feature view to a model method (such as predict). At inference time, the
model service fetches any missing feature columns from the feature view before invoking the model. You can send only
entity IDs in the request payload and let the service retrieve the rest.
mv is a ModelVersion object from the Snowflake Model Registry. Obtain it with reg.get_model("my_model").version("v1"), where reg is a snowflake.ml.registry.Registry object.
For more details, see Online Feature Store integration in the real-time inference documentation.
Stream feature views
Stream feature views allow you to ingest events in real time and serve updated
features with near-zero latency. They use a StreamSource to define the event schema
and a StreamConfig to specify the transformation logic and historical backfill data.
Register a stream source
A StreamSource defines the schema for events that will be ingested in real time.
The column names and types must exactly match what is sent through the REST API.
You can manage stream sources with:
fs.list_stream_sources(): List all registered stream sourcesfs.delete_stream_source(name): Delete a stream sourcefs.ingest(name, records): Ingest a list of records (dicts) into a named stream source
Create a stream feature view
A stream feature view uses a StreamConfig to link a registered stream source, a
transformation function, and a backfill DataFrame. The online store serves the latest
row per entity key.
Define the transformation function
The transformation function (transformation_fn) must be a named Python function
that takes a pandas DataFrame as input and returns a pandas DataFrame as output
(pd.DataFrame -> pd.DataFrame). Snowflake applies it to incoming stream events at
ingest time and to historical backfill data at registration time, so live and
backfilled features use the same logic. Lambdas and callable classes aren’t supported.
Inside the function, you can use pandas, numpy, re, copy, and Python built-ins.
Provide backfill data
backfill_df is a Snowpark DataFrame of historical events that match your
StreamSource schema. When you register the feature view, Snowflake runs
transformation_fn on this data server-side and loads the results into the online
store. That seeds serving with existing feature values before live events arrive
through the Ingest API.
Use a permanent table or view for backfill_df. Its SQL must be re-executable from
a fresh session, so avoid temporary tables, cached results, or DataFrames created from
local data. Column names and types must match the registered stream source. Do not pass
feature_df on a stream feature view; use backfill_df instead.
Register the stream feature view
Pass the stream source, transformation function, and backfill DataFrame in
StreamConfig, then register the feature view with Postgres online serving enabled:
Stream feature view with time-windowed aggregation
You can combine stream ingestion with time-windowed aggregation to compute rolling metrics (such as total spend over 48 hours) that update continuously as new events arrive. For details on defining time-windowed aggregation features and which aggregations are supported for Postgres online serving, see Time-windowed aggregation features.
To get fresher online features, you can further enable continuous aggregation by setting the feature aggregation method as
FeatureAggregationMethod.CONTINUOUS. This instructs the online service to maintain running aggregates as events arrive
through the Ingest API, rather than periodically re-tiling from the offline store.
Real-time feature views
Many ML features can’t be precomputed because they depend on information that only exists at the time of request. For example, a fraud model needs the current transaction amount to compare against historical averages. A pricing model needs the live exchange rate to convert a stored balance. A recommendation model needs the user’s current location to weight nearby offers.
Real-time feature views solve this by running a Python function (compute_fn) at
query time rather than precomputing and storing results. When you call
read_feature_view, the online service evaluates the function against the latest
values from upstream feature views together with per-request inputs you provide,
and returns the computed result in the same call.
Common use cases include:
- Features from request-time data: Incorporate values that are only available at inference time, such as the current transaction amount, user GPS coordinates, or device context.
- Derived features from upstream feature views: Combine or transform values from one or more precomputed feature views into new features, such as a risk score that multiplies a transaction amount by a stored fraud probability.
- Post-processing on the fly: Apply null imputation, normalization, unit conversion, or other cleanup to stored feature values before they reach the model.
Author the compute function
The compute function receives pandas DataFrames as input and returns a pandas
DataFrame. The first parameter receives the per-request data (from the
RequestSource), and each subsequent parameter receives the latest feature
values from one of the source feature views. The returned DataFrame must
contain the columns declared in output_schema.
The framework aligns input rows by position: row 0 of every input DataFrame corresponds to the same entity key. You don’t need to handle join keys in the function; they’re added to the output automatically.
The function must be a named function defined at module level or in a notebook
cell. Lambdas and callable classes aren’t supported. The number of parameters
must match the number of entries in RealtimeConfig.sources.
Inside the function, you can use pandas, numpy, re, copy, and Python
built-ins. Other imports aren’t supported and cause an error at registration
time.
Define and register
Wrap the compute function in a RealtimeConfig together with its sources and
the output schema, then attach it to a FeatureView.
The sources list begins with an optional RequestSource (for per-request
input), followed by one or more registered feature views or feature view
slices. Don’t include entity join keys in RequestSource.schema; the server
adds them automatically. Feature groups can’t be used as sources for a
real-time feature view.
Read real-time features from the online store
When reading a real-time feature view, pass a request_context DataFrame
with one row per entity key. Each row provides the per-request inputs for
the corresponding key.
Two row-alignment rules apply:
request_contextmust have exactly as many rows as there are entity keys.- Row i of
request_contextis paired withkeys[i], and the result preserves that order.
If a source feature view has no stored value for a requested entity key, the
corresponding DataFrame passed to compute_fn omits that row. Handle
missing values inside the function (for example, with .fillna(0.0)) to
ensure deterministic output.
Real-time feature views don’t have offline storage at the feature view level;
read_feature_view always reads through the online service. To generate a
training set that combines batch and real-time features, see
Feature groups.
REST API
In addition to the Python SDK, the online service exposes REST endpoints for
streaming data ingestion and online feature retrieval. These endpoints enable
integration with non-Python applications. Query requests accept either a feature view or a
feature group through the
object_type parameter.
For the complete API specifications, see:
Base URL and authentication
Online reads through the Python SDK (read_feature_view, read_feature_group) and
REST query calls both require authentication and network connectivity to the online
service. Set a SNOWFLAKE_PAT environment variable or configure key-pair JWT
authentication as described in the setup prerequisites. The sections below cover
endpoint URLs, PrivateLink routing, and network rules.
Each online service has ingest and query endpoint URLs. Retrieve them from the online service status:
PrivateLink URL configuration
By default, endpoint_url returns the PrivateLink URL when the account has
PrivateLink enabled. If the account doesn’t have a PrivateLink URL, it uses
SPCS-internal URLs when running inside SPCS, or falls back to the public URL
otherwise. For information about setting up private connectivity, see
Snowpark Container Services private connectivity.
To list all available endpoints (public, PrivateLink, and internal), run:
To override the default URL routing, pass online_service_access when
initializing the Feature Store:
Valid values:
OnlineServiceAccess.PUBLIC: Force the public REST API URL.OnlineServiceAccess.PRIVATELINK: Force the PrivateLink REST API URL.OnlineServiceAccess.INTERNAL: Force the SPCS-internal REST API URL.
All REST requests must include an Authorization header and set
Content-Type: application/json. You can authenticate with either a PAT or
a key pair JWT.
Using a PAT:
Online serving with hybrid tables
Snowflake also supports online serving through online feature tables
backed by hybrid tables. This product is generally available and synchronizes the latest
feature values from the offline store on a schedule you configure with target_lag.
Use hybrid table online serving when you need low-latency point lookups for batch feature
views and don’t require Postgres-backed capabilities. Hybrid tables don’t support the
Online Feature Store online service, stream ingest, real-time feature views, REST APIs,
or the time-windowed aggregation API. That aggregation API isn’t currently supported
for hybrid table online serving. For those workloads, use OnlineStoreType.POSTGRES in
the sections above.
Prerequisites
Important
You must have Snowflake version 9.26 or later and snowflake-ml-python version 1.18.0
or later to use hybrid table online serving.
Hybrid table online serving doesn’t use the Postgres online service. You don’t need to
call create_online_service, set SNOWFLAKE_PAT, or configure network access for the
REST endpoints described earlier on this page.
Create or connect to a feature store the same way you do for offline feature views. For details, see Creating or connecting to a feature store.
Enable hybrid table online serving
Enable online serving in OnlineConfig on a batch feature view. When you omit
store_type, the feature view uses hybrid table online serving by default
(OnlineStoreType.HYBRID_TABLE). For parameter descriptions, see the
OnlineConfig table above.
The refresh_freq and target_lag settings work the same way as described in Enabling online serving for feature views.
Permissions
Before you enable hybrid table online serving, grant the producer and consumer roles access to online feature tables. Use the access control script in Feature Store access control, then grant the following privileges:
Read features from hybrid table online store
To retrieve feature values from hybrid table online storage, use read_feature_view
with store_type=StoreType.ONLINE. Reads use the hybrid table online feature table,
not the Postgres online service.
Alternatively, you can read features from the hybrid table directly through SQL. This approach isn’t recommended for production use because it can increase latency.
Time series data handling
To ensure data consistency, you can specify a timestamp_col. When multiple rows with the same primary key are found in the source, Snowflake only ingests the version with the most recent timestamp. If you don’t specify a timestamp column, the most recently processed row takes precedence.
Understanding costs
Online feature tables incur costs across the following consumption modes:
- Virtual warehouse compute: Both key lookups and data ingestion operations consume virtual warehouse credits at standard rates. For more information, see Virtual warehouse credit usage.
- Cloud Services compute: Required to identify changes in underlying base objects and determine when refresh operations are needed. For more information, see Cloud service credit usage.
- Hybrid table storage: Storage costs based on flat monthly rate per GB. It’s more expensive than the cost for traditional Snowflake storage, but identical to the cost to store hybrid tables. For more information, see Table 3(b) in the Credit Consumption Table.
- Hybrid table requests: As of March 1, 2026, hybrid table requests are no longer billed, and metering was disabled soon after this pricing change took effect.
Tip
Incremental refresh can help reduce costs. Incremental updates are generally more cost-efficient than full refresh, resulting in lower compute and data ingestion costs.
Cost monitoring
To monitor costs, use these views:
Managing offline to online sync
For batch feature views with online serving enabled, Snowflake refreshes the offline
dynamic table on refresh_freq and syncs values to the online store on
OnlineConfig.target_lag. These settings apply to both Postgres and hybrid table online
serving.
You can also suspend refresh, trigger refreshes manually, and inspect refresh history through the Python SDK.
Refresh modes
Snowflake uses the following refresh modes when updating the offline dynamic table and, for hybrid table online serving, the online feature table:
- Incremental refresh: Snowflake tracks changes in the sources and merges only the new or updated rows into the store. This is the preferred and most efficient mode.
- Full refresh: Snowflake drops all existing data in the table and reloads everything from the source. This mode is more resource-intensive and is used when an incremental refresh is not possible.
Set refresh_mode to INCREMENTAL, FULL, or AUTO on the feature view to choose a
mode explicitly, or use AUTO to let Snowflake pick the most efficient available mode.
For Postgres online serving, the Online Service syncs the online store automatically on
target_lag. Manual online refresh isn’t supported on that path.
Suspend and resume refresh
Use suspend_feature_view and resume_feature_view to pause or restart refresh for a
feature view. These calls affect both the offline dynamic table and the online store so
offline and online data stay consistent.
Trigger a refresh manually
Use refresh_feature_view to trigger a refresh outside the scheduled interval. Pass
store_type=StoreType.OFFLINE to refresh the offline dynamic table, or
store_type=StoreType.ONLINE to refresh a hybrid table online feature table.
Note
Manual online refresh isn’t supported when store_type=OnlineStoreType.POSTGRES. Postgres
online stores are refreshed automatically by the Online Service.
View refresh history
Use get_refresh_history to inspect past refresh jobs for the offline store or online
store. To monitor refresh jobs in Snowsight, see
Monitoring and Observability.
Troubleshooting
This section lists common Online Feature Store issues and actionable workarounds you can apply from your account or client environment. Platform-level limitations that require admin action are listed under Known limitations.
Object already exists error on online service creation
If you receive the following error when calling create_online_service():
A previous online service creation was interrupted or left in a partial state. Drop the existing online service and recreate it:
Backfill fails and online table stays empty
When a stream feature view backfill job fails, it sets backfill_status to FAILED. The
SDK cleans up the $BACKFILL staging table by design and doesn’t retry. The online table
can then poll an empty staging table every 10 seconds and skip updates indefinitely. The
system can’t self-heal from this state.
Diagnose the root cause:
Workaround: re-register the feature view with overwrite=True to reset state and
trigger a fresh backfill:
Related caveats:
- If the feature view source is a SQL view rather than a base table, backfill is more likely to fail. Use a base table as the source where possible.
- For datasets larger than 10 million rows, use at least an XL warehouse. A backfill failure with no obvious SQL error can indicate out-of-memory on an undersized warehouse.
Online table initial sync is stuck
After create_online_service() or register_feature_view(), the online table can show
initial sync running indefinitely without raising an error.
Diagnose task history:
Workaround: drop and recreate the online service to reset internal state:
If sync hangs again, re-register the feature view:
Online service unreachable (DNS resolution with PrivateLink)
Error:
Accounts with both public and PrivateLink endpoints can resolve to a PrivateLink hostname
when online_service_access isn’t set or is set to OnlineServiceAccess.PRIVATELINK. That
hostname isn’t DNS-resolvable from machines outside the private network, such as a
developer laptop.
Set online_service_access when you construct the FeatureStore to match the network
your client runs on. For more context, see
PrivateLink URL configuration.
HTTP 401: client IP not allowed
Error:
The SPCS endpoint that hosts the online service can enforce a network ingress rule that doesn’t include your client IP. This is separate from account-level network policy: you might reach Snowflake SQL endpoints but still be blocked at the SPCS endpoint.
Workaround: ask your Snowflake account admin to add the client IP to the network rule attached to the SPCS endpoint:
If online reads worked before and suddenly fail with HTTP 401, check whether network rules were recently modified.
Python UDF fails with dataclasses import blocked
Error (often surfaced through the Online Service REST API):
When a Python transform returns a list of dicts (for example,
[{"COL": val}]), pandas can lazy-load the dataclasses module during deserialization.
Snowflake UDFs block that import, so the transform fails. The error might appear as a
generic HTTP 500 from the online service.
Construct the output DataFrame directly instead of using a list of dicts:
Feature group read fails when a member feature view is unhealthy
Error:
Reading a feature group aggregates results from multiple feature views. If one member feature view’s online table is stuck (hung sync, failed backfill), the entire group read can fail even when other members are healthy. For more information about feature groups, see Feature groups.
Read each member feature view individually to find the failing one:
Apply the workaround for the failing feature view (see Backfill fails and online table stays empty or Online table initial sync is stuck), then retry the feature group read.
Offline read returns incorrect feature values
Symptoms:
read_feature_view(..., store_type="online")returns expected feature values for all users.read_feature_view(..., store_type="offline")returns entity keys but incorrect feature values for some users (for example, a count of0when the online read shows a value greater than zero).- Offline refresh history, the transform UDF table, and the underlying dynamic table look healthy.
This divergence is often caused by the session TIMEZONE parameter. Offline reads through the
Python SDK can interpret timestamp columns using the session timezone rather than the timezone
stored in the feature table. Online reads through the Postgres-backed online store do not show
the same behavior because those timestamps are handled as NTZ/UTC. Offline-only or hybrid-table
feature views can also use TIMESTAMP_LTZ, so you can’t assume all offline data is stored in UTC.
Workaround: set the session timezone to UTC before calling read_feature_view with
store_type="offline":
Snowflake is working on timezone-aware offline reads for a future release. Until then, use UTC for any notebook, job, or pipeline that reads offline feature views. For a general summary, see Known limitations on the feature views page.
Feature view name length with Postgres online serving
PostgreSQL limits identifier length (NAMEDATALEN is a compile-time constant; the usable
length is 63 characters). This limit can’t be changed at runtime or through Snowflake
account configuration.
When you enable online serving with OnlineStoreType.POSTGRES, the online service creates
internal Postgres objects for each feature view. Snowflake adds fixed metadata padding to
the feature view name and version when building those internal names. As a result, the
combined length of the feature view name and version must not exceed 46 characters.
If the combined length exceeds this limit, registration might succeed, but the online service can truncate internal Postgres identifiers. That can lead to:
- Collisions between feature views that differ only after truncation
- Undefined behavior when reading or ingesting features
- Stream ingest or online service errors (for example, HTTP 500)
Snowflake allows longer feature view names for offline-only feature views and for Snowflake SQL identifiers generally (for example, version strings up to 128 characters). Those longer limits do not apply to Postgres-backed online serving.
Workaround: Use abbreviated feature view names and short version strings before
registering with OnlineStoreType.POSTGRES. Plan naming conventions before migrating large
feature view catalogs to the online store.
Example: A feature view named sender_document_sender_device_ip_address_count_endtoend_uuid_new_city
(69 characters) with version V1 exceeds the limit. Shorten the name (and version if needed)
so len(name) + len(version) <= 46.
Future SDK releases might reject registration when the combined length exceeds this limit. Until then, validate name length in your own pipelines when enabling Postgres online serving.
Known limitations
Accounts with Tri-Secret Secure enabled on PrivateLink must complete Postgres CMK setup before creating the online service. Without CMK configuration, online service creation fails. For more information, see Snowflake Postgres Tri-Secret Secure.