CUDA-X Libraries in Snowflake ML
Use Snowflake Container Runtime’s CUDA-X integrations to seamlessly scale data transformations and ML over GPUs without changing your code. Snowflake has integrated NVIDIA’s cuML and cuDF libraries into the runtime environment. With this integration, you can use libraries such as scikit-learn, umap-learn, or hdbscan with your GPUs. You don’t have to learn new frameworks or handle complex dependencies.
You can run complex processing such as topic modeling, genomics, and pattern recognition without compromising on data sizes or algorithmic complexity. Reducing the processing time gives you the opportunity to further iterate on your models.
The integration with the CUDA-X libraries enables the GPU-accelerated processing of large datasets in the Snowflake ML Container Runtime. The processing speed can be orders of magnitude faster than using the Container Runtime exclusively.
NVIDIA CUDA-X Libraries for Data Science
Open-source libraries like cuML and cuDF utilize GPUs for more efficient and scalable data workflows. You can use these libraries to process data with billions of rows and millions of dimensions. For more information about these libraries, see NVIDIA CUDA-X Data Science.
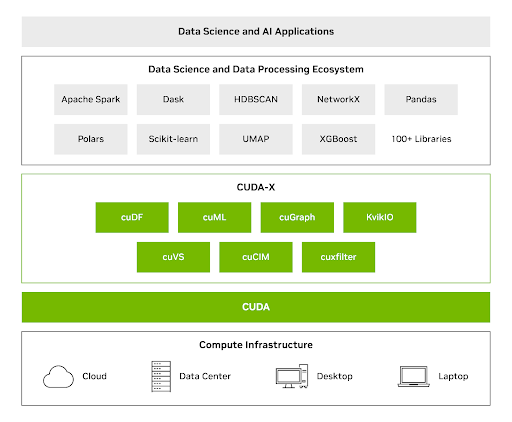
CUDA-X DS libraries combine the power of GPUs with commonly used Python libraries for data analytics, machine learning, and graph analytics—delivering major speedups without requiring teams to rewrite their code. With CUDA-X DS, you can use the GPU speed increases, to process datasets up to terabytes in size with a single GPU.
NVIDIA cuML can deliver the following performance improvements over CPU workflows:
- Up to 50x for scikit-learn
- Up to 60x for UMAP
- Up to 175x for HDBSCAN
Use Cases
The integration of the CUDA-X libraries in the Snowflake ML Container Runtime uses GPUs with Scikit-learn and pandas for the following use cases:
Large-Scale topic modeling
Topic modeling on large and feature-rich data sets requires:
- Using embedding models
- Applying dimensionality reduction at scale
- Using clustering and visualization to extract accurate and relevant topics
GPU parallelism can help you accomplish the preceding workflows more efficiently. By accelerating your processing with cuML, you can transform millions of product reviews from raw text to well-defined topic clusters that can be reduced from hours on CPU to minutes on GPU with no modifications to existing Python code. This highlights the seamless drop-in acceleration for UMAP and HDBSCAN libraries.
For more information about performing topic modeling over GPUs on Snowflake, see https://quickstarts.snowflake.com/guide/accelerate-topic-modeling-with-gpus-in-snowflake-ml/#0
Computational Genomics Workflows
Use Snowflake’s CUDA-X integrations to significantly accelerate the processing of biological sequences. You can convert DNA sequences into feature vectors for scalable classification tasks, such as predicting gene families.
Executing pandas and scikit-learn code directly on GPUs with cuDF and cuML speeds up data loading, preprocessing, and ensemble model training. This GPU acceleration for existing workflows, without code changes, allows researchers to prioritize biological insights and model design over low-level GPU programming.
Developing in Snowflake
Use the CUDA-X libraries to develop and deploy GPU-accelerated machine learning models within the Snowflake ML Container Runtime . This section provides a step-by-step guide for integrating these tools into your Python workflows.
To get started, do the following:
- Define your Python script in a Snowflake Notebook or an ML Job
- Select the GPU runtime and a GPU compute pool for your Notebook or ML Job
After you’ve done the preceding steps, run the following code to configure the CUDA-X accelerators in your environment.
Now you can run pandas operations directly over GPUs or fit the scikit-learn, umap, or hdbscan model (note that there is no code change
needed to run over GPUs). This example shows how to use hdbscan on large datasets:
Applied Use Case: Topic Modeling at Scale
Computational efficiency is crucial for large scale text analysis and topic modeling. GPUs use parallel processing to reduce processing time from hours to minutes. This section demonstrates how to accelerate ML models on a dataset of 200,000 beauty product reviews using GPU acceleration with CUDA-X.
You can use CUDA-X to do the following:
- Transform raw text into numerical representations (embeddings) for machine learning.
- Accelerate dimensionality reduction
To utilize the CUDA libraries, add %load_ext cuml.accel at the beginning of your code. This reduces your processing time from hours to minutes.
The following example code uses the SentenceTransformer class to create embeddings.
The following example code uses HDBSCAN to reduce high-dimensional data. It retains the cluster topics.
Applied Use Case: Running complex genomics workflows
Gene family organization, which includes paralogs and orthologs, is crucial for understanding gene evolution, function, and conserved biological processes.
With the CUDA-X libraries, you can create a classification model to predict gene families from DNA sequences. This model can accelerate genomic annotation, identify novel gene functions, and provide insights into evolutionary pathways.
The dataset has a series of plain text nucleotide sequences and their corresponding gene family class labels. The classes correspond to seven distinct human gene families.
The following code uses the nucleotide transformer from Hugging Face to convert the DNA sequences into vectors. The transformer tokenizes and batches the sequences to transform each gene sequence into a 1280-feature vector.
You can use the following code to evaluate two ensemble classification models:
- A Random Forest Classifier
- An XGBoost classifier