Multi-Location Resilience for Data Pipelines
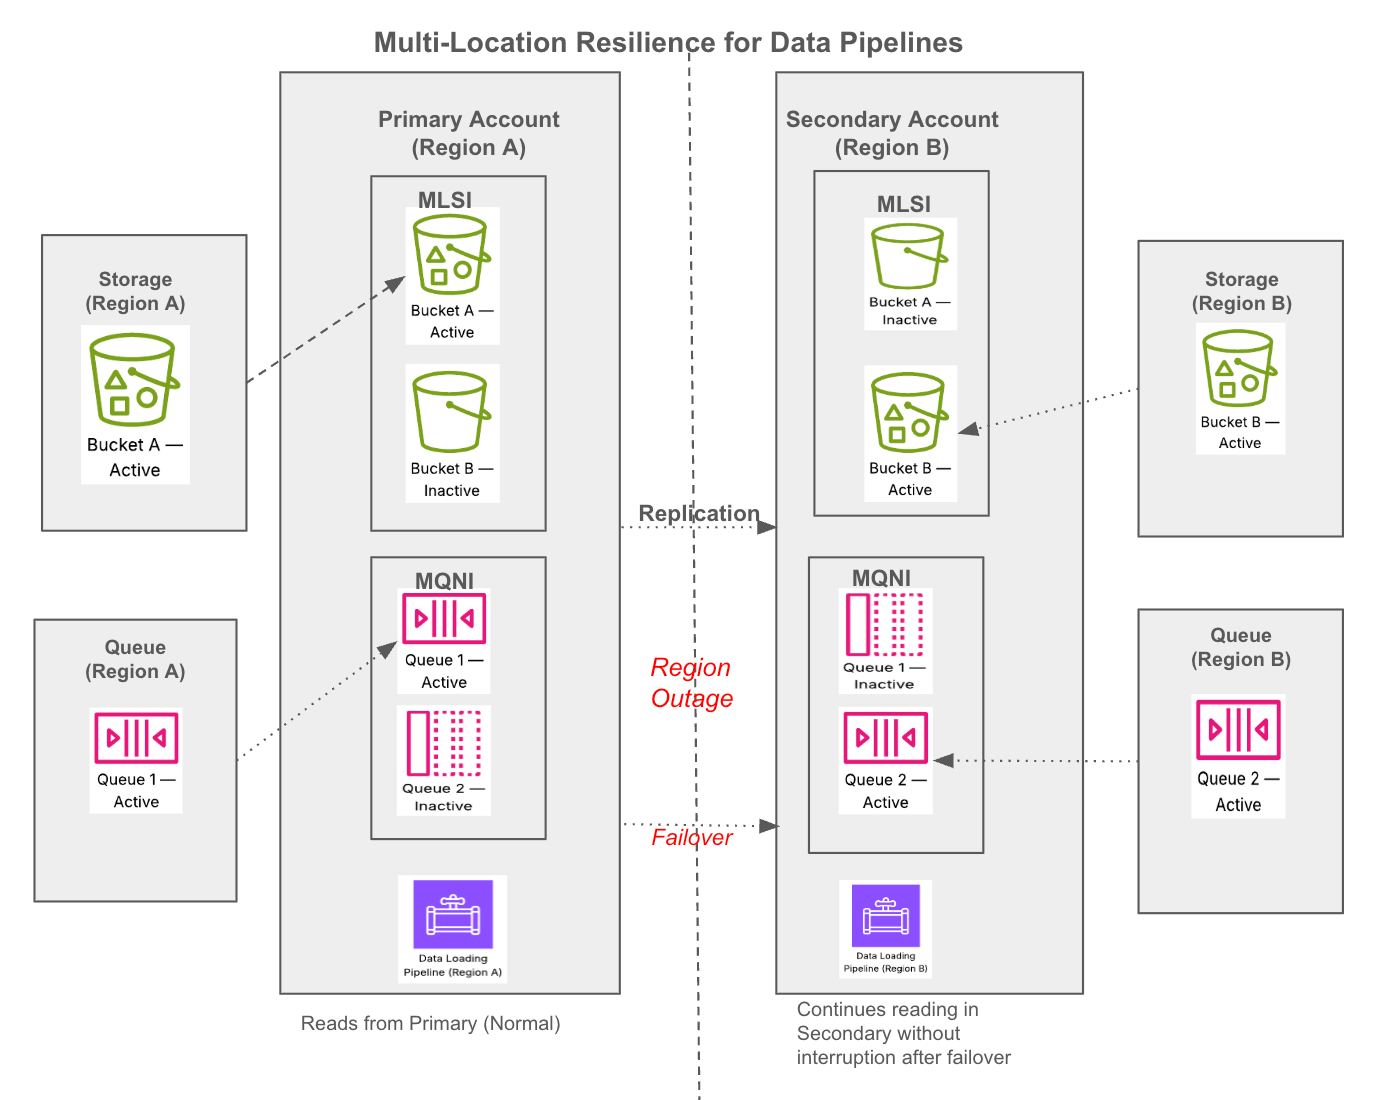
Multi-location resilience for data pipelines helps you safeguard your data pipelines against potential region-wide cloud provider outages. This feature ensures that upon failing over to a secondary location, your data pipelines (specifically those using Snowpipe and COPY INTO) resume loading new data without interruption or duplicate ingestion.
This feature works cross-cloud, allowing your primary and backup storage locations to span entirely different cloud providers (for example, failing over from AWS to Azure), as well as cross-region within the same cloud.
This feature relies on a shared-responsibility model:
- Snowflake’s role: Snowflake natively replicates your target tables and load history (ingestion state) to your secondary account. During a failover, Snowflake uses this state to prevent duplicates and only ingest files that were not processed in the primary location.
- Your role: In the event of an outage (or as part of a dual-write cloud setup), you must route new incoming files to your secondary cloud storage location. Snowflake does not replicate your external cloud storage files.
Pipeline resilience is powered by configuring up to two key resources:
- Multi-Location Storage Integration (MLSI): Securely connects Snowflake to multiple external cloud storage locations across regions or clouds. MLSI is needed when you want resilience for either COPY INTO from external stages alone or for your Snowpipe pipeline.
- Multi-Queue Notification Integration (MQNI): Connects Snowflake to multiple third-party cloud message queues, ensuring continuous receipt of new file notifications. MQNI is only needed if you want resilience for your Snowpipe pipeline, that is, for continuous data loading.
Requirements and considerations
Before configuring this feature, review the following prerequisites and considerations:
Requirements
- Edition: Snowflake Business Critical Edition (or higher).
- Supported ingestion methods: This feature exclusively supports file-based data loading through Snowpipe (auto-ingest) and COPY INTO <table>. It does not support Openflow or Snowpipe Streaming.
- Identical path structures: To allow your pipelines to locate new files after failover, you must write them to the secondary storage location using the exact same hierarchy, folder structure, and relative path as your primary location.
Considerations
- Billing: This feature incurs standard replication charges (data transfer and compute resources), billed to your target account.
- Stage modification downtime: Changing the RELATIVE_URL property on an existing stage will invalidate dependent objects and halt ingestion. We recommend creating new stages during setup to avoid downtime.
- Multi-Queue Notification Integration (MQNI): Using the same active queue in both source and target accounts is not supported. Doing so can result in notification loss. Snowflake does not check whether the same queue is in use across accounts.
- Directory table: Creating a directory table on a stage using MLSI is currently not supported.
Replication behavior
- Asynchronous replication: Snowflake replicates your tables and your pipeline’s load history together in the exact same snapshot. Because they are synchronized, an outage will not result in duplicate data. If your secondary database is four hours behind, the table data is also four hours behind, and processing four hours of queued notifications simply brings the table up to date.
- Dual-write data loss avoidance: Your Recovery Point Objective (RPO) is dictated by your replication refresh interval. To prevent data loss during a failover, your secondary cloud message queue’s message retention period must be longer than your replication interval. If your queue drops messages before your scheduled replication catches up, those files will not be ingested upon failover.
- Single-write data loss risk: If you use single-write routing, any files processed in the primary location after your last successful replication are entirely unknown to the secondary location. Upon failover, this data will be temporarily missing in your target account.
Warning
Critical warning for single-write failback: When you execute a refresh to fail back to your original primary account, the primary database is overwritten by the secondary database. If you do not manually reconcile and load those orphaned files into your secondary database before syncing back, they will be permanently erased from your primary database.
Choosing the right architecture
Because Snowflake asynchronously replicates your target tables and your pipeline’s load history together in the same snapshot, your pipelines are protected against data duplication and partial loads. If an outage occurs mid-ingestion, the transaction rolls back completely so that there are no partially loaded files.
However, how you recover “in-flight” files during an outage depends entirely on whether your external cloud storage routing is configured for dual-writes or single-write routing.
1. Dual-writes - recommended
Your producer application writes files to both your primary and secondary cloud storage buckets simultaneously. The secondary message queue accumulates notifications, but Snowflake does not process them because the secondary database is read-only.
- What happens on failover: The secondary database becomes writable. Snowpipe reads the secondary queue and uses the replicated load history to deduplicate files. If an outage prevented a file from finishing in the primary location, the secondary pipeline reads the notification from the secondary queue, sees the file is missing from the load history, and ingests it.
- What happens on failback: When the primary location recovers and you refresh the failover group and then fail back, Snowpipe automatically starts ingesting new files since the load history was synced from the secondary account during your failback preparation.
- Result: No missing data, no duplicates. Snowflake handles reconciliation automatically in both directions.
- Action needed: None, beyond the standard pre-failback replication sync (ALTER FAILOVER GROUP … REFRESH) to ensure the primary account has the latest load history.
2. Single-write routing
Your producer only writes to the primary cloud storage. Upon an outage, you reroute the producer to start writing new files to the secondary cloud storage.
- What happens on failover: The secondary account immediately begins processing new files routed to the secondary bucket. However, any in-flight files trapped in the impacted primary location are left behind temporarily.
- What happens on failback: When the primary location recovers and you fail back to your primary Snowflake account, Snowpipe automatically processes any file notifications that successfully reached the queue before the outage.
- Result: No duplicates. However, any files where the cloud notification completely failed to generate because of the outage (or where the outage outlasted your queue’s message retention policy) require manual intervention.
- Action needed: After failing back, compare your primary storage bucket against the COPY_HISTORY view in Snowflake to identify any missing files. Run ALTER PIPE … REFRESH or a manual COPY INTO command to load those specific stranded files.
Part 1: One-time configuration (setup)
The following steps are performed once to configure your resilient data pipelines. Because you configure the active locations for both accounts during setup, failing over during an actual outage is nearly instantaneous.
Step 1: Create a Multi-Location Storage Integration (MLSI)
To configure a Multi-Location Storage Integration, you follow the standard steps for configuring a storage integration with a few differences noted in this section.
In your source account, create the MLSI by providing values for each location in the STORAGE_LOCATIONS list. You can mix and match cloud providers for cross-cloud setups.
Where:
-
STORAGE_LOCATIONS: Specifies a list of one or more storage locations (S3 bucket, GCS bucket, or Azure container) for the storage integration. To view the parameters for each cloud provider, see cloud provider parameters (cloudProviderParams) on the CREATE STORAGE INTEGRATION reference page.
-
NAME: String that specifies the identifier (name) for the storage location.
-
ENCRYPTION: Specifies encryption for the storage location. You must specify encryption for the storage location at the storage integration level instead of at the stage level. Required only for loading from encrypted files; not required if the storage location and files are unencrypted. To view the encryption options for each cloud provider, see ENCRYPTION on the CREATE STAGE reference page.
-
ACTIVE: Specifies the name of the storage location to set as the active location for the storage integration in the current account.
For the active storage location in your source account, you must set up access control and grant Snowflake permission to access your storage. Use the instructions in the following topics:
Step 2: Associate MLSI with an external stage
We highly recommend creating a new stage rather than altering an existing one.
Warning
WARNING: Changing RELATIVE_URL causes downtime
If you use ALTER STAGE to change the RELATIVE_URL of an existing stage, any dependent directory tables are recreated, and any external tables or pipes using this stage are marked as invalid and will stop ingestion. Prepare for downtime if you choose to alter an existing stage.
Use the CREATE STAGE command to associate the multilocation storage integration that you created with one or more external stages:
Where:
- RELATIVE_URL: The relative path to your external stage location from the storage location defined in your storage integration. To allow your pipelines to locate new files after failover, you must write them to the secondary storage location using the same hierarchy, folder structure, and relative path as your primary location.
Note
This value must be a literal path. Specifying a pattern or wildcard isn’t supported. To specify access to all locations under the STORAGE_BASE_URL of your storage integration, use an empty string RELATIVE_URL = ‘’.
- STORAGE_INTEGRATION: The name of your Multi-Location Storage Integration.
Note
Alternatively, you can alter an existing external stage by specifying the RELATIVE_URL parameter and your MLSI. The ALTER STAGE command also supports rolling back this change so that the external stage does not use a Multi-Location Storage Integration.
For example:
Step 3: Configure a Multi-Queue Notification Integration (MQNI)
If you use automated data loading through cloud messaging and have configured a Multi-Location Storage Integration for your external stage, you must also use a Multi-Queue Notification Integration for seamless failover of your Snowpipe pipelines.
For each queue that you define for the notification integration, you must prepare your messaging service using the steps in the following topics:
- Configuring Amazon SNS to Automate Snowpipe using SQS Notifications. Create an SNS topic for each AWS region in which your MLSI has storage locations.
- Configuring Automation Using GCS Pub/Sub
- Configuring Automation With Azure Event Grid
Note
If you do not want to use Amazon SNS with Snowpipe, you can avoid creating an MQNI but you must perform an additional step during failover. If you choose this option, associate your pipe with the stage and MLSI created above, and then proceed to Step 4.
Scenario A: Create a new Multi-Queue Notification Integration (MQNI)
To create a Multi-Queue Notification Integration, you follow the standard steps for creating a notification integration with a few differences noted in this section.
In your source account, create a multi-queue notification integration by providing values for each queue in the QUEUES list:
Where:
- TYPE = MULTI_QUEUE: Specifies that this is a multi-queue integration between Snowflake and a third-party cloud message-queuing service.
- DIRECTION = INBOUND: Specifies that Snowflake receives notifications sent by the cloud messaging service.
- QUEUES: Specifies a list of one or more queues for the notification integration.
- NAME: String that specifies the identifier (name) for the queue.
To view the specific queue parameters for each cloud provider, see:
-
AWS:
- NOTIFICATION_PROVIDER = AWS_SNS: Specifies Amazon Simple Notification Service (SNS) as the third-party cloud message queueing service.
- AWS_SNS_TOPIC_ARN: Amazon Resource Name (ARN) of the Amazon SNS topic to which notifications are pushed.
-
Google Cloud: CREATE NOTIFICATION INTEGRATION (inbound from a Google Pub/Sub topic)
-
Azure: CREATE NOTIFICATION INTEGRATION (inbound from an Azure Event Grid topic)
-
ACTIVE: Specifies the name of the queue to set as the active queue for the notification integration in the current account.
For the active queue in your source account, you must grant Snowflake permission to access your messaging service. Follow the instructions for your cloud provider:
- For AWS, see Subscribe the Snowflake SQS Queue to the SNS Topic under Prerequisite: Create an Amazon SNS Topic and Subscription.
- For Google Cloud, see Grant Snowflake Access to the Pub/Sub Subscription under Configuring Automation Using GCS Pub/Sub.
- For Azure, see Grant Snowflake Access to the Storage Queue under Configuring Automation With Azure Event Grid.
After you create an MQNI, you can use it to create a new pipe with the CREATE PIPE command. The following example creates a pipe to load data from Amazon S3 into a table using an external stage (my_ext_stage) that depends on a Multi-Location Storage Integration:
Scenario B: Migrate an existing notification integration to MQNI
If you already have existing notification integrations that you want to convert to MQNI rather than creating a new one from scratch, use the SYSTEM$CONVERT_PIPES_TO_MULTI_QUEUE function.
The function creates a new multi-queue notification integration using the name you specify, sets the active queue for your source account to the original queue, and automatically migrates any pipes in the source account to use the new MQNI.
Syntax:
Where:
-
new_mqni_name: String that specifies an identifier (name) to assign to the new multi-queue notification integration that the function creates.
-
original_sns_topic_arn_or_int_name:
- For AWS, the Amazon Resource Name (ARN) of the original SNS topic associated with one or more pipes.
- For Google Cloud or Azure, a string that specifies the identifier of your original single-queue notification integration associated with one or more pipes.
-
new_sns_topic_arn_or_int_name:
- For AWS, the Amazon Resource Name (ARN) of a new SNS topic to add as a queue to the MQNI.
- For Google Cloud or Azure, a string that specifies the identifier of your new single-queue notification integration to combine with the original notification integration.
Example 1: Add a new SNS topic queue
This results in an MQNI named my_mqni with the following queues:
- MY_MQNI-queue1 (for the original, active SNS topic)
- MY_MQNI-queue2 (for the new SNS topic)
Example 2: Combine two notification integrations into MQNI
This results in an MQNI named my_azure_mqni with the following queues:
- my_azure_ni_1 (for the original, active queue)
- my_azure_ni_2 (for the new queue)
Note
If you want to change the active queue in your source account, you can use an ALTER INTEGRATION … SET ACTIVE = ‘<my_queue>’ statement. You must pause any pipes that use the notification integration before updating the active queue.
Step 4: Replicate your MLSI and MQNI to target account
Note
A refresh operation drops any storage or notification integrations in the target account that are not replicas unless the objects have global IDs.
For more information, see Replication and objects in target accounts.
- To replicate your multi-location storage integration and multi-queue notification integration, alter your existing replication or failover group to include STORAGE INTEGRATIONS and NOTIFICATION INTEGRATIONS in the ALLOWED_INTEGRATION_TYPES list.
For example, use the ALTER FAILOVER GROUP command:
- Then, in your target account, perform a refresh operation:
Step 5: Configure active states in target account
After you perform a refresh operation, to ensure a seamless failover during an actual outage, configure the active storage location and queue (if using a notification integration) in your target account.
In your target account:
-
For the storage location that you want to set as the active location in your target account, use the instructions in the following topics to grant Snowflake access to your storage:
-
Activate secondary storage: Set the MLSI to use your secondary backup storage location in the target account.
-
If you are using a Multi-Queue Notification Integration, grant Snowflake permission to access your messaging service for the queue that you want to set as active in your target account. Follow the instructions for your cloud provider:
- For AWS, see Subscribe the Snowflake SQS Queue to the SNS Topic under Prerequisite: Create an Amazon SNS Topic and Subscription.
- For Google Cloud, see Grant Snowflake Access to the Pub/Sub Subscription under Configuring Automation Using GCS Pub/Sub.
- For Azure, see Grant Snowflake Access to the Storage Queue under Configuring Automation With Azure Event Grid.
-
Activate secondary queue (if using MQNI): Set the active queue to your secondary location in the target account.
Part 2: Failover steps
Execute these steps during an outage to redirect your data ingestion to your secondary location. Because your active queues and storage were preconfigured in setup, this process requires minimal commands.
-
Promote the target account: Log in to your target account and promote it to serve as the new primary account. Data loading automatically resumes from your secondary cloud infrastructure.
-
If not using Amazon SNS with Snowpipe: If you are not using SNS with Snowpipe and only relying on SQS, you do not need to create an MQNI. Instead, call the following system function to rebind your pipe during failover.
Part 3: Failback steps
Once the outage is resolved and your primary location is healthy, execute these steps to move your pipelines back to the primary location.
-
Sync data back: Before promoting your original account, you must pull all data and state changes that occurred during the outage back to your original account. Log in to your original primary account (currently acting as the secondary account) and initiate a manual refresh:
Important
Wait for this refresh operation to finish completely before moving to the next step. Failing over before sync completes can result in data loss.
Warning
Critical warning for single-write failback: If you use single-write routing, any files processed in the primary location after your last successful replication are unknown to the secondary location. Upon failover, this data is temporarily missing in your target account. When you execute a refresh to fail back to your original primary account, the primary database is overwritten by the secondary database. If you do not manually reconcile and load those orphaned files into your secondary database before syncing back, they are permanently erased from your primary database.
-
Promote the original account: Once refresh is complete, promote your original source account back to primary.
-
If not using Amazon SNS with Snowpipe: Call the system function to rebind your pipe back to the original source location.
Part 4: Monitoring and validation
After initiating a failover or failback, use the following commands to verify that your data pipelines successfully redirected and resumed ingestion.
1. Verify active integration states
Confirm that your integrations are pointing to the correct storage and queues by checking their properties. Look for the ACTIVE property in the output:
2. Check pipe status (Snowpipe only)
Use the SYSTEM$PIPE_STATUS function to ensure your pipe is running and to check whether it is actively queueing new files from your secondary location.
Look for “executionState”:”RUNNING” and check “pendingFileCount” to confirm it is actively recognizing new files dropped into your secondary bucket.
3. Validate successful ingestion (load history)
To guarantee that data is loading without errors or duplicates, query the COPY_HISTORY view. This shows exactly which files were ingested, their source path, and when they were loaded.
Verify that the file_name paths reflect your active storage location and that status shows as LOADED.