Configure an Azure container for loading data
Configure secure access to data files stored in a Microsoft Azure container.
Snowflake supports the following options:
- Option 1:
Configure a storage integration object to delegate authentication responsibility for external cloud storage to an Azure service principal. A service principal is an identity created for use with services such as Snowflake to access Azure resources.
This option makes it easier to manage access for multiple users to different resources in Azure storage. A storage integration stores your secrets so that you don’t need to supply a SAS token every time you create an external stage.
Note
Accessing Azure blob storage in government regions using a storage integration is limited to Snowflake accounts hosted on Azure in the same government region. Accessing your blob storage from an account hosted outside of the government region using direct credentials is supported.
Confirm that Snowflake supports the Azure region that your storage is hosted in. For more information, see Supported cloud regions.
- Option 2:
Generate a shared access signature (SAS) token to grant Snowflake limited access to objects in your storage account. You can then access an external (Azure) stage that references the container using the SAS token.
Note
For the OneLake URL format, see CREATE STAGE.
Completing the instructions in this topic requires Azure administrative access. If you’re not an Azure administrator, ask your Azure administrator to perform these tasks.
To improve query performance for an Azure external stage, configure your network routing to use Microsoft network routing. For instructions, see the Azure documentation.
Option 1: Configure a Snowflake storage integration
This section describes how to use storage integrations to allow Snowflake to read data from and write data to an Azure container referenced in an external (Azure) stage. Integrations are named, first-class Snowflake objects that avoid the need for passing explicit cloud provider credentials such as secret keys or access tokens. Integration objects store an Azure identity and access management (IAM) user ID called the app registration. An administrator in your organization grants this app the necessary permissions in the Azure account.
An integration must also specify containers (and optional paths) that limit the locations users can specify when creating external stages that use the integration.
Note
Completing the instructions in this section requires permissions in Azure to manage storage accounts. If you are not an Azure administrator, ask your Azure administrator to perform these tasks.
In this Section:
Step 1: Create a cloud storage integration in Snowflake
Create a storage integration using the CREATE STORAGE INTEGRATION command. A storage integration is a Snowflake object that stores a generated service principal for your Azure cloud storage, along with an optional set of allowed or blocked storage locations (that is, containers). Cloud provider administrators in your organization grant permissions on the storage locations to the generated service principal. This option allows users to avoid supplying credentials when creating stages or loading data.
A single storage integration can support multiple external (that is, Azure) stages. The URL in the stage definition must align with the Azure containers (and optional paths) specified for the STORAGE_ALLOWED_LOCATIONS parameter.
Note
Only account administrators (users with the ACCOUNTADMIN role) or a role with the global CREATE INTEGRATION privilege can execute this SQL command.
CREATE STORAGE INTEGRATION <integration_name>
  TYPE = EXTERNAL_STAGE
  STORAGE_PROVIDER = 'AZURE'
  ENABLED = TRUE
  AZURE_TENANT_ID = '<tenant_id>'
  STORAGE_ALLOWED_LOCATIONS = ('azure://<account>.blob.core.windows.net/<container>/<path>/', 'azure://<account>.blob.core.windows.net/<container>/<path>/')
  [ STORAGE_BLOCKED_LOCATIONS = ('azure://<account>.blob.core.windows.net/<container>/<path>/', 'azure://<account>.blob.core.windows.net/<container>/<path>/') ]
Where:
integration_nameis the name of the new integration.tenant_idis the ID for your Office 365 tenant that the allowed and blocked storage accounts belong to. A storage integration can authenticate to only one tenant, so the allowed and blocked storage locations must refer to storage accounts that all belong this tenant.To find your tenant ID, sign in to the Azure portal and click Azure Active Directory » Properties. The tenant ID is displayed in the Tenant ID field.
containeris the name of an Azure container that stores your data files (for example,mycontainer). The STORAGE_ALLOWED_LOCATIONS and STORAGE_BLOCKED_LOCATIONS parameters allow or block access to these containers, respectively, when stages that reference this integration are created or modified.pathis an optional path that can be used to provide granular control over logical directories in the container.
The following example creates an integration that explicitly limits external stages that use the integration to reference either of two containers and paths. In a later step, we will create an external stage that references one of these containers and paths. Multiple external stages that use this integration can reference the allowed containers and paths:
CREATE STORAGE INTEGRATION azure_int
  TYPE = EXTERNAL_STAGE
  STORAGE_PROVIDER = 'AZURE'
  ENABLED = TRUE
  AZURE_TENANT_ID = 'a123b4c5-1234-123a-a12b-1a23b45678c9'
  STORAGE_ALLOWED_LOCATIONS = ('azure://myaccount.blob.core.windows.net/mycontainer1/mypath1/', 'azure://myaccount.blob.core.windows.net/mycontainer2/mypath2/')
  STORAGE_BLOCKED_LOCATIONS = ('azure://myaccount.blob.core.windows.net/mycontainer1/mypath1/sensitivedata/', 'azure://myaccount.blob.core.windows.net/mycontainer2/mypath2/sensitivedata/');
Step 2: Grant Snowflake Access to the Storage Locations
Execute the DESCRIBE INTEGRATION command to retrieve the consent URL:
DESC STORAGE INTEGRATION <integration_name>;
Where:
integration_nameis the name of the integration you created in Step 1: Create a Cloud Storage Integration in Snowflake.
Note the values in the following columns:
- AZURE_CONSENT_URL:
URL to the Microsoft permissions request page.
- AZURE_MULTI_TENANT_APP_NAME:
Name of the Snowflake client application created for your account. In a later step in this section, you will need to grant this application the permissions necessary to obtain an access token on your allowed storage locations.
In a web browser, navigate to the URL in the AZURE_CONSENT_URL column. The page displays a Microsoft permissions request page.
Click the Accept button. This action allows the Azure service principal created for your Snowflake account to be granted an access token on specified resources inside your tenant. Obtaining an access token succeeds only if you grant the service principal the appropriate permissions on the container (see the next step).
The Microsoft permissions request page redirects to the Snowflake corporate site (snowflake.com).
Sign in to the Microsoft Azure portal.
Navigate to Azure Services » Storage Accounts. Click the name of the storage account you are granting the Snowflake service principal access to.
Click Access Control (IAM) » Add role assignment.
Select the desired role to grant to the Snowflake service principal:
Storage Blob Data Readergrants read access only. This allows loading data from files staged in the storage account.Storage Blob Data Contributorgrants read and write access. This allows loading data from or unloading data to files staged in the storage account. The role also allows executing the REMOVE command to remove files staged in the storage account.
Search for the Snowflake service principal. This is the identity in the AZURE_MULTI_TENANT_APP_NAME property in the DESC STORAGE INTEGRATION output (in Step 1). Search for the string before the underscore in the AZURE_MULTI_TENANT_APP_NAME property.
Important
It can take an hour or longer for Azure to create the Snowflake service principal requested through the Microsoft request page in this section. If the service principal is not available immediately, we recommend waiting an hour or two and then searching again.
If you delete the service principal, the storage integration stops working.
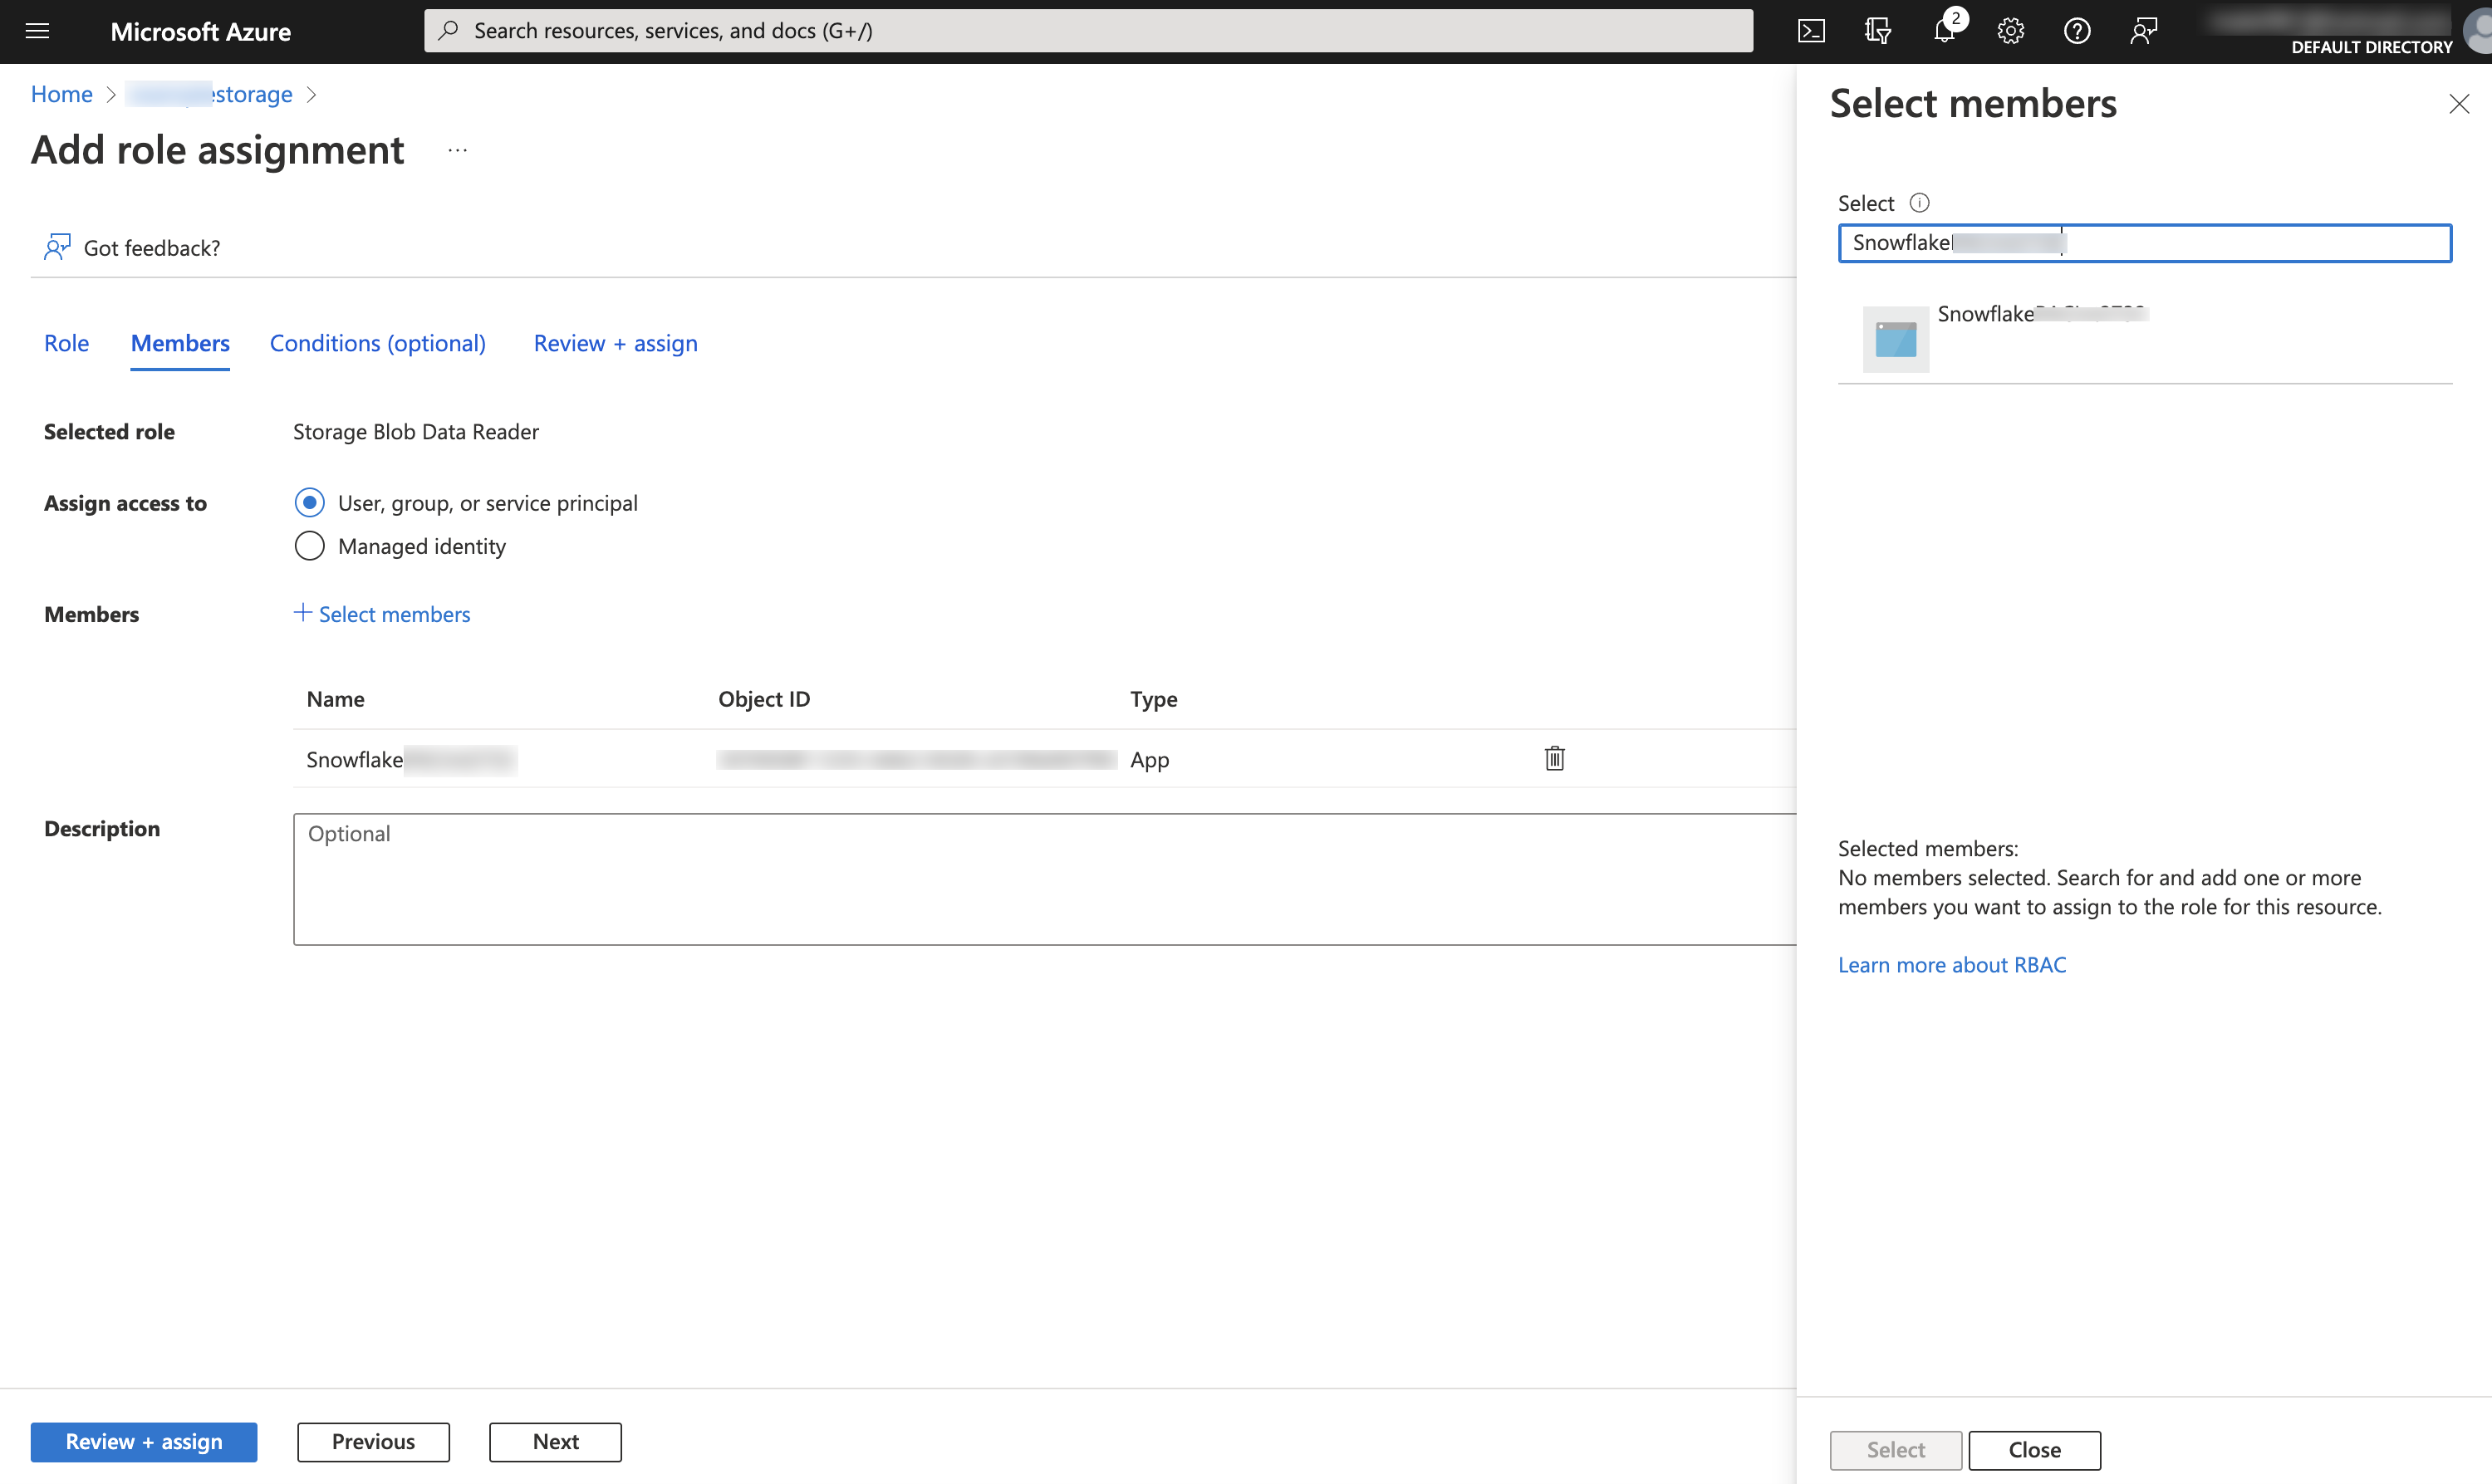
Click the Review + assign button.
Note
According to the Microsoft Azure documentation, role assignments may take up to five minutes to propagate.
Snowflake caches the temporary credentials for a period that cannot exceed the 60 minute expiration time. If you revoke access from Snowflake, users might be able to list files and load data from the cloud storage location until the cache expires.
Note
You can use the SYSTEM$VALIDATE_STORAGE_INTEGRATION function to validate the configuration for your storage integration.
Step 3: Create an external stage
Create an external (Azure) stage that references the storage integration you created in Step 1: Create a Cloud Storage Integration in Snowflake (in this topic).
Note
Creating a stage that uses a storage integration requires a role that has the CREATE STAGE privilege for the schema as well as the USAGE privilege on the integration. For example:
GRANT CREATE STAGE ON SCHEMA public TO ROLE myrole;

GRANT USAGE ON INTEGRATION azure_int TO ROLE myrole;
To reference a storage integration in the CREATE STAGE statement, the role must have the USAGE privilege on the storage integration object.
Append a forward slash (
/) to the URL value to filter to the specified folder path. If the forward slash is omitted, all files and folders starting with the prefix for the specified path are included.Note that the forward slash is required to access and retrieve unstructured data files in the stage.
Create the stage using the CREATE STAGE command.
For example, set mydb.public as the current database and schema for the user session, and then create a stage named my_azure_stage. In this example, the stage references the Azure container and path mycontainer1/path1, which are supported by the integration. The stage also references a named file format object called my_csv_format:
USE SCHEMA mydb.public;

CREATE STAGE my_azure_stage
  STORAGE_INTEGRATION = azure_int
  URL = 'azure://myaccount.blob.core.windows.net/container1/path1'
  FILE_FORMAT = my_csv_format;
Note
The stage owner (i.e. the role with the OWNERSHIP privilege on the stage) must have the USAGE privilege on the storage integration.
To load or unload data from or to a stage that uses an integration, a role must have the USAGE privilege on the stage. It is not necessary to also have the USAGE privilege on the storage integration.
Use the
blob.core.windows.netendpoint for all supported types of Azure blob storage accounts, including Data Lake Storage Gen2.The STORAGE_INTEGRATION parameter is handled separately from other stage parameters, such as FILE_FORMAT. Support for these other parameters is the same regardless of the integration used to access your Azure container.
Option 2: Generate a SAS token
Step 1: Generate the SAS token
The following step-by-step instructions describe how to generate an SAS token to grant Snowflake limited access to objects in your storage account:
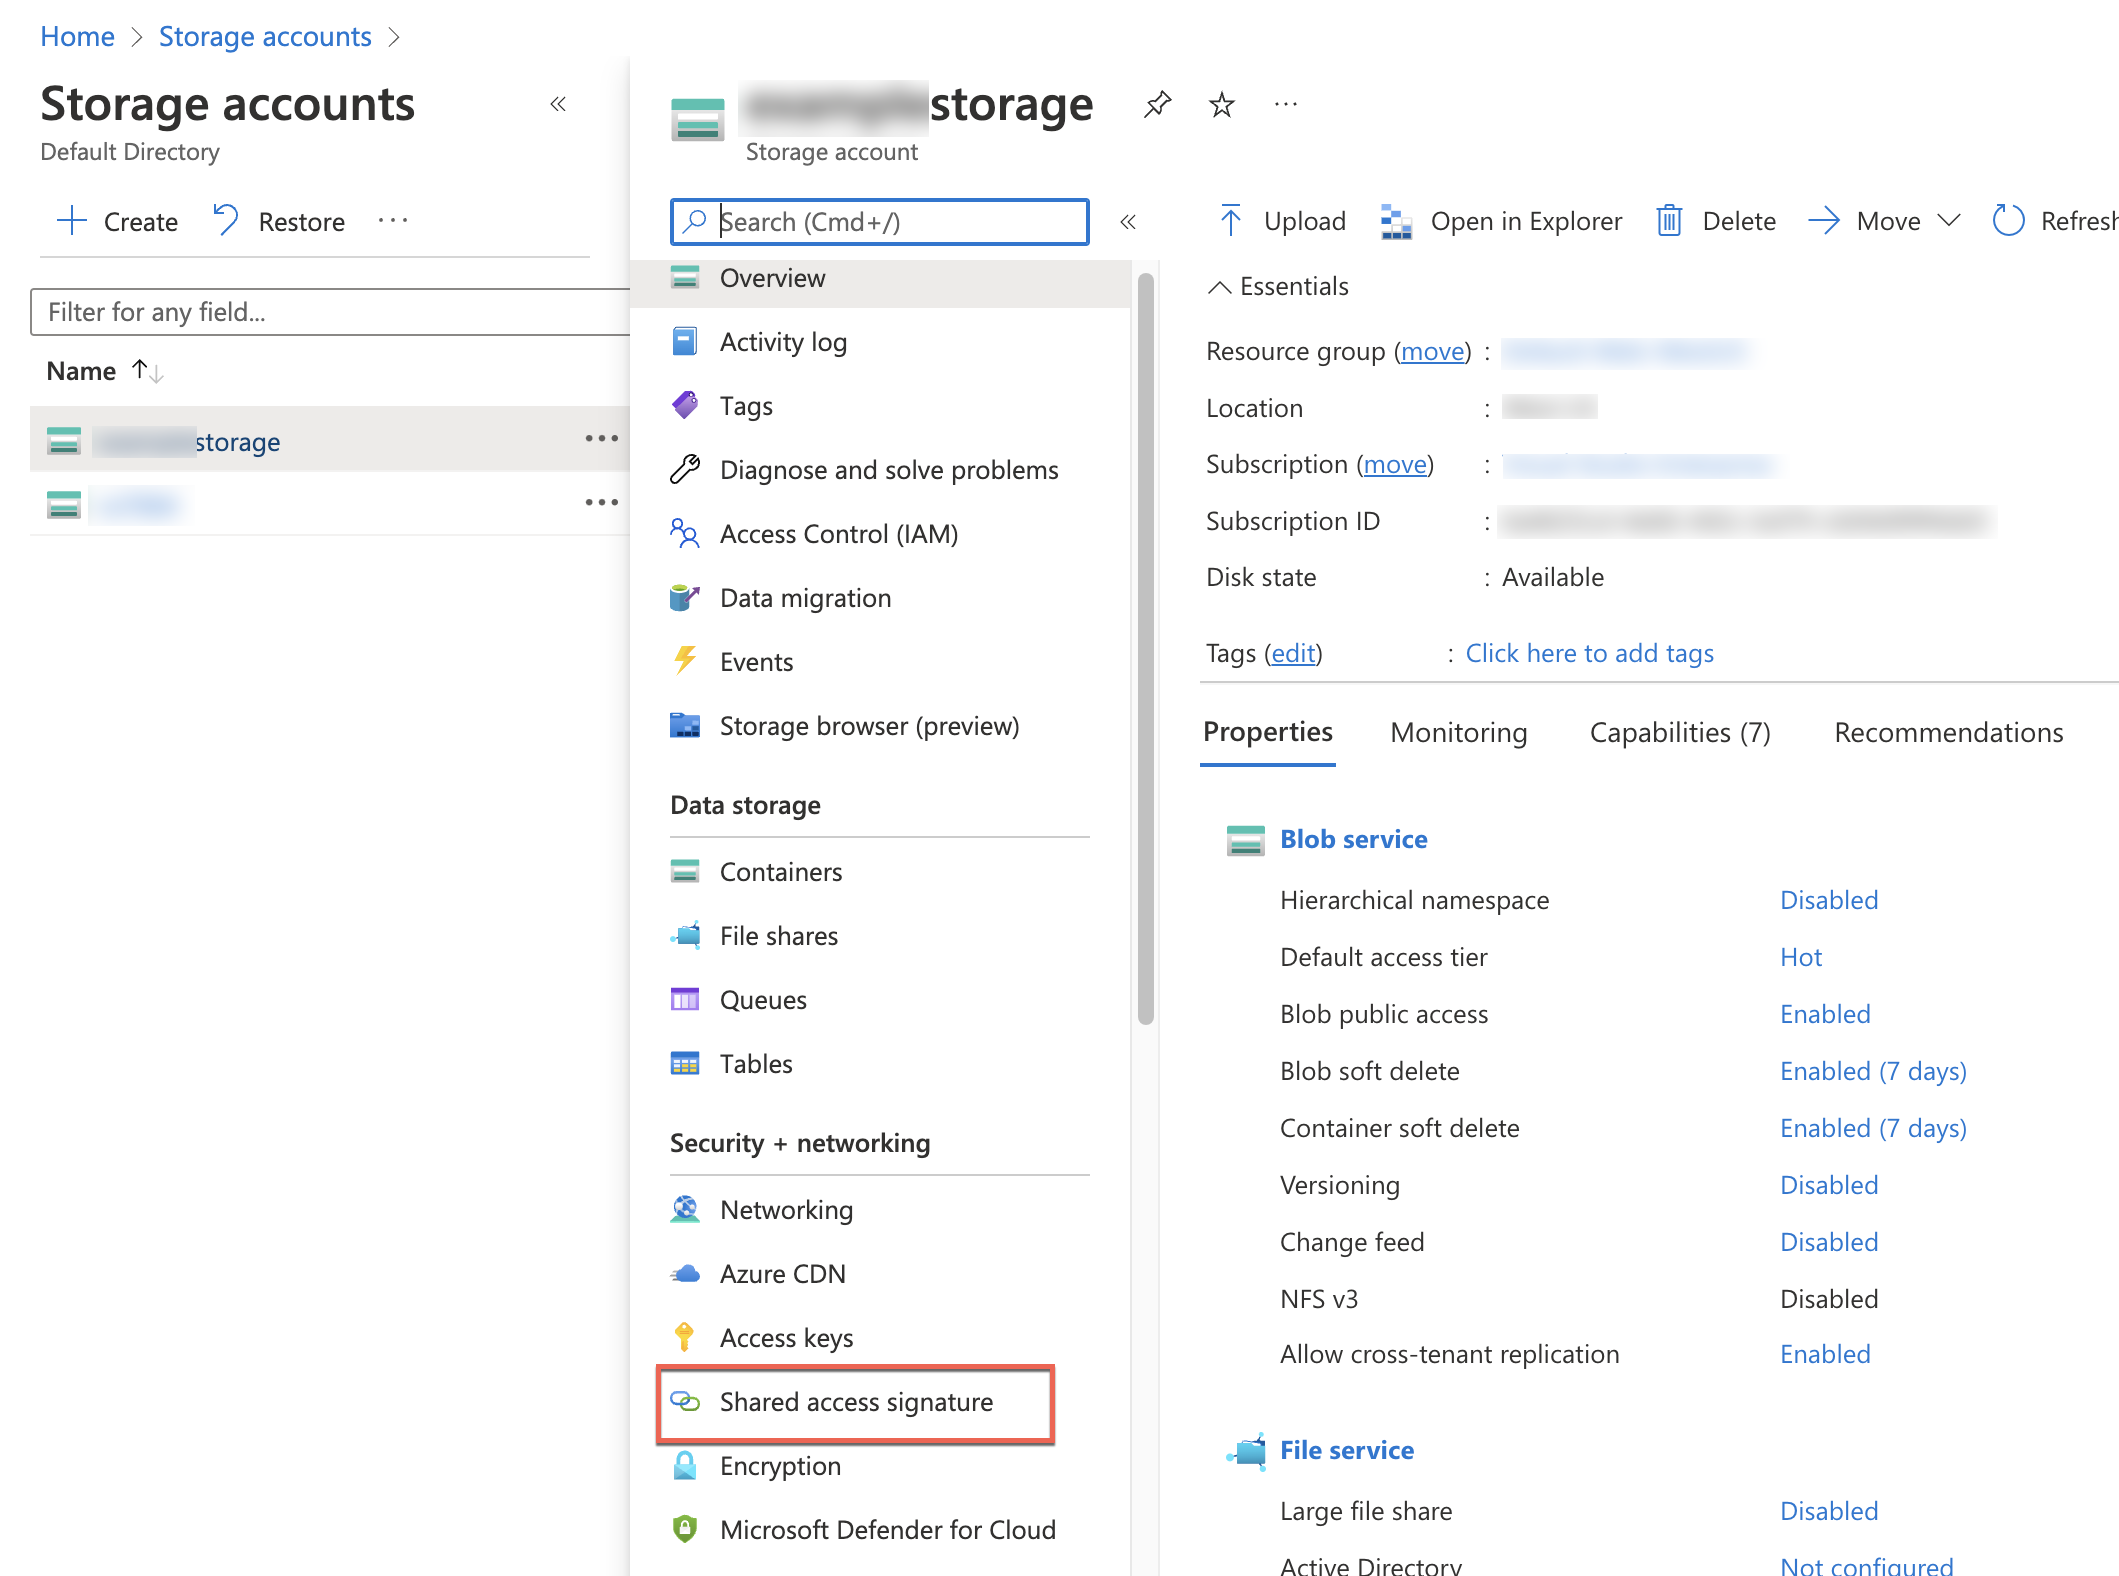
Log into the Azure portal.
From the home dashboard, choose Storage Accounts » <storage_account>. Under Security + networking, choose Shared access signature.
Select the following Allowed services:
Blob
Select the following Allowed resource types:
Container(required to list objects in the storage account)Object(required to read/write objects from/to the storage account)
Select the following allowed permissions to load data files from Azure resources:
Read
List
The
Write,Add, andCreatepermissions are also required if you plan to unload files to a container. In addition, to use thePURGE = TRUEoption, thePermanent Deletepermission is required.Specify start and expiry dates/times for the SAS token. As part of a general security plan, you could generate a different SAS token periodically.
Leave the Allowed IP addresses field blank, and specify either HTTPS only or HTTPS and HTTP under Allowed protocols.
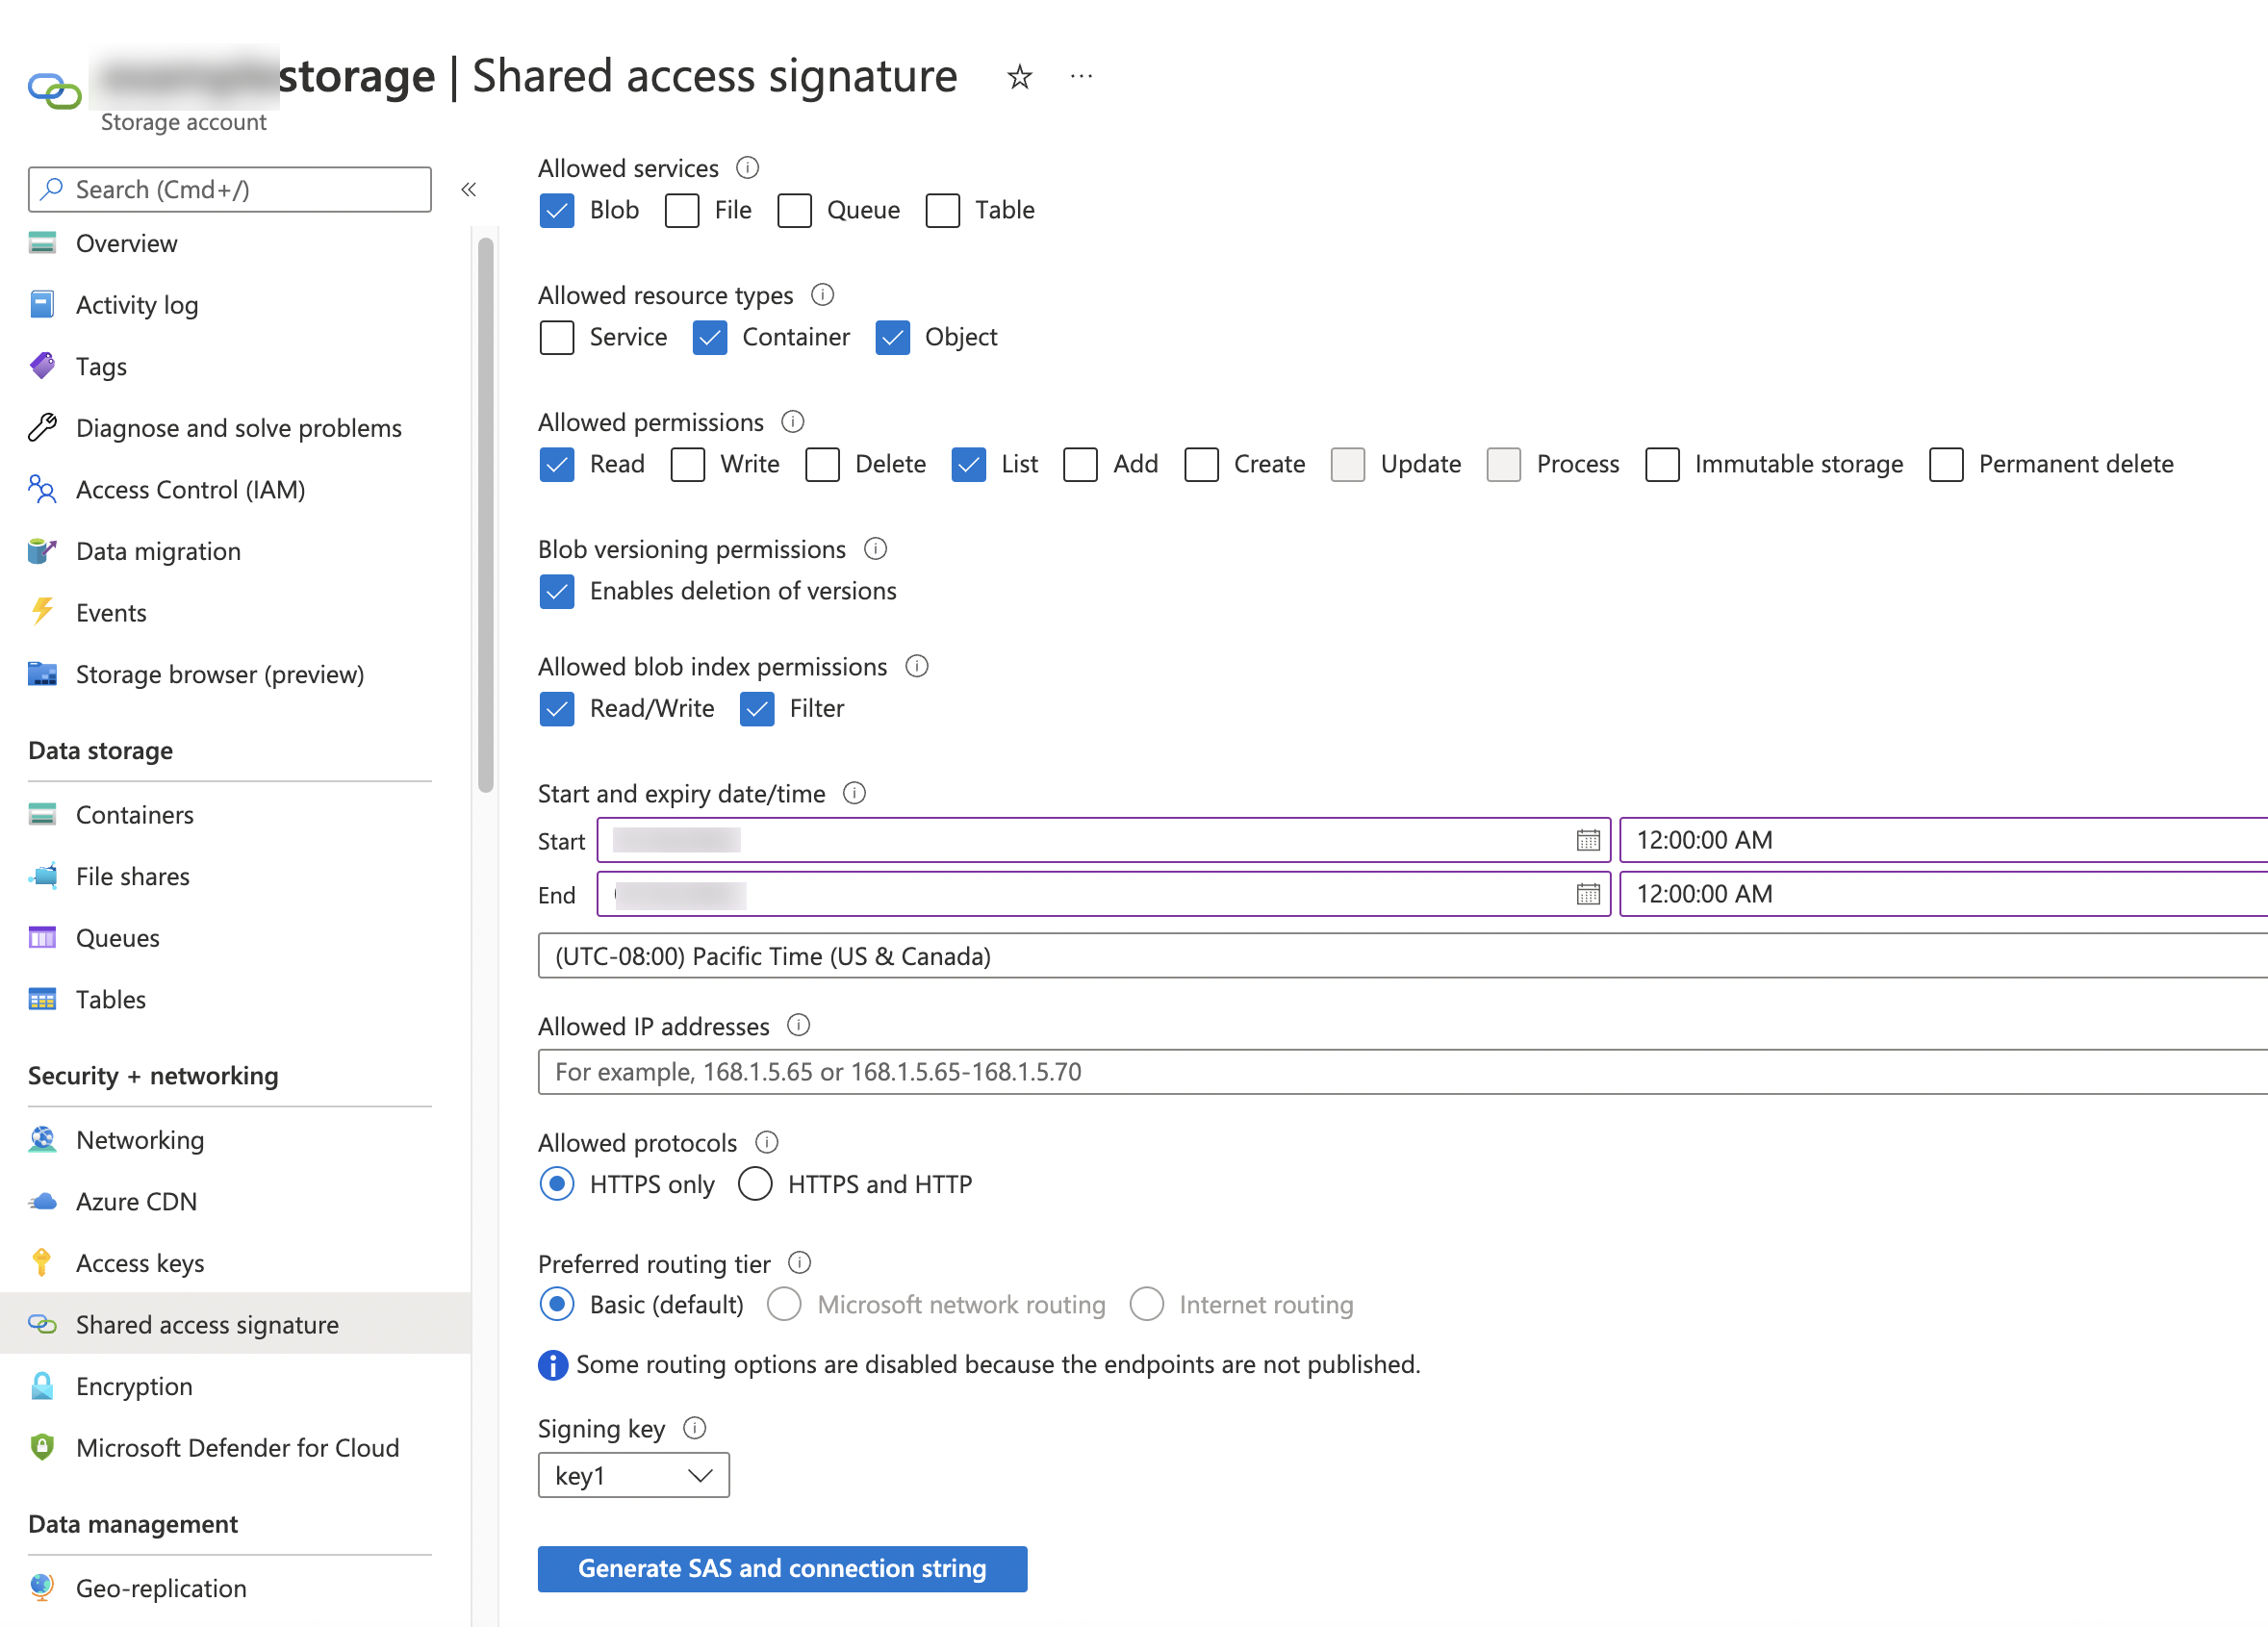
Click the Generate SAS and connection string button. Record the full value in the SAS token field, starting with and including the
?. This is your SAS token. You will specify this token when you create an external stage.
Step 2: Create an external stage
Create an external (Azure) stage that references the SAS token you generated in Step 1: Generate the SAS Token (in this topic).
The following example uses SQL to create an external stage named my_azure_stage that includes Azure credentials and a
master encryption key. The stage URL references the Azure myaccount account. The
data files are stored in the mycontainer container and /load/files path. The stage references a named file format object called
my_csv_format. Note that the example truncates the MASTER_KEY value:
CREATE OR REPLACE STAGE my_azure_stage
  URL='azure://myaccount.blob.core.windows.net/mycontainer/load/files'
  CREDENTIALS=(AZURE_SAS_TOKEN='?sv=2016-05-31&ss=b&srt=sco&sp=rwdl&se=2018-06-27T10:05:50Z&st=2017-06-27T02:05:50Z&spr=https,http&sig=bgqQwoXwxzuD2GJfagRg7VOS8hzNr3QLT7rhS8OFRLQ%3D')
  ENCRYPTION=(TYPE='AZURE_CSE' MASTER_KEY = 'kPx...')
  FILE_FORMAT = my_csv_format;
Note that the AZURE_SAS_TOKEN and MASTER_KEY values used in this example are for illustration purposes only.
Note
By specifying a named file format object (or individual file format options) for the stage, it is not necessary to later specify the same file format options in the COPY command used to load data from the stage. For more information about file format objects and options, see CREATE FILE FORMAT.
Data file encryption
Enable Azure Storage Service Encryption (SSE) for Data at Rest on your storage account directly, and Snowflake will handle it correctly. For more information, see the Azure documentation on SSE.
In addition, Snowflake supports client-side encryption to decrypt files staged in Azure containers.
Client-side encryption:
AZURE_CSE: Requires a MASTER_KEY value. For information, see the Client-side encryption information in the Microsoft Azure documentation.
Note
Block blobs and append blobs support client-side encryption but page blobs do not.
Next: Create an Azure stage