Configuring an integration for Google Cloud Storage
This topic describes how to configure secure access to data files stored in a Google Cloud Storage bucket.
Configuring a Snowflake storage integration
This section describes how to use storage integrations to allow Snowflake to read data from and write to a Google Cloud Storage bucket referenced in an external (that is, Cloud Storage) stage. Integrations are named, first-class Snowflake objects that avoid the need for passing explicit cloud provider credentials such as secret keys or access tokens; instead, integration objects reference a Cloud Storage service account. An administrator in your organization grants the service account permissions in the Cloud Storage account.
Administrators can also restrict users to a specific set of Cloud Storage buckets (and optional paths) accessed by external stages that use the integration.
Note
Completing the instructions in this section requires access to your Cloud Storage project as a project editor. If you are not a project editor, ask your Cloud Storage administrator to perform these tasks.
Confirm that Snowflake supports the Google Cloud Storage region that your storage is hosted in. For more information, see Supported cloud regions.
The following diagram shows the integration flow for a Cloud Storage stage:
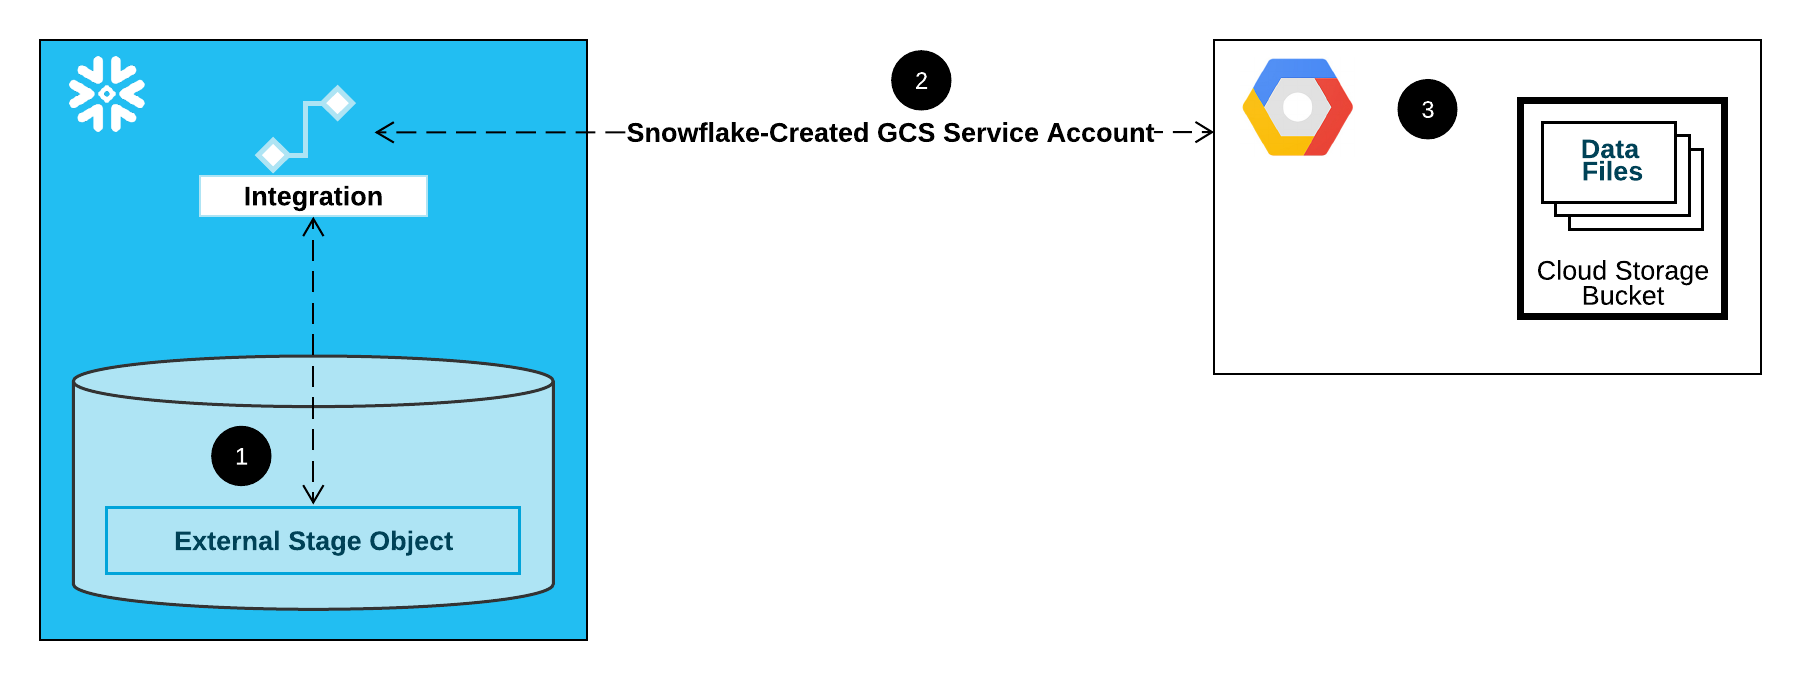
An external (that is, Cloud Storage) stage references a storage integration object in its definition.
Snowflake automatically associates the storage integration with a Cloud Storage service account created for your account. Snowflake creates a single service account that is referenced by all GCS storage integrations in your Snowflake account.
A project editor for your Cloud Storage project grants permissions to the service account to access the bucket referenced in the stage definition. Note that many external stage objects can reference different buckets and paths and use the same integration for authentication.
When a user loads or unloads data from or to a stage, Snowflake verifies the permissions granted to the service account on the bucket before allowing or denying access.
In this Section:
Step 1: Create a Cloud Storage integration in Snowflake
Create an integration using the CREATE STORAGE INTEGRATION command. An integration is a Snowflake object that delegates authentication responsibility for external cloud storage to a Snowflake-generated entity (that is, a Cloud Storage service account). For accessing Cloud Storage buckets, Snowflake creates a service account that can be granted permissions to access the bucket(s) that store your data files.
A single storage integration can support multiple external (that is, GCS) stages. The URL in the stage definition must align with the GCS buckets (and optional paths) specified for the STORAGE_ALLOWED_LOCATIONS parameter.
Note
Only account administrators (users with the ACCOUNTADMIN role) or a role with the global CREATE INTEGRATION privilege can execute this SQL command.
CREATE STORAGE INTEGRATION <integration_name>
  TYPE = EXTERNAL_STAGE
  STORAGE_PROVIDER = 'GCS'
  ENABLED = TRUE
  STORAGE_ALLOWED_LOCATIONS = ('gcs://<bucket>/<path>/', 'gcs://<bucket>/<path>/')
  [ STORAGE_BLOCKED_LOCATIONS = ('gcs://<bucket>/<path>/', 'gcs://<bucket>/<path>/') ]
Where:
integration_nameis the name of the new integration.bucketis the name of a Cloud Storage bucket that stores your data files (for example,mybucket). The required STORAGE_ALLOWED_LOCATIONS parameter and optional STORAGE_BLOCKED_LOCATIONS parameter restrict or block access to these buckets, respectively, when stages that reference this integration are created or modified.pathis an optional path that can be used to provide granular control over objects in the bucket.
The following example creates an integration that explicitly limits external stages that use the integration to reference either of two buckets and paths. In a later step, we will create an external stage that references one of these buckets and paths.
Additional external stages that also use this integration can reference the allowed buckets and paths:
CREATE STORAGE INTEGRATION gcs_int
  TYPE = EXTERNAL_STAGE
  STORAGE_PROVIDER = 'GCS'
  ENABLED = TRUE
  STORAGE_ALLOWED_LOCATIONS = ('gcs://mybucket1/path1/', 'gcs://mybucket2/path2/')
  STORAGE_BLOCKED_LOCATIONS = ('gcs://mybucket1/path1/sensitivedata/', 'gcs://mybucket2/path2/sensitivedata/');
Step 2: Retrieve the Cloud Storage service account for your Snowflake account
Execute the DESCRIBE INTEGRATION command to retrieve the ID for the Cloud Storage service account that was created automatically for your Snowflake account:
DESC STORAGE INTEGRATION <integration_name>;
Where:
integration_nameis the name of the integration you created in Step 1: Create a Cloud Storage integration in Snowflake (in this topic).
For example:
DESC STORAGE INTEGRATION gcs_int;

+-----------------------------+---------------+-----------------------------------------------------------------------------+------------------+
| property                    | property_type | property_value                                                              | property_default |
+-----------------------------+---------------+-----------------------------------------------------------------------------+------------------|
| ENABLED                     | Boolean       | true                                                                        | false            |
| STORAGE_ALLOWED_LOCATIONS   | List          | gcs://mybucket1/path1/,gcs://mybucket2/path2/                               | []               |
| STORAGE_BLOCKED_LOCATIONS   | List          | gcs://mybucket1/path1/sensitivedata/,gcs://mybucket2/path2/sensitivedata/   | []               |
| STORAGE_GCP_SERVICE_ACCOUNT | String        | service-account-id@project1-123456.iam.gserviceaccount.com                  |                  |
+-----------------------------+---------------+-----------------------------------------------------------------------------+------------------+
The STORAGE_GCP_SERVICE_ACCOUNT property in the output shows the Cloud Storage service account created for your Snowflake account (that is, service-account-id@project1-123456.iam.gserviceaccount.com). We provision a single Cloud Storage service account for your entire Snowflake account. All Cloud Storage integrations use that service account.
Step 3: Grant the service account permissions to access bucket objects
The following step-by-step instructions describe how to configure IAM access permissions for Snowflake in your Google Cloud console so that you can use a Cloud Storage bucket to load and unload data:
Creating a custom IAM role
Create a custom role that has the permissions required to access the bucket and get objects.
Sign in to the Google Cloud console as a project editor.
From the home dashboard, select IAM & Admin » Roles.
Select Create Role.
Enter a Title and optional Description for the custom role.
Select Add Permissions.
Filter the list of permissions, and add the following from the list:
Action(s)
Required permissions
Data loading only
storage.buckets.getstorage.objects.getstorage.objects.list
Data loading with purge option, executing the REMOVE command on the stage
storage.buckets.getstorage.objects.deletestorage.objects.getstorage.objects.list
Data loading and unloading
storage.buckets.get(for calculating data transfer costs)storage.objects.createstorage.objects.deletestorage.objects.getstorage.objects.list
Data unloading only
storage.buckets.getstorage.objects.createstorage.objects.deletestorage.objects.list
Using COPY FILES to copy files to an external stage
You must have the following additional permissions:
storage.multipartUploads.abortstorage.multipartUploads.createstorage.multipartUploads.liststorage.multipartUploads.listParts
Select Add.
Select Create.
Assigning the Custom Role to the Cloud Storage Service Account
Sign in to the Google Cloud console as a project editor.
From the home dashboard, select Cloud Storage » Buckets.
Filter the list of buckets, and select the bucket that you specified when you created your storage integration.
Select Permissions » View by principals, then select Grant access.
Under Add principals, paste the name of the service account name that you retrieved from the DESC STORAGE INTEGRATION command output.
Under Assign roles, select the custom IAM role that you created previously, then select Save.
Important
If your Google Cloud organization was created on or after May 3, 2024, Google Cloud enforces a domain restriction constraint in project organization policies. The default constraint lists your domain as the only allowed value.
To allow the Snowflake service account access to your storage, you must update the domain restriction.
Granting the Cloud Storage service account permissions on the Cloud Key Management Service cryptographic keys
Note
This step is required only if your GCS bucket is encrypted using a key stored in the Google Cloud Key Management Service (Cloud KMS).
Sign in to the Google Cloud console as a project editor.
From the home dashboard, search for and select Security » Key Management.
Select the key ring that is assigned to your GCS bucket.
Click SHOW INFO PANEL in the upper-right corner. The information panel for the key ring slides out.
Click the ADD PRINCIPAL button.
In the New principals field, search for the service account name from the DESCRIBE INTEGRATION output in Step 2: Retrieve the Cloud Storage service account for your Snowflake account (in this topic).
From the Select a role dropdown, select the
Cloud KMS CrytoKey Encryptor/Decryptorrole.Click the Save button. The service account name is added to the Cloud KMS CrytoKey Encryptor/Decryptor role dropdown in the information panel.
Note
You can use the SYSTEM$VALIDATE_STORAGE_INTEGRATION function to validate the configuration for your storage integration.
Step 4: Create an external stage
Create an external stage that references the integration you created.
Note
You must use a role that is granted or inherits the USAGE privilege on the database and schema and the CREATE STAGE privilege on the schema. The stage owner (that is, the role with the OWNERSHIP privilege on the stage) must also have the USAGE privilege on the storage integration.
Refer to Access control requirements for CREATE STAGE.
To load data to or unload data from a stage that uses an integration, a role must have the USAGE privilege on the stage. It isn’t necessary to also have the USAGE privilege on the storage integration.
Snowflake uses multipart uploads when uploading to Amazon S3 and Google Cloud Storage. This process might leave incomplete uploads in the storage location for your external stage.
To prevent incomplete uploads from accumulating, we recommend that you set a lifecycle rule. For instructions, see the Amazon S3 or Google Cloud Storage documentation.
Create an external stage by using SQL
Ensure that the role in use is granted or inherits the necessary privileges to create a stage that uses a storage integration. For example:
GRANT USAGE ON DATABASE mydb TO ROLE myrole;
GRANT USAGE ON SCHEMA mydb.stages TO ROLE myrole;
GRANT CREATE STAGE ON SCHEMA mydb.stages TO ROLE myrole;
GRANT USAGE ON INTEGRATION gcs_int TO ROLE myrole;
You can create an external stage using the CREATE STAGE command.
Example 1:
In this example, we set mydb.stages as the current database and schema for the user session, and then create a stage named my_gcs_stage. In this example, the stage references the Cloud Storage bucket and path mybucket1/path1, which are supported by the integration. The stage also references a named file format object called my_csv_format:
USE SCHEMA mydb.stages;

CREATE STAGE my_gcs_stage
  URL = 'gcs://mybucket1/path1'
  STORAGE_INTEGRATION = gcs_int
  FILE_FORMAT = my_csv_format;
Example 2:
In this example, we connect to Google Cloud Storage using a customer-managed key (CMK):
USE SCHEMA mydb.stages;

CREATE STAGE my_ext_stage2
  URL='gcs://load/encrypted_files/'
  STORAGE_INTEGRATION = gcs_int
  ENCRYPTION=(TYPE = 'GCS_SSE_KMS' KMS_KEY_ID = '{a1b2c3});
  FILE_FORMAT = my_csv_format;
Note
Append a forward slash (
/) to the URL value to filter to the specified folder path. If the forward slash is omitted, all files and folders starting with the prefix for the specified path are included.Note that the forward slash is required to access and retrieve unstructured data files on the stage.
The STORAGE_INTEGRATION parameter is handled separately from other stage parameters, such as FILE_FORMAT. Support for these other parameters is the same regardless of the integration used to access your GCS bucket.
Create an external stage using Python
Use the StageCollection.create method of the Snowflake Python APIs to create an external stage.
Similar to the preceding SQL example, the following Python example creates an external stage named my_gcs_stage in the mydb database
and the stages schema:
from snowflake.core.stage import Stage

my_stage = Stage(
  name="my_gcs_stage",
    storage_integration="gcs_int",
    url="gcs://mybucket1/path1"
)
root.databases["mydb"].schemas["stages"].stages.create(my_stage)
Note
The Python API currently does not support the FILE_FORMAT parameter of the CREATE STAGE SQL command.
Create an external stage using Snowsight
To use Snowsight to create a named external stage, do the following:
Sign in to Snowsight.
In the navigation menu, select Catalog » Database Explorer.
Select the database and schema where you want to create a stage.
Select Create » Stage.
Select Google Cloud Platform.
Enter a Stage Name.
Enter the URL of your Google Cloud Storage bucket.
Note that Enable Directory Table is selected by default. This lets you see the files on the stage, but requires a warehouse and thus incurs a cost. You can choose to deselect this option for now and enable a directory table later.
Enable Authentication.
Select your storage integration from the menu.
Optionally expand the SQL Preview to view a generated SQL statement. To specify additional options for your stage such as AUTO_REFRESH, you can open this SQL preview in a worksheet.
Select Create.
Editing existing stages to use storage integrations
You can edit an existing external stage configuration to use a storage integration using SQL or the web interface.
Note
You cannot disable authentication or encryption settings for a stage.
You can update a stage to use a storage integration for authentication. However, you cannot change the authentication type to credentials if the stage already uses a storage integration. To change the authentication type, you can drop and re-create the stage.
Edit a stage using SQL
Use ALTER STAGE to modify the stage. For example:
ALTER STAGE my_gcs_stage
  SET STORAGE_INTEGRATION = gcs_int;
Edit a stage using Snowsight
Sign in to Snowsight.
In the navigation menu, select Catalog » Database Explorer.
Select the stage that you want to edit.
Select
 » Edit.
Make your desired changes to the stage.
Select Save.