Multi-Location Resilience for Data Pipelines
Multi-location resilience for data pipelines helps you safeguard your data
pipelines against potential region-wide cloud provider outages. This feature
ensures that after you fail over to a secondary location, your data pipelines
(specifically those using Snowpipe and COPY INTO) resume loading new data
with minimal interruption and no duplicate data.
This feature works cross-cloud, allowing your primary and secondary storage locations to span entirely different cloud providers (for example, failing over from AWS to Azure), as well as cross-region within the same cloud.
Responding to an outage
Go to Part 2: Fail over your pipelines, and run those steps in your target account, the account that holds the replicas. Step 1 of that procedure shows how to identify your setup. To move back after the outage, see Part 3: Fail back your pipelines.
How multi-location resilience works
Source and target accounts
This topic uses two fixed labels for the two Snowflake accounts, and they never change meaning:
- Source account: The account where you create the objects in Part 1. It’s the primary account until you fail over, and then it’s the secondary account until you fail back.
- Target account: The account that holds the replicas. It’s the secondary account until you fail over, and then it’s the primary account until you fail back.
The words primary and secondary describe a role that swaps when you fail over. The words source and target describe the account itself and don’t change. Every step in this topic names the account that you must be connected to.
This feature relies on a shared-responsibility model:
- Snowflake’s role: Snowflake replicates the tables that your pipelines load, and their load history (ingestion state), to your target account. After a failover, Snowflake uses this state to prevent duplicates and to load only the files that weren’t loaded in the primary location.
- Your role: Make sure that your producer writes new files to your secondary cloud storage location, either all the time (dual-write) or after an outage starts (single-write). Snowflake doesn’t replicate the files in your cloud storage. For more information, see Choose how your producer writes files.
What Snowflake replicates
Snowflake replicates your pipelines through the failover group that holds your pipeline databases. Replication is asynchronous, so your replicas can lag behind your source account by up to twice your refresh interval. Each refresh copies a table and its load history at the same point in time, so in your target account the two always match, and a failover doesn’t result in duplicate data. For example, with dual-write, if your replicas are four hours behind, loading four hours of queued notifications brings the table up to date.
The load history also covers files that an outage interrupts. If an outage
interrupts a COPY INTO statement, the statement rolls back completely.
Snowpipe can commit a large file in parts. The replicated load history records
the parts that Snowpipe committed, and after a failover the pipe in your target
account loads the rest of the file.
What else replicates, and what doesn’t:
- Stages, pipes, and tasks: These replicate as part of the databases in your failover group, so you don’t recreate them in your target account.
- Integrations: These are account-level objects, which is why Step 4 adds them to the group explicitly.
- Not replicated: The files in your cloud storage and the messages in your cloud message queues.
Your refresh interval also sets your Recovery Point Objective (RPO) for table
changes that don’t come from Snowpipe or COPY INTO. For more information, see
Stage, pipe, and load history replication.
What you configure
To make your pipelines resilient, you configure up to two types of resources:
- Multi-Location Storage Integration (MLSI): Securely connects Snowflake to
multiple external cloud storage locations across regions or clouds. You always
need an MLSI, whether you want resilience for
COPY INTOfrom external stages alone or for your full Snowpipe pipeline. - Multi-Queue Notification Integration (MQNI): Connects Snowflake to multiple third-party cloud message queues, ensuring continuous receipt of new file notifications. You need an MQNI only for Snowpipe, that is, for continuous data loading. On Google Cloud and Azure, and across cloud providers, Snowpipe requires one. On Amazon S3, it’s optional: your pipes can instead read Amazon Simple Queue Service (SQS) notifications directly. On that path, you rebind each existing pipe once in your target account during setup. A pipe that you create later binds to your target account’s queue when it replicates. For the trade-offs between the two paths, see Choose a notification path for Amazon S3.
Both resources hold a list of locations or queues, plus one ACTIVE value that
names the one in use. On Amazon S3, each queue in an MQNI is an Amazon Simple
Notification Service (SNS) topic, and Snowflake subscribes its own Amazon SQS queue to the active topic.
You set ACTIVE independently in each account, so your
source account can use its primary location while your target account is already
pointed at the secondary one.
For Snowpipe across cloud providers where one of the two providers is AWS, create the MQNI with Scenario A in Step 3.
If you load data only with COPY INTO <table>, whether you run the statements
yourself or in tasks, you don’t need an MQNI. Skip Step 3, the
Rebind SQS-only pipes procedure in Step 5, and the
pipe status check in Part 4. Also skip any item
that’s marked for Snowpipe or for an MQNI. Run every other step that applies to dual-write or single-write, whichever your producer uses. Where a step covers both
pipes and COPY INTO jobs, follow the instructions for COPY INTO jobs.
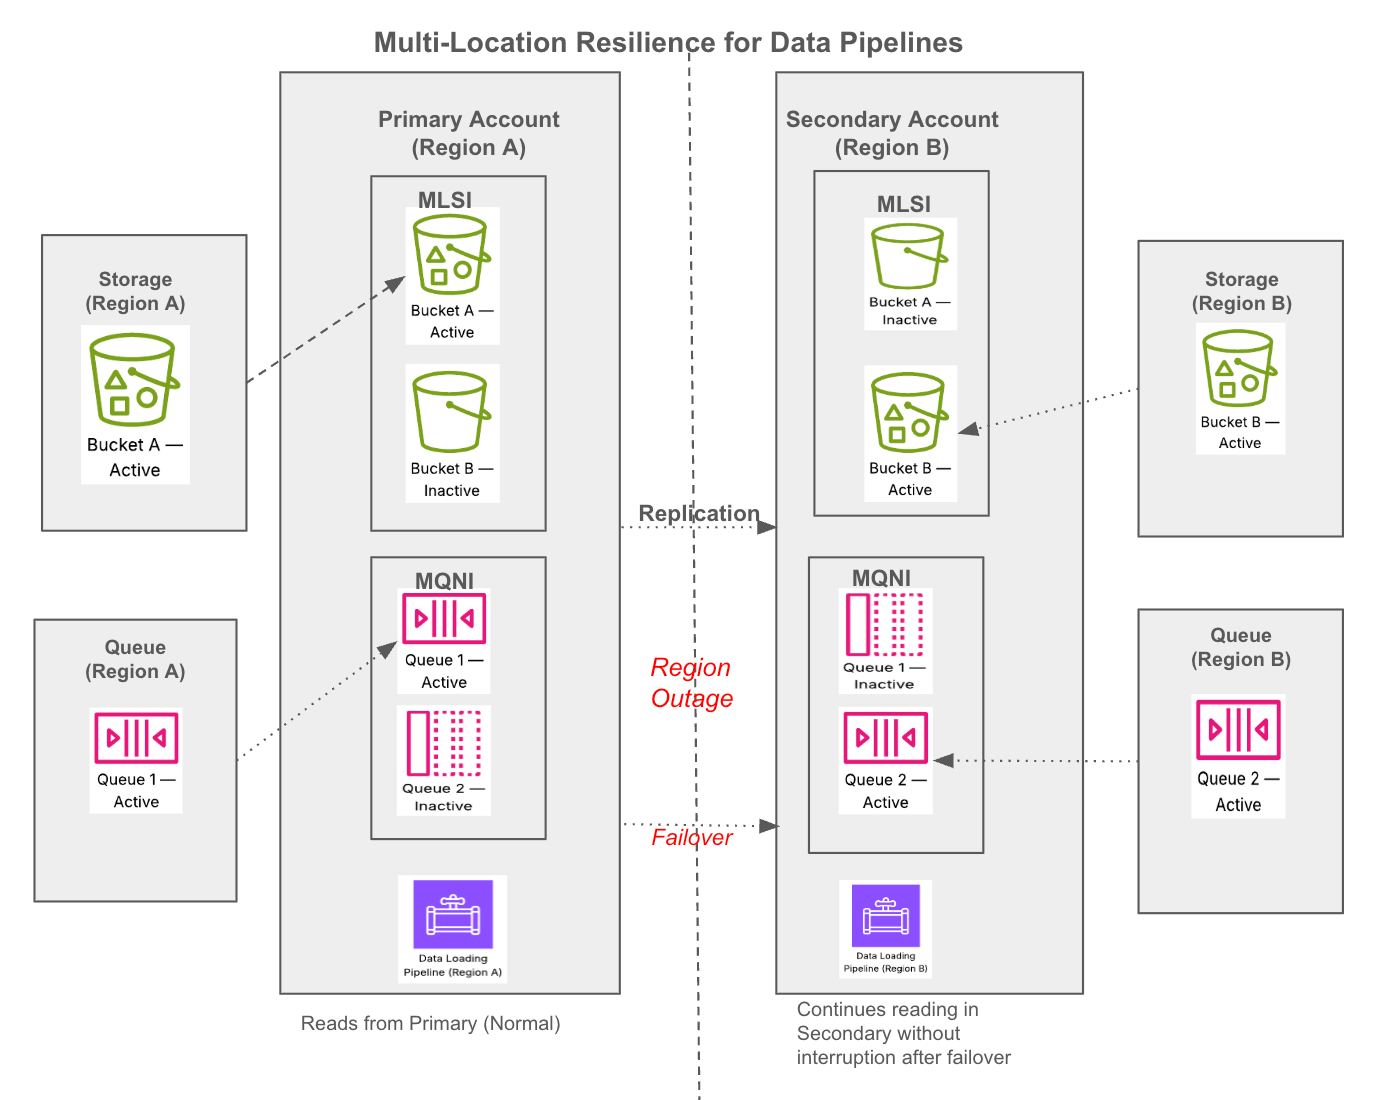
The source account holds the integrations, and the target account holds replicas of them. Each account sets its own active storage location and active queue. Failing over promotes the target account, which is already pointed at the secondary location.
What happens when you fail over and fail back
- Before a failover: After you complete Step 5, the pipes in your target account read notifications from their queue and record each file, but they don’t load it, because the replicated databases in your target account are read-only.
- Failover: You promote your target account. Because you set
ACTIVEin both accounts during setup, failover requires no storage or notification reconfiguration in Snowflake. With single-write, you also point your producer at your secondary location. The pipes then load each recorded file that the replicated load history doesn’t include, and then new files as they arrive. For the steps, see Part 2: Fail over your pipelines. - Failback: After your primary location recovers, you refresh the failover group in your source account, so that it gets the latest tables and load history from your target account, and then you promote your source account. With single-write, before that refresh, you also copy files that only your source account loaded to your secondary location so that your target account loads them, and you point your producer back at your primary location. After you fail back, you reconcile files. For the steps, see Part 3: Fail back your pipelines.
Requirements and considerations
Before configuring this feature, review the following:
Prerequisites
This feature builds on Snowflake account replication. Before you start Part 1, you must already have the following in place:
- Business Critical Edition (or higher). Both accounts must use this edition, because failover and storage integration replication require it.
- A target account in a second region or cloud. The account must belong to the same organization as your source account, and replication must be enabled for both accounts. For more information, see Replicating databases and account objects across multiple accounts.
- A failover group that already replicates your pipeline databases. The
group must include the databases that contain the tables, stages, pipes, and
tasks that you want to protect. Step 4 alters this group;
it doesn’t create one. To see what you already have, run
SHOW FAILOVER GROUPS in your source account. Throughout
this topic,
my_fgis the name of that existing group. Refresh the group at least once every 14 days, and preferably much more often: pipes in your target account keep notification records for 14 days, and the failover steps read refresh history from the last 14 days. - A secondary cloud storage location for each primary location, in the region that you want to fail over to. The location (bucket or container) must use the same folder structure as your primary location, and your producer must write new files to it using the same relative paths. For more information, see How paths resolve in each location.
- Permissions in your cloud provider. You or your cloud administrator must be able to grant Snowflake access to both storage locations and, if you use Snowpipe auto-ingest, to the messaging service in both regions. On AWS, that means creating AWS Identity and Access Management (IAM) policies and roles, adding event notifications to both buckets, and, if you use Amazon SNS, editing SNS topic access policies. On Azure, it means granting consent for Snowflake’s apps in your Microsoft Entra ID tenant, assigning roles on both storage accounts, and creating Event Grid subscriptions and storage queues. On Google Cloud, it means granting Snowflake’s service accounts access to both buckets and creating Pub/Sub topics, subscriptions, and bucket notifications.
- The roles and warehouses that your loads use, in your target account. A
replicated task is resumed in your target account only if the group replicates the task’s
owner role. After a failover, your own
COPY INTOstatements and any tasks that use a warehouse also need a warehouse in your target account. IncludeROLESandWAREHOUSESin the group’sOBJECT_TYPES, or create the warehouses in your target account yourself. Adding an object type drops objects of that type that you created directly in your target account, as described in Step 4. For more information, see Replication and tasks.
If you don’t have a failover group yet, set up account replication first by following Replicating databases and account objects across multiple accounts, and then return to this topic.
Supported ingestion methods
This feature exclusively supports file-based data loading through Snowpipe
(auto-ingest) and COPY INTO <table>. It doesn’t support Openflow or Snowpipe
Streaming.
Considerations
- Billing: This feature incurs standard replication charges (data transfer and compute resources), billed to your target account.
- Stage modification downtime: If you change an existing stage to use an MLSI and the stage then resolves to a different location, Snowflake marks the stage’s pipes invalid, and you must recreate them. The same change drops the stage’s directory table, and the change fails if external tables use the stage. Snowflake recommends creating new stages during setup. For more information, see Step 2.
- Active locations and queues: Set a different active storage location and a different active queue in your source and target accounts. Using the same active queue in both accounts isn’t supported and can result in notification loss. Snowflake doesn’t check whether the same queue is active in both accounts. Using the same active storage location in both accounts means that failing over doesn’t move your ingestion to a healthy region.
- Queue message retention: After you complete Step 5, the pipes in your target account read notifications from their queue even before a failover. Snowflake records each file and removes the record when replicated load history shows that your source account loaded the file or tried to. Otherwise, Snowflake keeps the record for 14 days. If you fail over during that time, the pipes load the file. The queue’s own retention matters only while the pipes in your target account aren’t reading it, for example before you complete Step 5. On Amazon S3, the Snowflake-managed SQS queue retains messages for 14 days. On Azure and Google Cloud, your queue retains messages for the period that you configure.
- Directory table: Creating a directory table on a stage that uses an MLSI isn’t currently supported.
Choose how your producer writes files
How you recover “in-flight” files during an outage depends on whether your producer writes each file to both cloud storage locations (dual-write) or only to the primary location (single-write).
Dual-write (recommended)
Your producer application writes files to both your primary and secondary cloud storage buckets simultaneously. Because your secondary queue receives a notification for every file, the pipes in your target account record every file before a failover.
- What happens on failover: The replicated database in your target account becomes writable. Snowpipe uses the replicated load history to deduplicate files. If an outage prevented a file from finishing in the primary location, the pipe in your target account already has the file’s notification from the secondary queue. Because the replicated load history doesn’t include the file, the pipe loads it.
- What happens on failback: After the primary location recovers, you refresh the failover group in your source account and then fail back. Snowpipe then starts ingesting new files automatically, because the refresh synced the load history from your target account to your source account.
- Result: No missing data, no duplicates. Snowflake handles reconciliation automatically in both directions.
- Requirement: Refresh the failover group at least once every 14 days, and preferably much more often. Before a failover, pipes in your target account keep a record of each notification for 14 days. Your refresh interval determines how many files your target account has to load after a failover.
- Action needed: Promote your target account to fail over, as described in Part 2: Fail over your pipelines. Before you fail back, refresh the failover group so that your source account has the latest tables and load history, as described in Part 3: Fail back your pipelines.
Single-write
Your producer writes only to the primary cloud storage. During an outage, you reroute the producer to start writing new files to the secondary cloud storage.
- What happens on failover: The target account immediately begins processing
new files routed to the secondary bucket. However, any in-flight files trapped
in the impacted primary location are left behind temporarily. Rows that
Snowpipe or your
COPY INTOjobs loaded in the primary location after your last successful replication are also missing from your target account until you reconcile them. - What happens on failback: When the primary location recovers and you fail
back to your source account, Snowpipe automatically processes any file
notifications that were still unread in the queue when the outage began. On
their next run, your
COPY INTOstatements load files in your primary location that weren’t loaded before the outage, becauseCOPY INTOskips files that the table’s load metadata records as loaded. If your source account had read a file’s notification but hadn’t loaded the file before the outage, the failback refresh discards that notification. To reconcile those files, see step 8 of Part 3. - Result: No duplicates. However, any files where the cloud notification completely failed to generate because of the outage (or where the outage outlasted your queue’s message retention period) require manual intervention.
- Action needed: Reconcile files twice: before you fail back, to keep rows that exist only in your source account, and after you fail back, to load files that were never loaded. For both procedures, see Part 3: Fail back your pipelines.
Part 1: Configure resilient pipelines (one-time setup)
Perform the following steps once to configure your resilient data pipelines.
Before you start, make the following decisions. Your notification choices determine what you configure in Steps 3 and 5, and how your producer writes files determines which steps you run in Parts 2 and 3:
- Whether your producer uses dual-write or single-write. See Choose how your producer writes files.
- On Amazon S3, whether your pipes use Amazon SNS with an MQNI or Amazon SQS only. See Choose a notification path for Amazon S3.
- If you use an MQNI, whether you create it with new pipes (Scenario A) or create it from your existing pipes (Scenario B). See Choose how to create your MQNI.
If you load data only with COPY INTO, only the first decision applies. If
your failover group has a replication schedule, you also run item 1 of Step 4
right after Step 1, as Step 1 describes.
The examples in this topic assume that you use the ACCOUNTADMIN role in both
accounts, unless a step names another role or privilege. To use other roles, see
the access control requirements on the reference page for each command.
Step 1: Create a Multi-Location Storage Integration (MLSI)
To configure a Multi-Location Storage Integration, you follow the standard steps for configuring a storage integration with a few differences noted in this section.
On AWS, create the IAM policy and IAM role for each bucket before you create the
MLSI, because STORAGE_LOCATIONS takes each role’s Amazon Resource Name (ARN). In
Option 1: Configure a Snowflake storage integration to access Amazon S3, follow only Step 1 and
Step 2, once for each bucket. Skip that topic’s Step 3, which creates a
single-location storage integration: the following statement replaces it. On
Google Cloud and Azure, you grant access after you create the integration, as
described in the topic for your cloud provider.
An MLSI has one active storage location, and every stage that uses it resolves
its RELATIVE_URL against that location’s STORAGE_BASE_URL. If your stages read
from more than one bucket or container, create one MLSI for each primary
location, and pair it with that location’s secondary location. Repeat this step,
Step 2, and items 1 and 2 of Step 5 for each MLSI.
In your source account, create the MLSI by providing values for each location
in the STORAGE_LOCATIONS list. You can mix and match cloud providers for
cross-cloud setups. The following example uses two Amazon S3 locations:
Locations on Azure and Google Cloud have the following form in the
STORAGE_LOCATIONS list:
Where:
- STORAGE_LOCATIONS: Specifies a list of one or more storage locations
(Amazon S3 bucket, Google Cloud Storage bucket, or Azure container) for the
storage integration. Each location requires
NAME,STORAGE_PROVIDER, andSTORAGE_BASE_URL. Amazon S3 locations also requireSTORAGE_AWS_ROLE_ARN, and Azure locations requireAZURE_TENANT_ID. A location can also specifyENCRYPTION,USE_PRIVATELINK_ENDPOINT(Amazon S3 and Azure, only for a location on the same cloud provider that hosts your Snowflake account), andSTORAGE_AWS_EXTERNAL_ID(Amazon S3). An MLSI doesn’t supportSTORAGE_AWS_OBJECT_ACL. For descriptions of these parameters, see Cloud provider parameters (`cloudProviderParams`) on the CREATE STORAGE INTEGRATION reference page. - NAME: String that specifies the identifier (name) for the storage location.
- STORAGE_BASE_URL: Specifies the URL of the bucket or container that a
stage’s
RELATIVE_URLis appended to, such ass3://my-bucket-west,gcs://my-bucket-central, or a URL that includes a path, such ass3://my-bucket-west/data/. If the URL includes a path, end it with a slash. - ENCRYPTION: Specifies encryption for the storage location. You must specify encryption for the storage location at the storage integration level instead of at the stage level. Required only for loading from encrypted files; not required if the storage location and files are unencrypted. To view the encryption types for each cloud provider, see ENCRYPTION on the CREATE STAGE reference page.
- STORAGE_ALLOWED_LOCATIONS: Required. Limits the stages that use this
integration to the paths that you list. The
CREATE STORAGE INTEGRATIONexample uses('*'), which allows any path in any of the storage locations. To restrict access, replace the wildcard with a list of paths relative toSTORAGE_BASE_URL, such as('my_folder/'). The same list applies to every location. Snowflake matches each path as a literal prefix of a stage’sRELATIVE_URL, so either start both the path and theRELATIVE_URLwith a slash, or start neither with one. For example,('my_folder/')allowsRELATIVE_URL = 'my_folder/my_sub_folder/'but notRELATIVE_URL = '/my_folder/my_sub_folder/'. - STORAGE_BLOCKED_LOCATIONS: Optional, and not shown in the example. Prevents stages that use this integration from accessing the paths that you list. Snowflake also rejects a stage whose
RELATIVE_URLis a parent of a blocked path, such as a stage atmy_folder/whenmy_folder/private/is blocked. Paths are relative toSTORAGE_BASE_URL, apply to every location, and follow the same slash rule asSTORAGE_ALLOWED_LOCATIONS. If a blocked path starts with a slash and the stage’sRELATIVE_URLdoesn’t, or the reverse, the path doesn’t block anything. - ACTIVE: Required. Specifies the name of the storage location to set as the active location for the storage integration in the current account. The value
must match a location’s
NAMEexactly, including case.
After you run the statement, grant Snowflake access only to the location that’s
active in your source account. In the DESCRIBE STORAGE INTEGRATION output,
each location’s identity values, such as STORAGE_AWS_IAM_USER_ARN, are in the
JSON of its STORAGE_LOCATION_<n> row:
- On AWS, run
DESCRIBE STORAGE INTEGRATION my_mlsi, and then follow Step 4 and Step 5 of Option 1: Configure a Snowflake storage integration to access Amazon S3 to update the trust policy of the IAM role formy-s3-us-west-1. - On Google Cloud, follow Step 2 and Step 3 of Configure an integration for Google Cloud Storage for your primary bucket only. Skip that topic’s Step 1 and Step 4, which create a single-location storage integration and a stage.
- On Azure, follow “Step 2: Grant Snowflake Access to the Storage Locations” in Configure an Azure container for loading data for your primary container only. Skip the steps in that topic that create a storage integration and a stage.
Don’t grant access to your secondary location yet. The replicated integration
in your target account uses that account’s cloud identity, which differs from
your source account’s. You can’t look up that identity with DESCRIBE STORAGE INTEGRATION
until the first refresh after you add integrations to the group in Step 4. Step
5 grants that identity access.
If my_fg has a replication schedule, read the warnings in
Step 4, and then run item 1 of Step 4 now,
before you create or alter stages in Step 2. If you plan to create an MQNI in
Step 3, include NOTIFICATION INTEGRATIONS when you run item 1. If you run
item 1 of Step 4 later, a scheduled refresh can replicate your stages before their MLSI, and those stages
can’t be used in your target account until they’re replicated again.
Step 2: Associate an MLSI with your external stages
Every stage that a protected pipe or COPY INTO statement reads from must use
the MLSI. A pipe whose stage still uses a single-location URL can’t find files
after a failover. If you migrate pipes in Step 3, the migration simultaneously moves every pipe that shares a notification integration, SNS topic, or
bucket with a migrated pipe. Before Step 3, move each of those pipes to an MLSI stage. A COPY INTO <table> statement that reads directly from a URL, rather
than from a stage, always reads that URL, so it doesn’t follow the MLSI’s active
location after a failover. Create a stage as described in this step, and change
the statement to read from it.
Create the stage, its pipes, the tables that those pipes and your COPY INTO
statements load, and any tasks that run those statements, in a database that
my_fg already replicates. To check, run
SHOW DATABASES IN FAILOVER GROUP
in your source account. If you create a new database, add it to the group’s
allowed databases with ALTER FAILOVER GROUP.
Create or alter the stage
Snowflake recommends creating a new stage rather than altering an existing one. Choose the approach that matches your pipelines and stages:
- New pipelines: Create a new stage, and then create pipes against it.
- Existing pipelines that you can take offline: Alter the existing stage to
use the MLSI. If the stage now resolves to a location different from its old
URL, Snowflake marks its pipes invalid, and SYSTEM$PIPE_STATUS reportsSTOPPED_STAGE_ALTERED. Recreate each of those pipes by following Recreating pipes. If the stage resolves to the same location as before, its pipes keep working and keep their load history. - Existing pipelines that you want to move one at a time: Create a new stage
whose
RELATIVE_URLresolves to the same path as the existing stage’sURL. To find the value, remove your primary location’sSTORAGE_BASE_URLfrom the start of the existing stage’sURL. Then recreate each pipe against the new stage by following Recreating pipes. Pipes that you haven’t moved yet keep loading from the existing stage. - Stages that only
COPY INTOstatements read: No pipe needs recreating. If you create a new stage, point each statement at it. For a standalone task, suspend it, update its statement with ALTER TASK … MODIFY AS, and then resume it. For a task in a task graph, suspend the root task instead of the task whose statement you’re changing, update that task’s statement, and then resume the root task. - Existing stages with a directory table: Create a new stage instead of altering the existing one, because directory tables aren’t supported on a stage that uses an MLSI.
Recreating a pipe drops its load history, so a later ALTER PIPE ... REFRESH can
load files that the original pipe already loaded. If you plan to move pipes onto
an MQNI with Scenario B in Step 3, keep each
recreated pipe’s original
INTEGRATION value (Google Cloud and Azure) or AWS_SNS_TOPIC value (Amazon
S3), so that the migration finds the pipe.
In your source account, use the CREATE STAGE command to associate the
MLSI that you created with one or more external
stages:
Where:
-
RELATIVE_URL: The relative path to your external stage location from the storage location defined in your storage integration. A stage that uses an MLSI requires
RELATIVE_URLinstead ofURL, andRELATIVE_URLis allowed only with an MLSI. A leading slash is optional, but if you setSTORAGE_ALLOWED_LOCATIONSto specific paths or setSTORAGE_BLOCKED_LOCATIONS, use the same style as those paths. A blocked path written in the other style doesn’t block anything. The path must resolve in both storage locations. For more information, see How paths resolve in each location.This value must be a literal path. Specifying a pattern or wildcard isn’t supported. To specify access to all locations under the
STORAGE_BASE_URLof your storage integration, use an empty string:RELATIVE_URL = ''. An empty string requiresSTORAGE_ALLOWED_LOCATIONS = ('*')and noSTORAGE_BLOCKED_LOCATIONSon the MLSI. -
STORAGE_INTEGRATION: The name of your MLSI.
If you’re replacing an existing stage, copy its other properties, such as
FILE_FORMAT, to the new stage. To see them, run DESCRIBE STAGE on the
existing stage. Don’t copy ENCRYPTION: set it on the MLSI instead, as described
in Step 1.
To use an existing external stage instead, alter it with
ALTER STAGE to specify RELATIVE_URL and
your MLSI:
To roll back this change later, run
ALTER STAGE my_existing_stage SET STORAGE_INTEGRATION = <original_integration>.
If the stage used a single-location storage integration before, Snowflake
restores its previous URL.
To confirm that a stage resolves to your primary location, run LIST on it in
your source account.
How paths resolve in each location
A stage has one RELATIVE_URL. Snowflake appends it to the
STORAGE_BASE_URL of whichever storage location is active in the account that
you’re connected to. That’s why both locations need the same folder structure:
the same RELATIVE_URL has to be valid in both.
The following table traces the MLSI from Step 1 and the stage from Step 2 through both locations:
| Item | Active in the source account | Active in the target account |
|---|---|---|
Storage location NAME | my-s3-us-west-1 | my-s3-us-east-1 |
STORAGE_BASE_URL | s3://my-bucket-west | s3://my-bucket-east |
Stage RELATIVE_URL | my_folder/my_sub_folder/ | my_folder/my_sub_folder/ |
@my_ext_stage resolves to | s3://my-bucket-west/my_folder/my_sub_folder/ | s3://my-bucket-east/my_folder/my_sub_folder/ |
A pipe that reads @my_ext_stage/my_pipe/ reads from | s3://my-bucket-west/my_folder/my_sub_folder/my_pipe/ | s3://my-bucket-east/my_folder/my_sub_folder/my_pipe/ |
Bucket names don’t have to match, and the two locations don’t have to be on the
same cloud provider. Everything after the STORAGE_BASE_URL must match,
including any subpath that a pipe or COPY INTO statement appends to the stage
name.
Step 3: Configure notifications for auto-ingest
This step applies only to Snowpipe auto-ingest. If you load data only with
COPY INTO <table> statements, whether you run them yourself or in tasks, there
are no file notifications to redirect, so skip to Step 4.
Snowflake needs a way to keep receiving file notifications after a failover. On Google Cloud and Azure, every Snowpipe auto-ingest pipe uses a notification integration, so you use an MQNI. You also use an MQNI if your two locations are on different cloud providers. In both cases, skip to Choose how to create your MQNI. If both locations are on Amazon S3, you choose between two notification paths, and your choice determines what you configure in this step and in Step 5.
Choose a notification path for Amazon S3
The following table compares the two notification paths:
| Consideration | Amazon SNS with an MQNI | Amazon SQS only |
|---|---|---|
| Cloud resources you configure | In each region, an SNS topic that receives the bucket’s S3 event notifications, with an access policy that lets Snowflake subscribe its SQS queue | An S3 event notification on each bucket path that targets the pipe’s Snowflake-managed SQS queue |
| Snowflake objects you configure | One MQNI with a queue for each topic | None |
| Redirecting notifications in the target account | Set the active queue once with ALTER INTEGRATION ... SET ACTIVE | Rebind each existing pipe once with SYSTEM$INGEST_REBIND_PIPE. Pipes that you create later don’t need it. |
| Work that scales with the number of pipes | None (one MQNI serves every pipe that uses it) | One function call for each existing pipe |
Requires ACCOUNTADMIN | Only for existing pipes: one SYSTEM$CONVERT_PIPES_SQS_TO_SNS call for each bucket of SQS-only pipes, and one SYSTEM$CONVERT_PIPES_TO_MULTI_QUEUE call for each topic in Scenario B | Yes: one SYSTEM$INGEST_REBIND_PIPE call for each existing pipe |
| Works when another application already has an S3 event notification on the same bucket path | Yes | No |
| Can fan out the same notifications to other subscribers | Yes | No |
| Works when your secondary location isn’t on Amazon S3 | Yes, with an MQNI that you create in Scenario A | No |
Use Amazon SNS with an MQNI when you have many pipes, when another application already has an S3 event notification on a path that your pipes read, or when other subscribers need the same notifications. The active queue is a property of the integration rather than of each pipe, so redirecting notifications in the target account is a single statement no matter how many pipes you run. If another application, such as an AWS Lambda workload, already has an S3 event notification on a path that your pipes read, SNS is the only option. AWS doesn’t allow overlapping event notifications for the same path in a bucket. A notification that already targets the Snowflake-managed SQS queue doesn’t count: it’s the one that SQS-only pipes use.
Use Amazon SQS only when you can’t introduce an SNS topic, or when you have few enough existing pipes that a one-time rebind for each is manageable. Neither path avoids the pipe changes in Step 2: you recreate each pipe that moves to a new stage or whose stage now resolves to a new location. Weigh these trade-offs:
- A call to SYSTEM$INGEST_REBIND_PIPE requires
ACCOUNTADMIN, because it needs theMODIFYprivilege on the account, which can’t be granted directly to a custom role. - The function returns no error if it binds a pipe to the wrong queue. It also reports some failures in its return value instead of as an error, so check each result and verify each pipe yourself.
Then continue based on your choice:
- Amazon SNS with an MQNI, for new pipes or pipes that already use SNS: Skip to Choose how to create your MQNI.
- Amazon SNS with an MQNI, for existing SQS-only pipes: Follow Move existing SQS-only pipes to Amazon SNS.
- Amazon SQS only: Follow Set up the Amazon SQS-only path.
Move existing SQS-only pipes to Amazon SNS
Repeat the following steps for each bucket that your SQS-only pipes load from. Run each step in your source account unless the step names another account:
-
Finish Step 2 for every pipe that loads from the bucket. In one call,
SYSTEM$CONVERT_PIPES_SQS_TO_SNSconverts every SQS-only pipe that loads from the bucket. If you recreate a converted pipe from its original definition, which specifies neitherAWS_SNS_TOPICnorINTEGRATION, the pipe becomes an SQS-only pipe again. -
Create an SNS topic in the bucket’s region, or reuse an existing topic in that region, such as the topic that your SNS pipes on the same bucket already use. Pipes that share a topic move to one MQNI in Scenario B. In the topic’s access policy, allow Amazon S3 to publish to the topic from each bucket that uses the topic, and allow Snowflake to subscribe your source account’s SQS queue to the topic. Also allow Snowflake to subscribe your target account’s SQS queue: Snowflake subscribes that queue to the topic at the next refresh. To get each account’s policy statement, run
SYSTEM$GET_AWS_SNS_IAM_POLICYwith the topic ARN once in your source account and once in your target account. For instructions, see “Step 1: Subscribe the Snowflake SQS Queue to the SNS Topic” in Automating Snowpipe for Amazon S3. -
With
ACCOUNTADMINas the primary role of your session, call SYSTEM$CONVERT_PIPES_SQS_TO_SNS with the bucket name, withouts3://, and the topic ARN: -
Run
DESCRIBE PIPEfor each pipe that loads from the bucket, and confirm thatnotification_channelshows the topic ARN. If a pipe was created before Snowflake began storing the metadata that the function needs, the pipe stays on Amazon SQS, and the function doesn’t report it. Recreate that pipe, and then call the function again. Recreating a pipe drops its load history, as described in Step 2. -
On the bucket, update each event notification that targets the Snowflake-managed SQS queue so that it targets the SNS topic instead. Don’t make this change until every pipe shows the topic in item 4.
If several buckets share one topic, one SYSTEM$CONVERT_PIPES_TO_MULTI_QUEUE
call in Scenario B moves the pipes for all of them. With a separate topic for
each bucket, you call the function once for each topic, and each call creates
its own MQNI. Give each call a different MQNI name, because the function
replaces an existing integration that has the same name. If you end up with
more than one MQNI, see the end of Scenario B.
After you convert the pipes for every bucket, continue with Prepare your messaging service for your secondary location, and then with Scenario B.
Set up the Amazon SQS-only path
On this path, create each pipe in your source account without a notification integration, as in the following example:
DESCRIBE PIPE then reports NULL in the integration column, which matches
the example in Rebind SQS-only pipes.
For each new pipe, run DESCRIBE PIPE in your source account, and copy the ARN
in the notification_channel column. Then, on your primary bucket, make sure that an S3 event notification for the pipe’s path targets that ARN, as described in
Configure event notifications
in Automating Snowpipe for Amazon S3. Pipes that load from the same bucket share one queue, so an existing notification on the bucket might already cover the pipe’s path. If one does, confirm that it targets that ARN. If it targets an earlier Snowflake queue, update it to target that ARN. If it serves another application, such as an AWS Lambda function, use Amazon SNS with an MQNI instead, as described in Choose a notification path for Amazon S3. AWS doesn’t allow overlapping notifications for the same path, so add a notification only for a path that no existing notification covers. Don’t configure your secondary bucket yet:
the pipe in your target account uses a different queue. For a pipe that exists
when you run Step 5, you get that queue after you rebind the pipe. For a
pipe that you create later, you get it after the refresh that replicates the
pipe, as described in item 4 of Step 6.
If you recreated existing SQS-only pipes in Step 2, they already match the
example. Run DESCRIBE PIPE on each one, and compare its notification_channel
ARN with the queue that your primary bucket’s event notifications target. If
the ARNs differ, update the event notification to target the pipe’s new ARN.
You don’t create an MQNI, so skip the rest of Step 3 and continue with Step 4.
Choose how to create your MQNI
Pick the scenario that matches the pipes that you have today:
- No auto-ingest pipes yet, or pipes that you’re willing to recreate: Use Scenario A to create the MQNI yourself, and then create pipes that reference it.
- Existing pipes that use a single-queue notification integration (Google
Cloud or Azure) or a single Amazon SNS topic (Amazon S3): Use
Scenario B. One function call creates the MQNI
and moves those pipes onto it. This includes Amazon S3 pipes that you’ve
converted from SQS to SNS, and pipes that you recreated against a new stage in
Step 2 with their original
INTEGRATION(Google Cloud and Azure) orAWS_SNS_TOPIC(Amazon S3) value. - Locations on different cloud providers, where one of them is on Amazon
S3: Use Scenario A.
SYSTEM$CONVERT_PIPES_TO_MULTI_QUEUEcombines either two SNS topics or two notification integrations, so it can’t combine an SNS topic with an Azure storage queue or a Pub/Sub subscription.
After you choose a scenario, complete Prepare your messaging service, and then follow that scenario.
Prepare your messaging service for an MQNI
Complete the following before you create the MQNI. From the linked topics, use only the parts named here. Don’t create the stages or pipes that the linked topics describe: you set up stages in Step 2, and you create any new pipes later in this step.
What you prepare depends on the scenario that you chose in Choose how to create your MQNI.
On Amazon S3:
-
Create an SNS topic in each AWS region in which your MLSI has storage locations. Record each topic’s ARN. You pass the ARNs to
CREATE NOTIFICATION INTEGRATIONin Scenario A or toSYSTEM$CONVERT_PIPES_TO_MULTI_QUEUEin Scenario B. For instructions, see Option 2: Configuring Amazon SNS to automate Snowpipe using SQS notifications. -
In each topic’s access policy, allow Amazon S3 to publish to the topic, as described in “Step 1: Subscribe the Snowflake SQS Queue to the SNS Topic” in Automating Snowpipe for Amazon S3. Don’t add the policy that
SYSTEM$GET_AWS_SNS_IAM_POLICYreturns yet. -
On each bucket, configure an S3 event notification that sends object-created events for your stage’s path to the SNS topic in the bucket’s region. Use the same path in both buckets, and cover each path that your primary bucket’s existing notifications cover. For the event notification, see Enabling and configuring event notifications in the Amazon S3 documentation.
In Scenario B, do these items only for your secondary location, because your existing pipes already use the SNS topic for your primary location.
On Google Cloud, follow “Prerequisites” in Configuring Automation Using GCS Pub/Sub to create a Pub/Sub topic and a subscription. In Scenario A, do this for each storage location. In Scenario B, do it only for your secondary location, because your existing notification integration already uses the subscription for your primary location. For Scenario B, also create a notification integration for the new subscription in your source account, as described in “Step 1: Create a Notification Integration in Snowflake” in that topic.
On Azure, follow “Step 1: Configuring the Event Grid Subscription” in Configuring Automation With Azure Event Grid, and then the “Retrieve the Storage Queue URL and Tenant ID” section of Step 2. Skip the “Create a Storage Account for Data Files” section, because your storage location already exists. In Scenario A, do this for each storage location. In Scenario B, do it only for your secondary location, and also create a notification integration for that queue in your source account, as described in “Step 2: Creating the Notification Integration” in that topic.
Don’t grant Snowflake access to the queues yet. Each Snowflake account gets access only to the queue that’s active in that account. You grant your source account access in Scenario A (in Scenario B, your existing pipes already have access), and you grant your target account access in Step 5. The exception is the Amazon SNS topic for your primary location when you convert SQS-only pipes: both accounts subscribe to that topic, as described in Move existing SQS-only pipes to Amazon SNS.
Scenario A: Create a new MQNI and new pipes
Before you create the MQNI, complete Prepare your messaging service.
On Google Cloud and Azure, creating an MQNI follows the standard steps for creating a notification integration, with the differences noted in this section. On Amazon S3, auto-ingest pipes usually reference an SNS topic or use the Snowflake-managed SQS queue directly, without a notification integration.
In your source account, create an MQNI by
providing values for each queue in the QUEUES list:
Where:
- TYPE = MULTI_QUEUE: Specifies that this is a multi-queue integration between Snowflake and a third-party cloud message-queuing service.
- DIRECTION = INBOUND: Specifies that Snowflake receives notifications sent by the cloud messaging service.
- QUEUES: Specifies a list of one or more queues for the notification integration. An MQNI can have at most two queues by default.
- NAME: Required. String that specifies the identifier (name) for the queue.
- ACTIVE: Required. Specifies the name of the queue to set as the active
queue for the notification integration in the current account. The value must
match a queue’s
NAMEexactly, including case.
Each queue requires NAME, NOTIFICATION_PROVIDER, and the following
parameters for its cloud provider, and accepts no other parameters:
- AWS:
- NOTIFICATION_PROVIDER = AWS_SNS: Specifies Amazon SNS as the third-party cloud message-queuing service.
- AWS_SNS_TOPIC_ARN: Required. ARN of the Amazon SNS topic to which notifications are pushed.
- Google Cloud:
- NOTIFICATION_PROVIDER = GCP_PUBSUB: Specifies Google Cloud Pub/Sub as the third-party cloud message-queuing service.
- GCP_PUBSUB_SUBSCRIPTION_NAME: Required. Name of the Pub/Sub subscription. For more information, see CREATE NOTIFICATION INTEGRATION (inbound from a Google Pub/Sub topic).
- Azure:
- NOTIFICATION_PROVIDER = AZURE_STORAGE_QUEUE: Specifies Azure Queue Storage as the third-party cloud message-queuing service.
- AZURE_STORAGE_QUEUE_PRIMARY_URI: Required. URL of the storage queue.
- AZURE_TENANT_ID: Required. ID of the Microsoft Entra ID tenant. For more information, see CREATE NOTIFICATION INTEGRATION (inbound from an Azure Event Grid topic).
Other notification integration parameters, such as ENABLED, TYPE, and
DIRECTION, aren’t allowed inside QUEUES.
Queues on Azure and Google Cloud have the following form in the QUEUES list:
After you create the MQNI, and before you create pipes that use it, grant
Snowflake permission to access the queue that’s active in your source account.
Grant access only for that queue: you grant your target account access to its
own queue in Step 5. On Google Cloud and Azure, the values that the following
instructions use, such as GCP_PUBSUB_SERVICE_ACCOUNT, AZURE_CONSENT_URL, and
AZURE_MULTI_TENANT_APP_NAME, are in the active queue’s entry in the QUEUES
row of DESCRIBE INTEGRATION my_mqni. Follow the instructions for your cloud
provider:
- For AWS, see “Step 1: Subscribe the Snowflake SQS Queue to the SNS Topic” in Automating Snowpipe for Amazon S3.
- For Google Cloud, see “Step 2: Grant Snowflake Access to the Pub/Sub Subscription” in Configuring Automation Using GCS Pub/Sub.
- For Azure, see “Grant Snowflake Access to the Storage Queue” in Configuring Automation With Azure Event Grid.
After you create an MQNI, you can use it to create a new pipe in your source
account with the CREATE PIPE command. The
following example creates a pipe that loads data from Amazon S3 into a table
through an external stage (my_ext_stage) that uses an MLSI. Type the integration name in all uppercase. Snowflake looks up a quoted integration name exactly as you type it, and ALTER INTEGRATION ... SET ACTIVE rebinds only pipes whose INTEGRATION value matches the MQNI’s name exactly:
Then continue with Step 4.
Scenario B: Create an MQNI from your existing pipes’ queues
In your source account, with ACCOUNTADMIN as the primary role of your
session, use SYSTEM$CONVERT_PIPES_TO_MULTI_QUEUE to migrate pipes that use a
single-queue notification integration, or a single Amazon SNS topic, to a new
MQNI.
The function creates the MQNI and names it with the first argument. If no pipe uses the original topic or integration, the function
returns Success without creating the MQNI. The function sets the active queue
for your source account to the original queue. It migrates every pipe in your
source account that uses that topic or integration, including paused pipes and
pipes in databases outside the failover group. It doesn’t drop the
integrations that you pass, pause pipes, or interrupt ingestion.
Warning
Don’t create the MQNI first: the function replaces any existing integration that has the same name. On Google Cloud and Azure, both integrations that you pass become the MQNI’s queues, so if you later drop the MQNI, Snowflake drops both integrations too.
Before you call the function, complete Prepare your messaging service for your secondary location. On Google Cloud and Azure, that includes the single-queue notification integration that the function takes as its third argument.
Syntax:
Where:
- new_mqni_name: String that specifies an identifier (name) to assign to the new MQNI that the function creates.
- original_sns_topic_arn_or_int_name:
- For AWS, the Amazon Resource Name (ARN) of the original SNS topic associated with one or more pipes.
- For Google Cloud or Azure, a string that specifies the identifier of your original single-queue notification integration associated with one or more pipes.
- new_sns_topic_arn_or_int_name:
- For AWS, the Amazon Resource Name (ARN) of a new SNS topic to add as a queue to the MQNI.
- For Google Cloud or Azure, a string that specifies the identifier of your new single-queue notification integration to combine with the original notification integration.
Both queue arguments must be the same kind: two SNS topic ARNs, or two integration names.
Example 1: Add a new SNS topic queue
The following call combines your original SNS topic with a new SNS topic:
This call results in an MQNI named MY_MQNI with the following queues:
MY_MQNI-queue1(for the original, active SNS topic)MY_MQNI-queue2(for the new SNS topic)
Example 2: Create an MQNI from two notification integrations
The following call combines two Azure notification integrations:
This call results in an MQNI named MY_MQNI with the following queues:
MY_AZURE_NI_1(for the original, active queue)MY_AZURE_NI_2(for the new queue)
On Google Cloud, pass your integration names the same way.
The function names the queues that it creates, so their names don’t match the
example names in Scenario A. Run DESCRIBE INTEGRATION to see them before you
reference a queue name in a later step. To confirm that the pipes moved, run
SHOW PIPES and check that the integration column shows
the new MQNI.
If your pipes use more than one SNS topic or single-queue notification integration, call the function once for each, with a different MQNI name each time. Later, repeat the MQNI steps for each MQNI: items 3 and 4 of Step 5, the MQNI checks in Step 6, and the MQNI checks in Part 4.
Then continue with Step 4.
Step 4: Replicate your integrations to the target account
In this step, you add your integrations to the failover group in your source account (item 1), and then refresh the group in your target account (item 2).
Warning
If you created storage integrations, or notification integrations of a
replicated type, directly in your target account, the next refresh after item 1
drops them. You can’t link an integration that you created in your target
account to a replica that has the same name. Inbound
single-queue notification integrations aren’t replicated and aren’t dropped. If
your group has a replication schedule, that refresh can run before item 2. Run
SHOW INTEGRATIONS in your target account before you alter the group. If it
lists integrations that you created there and still need, create them in your
source account so that they replicate. For more information, see
Replication and objects in target accounts.
If you already ran item 1 right after Step 1, run SHOW FAILOVER GROUPS in your source
account. If you created an MQNI in Step 3, confirm that
allowed_integration_types includes NOTIFICATION INTEGRATIONS. Then continue
with item 2.
-
In your source account, alter your existing failover group to include
INTEGRATIONSin theOBJECT_TYPESlist andSTORAGE INTEGRATIONSin theALLOWED_INTEGRATION_TYPESlist. If you created an MQNI, or plan to create one in Step 3, also includeNOTIFICATION INTEGRATIONSinALLOWED_INTEGRATION_TYPES. This change replicates your MLSI and, if you created one, your MQNI.For example, if
SHOW FAILOVER GROUPSreportsobject_typesasDATABASESandallowed_integration_typesas empty, and you created an MQNI, run:If you didn’t create an MQNI, as on the Amazon SQS-only path or when you load data only with
COPY INTO, omitNOTIFICATION INTEGRATIONSunless the group already replicates them.Warning
SETreplaces both lists. Include every object type and integration type that the group already replicates, not only the values in this example. To see the current lists, run SHOW FAILOVER GROUPS and check theobject_typesandallowed_integration_typescolumns. Don’t add other object types only because an example lists them: when you add a type, the next refresh drops objects of that type that you created directly in your target account. -
In your target account, perform a refresh operation:
If a stage is replicated before its MLSI is in the group, you can’t use the stage in your target account: commands on the stage fail because its integration can’t be found. A later refresh repairs the stage when it replicates the stage again. That’s why Step 1 has you run item 1 of Step 4 early when your group has a replication schedule. If a stage was already replicated before its MLSI, how you repair it depends on whether the group uses Optimized Refresh:
- If the group doesn’t use Optimized Refresh, every refresh replicates the stage, so the next refresh after item 1 repairs it.
- With Optimized Refresh, a refresh replicates only the objects that changed.
If item 1 adds
INTEGRATIONStoOBJECT_TYPES, the next refresh replicates every object, which repairs the stage. If the group already includedINTEGRATIONS, change the stage in your source account, for example withALTER STAGE <stage_name> SET COMMENT = '<comment>', and then refresh the failover group in your target account. Changing a stage’s comment doesn’t affect its pipes.
If a stage needs repair, don’t start Step 5 until the refresh that repairs it finishes.
Step 5: Configure your target account for your secondary location
After the refresh in item 2 of Step 4, configure your target account: grant access to the secondary storage location and set it as active (items 1 and 2). With an MQNI, also grant access to the secondary queue and set it as active (items 3 and 4). On the Amazon SQS-only path, skip items 3 and 4, and follow Rebind SQS-only pipes instead.
After the first refresh, the replicated MLSI in your target account has the same active location as the MLSI in your source account, and the replicated MQNI has no active queue. Pipes that replicate while the MQNI has no active queue aren’t bound to a queue, and pipes that were already bound in your target account stay on their previous queue or topic. Item 4 binds both kinds of pipes to the queue that you set as active. Later refreshes keep the values that you set in your target account. The exception is the MLSI’s active location. If you remove your target account’s active storage location from the MLSI in your source account, the next refresh resets the active location in your target account to the one that’s active in your source account.
Grant access and set the active storage location and queue
In your target account:
-
Grant storage access: The replicated storage integration in your target account has its own cloud identity, different from the one in your source account, so you must grant that identity access to your secondary storage location.
First, get the target account’s identity values:
On AWS, find the
STORAGE_LOCATION_<n>row formy-s3-us-east-1, and recordSTORAGE_AWS_IAM_USER_ARNandSTORAGE_AWS_EXTERNAL_IDfrom its JSON. The IAM user ARN differs from the one in your source account; the external ID is the same. Then edit the trust policy of the IAM role for your secondary location only: theSTORAGE_AWS_ROLE_ARNofmy-s3-us-east-1in Step 1. Follow only Step 5 of Option 1: Configure a Snowflake storage integration to access Amazon S3. Don’t edit the role formy-s3-us-west-1, because your source account still uses it.On Google Cloud and Azure, read the values from the JSON of the
STORAGE_LOCATION_<n>row for your secondary location. On Google Cloud, recordSTORAGE_GCP_SERVICE_ACCOUNT, and then follow Step 3 of Configure an integration for Google Cloud Storage for your secondary bucket only. On Azure, use theAZURE_CONSENT_URLandAZURE_MULTI_TENANT_APP_NAMEvalues, and follow “Step 2: Grant Snowflake Access to the Storage Locations” in Configure an Azure container for loading data for your secondary container only.On any cloud, don’t create a storage integration in your target account. While the account is a secondary account for this group,
CREATE STORAGE INTEGRATIONfails there, and a refresh drops any storage integration that you created there earlier.You configure this trust relationship once. For more information, see Configure cloud storage access for secondary storage integrations.
-
Activate secondary storage: In the target account, set the MLSI to use your secondary storage location, choosing from the location names in the
DESCRIBEoutput from item 1. Use ALTER STORAGE INTEGRATION:Set only
ACTIVEin this statement. On a replica, anALTER STORAGE INTEGRATIONstatement that changes anything else fails. -
Grant queue access: If you use an MQNI, grant Snowflake permission to access your messaging service for the queue that you want to set as active in your target account. Follow the instructions for your cloud provider:
- For AWS, see “Step 1: Subscribe the Snowflake SQS Queue to the SNS Topic” in Automating Snowpipe for Amazon S3, and use the ARN of the topic for your secondary location.
- For Google Cloud, see “Step 2: Grant Snowflake Access to the Pub/Sub Subscription” in Configuring Automation Using GCS Pub/Sub, for your secondary location’s subscription only.
- For Azure, see “Grant Snowflake Access to the Storage Queue” in Configuring Automation With Azure Event Grid, for your secondary location’s queue only.
On Google Cloud and Azure, follow these instructions in your target account. Snowflake creates the integrations behind the replicated MQNI with your target account’s own Snowflake identity, so the values differ from the ones that you used in your source account. To get them, run
DESCRIBE INTEGRATION my_mqniin your target account. TheQUEUESrow shows each queue’sGCP_PUBSUB_SERVICE_ACCOUNTon Google Cloud, or itsAZURE_CONSENT_URLandAZURE_MULTI_TENANT_APP_NAMEon Azure. -
Activate secondary queue: If you use an MQNI, set the active queue to the queue for your secondary location.
Queue names depend on how you created the MQNI, so look them up rather than copying a name from this topic:
If you created the MQNI in Scenario A, the names are the ones that you chose, such as
my-us-east-1. If you created it withSYSTEM$CONVERT_PIPES_TO_MULTI_QUEUEin Scenario B, the function named them: on Amazon S3,MY_MQNI-queue1andMY_MQNI-queue2; on Google Cloud and Azure, the names of the two integrations that you passed to it, in uppercase. The value that you set must match a queue name in theDESCRIBE INTEGRATIONoutput exactly, including case. Run the statement for your scenario:Use
ALTER INTEGRATION, without theNOTIFICATIONkeyword, as described in ALTER NOTIFICATION INTEGRATION (inbound from multiple queues). The replicated MQNI is read-only in your target account, and onlyALTER INTEGRATION ... SET ACTIVEcan change its active queue. Setting the active queue rebinds every pipe that uses the MQNI, so set the MLSI’s active location in item 2 first. If you change the MLSI’s active location later, run this statement again. If the statement fails, a pipe can be left without a queue. For more information, see Change the active queue later.When you create a pipe that uses the MQNI in your source account later, you don’t need to run this statement again. The refresh that replicates the pipe binds the replica to the queue that’s active in your target account.
Rebind SQS-only pipes
If you chose the Amazon SQS-only path in
Choose a notification path for Amazon S3, your pipes have no MQNI whose
active queue you can set. In your target account, rebind each of them once with
SYSTEM$INGEST_REBIND_PIPE. Run the function as
ACCOUNTADMIN. This call does for a single pipe what
ALTER INTEGRATION ... SET ACTIVE does for every pipe that shares an MQNI.
You don’t need to run it for pipes that you create later, and the failover
steps in Part 2 don’t run it. When a refresh replicates a new SQS-only pipe, Snowflake
binds it to the Amazon SQS queue for its stage’s active location in that
account. If item 4 of Step 6 finds a new pipe
bound to another region’s queue, fix its stage as described there, and then
rebind it.
During failback, you run it only for a pipe in your source account that isn’t
bound to your primary region’s queue, such as a pipe on the stages of an MLSI
whose ACTIVE value you had to correct, as described in step 5 of
Part 3: Fail back your pipelines.
Before you call the function:
- Make sure that the pipe’s stage points at the storage location in your secondary region. The function derives the new notification queue from the stage’s current bucket region. Because the stage uses your MLSI, item 2 of Step 5 already made that storage location active.
- Run
DESCRIBE PIPEand check theintegrationcolumn.- If the column is
NULLandnotification_channelshows an Amazon SQS queue ARN, pass an empty string as the third argument. Ifnotification_channelshows an SNS topic ARN instead, the pipe isn’t an SQS-only pipe, and this function keeps it on that topic, so don’t call the function for that pipe. To protect it, use an MQNI, as described in Choose a notification path for Amazon S3. - If the column contains the name of an MQNI, the pipe isn’t an SQS-only pipe. Rebind it with items 3 and 4 of Step 5 instead. On Amazon S3, this function doesn’t use a named integration’s SNS topic.
- If the column contains any other integration name, pass that name exactly. If
notification_channelshows an SNS topic ARN, the pipe isn’t an SQS-only pipe, and on Amazon S3 this function keeps it on that topic, so it doesn’t move the pipe to your secondary location.
- If the column is
Warning
If the stage still resolves to the previous region, the function rebinds the
pipe to that region’s queue and reports success. If the stage resolves to an
Azure container or a Google Cloud Storage bucket, the SQS-only path doesn’t
apply: the function unbinds the pipe and then fails. If the third argument names an integration other than the pipe’s current one, a successful rebind changes the pipe’s integration column to that integration. On Amazon S3, the function doesn’t use that integration’s SNS topic. Check the returned text: a result that starts with Rebind failed
means that the pipe is no longer bound to any queue. Fix the cause and run the
function again. An error about the integration argument, such as a name that
doesn’t exist, leaves the pipe’s current binding in place. After any other error, assume that the pipe isn’t bound to any queue: fix the cause and run the function again. After a failed rebind, DESCRIBE PIPE can still show the previous queue in notification_channel, so use the function’s result, not DESCRIBE PIPE, to tell whether the rebind succeeded.
For Amazon SQS auto-ingest, pass an empty string as the second argument. The
following example rebinds my_sqs_pipe, the pipe created in Step 3 whose
integration column is NULL:
Check that the result starts with Rebind succeeded, and that the region in the
New channel ARN (arn:aws:sqs:<region>:...) is your secondary bucket’s
region, such as us-east-1. If it shows your primary region, the stage still
resolves to your primary location. Repeat item 2 of Step 5, and then run the
function again. This region check is for the one-time setup in your target
account. If you rebind a pipe during failback, as described in step 5 of
Part 3: Fail back your pipelines, the new channel must be in your primary region.
After your pipes rebind successfully, point your secondary bucket at their new queue.
In your target account, run DESCRIBE PIPE to get
the ARN in the notification_channel column. Pipes that load from the same bucket report the
same ARN. Pipes on different buckets in the same region usually do too, but
Snowflake can use more than one queue in a region, so check each bucket’s
pipes. On the secondary bucket, configure an S3 event notification that
targets that ARN for each path that your primary bucket’s notifications cover,
as described in
Configure event notifications
in Automating Snowpipe for Amazon S3. AWS limits each bucket to 100 event
notification configurations, and doesn’t allow overlapping prefix and suffix
filters for the same event type. Mirror your primary bucket’s notifications
rather than adding one for each pipe. The queue in your
target account is a different queue from the one in your source account, so
the event notification on your primary bucket doesn’t cover it.
Step 6: Validate your setup before an outage
Don’t wait for a real outage to discover a misconfiguration. Run these checks after you finish Step 5. They only describe objects, list files and tasks, and read pipe status. The checks themselves don’t change any pipe, stage, task, or integration.
-
In your source account, confirm that the integrations point at your primary location, and that your pipes are loading:
ACTIVEshould bemy-s3-us-west-1for the MLSI. For the MQNI, it should be your primary location’s queue:my-us-west-1if you used Scenario A. If you used Scenario B, it’sMY_MQNI-queue1on Amazon S3, or your original integration’s name, such asMY_AZURE_NI_1, on Google Cloud and Azure. In theSYSTEM$PIPE_STATUSoutput,executionStateshould beRUNNING, andlastIngestedTimestampshould advance as new files arrive. On Azure and Google Cloud, record each pipe’snotificationChannelNamefor item 4. -
In your target account, confirm that the replicas arrived and point at your secondary location:
The two
ACTIVEvalues must differ from the ones in your source account. If the active storage locations match, failing over doesn’t move ingestion to a healthy region.ACTIVEshould bemy-s3-us-east-1for the MLSI. For the MQNI, it should be your secondary location’s queue:my-us-east-1if you used Scenario A. If you used Scenario B, it’sMY_MQNI-queue2on Amazon S3, or your second integration’s name, such asMY_AZURE_NI_2, on Google Cloud and Azure. On the Amazon SQS-only path, only the MLSI has anACTIVEvalue.Warning
If the active queues in your source and target accounts match, notifications can be lost.
-
In your target account, confirm that the replicated integration can reach your secondary location. If you created more than one MLSI, run this command on at least one stage for each MLSI:
A listing that completes without a permission error shows that the replicated integration can list your secondary location. If you haven’t written files there yet, the listing is empty. A permission error means that the integration’s cloud identity doesn’t have access. Return to item 1 of Step 5. An error that the stage’s integration can’t be found means that the stage was replicated before its MLSI. See Step 4.
-
If you use Snowpipe, confirm in your target account that each pipe is ready to load from your secondary location:
Before a failover,
executionStateisREAD_ONLY, because a pipe in a secondary database receives notifications but doesn’t load data until you promote the account. If it shows another state, such asPAUSEDor an error state, fix that first. ForPAUSED, resume the pipe in your source account, and then refresh the failover group in your target account. Also check the output for areplicationBindingErrorDetailsfield. Snowflake adds it when a refresh can’t bind the pipe to a queue. In that case,executionStatestill showsREAD_ONLY, so check for the field even when the state looks correct. For a pipe that uses an MQNI, run item 4 of Step 5 again. For an SQS-only pipe, rebind it as described in Rebind SQS-only pipes. To confirm the binding:- On Azure and Google Cloud,
notificationChannelNamenames the active queue or Pub/Sub subscription, and it must differ from the value that you recorded in item 1. If it matches, return to item 4 of Step 5. - On Amazon S3, replication creates a separate SQS queue in your target
account, so
notificationChannelNamealways differs between accounts and doesn’t confirm the binding. For a pipe that uses an MQNI, runDESCRIBE PIPEand confirm thatnotification_channelshows the SNS topic for your secondary location. If it shows your primary location’s topic, run item 4 of Step 5 again. For an SQS-only pipe that you rebound in Step 5,DESCRIBE PIPEconfirms the binding only if the pipe’s most recentSYSTEM$INGEST_REBIND_PIPEcall returnedRebind succeeded. If you aren’t sure that it did, rebind the pipe again as described in Rebind SQS-only pipes. Then confirm that thenotification_channelARN fromDESCRIBE PIPEis in your secondary bucket’s region, and that the event notification on your secondary bucket targets that ARN. - For a pipe that you created in your source account after Step 5, wait for the refresh that replicates the pipe, and then check it in your target account. The refresh binds the pipe to the active queue of its MQNI in your target account or, for an SQS-only pipe, to the Amazon SQS queue for its stage’s region. The pipe needs more setup only if its stage resolves to the wrong location or its MQNI is new. Check each of the following:
- Stage: Run
LISTon the pipe’s stage, and confirm that the file URLs are in your secondary location. If they aren’t, the stage doesn’t use an MLSI, or it uses an MLSI that you created after Step 5. For a stage without an MLSI, change the stage in your source account as described in Step 2, and then refresh the failover group in your target account. For a new MLSI, complete items 1 and 2 of Step 5 for it. On AWS, if the trust policy of your secondary location’s role doesn’t already allow that IAM user ARN with that external ID, add an entry for it, and keep the existing entries, which your other integrations use. Then rebind the pipe. For a pipe that uses an MQNI, run item 4 of Step 5 again. For an SQS-only pipe, follow Rebind SQS-only pipes. - Binding: For a pipe that uses an MQNI that you created after Step 5, make sure that
my_fgreplicates notification integrations, as described in item 1 of Step 4. On the Amazon SQS-only path, you omitted them there, so add them, and then refresh the failover group in your target account. Then complete items 3 and 4 of Step 5 for that MQNI. Its replica has no active queue, so the pipe isn’t bound until you set one. For an SQS-only pipe, runDESCRIBE PIPE, and confirm that thenotification_channelARN is in your secondary bucket’s region. If it isn’t, rebind the pipe as described in Rebind SQS-only pipes. - Notifications: Make sure that an event notification on your secondary bucket for the pipe’s path targets the pipe’s queue: the
notification_channelARN for an SQS-only pipe, or the MQNI’s queue for your secondary location. If none does, add one. For an SQS-only pipe, see the end of Rebind SQS-only pipes.
- Stage: Run
- On Azure and Google Cloud,
-
If your
COPY INTOstatements run in tasks, confirm in your target account that the tasks run after a failover, with SHOW TASKS:Before a failover, tasks in your target account don’t run, whatever their
state. After a failover, a task whosestateisstartedis scheduled. A replicated task issuspendedin your target account if it was suspended in your source account when the last refresh began, or if its owner role isn’t available in your target account. To fix a suspended task, resume it in your source account. Make sure that the group replicates the task’s owner role and that the task’s warehouse exists in your target account. Then refresh the failover group in your target account. For a task graph, check the root task: a child task runs after a failover only if its root task is resumed. For more information, see Replication and tasks. -
Record your setup for on-call responders. Part 2 starts from this record. Save the following:
- The failover group name
- The source and target account names
- The names of your integrations, pipes, and tasks
- Whether your producer uses dual-write or single-write
- Which pipes use the Amazon SQS-only path
- The
ACTIVEvalues in each account - On Azure and Google Cloud, the
notificationChannelNamevalues in each account
Before you rely on this configuration, test a failover and a failback by following Part 2: Fail over your pipelines and Part 3: Fail back your pipelines.
Change the active queue later
To change the active queue of an MQNI in an account after this setup, follow these steps. You don’t need to pause pipes first.
-
Grant that account access to the new queue.
-
If you also change the MLSI’s active location in that account, change the location now. The rebind uses each stage’s current location.
-
If the previous queue is reachable, run
SYSTEM$PIPE_STATUSin the account whose active queue you’re changing, and wait until it showsnumOutstandingMessagesOnChannelas0.Warning
Notifications that are still in the previous queue aren’t loaded after the change.
-
In the account whose active queue you’re changing, run
ALTER INTEGRATION ... SET ACTIVE = '<queue_name>'.Setting the active queue rebinds every pipe that uses the integration. If Snowflake can’t bind a pipe to the new queue, the statement fails. Pipes that the statement already rebound stay on the new queue, and the pipe that failed isn’t bound to any queue. Grant the missing access to the new queue, and run the statement again with the same queue name.
-
In the same account, run
DESCRIBE INTEGRATION, and confirm thatACTIVEnames the new queue. -
If this account is the primary account, run
ALTER PIPE ... REFRESHfor each pipe that uses the integration. The refresh loads files whose notifications went to the previous queue but weren’t loaded, including any that arrived after item 3.
Part 2: Fail over your pipelines
Run these steps during an outage to redirect your data ingestion to your
secondary location. You don’t need your source account for any of them, except
for an optional part of step 3 that suspends the source account’s tasks if
that account is reachable. Because
you preconfigured the active storage location and queue during setup, failover
in Snowflake takes one ALTER FAILOVER GROUP ... PRIMARY command for each
failover group. With dual-write, you need only steps 1 through 4.
-
Identify your setup: In the setup record that you saved in Step 6, check whether your producer uses dual-write or single-write. That choice determines which of the following steps you run, and Snowflake doesn’t record it. Then, in your target account, run SHOW FAILOVER GROUPS to find your failover group. Use its name wherever this topic shows
my_fg. If more than one group contains your pipeline databases or integrations, run the following steps for each group.To see which pipes use the Amazon SQS-only path, run SHOW PIPES and check the
integrationandnotification_channelcolumns. On Amazon S3, a protected pipe uses that path if itsintegrationisNULLand itsnotification_channelis an Amazon SQS ARN (arn:aws:sqs:...). You need this list of SQS-only pipes for the pipe checks in Part 4. -
Record the snapshot time of your last refresh: In your target account, before you promote it, run the following query and save the
LAST_SNAPSHOTvalue as<last_snapshot>. You need it to check for duplicate loads in Part 4 and, with single-write, to reconcile files in Part 3.PRIMARY_SNAPSHOT_TIMESTAMPis the point in time of your source account’s data that the refresh copied. REPLICATION_GROUP_REFRESH_HISTORY takes only the group name and returns refreshes from the last 14 days. With single-write, also save theRECONCILE_FROM_ISO_8601value as<reconcile_from_iso_8601>. It’s one day before the snapshot, in the ISO 8601 format that step 8 of Part 3 needs. The following query returns both values: -
Promote the target account: In your target account, use a role with the
FAILOVERprivilege on the failover group to promote the target account to primary. If your source account is reachable, for example during a test, first suspend the tasks that run yourCOPY INTOstatements there, or their root tasks. Until your source account learns that it’s the secondary account, its tasks can still start runs. Then run the following command in your target account:With dual-write, your pipes automatically resume loading from your secondary location. Tasks and other
COPY INTOjobs resume in step 4.Note the time that the statement succeeds, and save it as
<promotion_time>. You need it in Part 4.If the command fails because a refresh operation is still in progress, follow Resolving failover statement failure due to an in-progress refresh operation. Either suspend the group with
ALTER FAILOVER GROUP my_fg SUSPENDand wait for the refresh to finish, or useSUSPEND IMMEDIATEto also cancel a scheduled refresh that’s in progress. To cancel a refresh that you started manually, follow the linked section.Warning
Canceling a refresh in the
SECONDARY_DOWNLOADING_METADATAorSECONDARY_DOWNLOADING_DATAphase can leave your target account in an inconsistent state. Check the linked section before you useIMMEDIATE.If a refresh finished while you waited, run the query in step 2 again, and save the new values. Then run
ALTER FAILOVER GROUP my_fg PRIMARYagain.After
ALTER FAILOVER GROUP my_fg PRIMARYsucceeds, your target account is the primary account and your source account is the secondary account. The failover group in your source account is now a secondary group, which is why the refresh operation in Part 3 runs there. -
Start your
COPY INTOjobs in your target account (if you run them):- Tasks: Run
SHOW TASKS IN DATABASE my_db. A task whosestateisstartedis scheduled again automatically. Ifstateissuspended, resume the task with ALTER TASK … RESUME. - Other
COPY INTOjobs: Run them in your target account, or point the scheduler that runs them at your target account.
- Tasks: Run
-
Reroute your producer (single-write only): Point your producer application at your secondary cloud storage location, using the same relative paths as your primary location. For how those paths resolve, see How paths resolve in each location. Snowflake doesn’t replicate your storage files, so no new data arrives until you do this.
-
Leave refreshes suspended in your source account (single-write only): Failing over suspends scheduled refreshes of the secondary group in your source account. Don’t run
ALTER FAILOVER GROUP my_fg RESUMEthere, even though the Resume scheduled replication in target accounts section says to resume them after a failover.Warning
A refresh in your source account overwrites rows that exist only in your source account. Part 3 runs manual refreshes only from step 4 onward, after steps 1 and 3 load those rows into your target account.
If you create stages, integrations, or auto-ingest pipes in your target account during the outage, set them up so that failback can move them:
- Use an MLSI for each new stage, as described in Step 2.
- In a new MLSI or MQNI, include both your primary and secondary storage
locations or queues, and set
ACTIVEto your secondary one. During failback, you make the primary one active in your source account, as described in step 5 of Part 3: Fail back your pipelines. - Grant your target account access to the secondary location of each new MLSI and the secondary queue of each new MQNI, as described in items 1 and 3 of Step 5. Don’t follow the primary-location grant steps in Step 1 and Scenario A. On AWS, if the trust policy of your secondary location’s role doesn’t already allow that IAM user ARN with that external ID, add an entry for it, and keep the existing entries.
- Create an MQNI only if
my_fgalready replicates notification integrations, as set in item 1 of Step 4. Otherwise, the MQNI doesn’t reach your source account. If the group doesn’t replicate them, as on the Amazon SQS-only path, don’t change the group during the outage. Create SQS-only pipes instead. - Make sure that an event notification on your secondary bucket for each new
pipe’s path targets the pipe’s queue: the
notification_channelARN fromDESCRIBE PIPEfor an SQS-only pipe, or the MQNI’s queue for your secondary location.
To confirm that ingestion resumed, see Part 4: Verify ingestion after failover or failback.
Part 3: Fail back your pipelines
After the outage is resolved and your primary location is healthy, run these steps to move your pipelines back to the primary location. With dual-write, run only steps 4 through 7.
-
Load primary-only files (single-write only): Rows that your source account loaded after
<last_snapshot>exist only in your source account. Load the files that those rows came from into your target account.Warning
Complete this step before the refresh in step 4. That refresh overwrites the database in your source account with the contents of the database in your target account, so rows that exist only in your source account are permanently erased.
-
In your source account, list the files that your tables loaded since one day before the
<last_snapshot>time that you recorded in step 2 of Part 2. The extra day also covers loads that finished close to the time of that refresh. Copying a file that your target account already loaded is safe, because the pipe orCOPY INTOjob skips it. The following query covers every table inmy_db:The view can lag by up to 2 hours, and by up to 2 days for a table that has had few loads since its last update in the view. If
<last_snapshot>is within the last 13 days, check each table with the COPY_HISTORY table function as well. Run it withmy_db.my_schemaas your current schema:pipe_nameisNULLfor files that aCOPY INTOstatement loaded, and for files that a pipe loaded if the pipe was dropped or your role can’t access it.file_nameis relative tostage_location, which is the URL of the location that the file was loaded from. -
Copy those files from your primary location to the same relative paths in your secondary location: the path after the
STORAGE_BASE_URLinstage_location, followed byfile_name. The pipes in your target account load them. For tables that a task or anotherCOPY INTOjob loads, you load those files in step 3 of this part.
-
-
Reroute your producer (single-write only): Point your producer application back at your primary cloud storage location. Your source account’s pipes are still read-only, but they receive the notifications and load the new files after you promote your source account. The refresh in step 4 doesn’t discard these notifications, because your source account receives them while it’s the secondary account.
-
Let your target account finish loading (single-write only): In your target account, make sure that every file in your secondary location is loaded. Your source account reads only your primary location, so a file that your target account doesn’t load in this step isn’t loaded after you fail back. Check each kind of job:
- Pipes: Run
SYSTEM$PIPE_STATUSfor each pipe and wait untilpendingFileCountandnumOutstandingMessagesOnChannelare both0on two checks a few minutes apart.numOutstandingMessagesOnChannelis approximate and counts every pipe that shares the queue. - Tasks: Suspend each standalone task, or the root task of each task
graph, with
ALTER TASK ... SUSPEND, and then run it once with EXECUTE TASK, which runs a suspended task without resuming it. Don’t suspend child tasks, becauseEXECUTE TASKskips suspended child tasks. Wait until TASK_HISTORY shows that run asSUCCEEDED. - Other
COPY INTOjobs: Run each job once more, and then stop it.
Warning
If your target account loads data after the refresh in step 4 starts, that data doesn’t reach your source account.
- Pipes: Run
-
Sync data back: Pull all data and state changes that occurred during the outage back to your source account. Log in to your source account, which is acting as the secondary account at this point, and initiate a manual refresh:
Warning
Wait for this refresh operation to finish completely before moving to the next step. Failing back before the sync completes can result in data loss.
To check progress, run the following query in your source account with REPLICATION_GROUP_REFRESH_PROGRESS:
The refresh is finished when the last row shows
COMPLETED. If it showsFAILED, readerrorMessagein thedetailscolumn, fix the cause, and run the refresh again. If it showsCANCELED, run the refresh again. -
Check your integrations, and then promote the source account: After the refresh is complete, and while your source account is still the secondary account, check the integrations that your stages and pipes use. Your pipes record notifications while your source account is secondary and load them after the promotion, so fix any problem before you promote.
Pipes that you created in your target account while it was the primary account usually don’t need a rebind. The refresh in step 4 bound each of them in your source account to the queue for its stage’s active location there: the MQNI’s active queue for a pipe that uses an MQNI, or the Amazon SQS queue for that location’s region for an SQS-only pipe. That’s your primary location, unless the pipe’s stage doesn’t use an MLSI or uses one that you created in your target account during the outage, or the pipe uses an MQNI that you created there. Items 1 and 2 cover those cases. Pipes that existed before the outage keep their binding in your source account.
-
Run
DESCRIBE STORAGE INTEGRATION my_mlsi, and confirm thatACTIVEis your primary location, such asmy-s3-us-west-1. If you created more than one MLSI, check each one. An MLSI that you created in your target account during the outage arrives with your target account’s active location. If an MLSI’sACTIVEvalue isn’t your primary location, set it:An MLSI that you created during the outage has a different cloud identity in your source account, and nothing has granted that identity access to your primary location yet. Grant it by following item 1 of Step 5 in your source account, with your primary location in place of your secondary one. On AWS, if the trust policy of your primary location’s role doesn’t already allow that IAM user ARN with that external ID, add an entry for it, and keep the existing entries, which your other integrations use. Then run
LISTon one of the MLSI’s stages in your source account to confirm access.If you use an MQNI, also run
DESCRIBE INTEGRATIONfor each MQNI, including any that you created in your target account during the outage, and confirm thatACTIVEnames your primary location’s queue. An MQNI that you created during the outage arrives with no active queue, so its pipes aren’t bound to any queue. IfACTIVEis empty or names another queue, grant your source account access to your primary location’s queue, and then set it, as described in items 1, 4, and 5 of Change the active queue later.Changing an MLSI’s
ACTIVEvalue doesn’t rebind the pipes on that MLSI’s stages. If you changed it, rebind those pipes in your source account now:- For pipes that use an MQNI, set the MQNI’s active queue again with your primary location’s queue name, as described in item 4 of Change the active queue later.
- For each SQS-only pipe, run
SYSTEM$INGEST_REBIND_PIPEwith the same arguments as in Rebind SQS-only pipes. Check that the result starts withRebind succeededand that the region in theNew channelARN is your primary bucket’s region, such asus-west-1. If the result starts withRebind failed, or the function raises an error, follow the warning in Rebind SQS-only pipes. If the ARN shows another region, check the pipe’s stage as described in the Stage check of item 2.
-
Check each pipe that you created in your target account during the outage:
- Stage: Run
LISTon the pipe’s stage in your source account, and confirm that the file URLs are in your primary location. If they aren’t, and the stage uses an MLSI, set that MLSI’sACTIVEvalue to your primary location, and then rebind the pipe, as described in item 1. If the stage doesn’t use an MLSI, change it as described in Step 2. The stage is read-only in your source account, so change it in your target account, which is still the primary account, and then repeat the refresh in step 4. Then rebind the pipe as described in item 1. - Binding: For an SQS-only pipe, run
DESCRIBE PIPEin your source account, and confirm that the region in thenotification_channelARN is your primary bucket’s region. If it isn’t, rebind the pipe as described in item 1. - Notifications: Make sure that an event notification on your primary
bucket for the pipe’s path targets the pipe’s queue: the current
notification_channelARN for an SQS-only pipe, or the MQNI’s queue for your primary location.
- Stage: Run
-
Promote your source account back to primary, using a role with the
FAILOVERprivilege:Note the time that the statement succeeds, and save it as
<promotion_time>for Part 4. -
If you set an MQNI’s active queue or rebound pipes in item 1 or 2, or added or updated an event notification in item 2, the affected pipes didn’t receive notifications for files that arrived before the change. Load those files by running
ALTER PIPE ... REFRESHfor each affected pipe. The statement covers files staged within the last 7 days, and the pipe skips files that its load history records as loaded:
-
-
Restart your
COPY INTOjobs in your source account (if you run them):- Tasks: The refresh in step 4 copied each task’s state from your target
account. With single-write, a task that you suspended in step 3 is
therefore also suspended in your source account. Run
SHOW TASKS IN DATABASE my_db, and resume each task whosestateissuspendedwith ALTER TASK … RESUME. - Other
COPY INTOjobs: Run them in your source account, or point the scheduler that runs them back at your source account.
- Tasks: The refresh in step 4 copied each task’s state from your target
account. With single-write, a task that you suspended in step 3 is
therefore also suspended in your source account. Run
-
Resume scheduled refreshes: Failing back suspends scheduled refreshes of the secondary group in your target account. Until you resume them, your target account doesn’t receive changes. For more information, see Resume scheduled replication in target accounts. In your target account, run the following command:
-
Reconcile stranded files (single-write only): In your source account, load the files that were never loaded. A file can be missed because the outage stopped its notification from arriving, because the outage outlasted the queue’s message retention period, or because your source account had read the notification but hadn’t loaded the file when the outage began. For files staged within the last 7 days, run ALTER PIPE … REFRESH for each pipe, with
MODIFIED_AFTERset to the<reconcile_from_iso_8601>value from step 2 of Part 2. That value is one day before your last refresh’s snapshot time, soALTER PIPE ... REFRESHalso picks up files that were in flight at that refresh. The pipe skips files that its load history records as loaded. The value must be in ISO 8601 format with a time zone offset, such as'2026-10-01T18:30:00-07:00'. A value older than 7 days is treated as 7 days ago. Run the following statement for each pipe:For older files that pipes didn’t load, compare your primary storage bucket against COPY_HISTORY. If the outage spanned more than 14 days, use the Account Usage COPY_HISTORY view instead. Then run a manual
COPY INTOcommand for the files that weren’t loaded.For tables that only
COPY INTOstatements or tasks load, no action is needed. The next run of each statement loads files in your primary location that the table’s load metadata doesn’t record as loaded.
To confirm that ingestion resumed, see Part 4: Verify ingestion after failover or failback.
Part 4: Verify ingestion after failover or failback
After you initiate a failover or failback, connect to the account that’s now the primary account, and use the following commands to verify that your data pipelines were redirected successfully and have resumed ingestion.
Check active integration states
Confirm that each integration’s ACTIVE value names the storage location or
queue for the region that’s now primary. After a failover, in your target
account, ACTIVE should be your secondary location: my-s3-us-east-1 for the
MLSI and, if you used Scenario A, my-us-east-1 for the MQNI. After a failback,
in your source account, it should be your primary location: my-s3-us-west-1
for the MLSI and, if you used Scenario A, my-us-west-1 for the MQNI. If you used Scenario B, the MQNI’s active queue after a failover is MY_MQNI-queue2 on Amazon S3, or your second integration’s name, such as MY_AZURE_NI_2, on Google Cloud and Azure. After a failback, it’s MY_MQNI-queue1 on Amazon S3, or your original integration’s name, such as MY_AZURE_NI_1, on Google Cloud and Azure. On the
Amazon SQS-only path, only the MLSI has an ACTIVE value. Run the following commands, and
check ACTIVE in the output:
Check pipe status (Snowpipe only)
To list your pipes, run SHOW PIPES. Use the SYSTEM$PIPE_STATUS function to confirm that each pipe is running and bound to the queue in your active location:
In the output:
executionStateshould beRUNNING.- On Azure and Google Cloud,
notificationChannelNameshould differ from the value that the same pipe reports in the other account. If the other account is unreachable, compare it with the values that you recorded in Step 6. - On Amazon S3, for a pipe that uses an MQNI,
notificationChannelNamedoesn’t confirm the binding. RunDESCRIBE PIPE, and confirm thatnotification_channelshows the SNS topic for your active location. If it shows the other location’s topic, runALTER INTEGRATION my_mqni SET ACTIVEagain with the name of the queue that’s active in this account. Then runALTER PIPE ... REFRESHfor the pipe. - On Amazon S3, for an SQS-only pipe, confirm that the bucket for your active
location has an event notification that targets the
notification_channelARN fromDESCRIBE PIPE. lastIngestedTimestampshould advance as new files arrive.
Check task status
If your COPY INTO statements run in tasks, confirm that each task is resumed
and that its runs succeed. Run SHOW TASKS and the
TASK_HISTORY table function. Replace
my_copy_task with your task’s name:
In the SHOW TASKS output, state should be started. If it’s suspended,
resume the task with ALTER TASK ... RESUME. In the TASK_HISTORY output, runs
scheduled after you promoted the account should show SUCCEEDED in the state
column. The first rows can be future runs with a state of SCHEDULED.
Scheduling can take a while to return to normal after a promotion, so the first
run might start later than its schedule.
Check load history
To confirm that data is loading without errors or duplicates, query the
COPY_HISTORY table function, which shows which
files were ingested and when they were loaded. Run the following query with
my_db.my_schema as your current schema:
Replace <promotion_time> with the time that you saved in step 3 of Part 2 or
step 5 of Part 3. Verify that status shows Loaded, that stage_location
shows the URL of your active location, and that last_load_time is later than
<promotion_time>. file_name is relative to stage_location. For a table
that COPY INTO statements or tasks load, rows with the status
Load skipped another location are expected: COPY INTO skipped those files
because it already loaded them from your other storage location.
To confirm that no file was loaded twice across the failover, look for file
names that appear more than once. Start the search before the <last_snapshot>
value that you recorded in step 2 of Part 2; the following query starts one day
earlier. The function returns at most the last 14 days of history, and an
earlier START_TIME is treated as 14 days ago. Run the following query:
An empty result means that no file was loaded more than once into my_table
during that period. The check includes loads made in the other account up to the last refresh before you promoted this account. The check doesn’t show files that were never loaded. To find those, see step 8 of
Part 3: Fail back your pipelines.
Troubleshoot integrations and pipes
If an integration or pipe check fails, find the executionState value or the symptom in the
following list:
ACTIVEon the MQNI is empty: Set it to the queue for this account’s active location withALTER INTEGRATION ... SET ACTIVE. After a failover, follow items 3 and 4 of Step 5. After a failback, use your primary location’s queue, as described in step 5 of Part 3: Fail back your pipelines.ACTIVEon the MQNI names the queue in the region that’s down: Change the active queue to the queue in your healthy region, as described in Change the active queue later.- On Azure or Google Cloud,
notificationChannelNamematches the other account’s value: The active queue in this account is wrong. Change it as described in Change the active queue later. - On Amazon S3, an SQS-only pipe (
integrationisNULLandnotification_channelis an Amazon SQS ARN) isRUNNING, butlastIngestedTimestampdoesn’t advance: The bucket for your active location doesn’t send notifications to this account’s queue. After a failover, confirm that you completed Rebind SQS-only pipes, including the event notification on your secondary bucket. For a pipe that you created after Step 5, check it as described in item 4 of Step 6, but make any stage change in your target account, which is now the primary account, and skip the refresh. For a stage that doesn’t use an MLSI, see the last paragraph of this section. After a failback, confirm that the event notification on your primary bucket targets thenotification_channelARN thatDESCRIBE PIPEreports in your source account. For a pipe that you created in your target account during the outage, see step 5 of Part 3: Fail back your pipelines. channelErrorMessageis present: Snowflake can’t read the active queue in this account. After a failover, for a pipe that uses an MQNI, repeat item 3 of Step 5. For an SQS-only pipe after a failover, confirm that you completed Rebind SQS-only pipes and that the result named your secondary region’s queue. For a pipe that you created after Step 5, check it as described in item 4 of Step 6, but make any stage change in your target account, which is now the primary account, and skip the refresh. For a stage that doesn’t use an MLSI, see the last paragraph of this section. After a failback, for a pipe that uses an MQNI, confirm that your primary queue grants access to your source account. For an MQNI that you created during the outage, grant your source account access to its primary queue, as described in step 5 of Part 3: Fail back your pipelines.FAILING_OVER: Snowflake is still syncing the replicated load history for the table that the pipe loads. The pipe can load new files in this state, and it changes toRUNNINGwhen the sync finishes.READ_ONLY: The pipe’s database is a secondary database in the account that you’re connected to. Confirm that you promoted every failover group that contains your pipeline databases.PAUSED: The pipe is paused. A paused pipe showsPAUSEDeven while its database is still secondary. Because the paused state replicates, a pipe that was paused in the other account at the last refresh is also paused here. Confirm that you promoted the failover group, and then resume the pipe withALTER PIPE <pipe_name> SET PIPE_EXECUTION_PAUSED = FALSE.STALLED_STAGE_PERMISSION_ERROR: The integration’s cloud identity in this account can’t read your active location. After a failover, repeat item 1 of Step 5. After a failback, repeat the grant for your primary location in Step 1, and keep the existing trust policy entries. For an MLSI that you created during the outage, grant access as described in step 5 of Part 3: Fail back your pipelines.- Any other state: Check the
errorfield, and see SYSTEM$PIPE_STATUS.
If a fix in this list rebinds a pipe, sets an MQNI’s active queue, or adds or
updates an event notification, the pipe didn’t receive notifications for files
that arrived before the fix. In the account that’s now the primary account, run
ALTER PIPE ... REFRESH for each affected pipe, as described in item 4 of step
5 of Part 3: Fail back your pipelines.
After a failover, a pipe whose stage doesn’t use an MLSI can’t load from your
secondary location, and a rebind doesn’t fix it. Changing the stage in your
target account to use an MLSI makes it resolve to a different location, so
Snowflake marks the stage’s pipes invalid. Recreate each of those pipes as
described in Step 2. A recreated pipe has no load
history, so load the files that it missed with ALTER PIPE ... REFRESH, with
MODIFIED_AFTER set to your <last_snapshot> time in ISO 8601 format, such as
'2026-10-01T18:30:00-07:00'. Don’t use an earlier time, because the pipe can
reload files whose rows your target account already has. To convert
<last_snapshot> to that format, run the following query: