Snowflake DCM Projects — Extended capabilities (early access)
Introduction
This document describes a rolling set of new DCM Project capabilities that are available in private preview to selected customers. These features extend the core DCM Projects functionality with additional object types and deployment capabilities.
Over time, this document will be extended with new capabilities as they become available for early testing. Once a capability is sufficiently tested and stable, it will progress into the Public Preview release of DCM Projects and be removed from this document.
Early access for the following DCM capabilities is currently available in private preview:
- DEFINE API INTEGRATION
- DEFINE EXTERNAL ACCESS INTEGRATION
- DEFINE STORAGE INTEGRATION
- DEFINE DBT PROJECT
- DEFINE TASK GRAPH
- DEFINE SECRET
- Environment variables and secrets
- CLI enhancements
For the main DCM documentation of all publicly available functionality, see Snowflake DCM Projects.
DEFINE API INTEGRATION
Use DEFINE API INTEGRATION to declaratively manage an API integration in a DCM Project. API integrations store configuration for HTTPS API services, including cloud proxy services, Git repository APIs, and external Model Context Protocol (MCP) servers.
DEFINE EXTERNAL ACCESS INTEGRATION
Use DEFINE EXTERNAL ACCESS INTEGRATION to declaratively manage an external access integration in a DCM Project. External access integrations allow UDF or procedure handler code to access external network locations through configured network rules and, when needed, secrets.
DEFINE STORAGE INTEGRATION
Use DEFINE STORAGE INTEGRATION to declaratively manage a storage integration in a DCM Project. Storage integrations connect Snowflake to external cloud storage without requiring users to supply cloud credentials when creating stages or loading and unloading data.
DEFINE DBT PROJECT
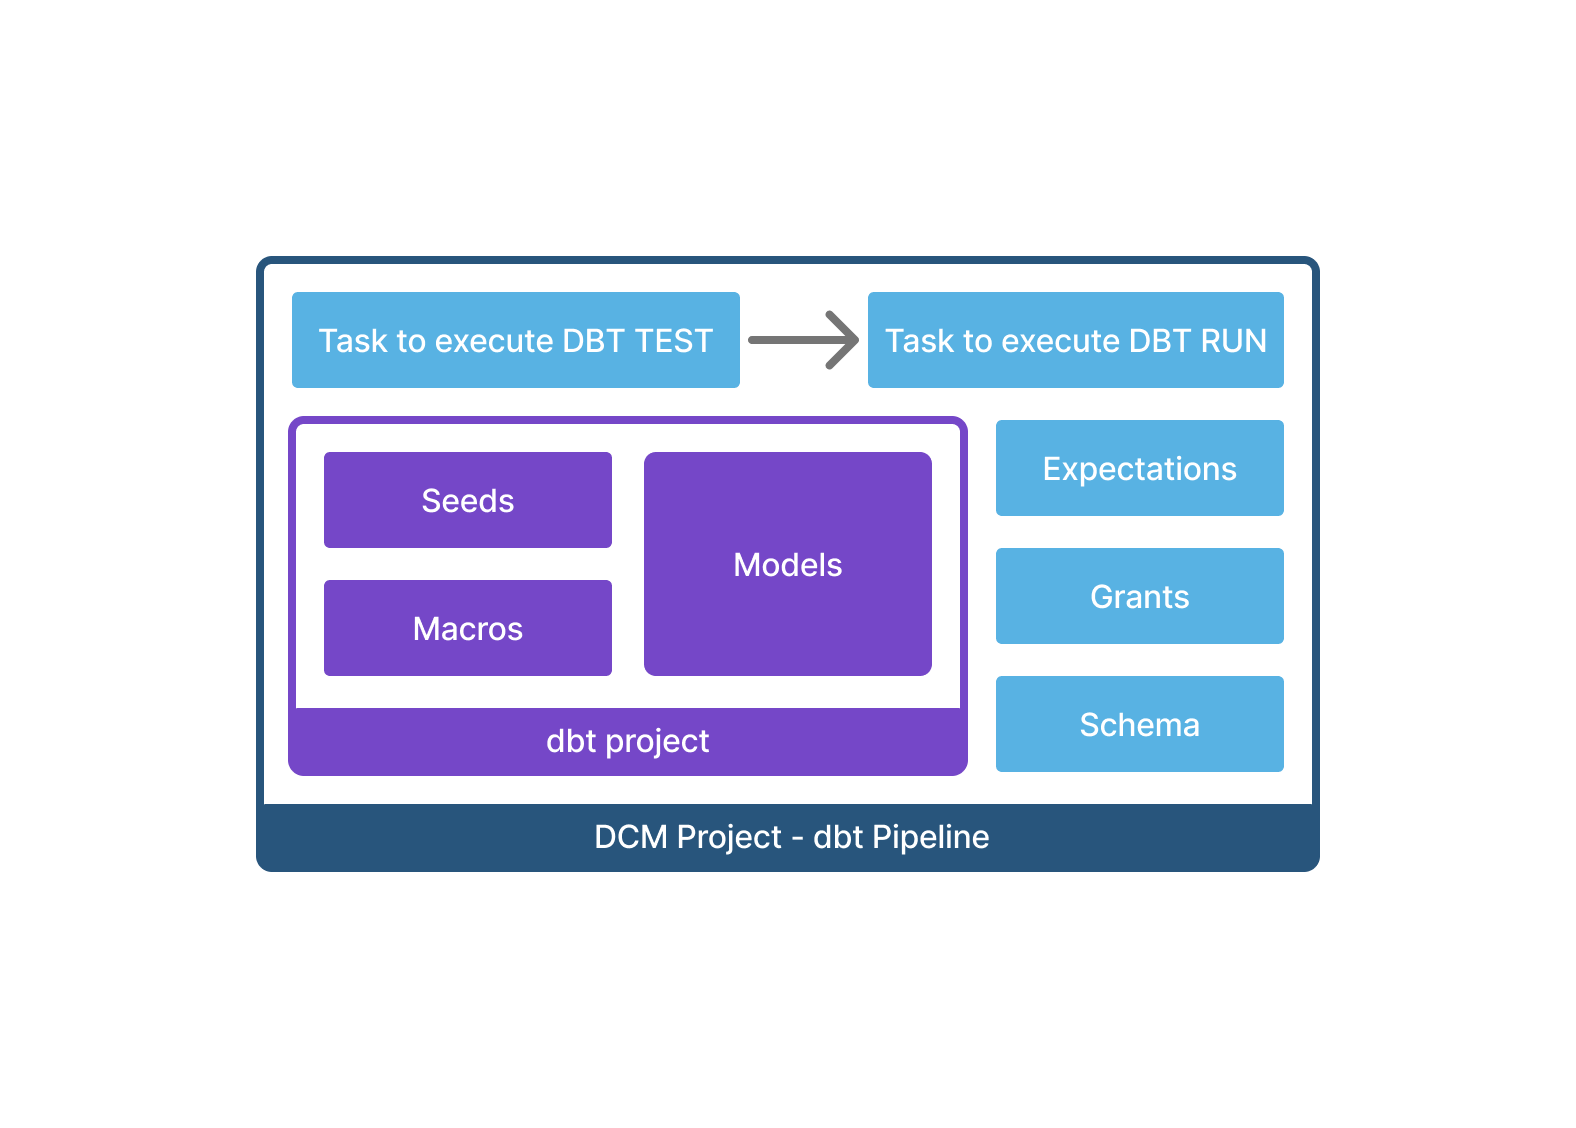
You can define a dbt project, its orchestration, infrastructure, and access control together in a single DCM Project folder, then deploy everything to any environment with one command.
Most commonly used is the combination of dbt projects + Tasks to execute dbt test and dbt run on a defined schedule. You can define a DAG of Tasks to orchestrate runs of different dbt projects or individual models.
Create a DCM Project for dbt
An existing dbt project folder can include:
- models
- dbt_project.yml
- packages.yml
- profiles.yml
Place the dbt project in a subfolder under sources/, outside sources/definitions/. For example, use sources/dbt/dbt_pipeline/.
Note
Project assets aren’t yet supported for DEFINE DBT PROJECT. For now, specify the relative path to the dbt project under sources/ directly in the FROM clause. Asset support is planned for an upcoming release and will become the standard way to reference dbt project files.
Add the DEFINE DBT PROJECT statement to your DCM definitions with:
- The relative path from
manifest.ymlto the dbt project folder - A default target (which can use Jinja templating to match the DCM deployment target)
In addition, you can add Tasks to execute dbt commands after the deployment as well as grants on the dbt project object or future tables and views.
Pass DCM variables to dbt
DCM Jinja templating and dbt templating variables are completely isolated. There’s no automatic pass-through between the DCM manifest.yml configuration and the dbt profiles.yml targets. The two configurations must be maintained separately and kept in sync.
If you need values from the DCM templating context inside a dbt run (for example, the active dbt target), pass them explicitly through the args of the EXECUTE DBT PROJECT statement. Jinja in args is rendered by DCM before the command is executed, so any DCM templating variable can be injected.
Plan & deploy a DCM Project for dbt
Run your regular DCM plan and deploy commands. If the DEFINE DBT PROJECT statement or any file in the dbt project folder has changed since the last successful deployment, PLAN:
- Render the jinja templating
- Compile the entire DCM Project
- Show the dbt project as part of the plan output
PLAN DELTA also detects these changes and shows the dbt project in the changeset.
The dbt project is compiled during DEPLOY, not during PLAN. PLAN only validates that the dbt project object can be created successfully. It doesn’t check whether the dbt project will run successfully.
Tables created by dbt don’t show as “DCM managed entities” because they aren’t defined directly in the DCM definitions. Removing the DEFINE DBT PROJECT statement drops the dbt project object on the next deployment, but it won’t drop the tables created by dbt.
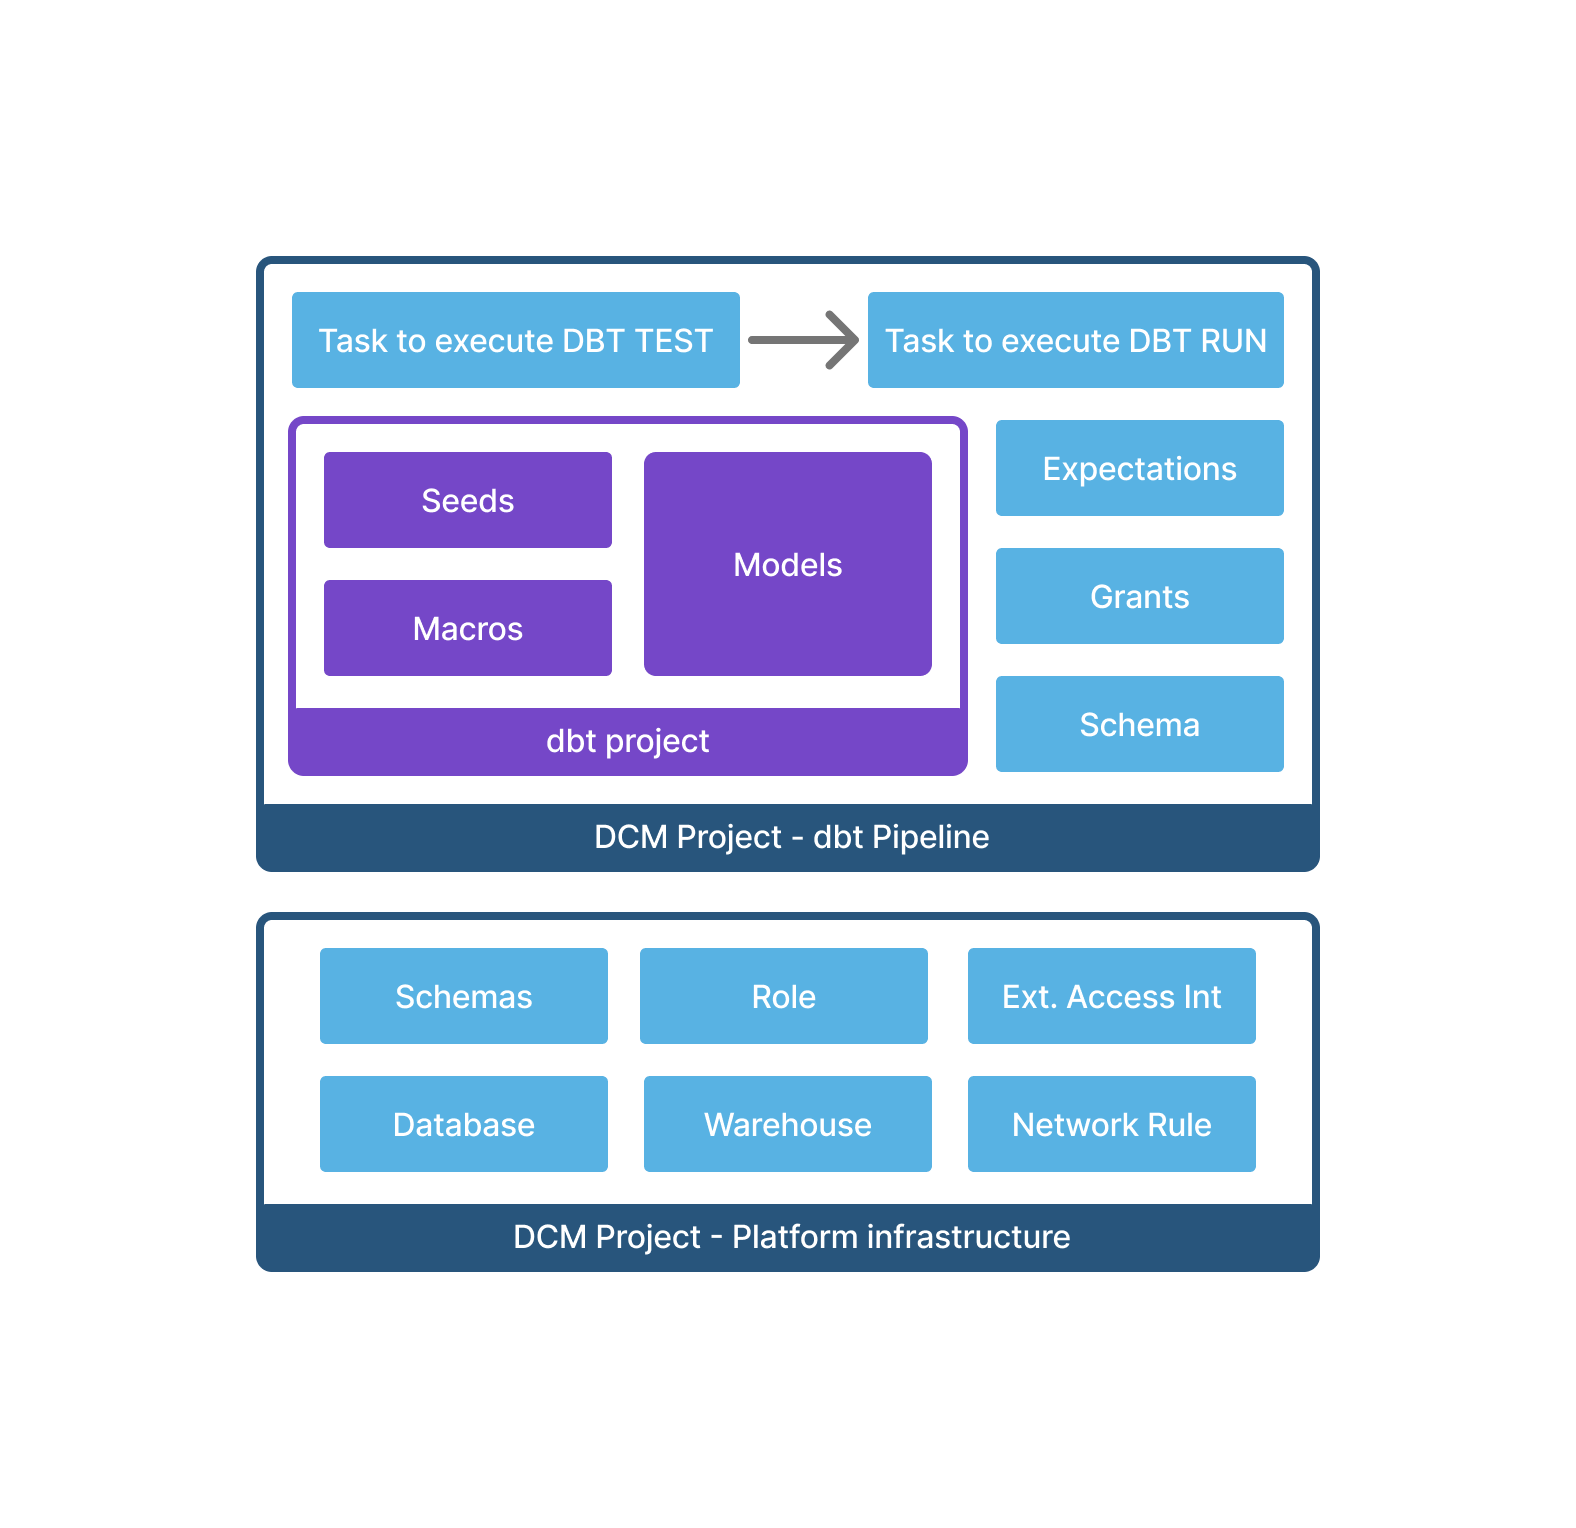
You can also consider creating a new DCM Project for dbt on top of an existing “platform” project.
Functional limitations
PLANandDEPLOYoutput only show the operation for a Snowflakedbt projectobject (CREATE/ALTER/DROP) and don’t show more granular changes in the dbt project configuration or models.- Dependencies: dbt models can refer to other objects defined in DCM, but other DCM objects can’t reference tables created by dbt, meaning dbt projects can’t have downstream dependencies.
- The relative path must resolve to a folder under
sources/in the DCM Project. You can’t specify a path to another repository or a folder outside the DCM Project.
DEFINE TASK GRAPH
You can define a Task Graph Object and its member tasks in a DCM Project. A Task Graph Object encapsulates a directed acyclic graph (DAG) of tasks and provides a single place for graph-wide settings, including the schedule, overlap policy, retry behavior, and member-task defaults. You can set the task graph’s default target state for its member tasks to STARTED or SUSPENDED.
During Private Preview, a task graph has exactly one root. Support for multiple roots will be added in Public Preview.
Define the member tasks with DEFINE TASK, using AFTER to establish their dependencies. Use DEFINE TASK GRAPH to identify the root and configure the graph:
For the complete Task Graph Object syntax, lifecycle commands, monitoring options, and Private Preview limitations, see Task Graph Object.
DEFINE SECRET
You can define and deploy a Secret in DCM Projects without revealing it in your definitions, repo code, artifacts, or logs. DEFINE SECRET supports all properties of CREATE SECRET for the following secret types: GENERIC_STRING, PASSWORD, OAUTH2, and CLOUD_PROVIDER_TOKEN.
Rotating a masked property shows in the changeset as an ALTER operation, but the value renders as ******** on both sides of the diff, so you can see that the value has changed.
Examples:
An OAUTH2 secret references an existing API_AUTHENTICATION security integration and supplies its refresh token the same way:
Functional limitations
- Every property required for the secret’s type must be specified on every deployment. Omitting a property that a previous deployment set doesn’t preserve its old value, the property is cleared instead.
Warning
Never write a sensitive property (SECRET_STRING, PASSWORD, or OAUTH_REFRESH_TOKEN) as a plain text literal in a definition file. DCM stores the rendered definition, including any literal value it contains, as plain text on the project’s stage. Always supply these values through _snow.env_secret() instead.
Environment variables and secrets
DCM Projects can declare environment variables and secrets in the manifest, then reference them from Jinja templating and directly in SQL properties. This keeps sensitive values, per-environment configuration, and CI/CD-supplied values out of your definition files and Git history.
Note
You can supply values for declared environment variables and secrets only from the Snowflake CLI or from SQL. Workspaces doesn’t support entering these values yet.
Declare env_
Add optional env_vars and env_secrets sections under templating in manifest.yml. Each entry is a single-key mapping, where the key is the declared name. Do not write any values for the keys in the manifest file.
Example:
env_vars and env_secrets are declared and referenced the same way. The only difference is that DCM masks secret values wherever it would otherwise surface them, including PLAN/DEPLOY changeset output, deployment history artifacts and logs.
Reference declared names in definition files
Reference a declared name with _snow.env_var("NAME") or _snow.env_secret("NAME") inside a definition file.
Example:
Use _snow.env_secret("NAME") the same way, most commonly to supply a secret’s value in a DEFINE SECRET statement.
Using a name that was never declared or declaring a name but never supplying a value for it will result in an error during PLAN or DEPLOY.
Supply values from the CLI
Note
Requires Snowflake CLI version 3.24 or later.
The Snowflake CLI collects a value for every declared name from the shell environment when you run snow dcm deploy, plan, or preview and forwards the values with the deployment. Export the variables in your shell, or in your CI/CD job, before running the command:
A declared name that isn’t present in the shell doesn’t fail the command by itself. DCM omits it from the deployment, and only reports an error if a definition actually needs it to render.
The CLI submits the collected values to Snowflake as a bind variable, not as literal text in the SQL statement. The values themselves never appear in Query History or in the plain SQL text of the underlying EXECUTE DCM PROJECT statement.
Supply values from a .env file
Pass --env-file/-e with a path to a KEY=VALUE file to source declared values from a file instead of exporting them in your shell. This is useful for CI/CD jobs, and for keeping a team’s non-secret defaults in one place:
For a name declared in both places, the shell value wins. The file only fills in names the shell doesn’t already provide.
Quote a value that contains # or has leading or trailing whitespace, or the value is silently truncated at the #, or trimmed.
Variable interpolation ($VAR or ${VAR}) isn’t supported. A literal $ in a value is never rewritten.
Whether a value is declared as env_vars or env_secrets only changes how DCM handles it once it reaches Snowflake. It doesn’t change how the CLI reads it from the file, so keep a .env file that contains real values out of Git, the same as you would for any file holding credentials.
Supply values from SQL
Both CLI options above are a convenience layer over the same underlying mechanism: an ENVIRONMENT clause on EXECUTE DCM PROJECT that binds a flat JSON object mapping each declared name to its value. You can supply this clause directly, without using the CLI.
ENVIRONMENT only accepts a bind parameter (a client ?, a session variable, or a Snowflake Scripting variable), never a literal string typed into the SQL text. From a client library, bind the JSON string to a ? placeholder the same way you would bind any other parameter. From a worksheet or snow sql, use a Snowflake Scripting block to supply the bind:
ENVIRONMENT is supported on PLAN, PREVIEW, and DEPLOY. It isn’t available on TEST ALL, or PURGE, since none of those render definition files.
Sensitive values
Values supplied through env_secrets are safe to use anywhere a definition renders. Unlike a plain templating variable, a secret value is never rendered into plain text SQL, and DCM masks it everywhere it would otherwise show the secret’s value.
Functional limitations
_snowis reserved for this and future built-in context functions. Don’t use it as a variable or macro name.
CLI enhancements
An early-access version of the Snowflake CLI includes improvements to several DCM Projects commands.
Re-run the same command with --force occasionally to pick up the latest updates to the early-access build:
To revert to the latest official release on main:
Note
Details of these improvements (such as syntax and output format) are subject to change while they’re in early access.
All of the commands (except snow dcm init) support the --save-output flag, which saves the command output as a .json file under out/.
snow dcm compile (new command)
snow dcm compile runs a static analysis of all DCM definitions and returns any errors or warnings found, grouped by file and entity. It’s intended for quickly checking iterative definition changes and catching errors before committing.
- Validates syntax and dependencies
- Runs faster than
PLAN, but doesn’t catch all possible errors. (Always runPLANto preview changes before deploying) - Shows a compressed file upload summary (file counter per path) with a progress bar
snow dcm dependencies (new command)
snow dcm dependencies runs a static analysis of all DCM definitions and builds a Mermaid flowchart representing the dependencies between all objects in the project (tables, dynamic tables, views, functions, procedures, and tasks).
The diagram is written to out/dependencies.md. The CLI prints a link to the file so you can open it in your IDE’s Markdown preview and explore the dependency graph visually.
Note that these dependencies refer to the deployment of objects (CREATE). It does not resolve run-time dependencies (for example, a Task that calls a stored procedure).
- Generate a dependency diagram for the current project:
snow dcm init (new command)
snow dcm init is the starting point for two common workflows: creating a brand-new empty DCM Project, or deploying an existing set of DCM definitions (from a repository or local path) to a new target environment.
In both cases it bootstraps the project in a single run: it writes or updates a manifest.yml, creates the DCM Project object in Snowflake, and provisions any missing supporting objects (database, schema, warehouse).
Before making any change, it prints a summary of every action and asks for confirmation. Nothing is created if you decline.
To start a new project the init process will walk you through all required steps for setting up a new project structure:
If you want to use an existing project folder and add a new target for a new account, then run init from a directory that already contains a manifest.yml.
A new target block is appended and your existing definitions are left untouched:
During a run, init resolves everything a target needs:
- Target name — defaults to your account alias; re-prompts if the name is invalid or already used.
- DCM Project object name — defaults to the target name. Identifiers with special characters are automatically wrapped in double quotes.
- Database and schema — uses your connection’s defaults (or prompts when there are none) and creates them if they don’t exist.
- Project owner — uses your current role, or prompts if it can’t be determined.
- Warehouse — uses your connection’s warehouse, or provisions an X-Small
DCM_WH(or a name you choose) and tells you how to configure it.
For automation and CI, pass --force to approve all changes non-interactively. --force requires --target; if that target already exists it’s reused as-is rather than failing:
The following options control init behavior:
| Option | Description |
|---|---|
--project-name <name> | Create a new project in a subfolder of this name. Omit to add a target to an existing manifest.yml. |
--target <name> | Name of the target to create in the manifest. Defaults to the account alias. Required with --force. |
--project-identifier <id> | Identifier of the DCM Project object (for example, MY_DB.MY_SCHEMA.MY_PROJECT). Defaults to the target name. |
--if-not-exists | Do nothing if the DCM Project object already exists in Snowflake. |
--force | Approve all changes non-interactively. |