Power BI SSO to Snowflake
This topic describes how to use Microsoft Power BI to instantiate a Snowflake session and access Snowflake using single sign-on (SSO).
Overview
Snowflake allows Microsoft Power BI users to connect to Snowflake using Identity Provider credentials and an OAuth 2.0 implementation to provide an SSO experience to access Snowflake data.
This feature eliminates the need for on-premises Power BI Gateway implementations since the Power BI service uses an embedded Snowflake driver to connect to Snowflake.
General workflow
The following diagram summarizes the authorization flow to instantiate a Snowflake session from Power BI:
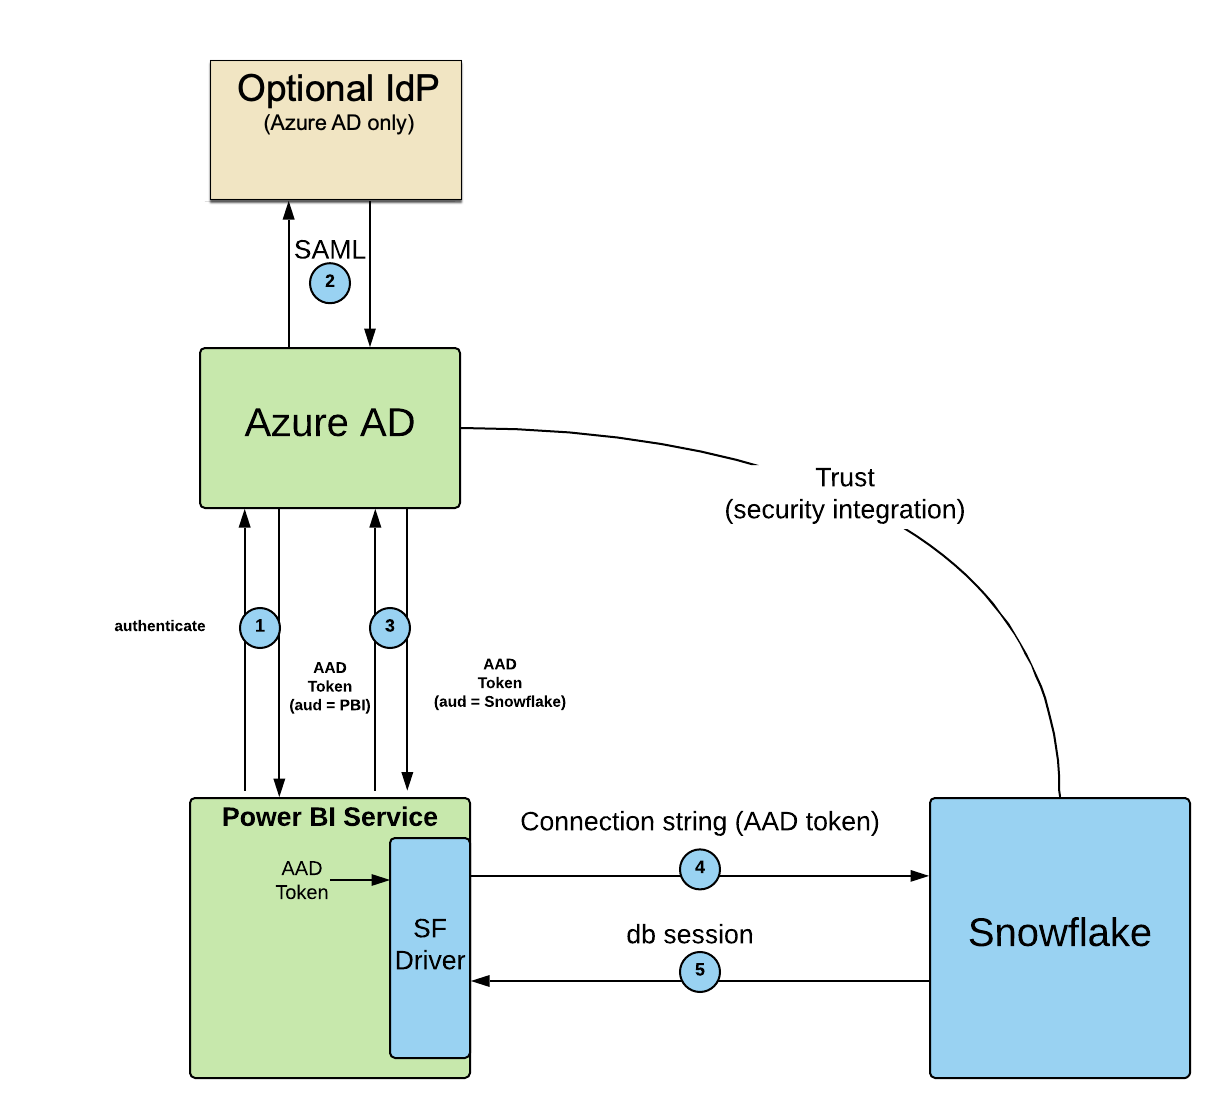
- The user logs into the Power BI service using Microsoft Entra ID.
- Optionally, Microsoft Entra ID can verify the user through an IdP via SAML. Currently, Microsoft only supports Microsoft Entra ID as the IdP for Power BI SSO.
- When the user connects to Snowflake, the Power BI service asks Microsoft Entra ID to give it a token for Snowflake.
- The Power BI service uses the embedded Snowflake driver to send the Microsoft Entra ID token to Snowflake as part of the connection string.
- Snowflake validates the token, extracts the username from the token, maps it to the Snowflake user, and creates a Snowflake session for the Power BI service using the user’s default role.
Prerequisites
For your Snowflake account, please verify the following before using the Power BI SSO feature:
-
In Snowflake, if you’re using Controlling network traffic with network policies, you should allow the Azure IP range that includes the Azure region where your Snowflake account is hosted and any additional Azure regions as necessary.
Important
To create a network policy that is specific to Power BI for the Azure region where your Snowflake on Azure account is located, search the JSON download from Microsoft for your region.
For example, if your Snowflake on Azure account is located in the Canada Central region, search the JSON download for
PowerBI.CanadaCentral. Select the IP address ranges from theaddressPrefixeslist. Use these IP address ranges to create or update a network policy in Snowflake.If the
addressPrefixeslist is empty, please contact Microsoft to request an update.If you are using multiple Microsoft Azure services (e.g. Power BI, SCIM), contact your Azure administrator to verify the correct IP address ranges to ensure the Snowflake network policy contains the correct IP address ranges to allow users to access Snowflake.
-
Either the
login_name,name, or theemailattribute for the user in Snowflake must map to the Microsoft Entra IDupnattribute. If thelogin_nameattribute is not defined, then the process defaults to thenameattribute.
Considerations
- With the Power BI gateway:
Private connectivity to the Snowflake service is supported. If it is necessary to use any of these two services to connect to Snowflake, use the on-premises gateway to connect.
- Without the Power BI gateway:
Private connectivity to the Snowflake service is not supported. For the Power BI Service and Power BI Desktop, create a network policy to allow the Microsoft Entra ID public IP address ranges. Note that network policies have a 100,000 character limit for the allowed IP addresses.
- Tokens and Keys:
Snowflake tries to verify Microsoft Entra ID through the URL value in the
external_oauth_jws_keys_urlproperty (shown below) or through the allowed IP addresses in the network policy, if the network policy exists. Microsoft updates its tokens and keys every 24 hours. For more information on the Microsoft updates, see Overview of tokens in Microsoft Entra ID B2C.- Setting allowed roles:
By default, the ACCOUNTADMIN, ORGADMIN, GLOBALORGADMIN, and SECURITYADMIN system roles are blocked from using Microsoft Power BI to instantiate a Snowflake session. If it is necessary to use these highly privileged roles, update the
EXTERNAL_OAUTH_ALLOWED_ROLESsecurity integration parameter to specify these roles. Exercise caution before specifying the ACCOUNTADMIN, ORGADMIN, GLOBALORGADMIN, and SECURITYADMIN system roles in theEXTERNAL_OAUTH_ALLOWED_ROLESsecurity integration parameter.For more information, see CREATE SECURITY INTEGRATION and ALTER SECURITY INTEGRATION.
Getting started
This section explains how to create a Power BI security integration in Snowflake and how to access Snowflake through Power BI.
Creating a Power BI security integration
Note
This step is not required if you are using the Power BI gateway for Power BI service to connect to Snowflake or are using your Snowflake username and password for authentication.
To use Power BI to access Snowflake data through SSO, it is necessary to create a security integration for Power BI using CREATE SECURITY INTEGRATION as shown below.
The security integration must have the correct value for the external_oauth_issuer parameter. Part of this value maps to your
Microsoft Entra tenant. You can find this value in the About section of your Power BI tenant.
If your organization has an advanced deployment of the Power BI service, then check with your Microsoft Entra ID administrator to get the correct value of the Microsoft Entra tenant to use in constructing the Issuer URL.
For example, if your Microsoft Entra tenant ID is a828b821-f44f-4698-85b2-3c6749302698, then construct the AZURE_AD_ISSUER value
similar to https://sts.windows.net/a828b821-f44f-4698-85b2-3c6749302698/. It is important to include the forward slash (i.e.
/) at the end of the value.
After constructing the value for AZURE_AD_ISSUER, execute the CREATE SECURITY INTEGRATION command.
If your Snowflake account or Microsoft Power BI service is in the Microsoft Azure Government cloud region, set
the external_oauth_audience_list property value to https://analysis.usgovcloudapi.net/powerbi/connector/Snowflake.
Security integration for Microsoft Power BI
Microsoft Azure Government security integration for Microsoft Power BI
Important
Only account administrators (i.e. users with the ACCOUNTADMIN role) or a role with the global CREATE INTEGRATION privilege can execute this SQL command.
The security integration parameter values are case-sensitive, and the values you put into the security integration must match those values in your environment. If the case does not match, it is possible that the access token will not be validated, resulting in a failed authentication attempt.
The list values that you specify for the EXTERNAL_OAUTH_AUDIENCE_LIST property are URLs with an uppercase and lowercase Snowflake
name. Include both URLs in this list to ensure that your client can connect to Snowflake based on the values that Microsoft might expect
to form a connection.
Verify that all parameter values are an exact match. For example, if the <AZURE_AD_ISSUER> URL value does not end with a
backslash and the security integration is created with a backslash character at the end of the URL, an error message will occur. It would
then be necessary to drop the security integration object (using DROP INTEGRATION) and then create the object again with the correct URL
value (using CREATE SECURITY INTEGRATION).
In your environment, if the user’s UPN
attribute value
matches the user’s email field instead of the login_name in Snowflake, then replace login_name with
email_address. For example:
Using Power BI SSO with B2B guest users
To allow Microsoft Entra ID business to business (i.e. B2B) guest users to access Snowflake using SSO from Microsoft Power BI, set the
EXTERNAL_OAUTH_TOKEN_USER_MAPPING_CLAIM property value to 'unique_name'. For example:
For more information, see Understand the B2B User.
Modifying Your External OAuth Security Integration
You can update your External OAuth security integration by executing an ALTER statement on the security integration.
For more information, see ALTER SECURITY INTEGRATION (External OAuth).
Using secondary roles with Power BI SSO to Snowflake
The desired scope for the primary role is passed in the external token. This role is a specific role that was granted to the user (session:role:<role_name>).
By default, the default secondary roles for a user (i.e. the DEFAULT_SECONDARY_ROLES user property) are not activated in the session.
To activate the default secondary roles for a user in a session and allow executing the USE SECONDARY ROLES command while using External OAuth, complete this step:
- Configure the security integration for the connection. Set the EXTERNAL_OAUTH_ANY_ROLE_MODE parameter value to either ENABLE or ENABLE_FOR_PRIVILEGE when you create the security integration (using CREATE SECURITY INTEGRATION) or later (using ALTER SECURITY INTEGRATION).
Using Client Redirect with Power BI SSO to Snowflake
Snowflake supports using Client Redirect with Power BI SSO to Snowflake.
For more information, see Redirecting client connections.
Using replication with Power BI SSO
Snowflake supports replication and failover/failback of the External OAuth security integration from a source account to a target account.
For details, see Replication of security integrations & network policies across multiple accounts.
Connecting to Snowflake from Power BI
For more details on how to connect to Snowflake from Power BI, refer to the Power BI documentation.
Using network policies with External OAuth
Currently, network policies cannot be added to an External OAuth security integration, which means that you cannot define a network policy that applies only to the Power BI integration. However, you can still implement network policies that apply broadly to the entire Snowflake account. For information about the Microsoft IP range that should be included in the network policy, see the Prerequisites section (in this topic).
Troubleshooting
- Warehouse resumption. If a given user attempts to use a suspended warehouse, Microsoft Power BI displays an error message that is not described in Error Messages. Verify, and if necessary, configure the warehouse to resume automatically to resolve the error message. For more information, see Starting or resuming a warehouse.
- While attempting to connect Power BI to Snowflake, errors may occur. Depending on the error message it may require troubleshooting in
Microsoft, Snowflake, or both.
- Error Messages describes common error messages Snowflake can return that display in Power BI.
- Login History describes how to use Snowflake to verify whether or when a user last accessed Snowflake.
Error messages
The following table describes error messages Snowflake returns while a user authenticates in Power BI:
| Behavior | Error Message | Troubleshooting Action |
|---|---|---|
| Invalid access token or audience value. | Failed to update data source credentials: ODBC:ERROR [28000] Invalid OAuth access token. [<number>]. | Verify that the external_oauth_issuer parameter contains the correct value. In Microsoft Entra ID, verify the access token is current. |
| AAD user not found in Snowflake account. | Failed to update data source credentials: ODBC:ERROR [28000] Incorrect username or password was specified. | Verify that the user exists in Snowflake (either the name or login_name attribute value matches with the user’s UPN value in Microsoft Entra ID). If you are adding a user, then verify that the UPN value does not already exist in Microsoft Entra ID. |
| Snowflake user present, but disabled. | Failed to update data source credentials: ODBC:ERROR [28000] User access disabled. Contact your local system administrator. | In Snowflake, run desc user <username> to verify if the disabled attribute is set to true. If you want this user to be allowed, run alter user <username> set disabled = true;. Try to access Snowflake from Power BI again. |
| Snowflake receives an expired AAD token from Power BI. | Failed to update data source credentials: ODBC:ERROR [28000] OAuth access token expired. [<number>]. | Contact Snowflake Support. |
| Security integration not created or disabled in Snowflake account. | Failed to update data source credentials: ODBC:ERROR [28000] OAuth Authz Server Integration is not enabled. | Run desc <security_integration_name> to verify or recreate the security integration. |
| Default role is not set for the user. | Failed to update data source credentials: ODBC: ERROR [28000] No default role has been assigned to the user, contact a local system administrator to assign a default role and retry. | Set default role for the user. |
| Default role for the user is not granted to the user. | Test failed because of 250001 (08001): Failed to connect to DB: <host>. User’s configured default role ‘<ROLE>’ is not granted to this user. Contact your local system administrator, or attempt to login using a CLI client with a connect string selecting another role, e.g. PUBLIC. | Check the default role for the user and grant it to them. |
Login history
If a user is able to access Power BI but not instantiate a Snowflake session, you can determine when the user last accessed Snowflake by running the following commands using any supported connector or the Snowflake web interface. Note that only successful authentications are logged.
For each result, evaluate the USER_NAME and FIRST_AUTHENTICATION_FACTOR columns.
- The
USER_NAMEvalue should align with the attribute mappings described the Prerequisites section.- The
FIRST_AUTHENTICATION_FACTORshould be set toOAUTH_ACCESS_TOKEN.