Snowpark Migration Accelerator: Using the SMA CLI
Description
The Snowpark Migration Accelerator (SMA) provides a Command Line Interface (CLI) that allows you to perform various operations. Using this CLI, you can execute the code processor, manage access codes (install or display them), and perform any other task that’s available in the SMA application.
The SMA uses a single code processor that works with all supported source platforms. You don’t need to provide any additional arguments for this processor.
Installation
Before installing the Command Line Interface (CLI), you need to download it to a location you can access. Choose the installation guide that matches your operating system:
Commands
To run the tool, you need to set up a sequence of commands based on your requirements. You can use either the long-command or short-command options with the following syntax:
sma [command] [argument] [command] [argument] ...
The following commands are available. Click any command to view its detailed explanation.
Long-command |
Short-Command |
Description |
|---|---|---|
-h |
Displays help documentation. |
|
-v |
Displays current tool version. |
|
install-ac |
Installs a new access code. |
|
show-ac |
Displays all installed access codes. |
|
-i |
Specifies the input folder location. |
|
-o |
Specifies the output folder location. |
|
-a |
Runs the tool in assessment mode. |
|
-m |
Specifies the folder containing custom mapping files. |
|
-j |
Enables or disables conversion of Databricks notebooks to Jupyter format. |
|
-f |
Specifies which database engine syntax to use for SQL commands. |
|
-e |
Sets the customer email address. |
|
-c |
Sets the customer company name. |
|
-p |
Sets the project name. |
|
-y |
Skips confirmation prompts during execution. |
Installing an access code
To begin the code conversion process, you must first install an access code. You can do this in two ways:
Enter the access code directly
Provide the path to a file containing the access code (This method is helpful when you’re working offline or behind a restrictive firewall)
You can install the access code by running the following command:
sma install-access-code <access-code>
This command produces the same result as the previous command.
sma install-ac <access-code>
To install an access code from a file, use either the --file or -f option with your command, like this:
sma install-access-code --file <path-to-file>
or
sma install-access-code -f <path-to-file>
If an error occurs while installing the license, an error message will be displayed.
To request an access code, please contact sma-support@snowflake.com
Checking which access codes are installed
To check which access codes are currently installed on your computer, use this command:
sma show-access-code
This command displays details about all access codes that are currently installed on your computer.
Converting
After installing a valid license, you can run the code processor to convert your code. To start the conversion process, you need to provide the following required arguments:
Input path: The folder containing your original source code
Output path: The folder where you want the converted code to be saved
Project Information
When you run the code processor for the first time, you need to provide certain arguments. These arguments will be saved and used for future executions. The required arguments are the same as those needed when creating a new project in the application.
Customer Email: Enter a valid email address
Customer Company: Enter your company name
Project Name: Enter a name for your project
This example demonstrates how to execute the code processor using only the essential requirements:
sma -i <input-path> -o <output-path> -e <client email> -c <client company> -p <project name> <additional-parameters>
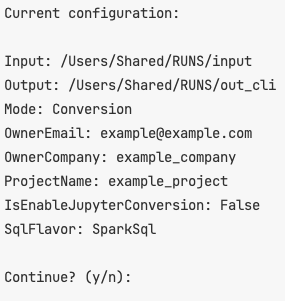
After entering the sequence of commands and pressing “Enter”, the tool will display your current settings and ask you to confirm before starting the process.

Would you like to add or modify any arguments? Type “n” to cancel or “y” to proceed.
Skipping the Project Confirmation
To bypass the confirmation prompt shown above, add either –yes or -y as an argument. This is particularly important when using the tool programmatically, as the confirmation prompt will appear every time without these parameters.
For more information about all available parameters, please refer to this link.
Performing an Assessment
When performing an assessment, add the --assessment or -a option to the standard conversion commands. Here are examples of how the commands should look:
sma --input <input-path> --output <output-path> --assessment <additional-parameters>
Each of these commands can accept additional parameters. For more details, please refer to the “Converting” section.
Checking the tool version
To check the tool version and code-processing engine, you can use any of these commands:
sma --version
sma -v
Enabling conversion of Databricks notebooks to Jupyter Notebooks
This option converts Python (.python) and/or Scala (.scala) source files into Jupyter Notebook (.ipynb) files. The conversion works regardless of whether the original files were exported from notebooks or were regular code files.
To convert Jupyter notebooks, add either the '--enableJupyter' flag or its shorthand version '-j' to your command.
sma -i <input-path> -o <output-path> --enableJupyter
Setting the SQL Flavor of the source code
You can specify which SQL syntax to use when a SQL command is detected. Use either the command '--sql' or its shortcut '-f'. The supported syntax options are ‘SparkSql’ (which is the default), ‘HiveSql’, and ‘Databricks’.
sma --input <input-path> --output <output-path> --sql SparkSql
sma --input <input-path> --output <output-path> --sql HiveSql
sma --input <input-path> --output <output-path> --sql Databricks
Need more help?
To view general help information for the Command Line Interface (CLI), you can use any of these commands:
sma --help
sma -h

To learn more about specific commands, you can execute this command:
sma <command> --help
To learn more about installing an access code, run the command sma install-access-code --help.