Plugins in CoCo Desktop
Plugins are reusable packages that extend your agent’s capabilities. A single plugin can bundle together any combination of skills, MCP servers, hooks, and subagents, letting you install an entire workflow in one step.
What plugins contain
Each plugin is a folder with a manifest file (.cortex-plugin/plugin.json) and one or more of the following components:
| Component | What it does |
|---|---|
| Skills | Markdown-based instructions that teach the agent how to handle specific tasks. Each skill lives in a subfolder under skills/ with a SKILL.md file. Skills are invoked in chat via slash commands. |
| MCP servers | Model Context Protocol servers that provide additional tools to the agent (for example, database connectors, API integrations). Configured in the manifest or in .mcp.json. |
| Hooks | Shell commands that run automatically in response to events such as before or after a tool call. Configured in the manifest or in .hooks.json. |
| Subagents | Specialized agents (defined as .md files in an agents/ folder) that the main agent can delegate work to. |
Open the Agent Settings panel
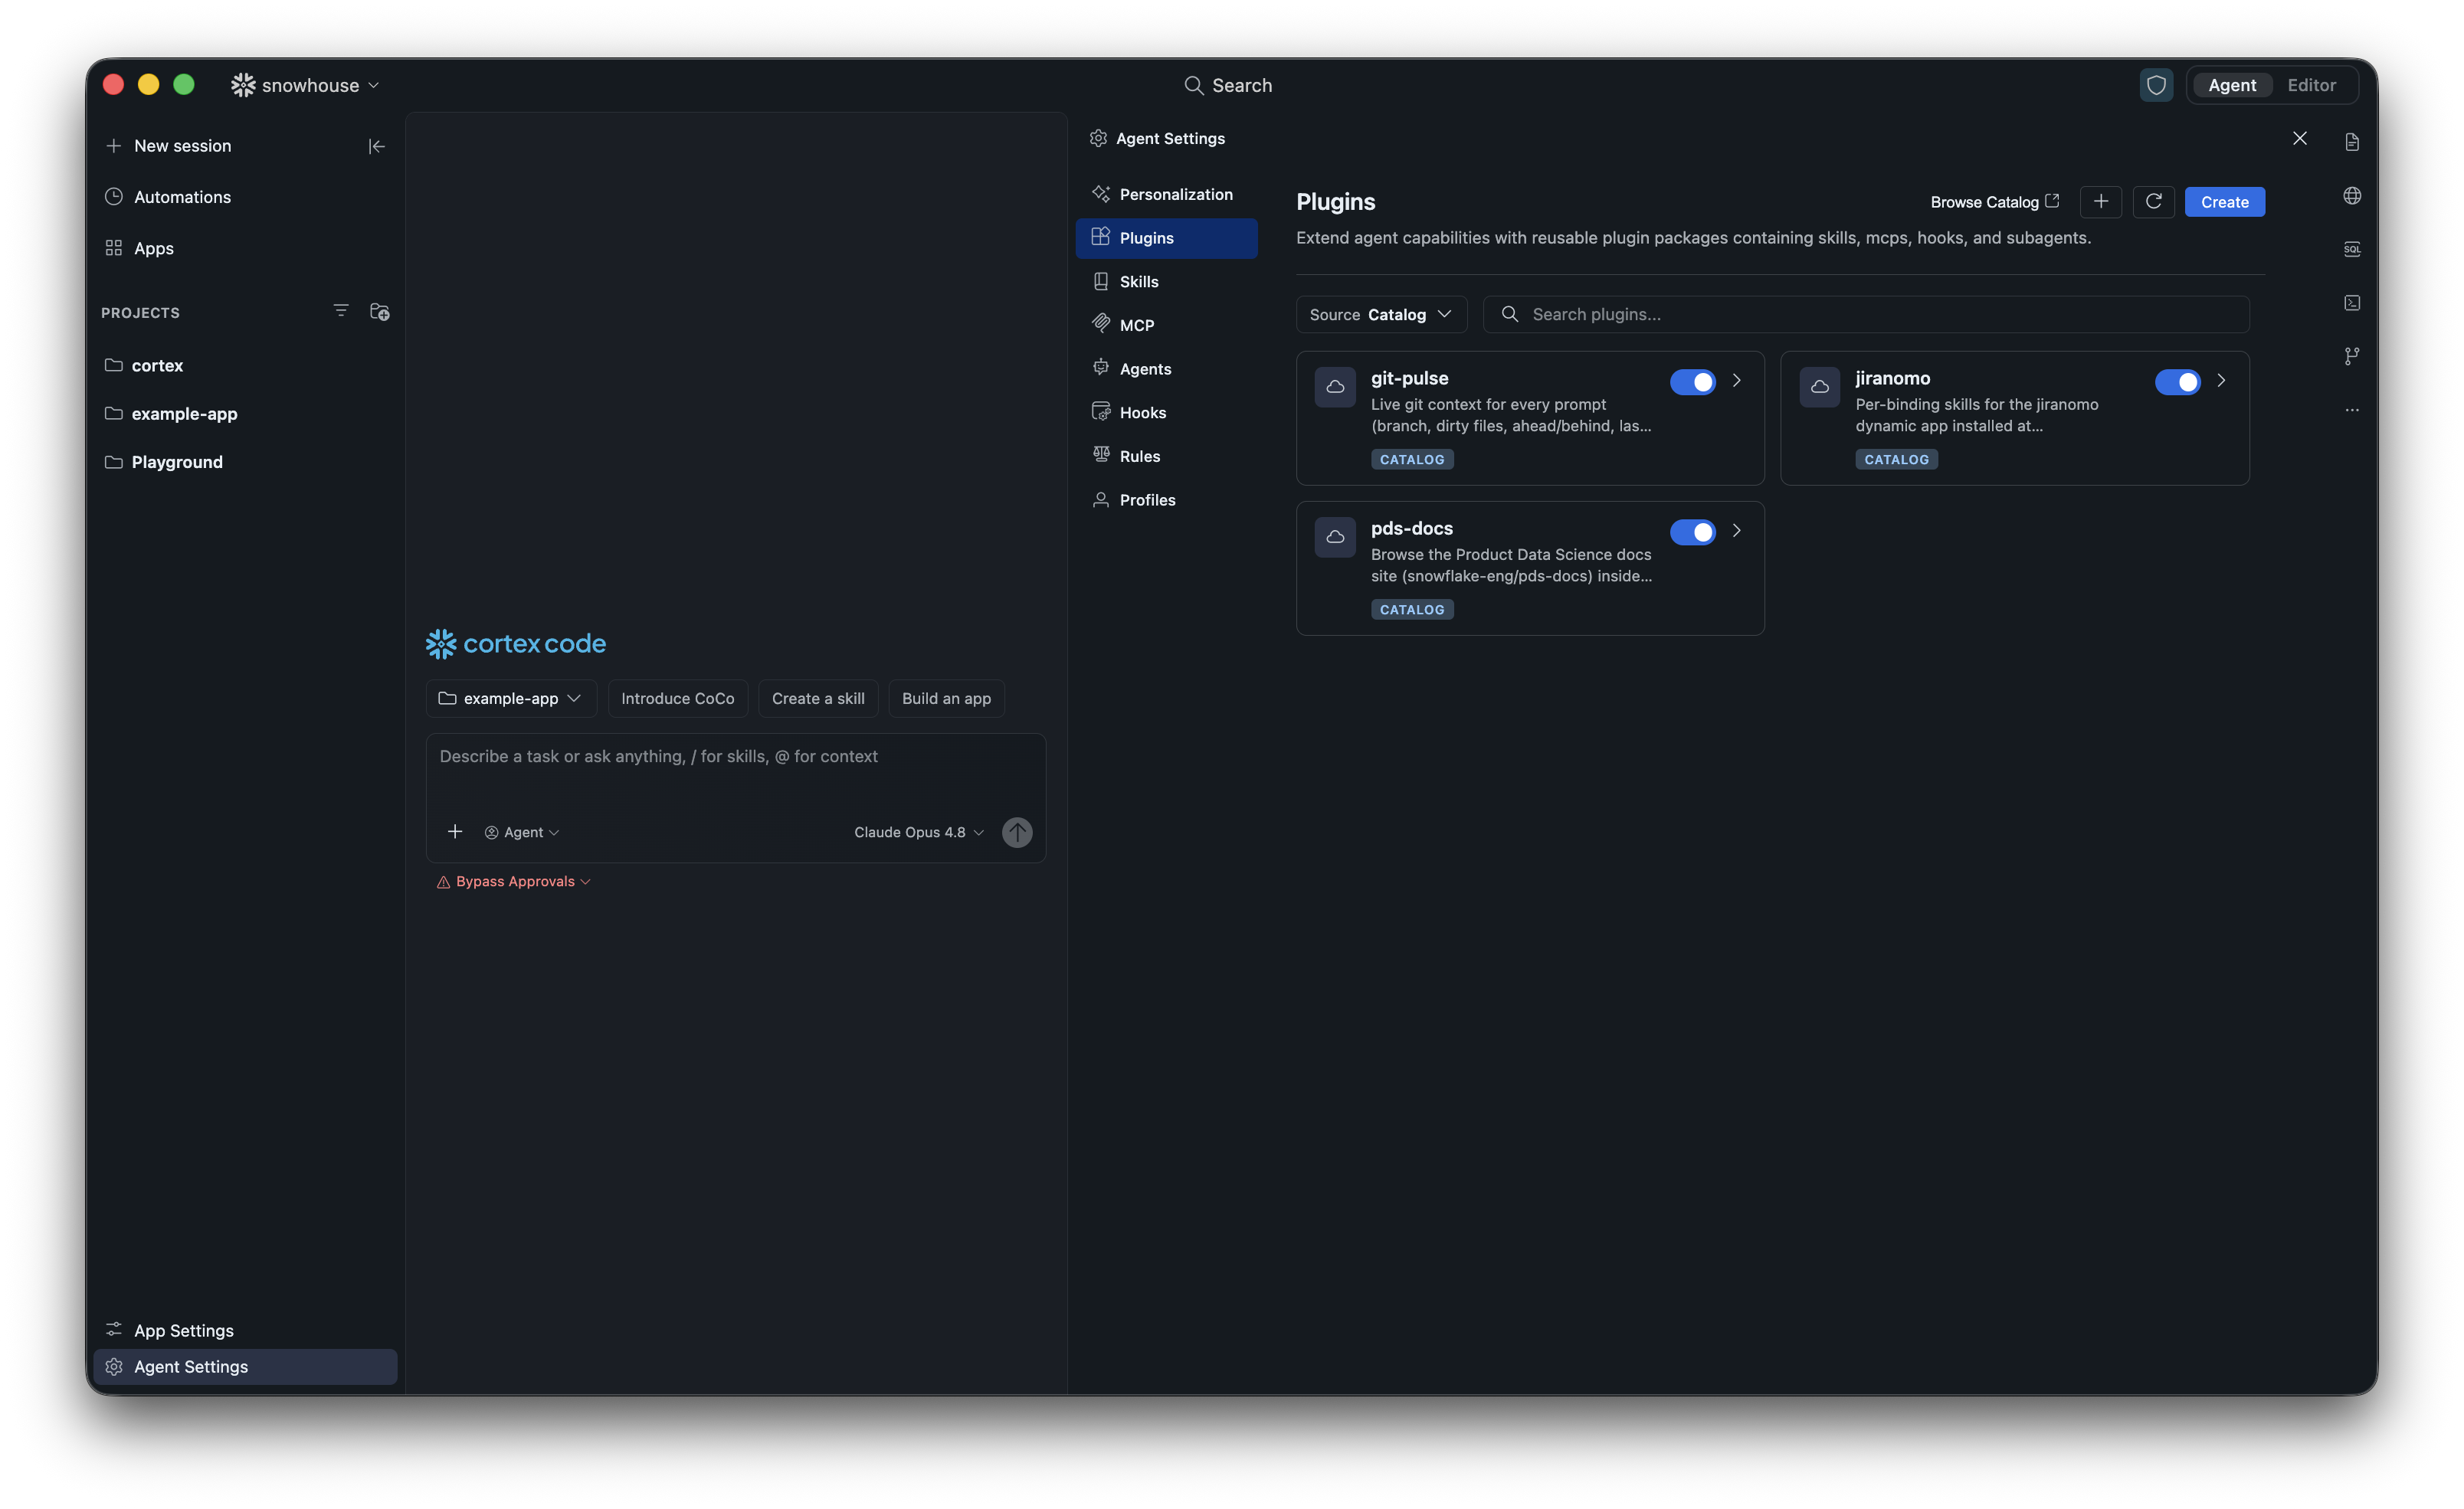
Plugins are managed from the Agent Settings panel. To open it, click the Agent Settings tab in the left sidebar.
In the Agent Settings panel, select the Plugins category from the left sidebar. This is the recommended place to browse, install, enable/disable, sync, and remove plugins.
Tip
Other Agent Settings categories (Skills, Profiles, MCP, Subagents, Hooks, and Rules) are also managed from the same panel. Skills contributed by your installed plugins appear automatically in the Skills tab.
From here you can:
- Toggle plugins on or off using the switch on each card.
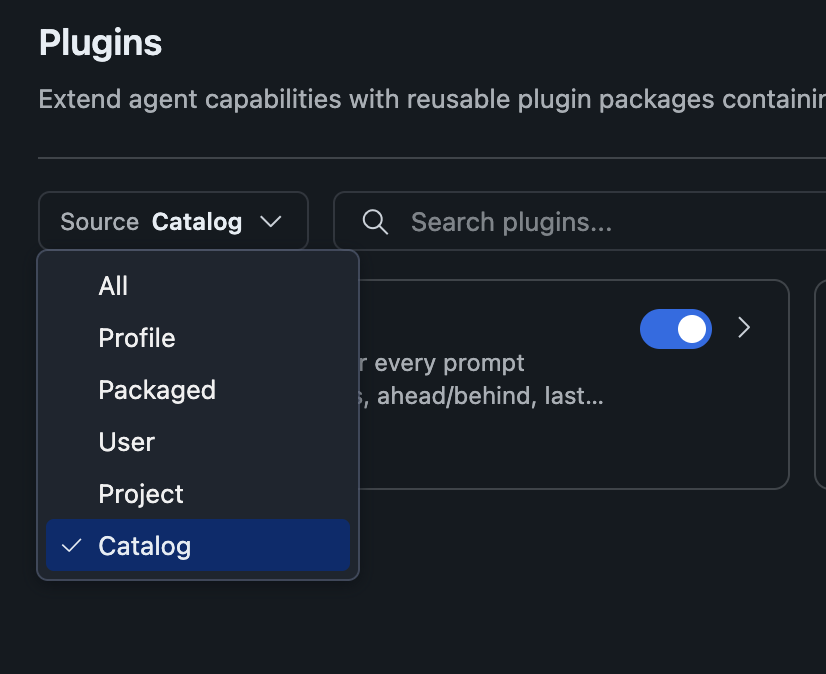
- Filter by source using the “Source” dropdown (All, User, Bundled, Project).
- Search by name or description using the search bar.
- Click a card to open the plugin detail view.
Plugin details
Clicking a plugin card opens its detail view, which shows the plugin’s description, source, version, status, and its components (skills, hooks, MCP servers, subagents).
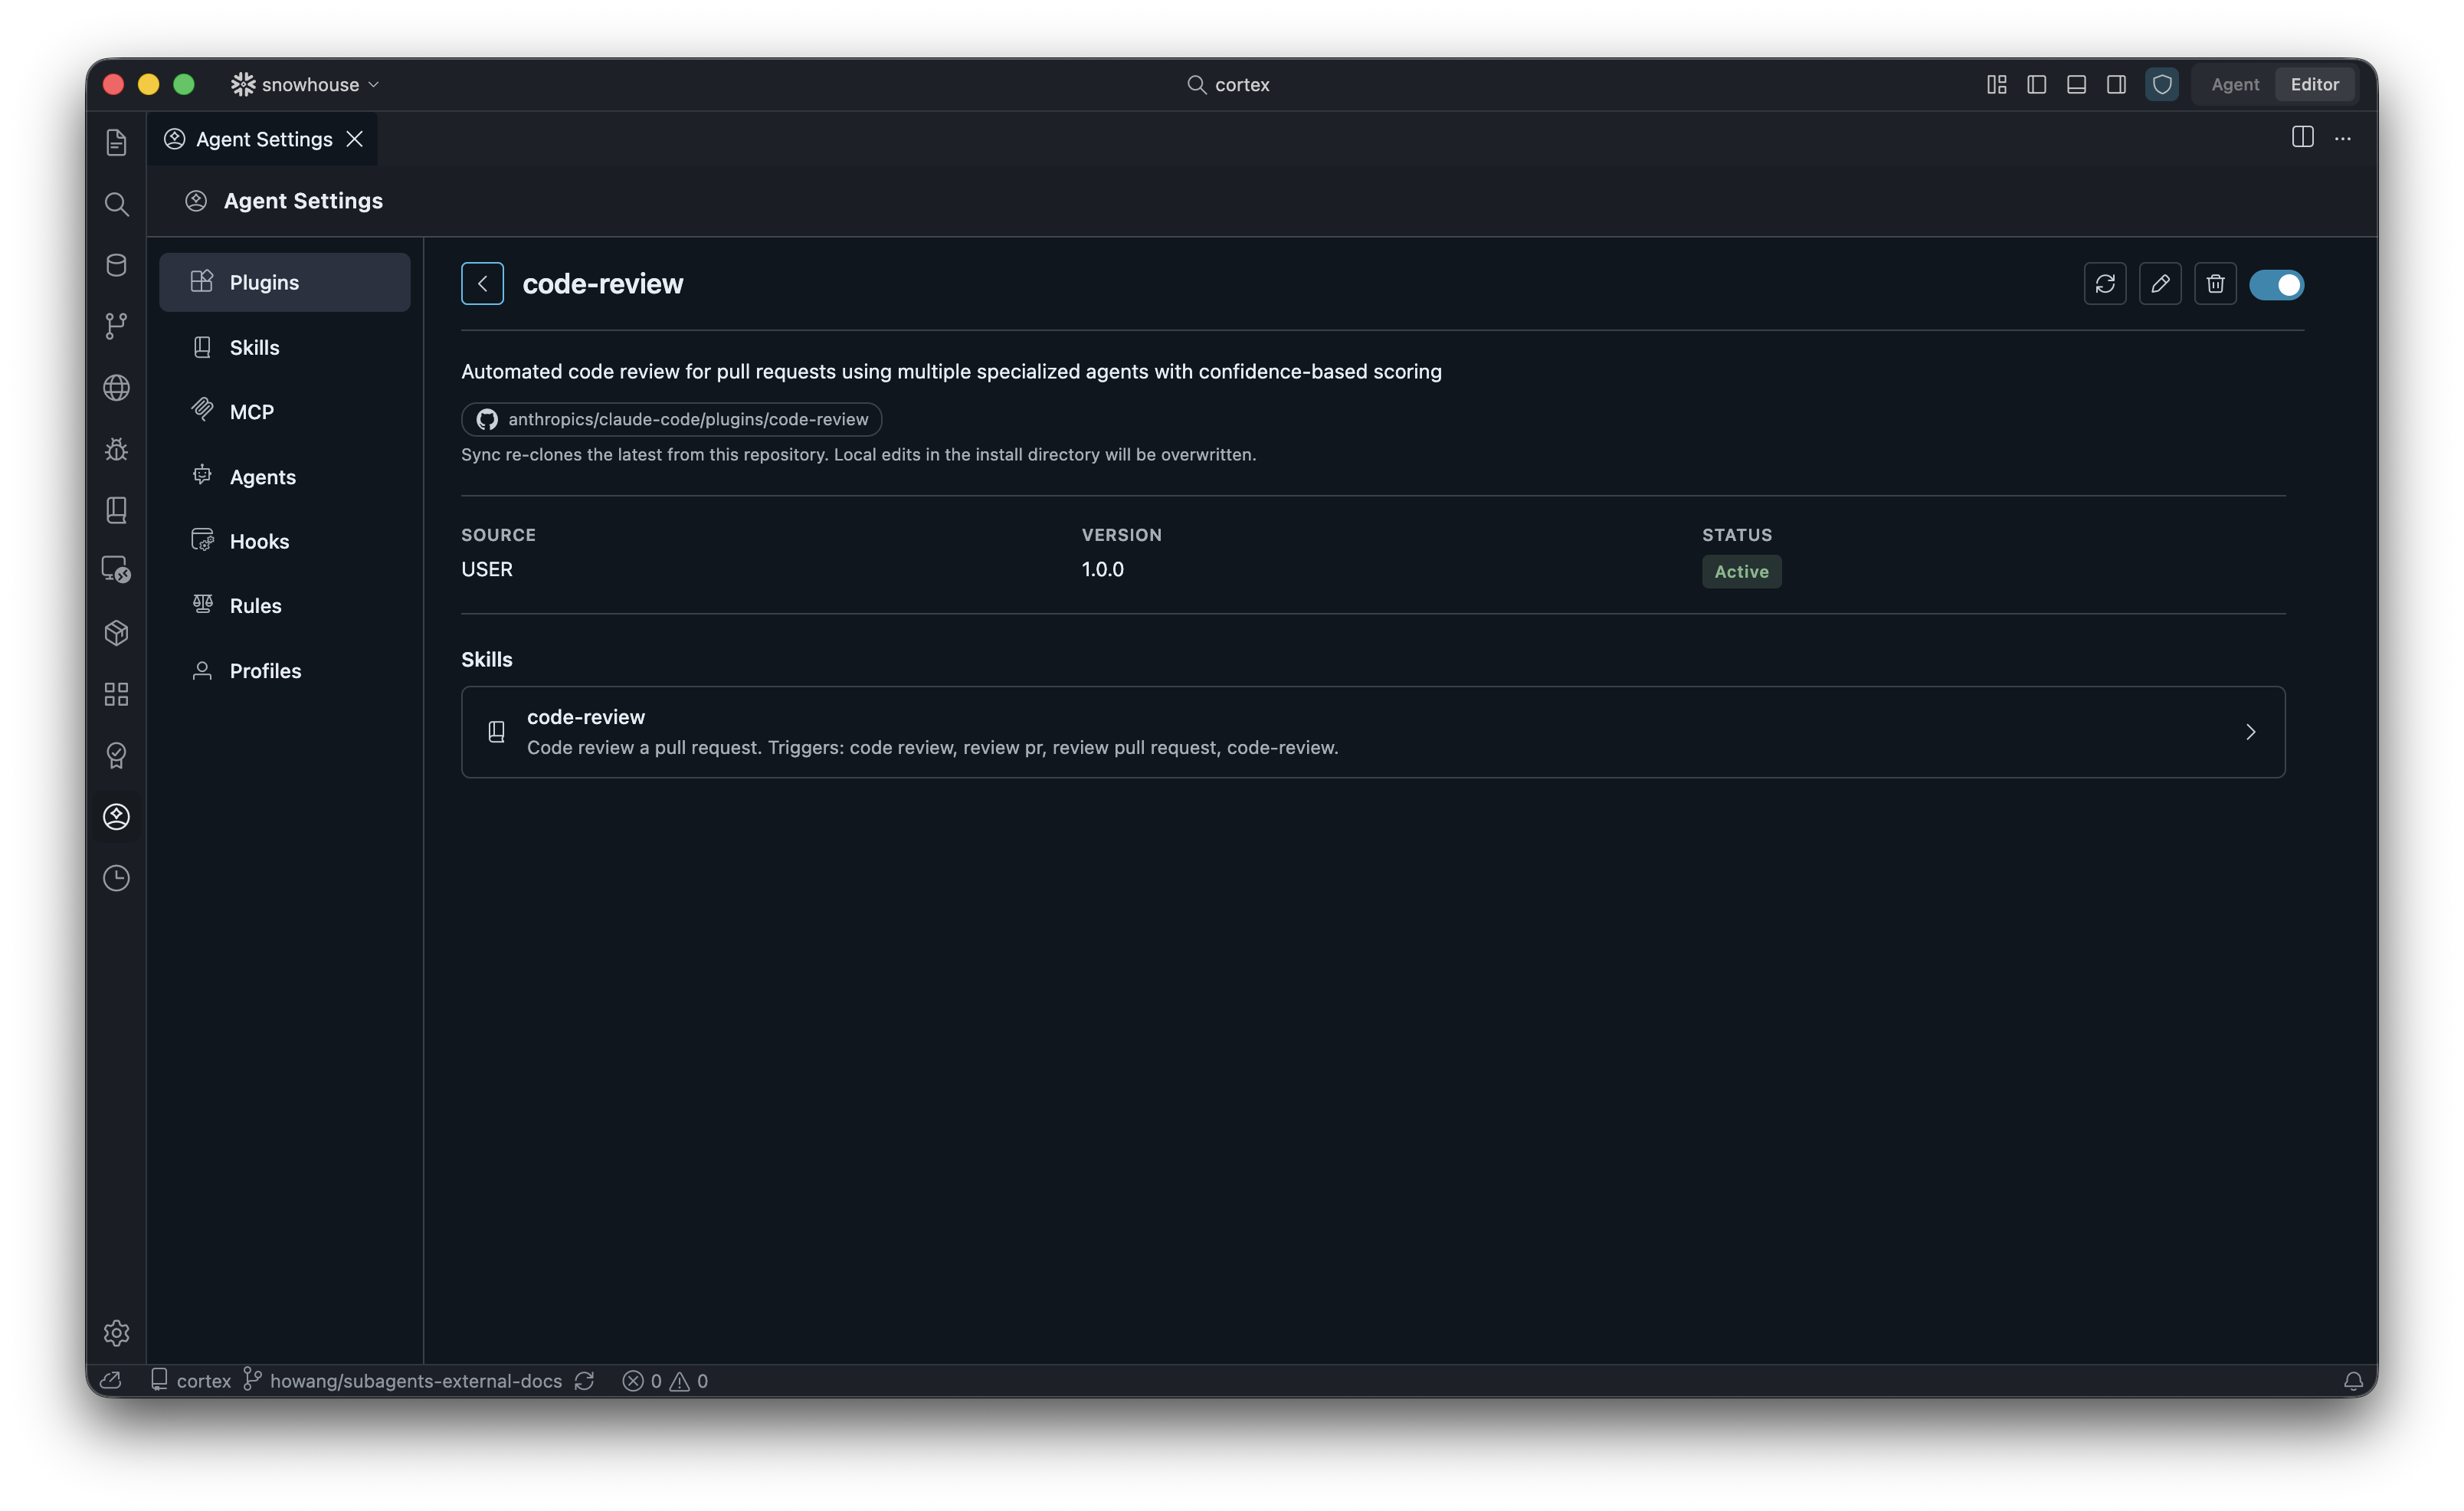
For plugins imported from GitHub, the detail view displays the source repository path and a note explaining that syncing will re-clone the latest version and overwrite local edits.
Plugins Catalog
The Plugins Catalog is Snowflake’s built-in registry for sharing and discovering plugins across your organization. Plugins in the catalog are stored as versioned Cortex Extension objects, so access is governed by Snowflake roles and grants: no Git credentials or file sharing required.
Browse the catalog
Click the Browse Plugins Catalog link in the Plugins view. This opens the Skills & Plugins page in Snowsight, where you can search for published plugins, read their descriptions, and copy import links.
Catalog-sourced plugins appear in the Plugins grid with a CATALOG badge and a cloud icon. Use the Source dropdown and select Catalog to filter the grid to only catalog-imported plugins.
Import a plugin from the catalog
-
In Snowsight, find the plugin you want and copy its share link, a URI that starts with
snow://skill_catalog/. -
In CoCo Desktop, open the Agent Settings panel and select the Plugins category.
-
Click the + button and choose Add from Plugins Catalog.
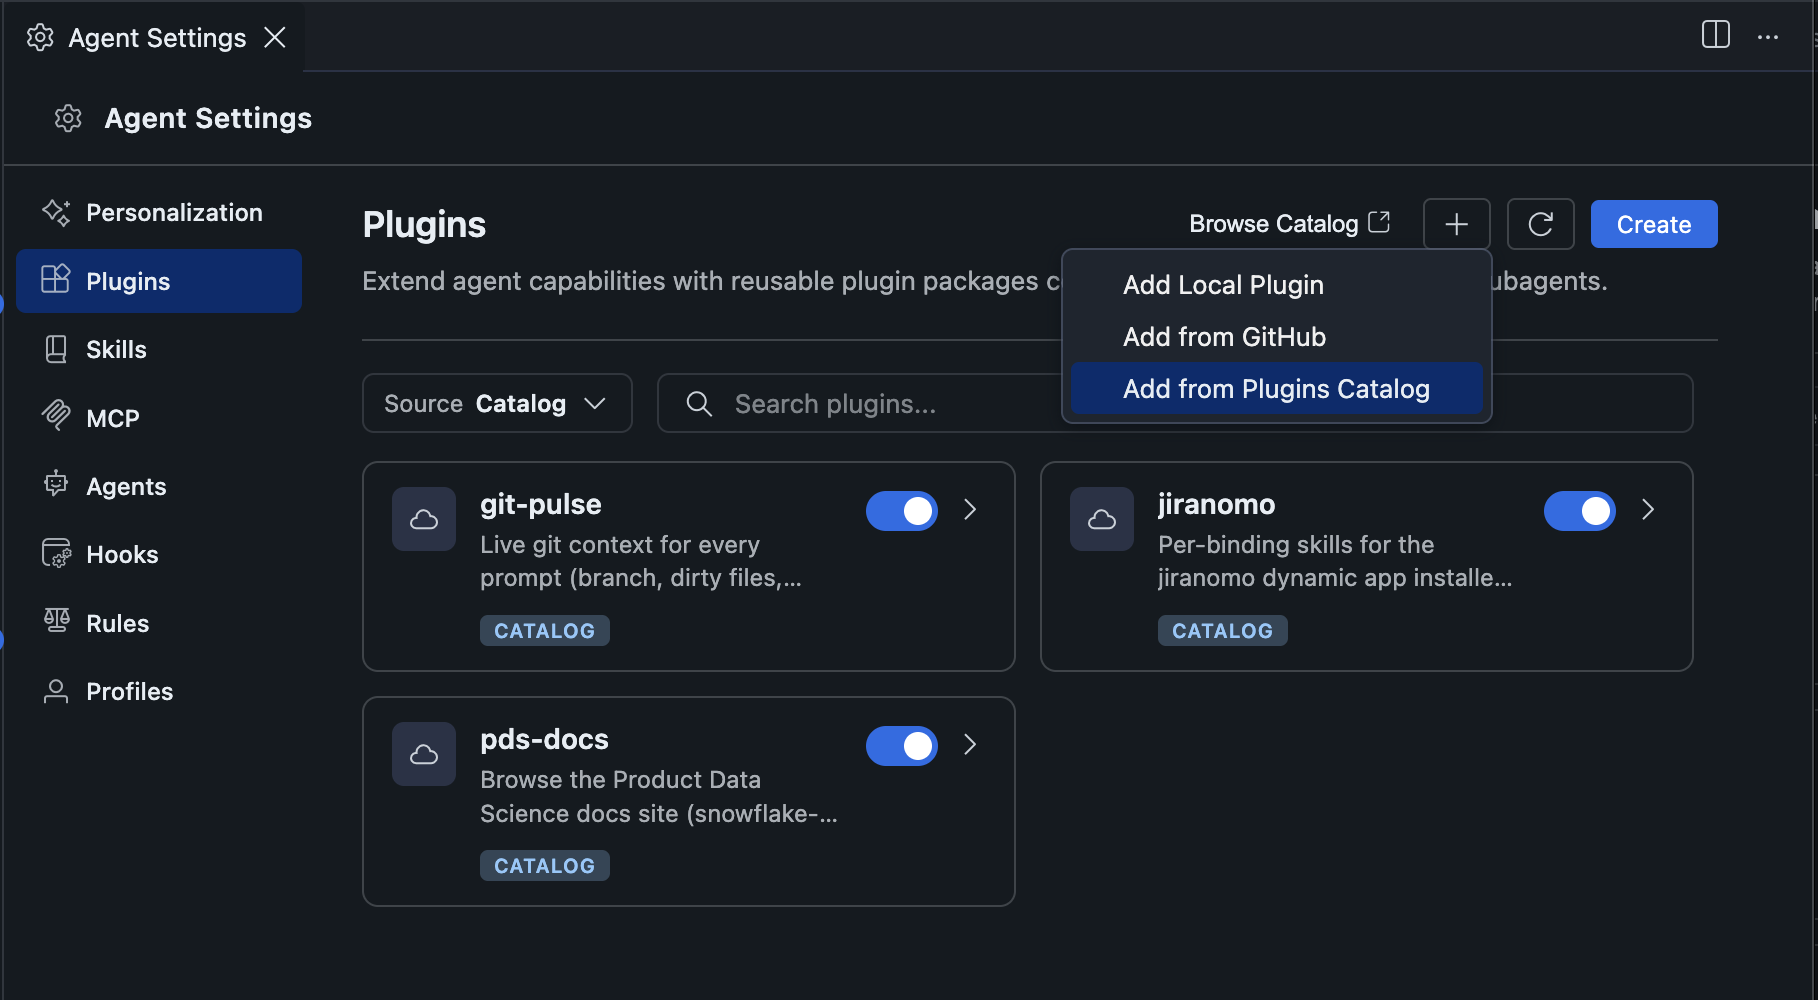
-
Paste the
snow://link into the Import link field and click Import.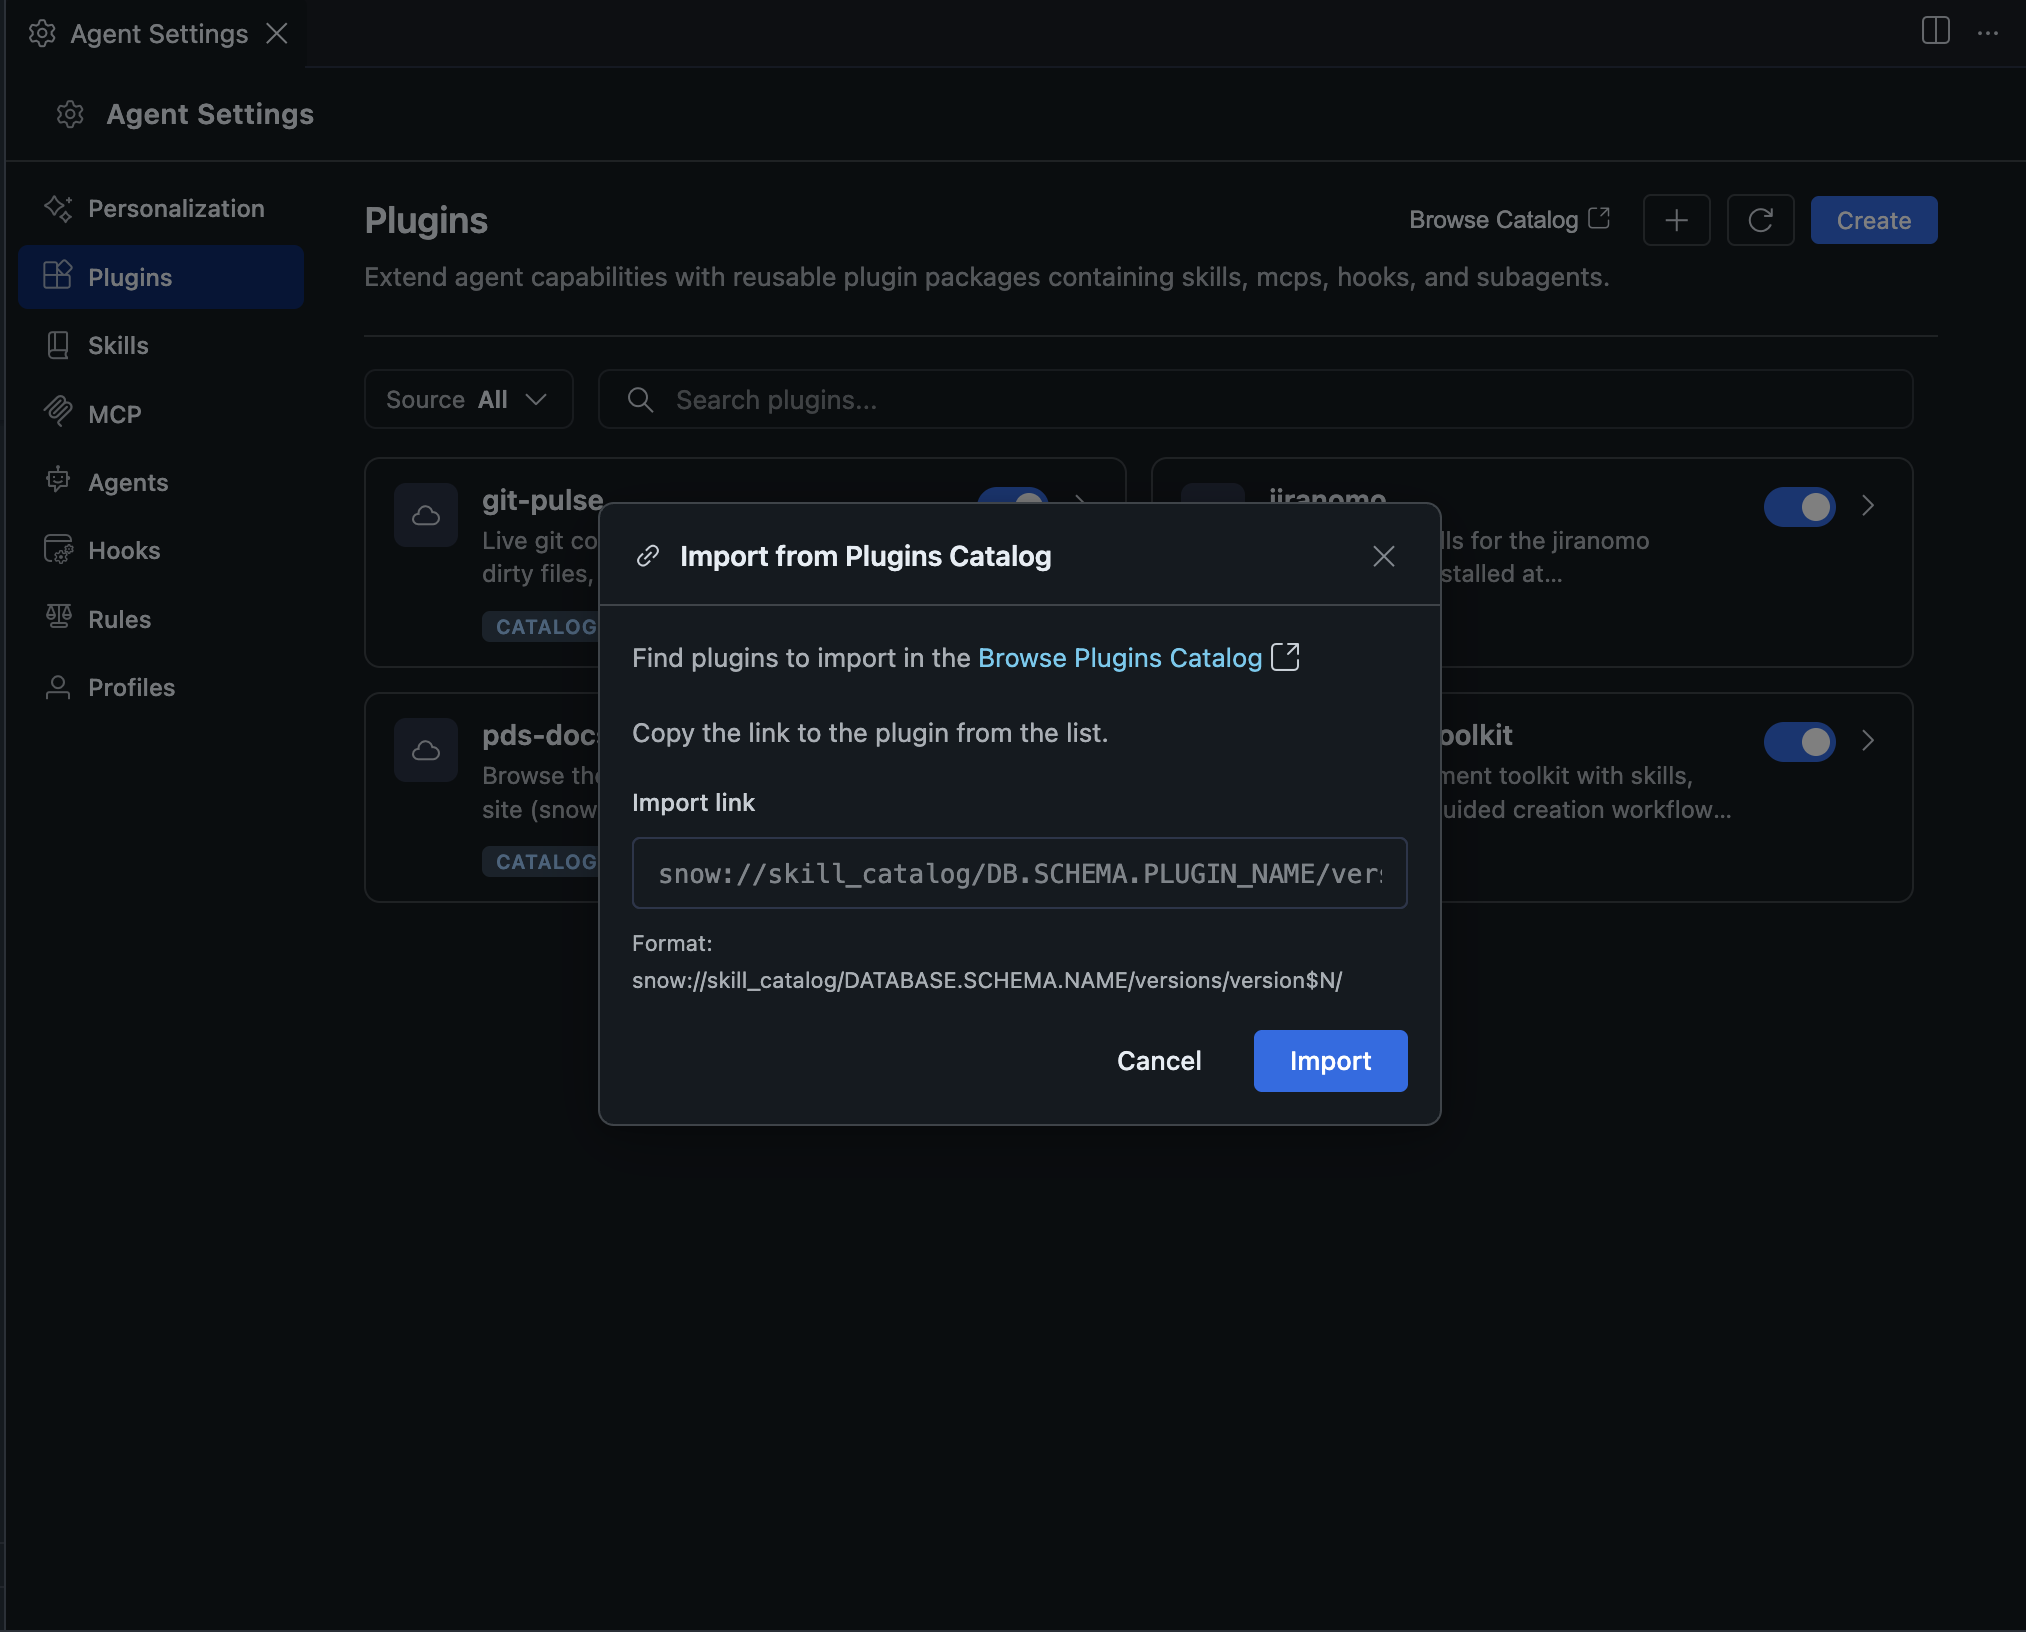
CoCo Desktop downloads the plugin files from Snowflake, parses the manifest, and registers the plugin. It appears in the grid with a CATALOG badge. The original share link is stored so you can sync to newer versions later.
Note
Import links must start with snow://skill_catalog/ or snow://cortex_extension/ and include a specific version number (for example, .../versions/version$1/). URIs that contain SQL metacharacters (;, --, /* */, backticks) are rejected.
Sync a catalog plugin
Catalog plugins can be updated to the latest published version without removing and reinstalling them.
Open the plugin’s detail page and click the Sync button (↻). CoCo Desktop queries Snowflake for the latest published version, downloads it, and overwrites the local cache.
The detail page also shows the plugin’s upstream URI: the snow:// link it was installed from. Click the pill to copy the URI to your clipboard.
Note
Sync overwrites any local edits you have made to the cached plugin files. If you need to customize a catalog plugin, publish your own fork to the catalog instead.
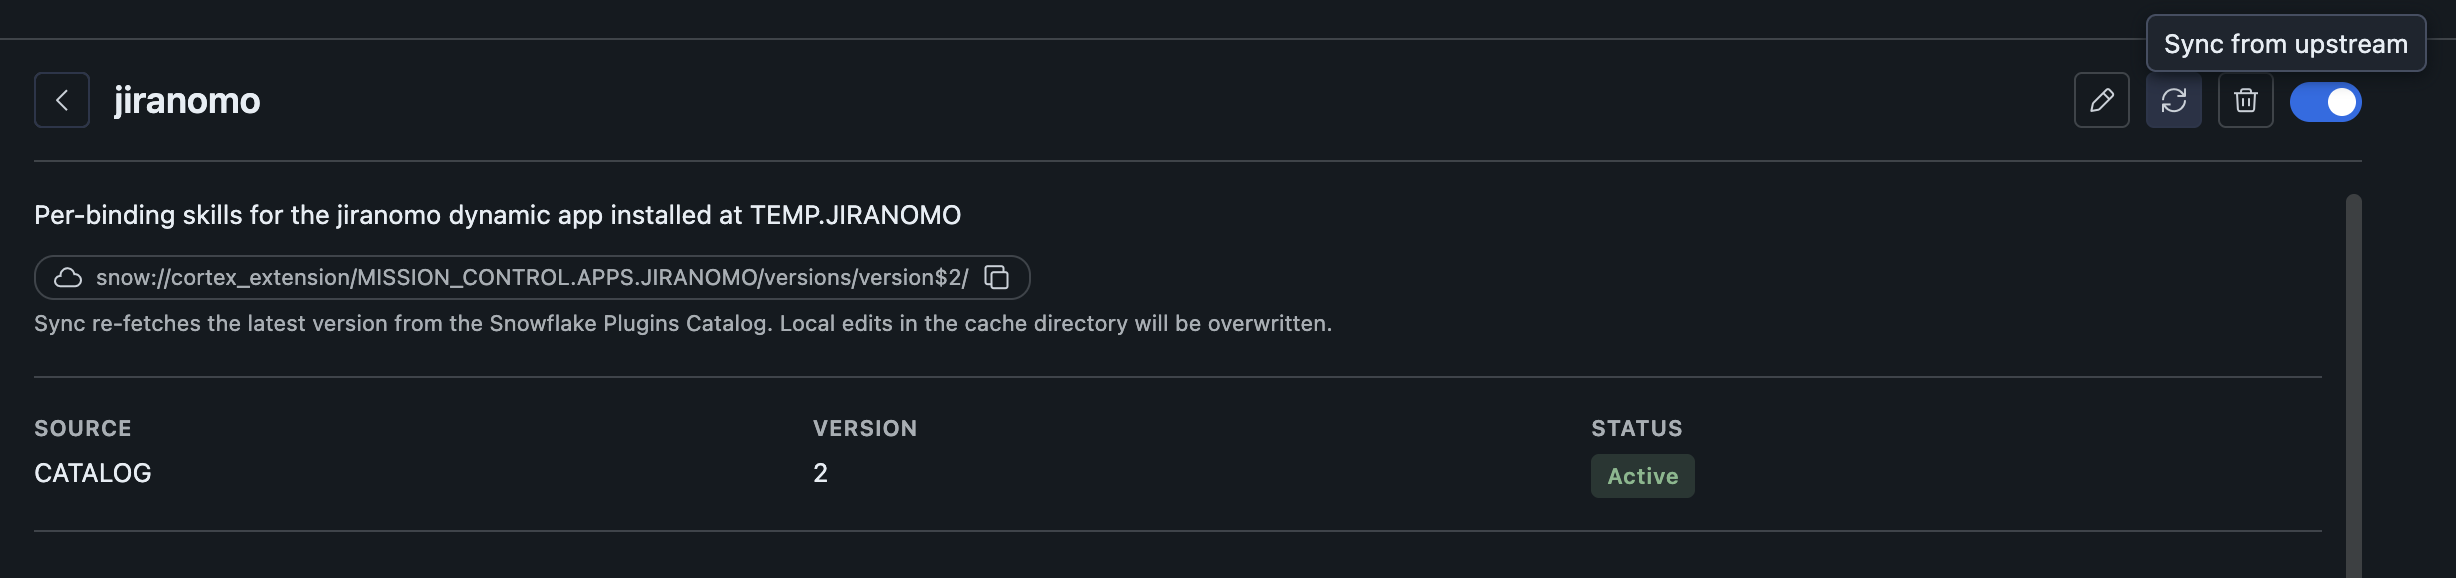
Publish a plugin to the catalog
You can publish any locally created plugin to the Plugins Catalog so others in your organization can import it.
-
Open the Agent Settings panel and select the Plugins category.
-
Click the plugin you want to publish to open its detail view.
-
Click Publish to Plugins Catalog (cloud-upload icon).
A chat session opens and runs the publish workflow, which:
- Creates a
CORTEX EXTENSIONobject (TYPE=PLUGIN) in your Snowflake account. - Uploads the plugin files to Snowflake’s versioned storage.
- Commits the version and grants read access (to PUBLIC, or to a role you specify).
- Returns a
snow://skill_catalog/...URI you can share with your team.
Note
The Publish to Plugins Catalog button is available only for locally created plugins (User or Project location). Plugins already imported from the catalog, from GitHub, or from a git URL cannot be republished through this workflow.
Remove a catalog plugin
To remove a catalog plugin, click Remove in the plugin’s detail view. This unregisters the plugin and deletes the local cache directory. The Cortex Extension object in your Snowflake account is not affected.
Importing plugins
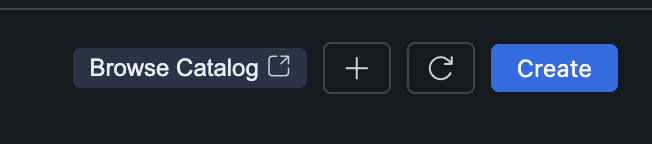
Click the + button in the Plugins toolbar to import an existing plugin.
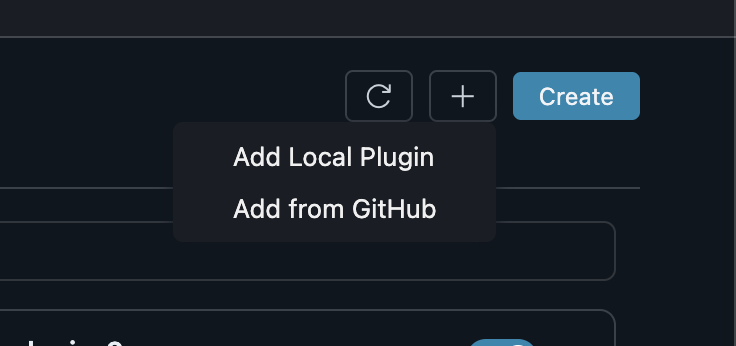
Add Local Plugin
Select a folder on your filesystem that contains a .cortex-plugin/plugin.json manifest.
The plugin is registered by reference. It stays where it is on disk, and no files are copied.
Tip
Local plugins update automatically. File watchers detect changes to skill files, hooks, and MCP configurations, so your edits take effect immediately without needing to sync or refresh.
Claude plugin format compatibility
CoCo Desktop recognizes both the native Cortex format and the Claude plugin format, so you can use plugins built for either tool without any manual conversion.
| Folder layout | How CoCo Desktop handles it |
|---|---|
.cortex-plugin/plugin.json present | Loaded as-is. This is the native CoCo Desktop format. |
.claude-plugin/plugin.json present (no .cortex-plugin/) | Manifest is read directly: no conversion required. |
commands/ folder present (older Claude Code style) | Requires interactive conversion. Use the local-plugin-installer skill to convert commands/ entries to the skills/<name>/SKILL.md layout (see below). |
Workspace discovery: CoCo Desktop also scans <workspace>/.claude/plugins/ for project-scoped plugins, in addition to the native <workspace>/.cortex/plugins/ path. If you have an existing Claude Code project, any plugins committed under .claude/plugins/ are discovered and activated automatically when you open that workspace.
Converting a commands/-style plugin: Older Claude Code plugins store slash commands under a commands/ directory rather than skills/. CoCo Desktop can’t load these as-is because each command needs to become a skills/<name>/SKILL.md entry. To convert:
- In the chat panel, type
install local pluginor invoke thelocal-plugin-installerskill explicitly. - Point the skill at the plugin’s root directory.
- The skill walks you through renaming each command to a skill and generates the required
SKILL.mdfiles. - Once complete, the plugin is registered and works like any other local plugin.
Note
The commands/-to-skills/ conversion is interactive because each command needs a description field that the agent uses for auto-invocation, something that can’t be inferred automatically from command names alone.
Add from GitHub
Provide a GitHub repository in the format owner/repo (optionally with a subpath and
branch, for example, owner/repo/plugins/my-plugin#main). The repository is cloned into
~/.snowflake/cortex/plugins/ and registered as a GitHub-sourced plugin.
GitHub-sourced plugins support sync (see below) to pull updates from the remote repository. If the cloned repository uses the Claude plugin format (.claude-plugin/plugin.json or a commands/ directory), CoCo Desktop applies the same compatibility handling described above automatically during sync.
GitHub sync
Plugins imported from GitHub can be synced to pull the latest version from the remote repository. Click the sync icon on the plugin detail page to start a sync.
The sync process:
- Re-clones the repository at the pinned ref (branch or commit).
- Validates that the cloned content is a valid Cortex plugin.
- Performs an atomic swap of the install directory. The old version is kept as a backup during the swap and restored if anything goes wrong.
- Updates the registry with the sync timestamp.
Note
Sync overwrites any local edits you have made in the plugin’s install directory. If you need to customize a GitHub-sourced plugin, consider forking the repository or creating a separate local plugin.
Creating a plugin
Click the Create button in the Plugins toolbar to scaffold a new plugin. This creates a plugin folder with the required manifest file and directory structure.
Plugin manifest
Every plugin must have a .cortex-plugin/plugin.json file. Here is an example:
| Field | Required | Description |
|---|---|---|
name | Yes | Plugin identifier. Must start with a letter or digit, use only A-Z a-z 0-9 _ -, and be at most 64 characters. |
version | No | Semantic version string (for example, 1.0.0). |
description | No | Short description shown in the Plugins panel. |
skills | No | Path(s) to skill directories (defaults to skills/). |
hooks | No | Hook configuration object, or loaded from .hooks.json. |
mcpServers | No | MCP server configuration object, or loaded from .mcp.json. |
Directory structure
Refresh button
The circular-arrow icon (↻) in the Plugins toolbar forces a full reload of the plugin registry. It invalidates all caches, re-reads the registry file, and re-activates all enabled plugins.
Use the refresh button when:
- You have manually edited plugin files outside of CoCo and changes are not appearing.
- A plugin appears stale or is not activating as expected.
- You have modified the registry file directly.
Tip
For local plugins, you usually do not need to refresh manually: file watchers detect changes automatically. The refresh button is most useful after bulk operations or external tooling modifies the plugins directory.
Plugin storage locations
| Location | Path | Notes |
|---|---|---|
| Bundled | Shipped with the app | Read-only plugins included in CoCo. Disabled by default (opt-in). |
| User | ~/.snowflake/cortex/plugins/ | Plugins you install or create. Available across all workspaces. |
| Project | .cortex/plugins/ in your project root | Workspace-scoped plugins shared with your team via version control. |
Important
Plugins are not cryptographically signed or verified by Snowflake. Treat each plugin source like running code from that author: review the manifest, the skills it bundles, and the MCP servers and hooks it registers before installing.
Note
Project-scoped plugins require workspace trust before they auto-activate. If your workspace is not trusted, project plugins are disabled by default. You can enable them individually via the toggle in the Plugins panel, or trust the workspace to activate them all.